Linn Majik 140 Manual
Linn Majik 140 Manual
Linn Majik 140 Manual

You also want an ePaper? Increase the reach of your titles
YUMPU automatically turns print PDFs into web optimized ePapers that Google loves.
MAJIK <strong>140</strong><br />
LOUDSPEAKER<br />
OWNER’S MANUAL
IMPORTANT SAFETY INSTRUCTIONS<br />
Explanation of symbols used in this manual or on the rear/underside of the<br />
apparatus:<br />
This symbol is intended to alert the user to the presence of uninsulated<br />
dangerous voltages within the enclosure of sufficient magnitude to<br />
cause electric shock.<br />
This symbol is intended to alert the user to the presence of important<br />
operation, maintenance and servicing information in the instruction<br />
and service manuals.<br />
For apparatus connected to the mains electricity supply<br />
CAUTION<br />
• To reduce the risk of electric shock do not remove the cover.<br />
• No user serviceable parts inside.<br />
• Refer servicing to qualified service personnel.<br />
• Replace the mains fuse in the plug with one of the same type<br />
and rating.<br />
• Disconnect supply cord before changing fuse.<br />
WARNING<br />
To reduce the risk of fire or electric shock do not expose this apparatus to<br />
rain or moisture. Shock hazard - do not open.<br />
<strong>Majik</strong> <strong>140</strong><br />
i
ii<br />
General Safety Instructions<br />
1. Read these instructions.<br />
2. Keep these instructions.<br />
3. Heed all warnings.<br />
4. Follow all instructions.<br />
5. Do not use the apparatus near water, for example near a bathtub, washbowl,<br />
kitchen sink, laundry tub, in a wet basement, near a swimming pool etc.<br />
6. Clean only with dry cloth.<br />
7. Do not block any ventilation openings. Install in accordance with the<br />
manufacturer’s instructions. Site the apparatus so that its location or position<br />
does not interfere with its proper ventilation. For example, the apparatus should<br />
not be situated on a bed, sofa, rug, or similar surface that may block the ventilation<br />
openings, or placed in a built in installation such as a bookcase or cabinet that may<br />
impede the flow of air through the ventilation openings.<br />
8. Do not install near any heat sources such as radiators, heat registers,<br />
stoves, or other apparatus (including amplifiers) that produce heat.<br />
9. Do not defeat the safety purpose of the polarised or grounding type plug.<br />
A polarised plug has two blades with one wider than the other. A grounding type<br />
plug has two blades and a third grounding prong. The wide blade or the third prong<br />
is provided for your safety. If the provided plug does not fit into your outlet, consult<br />
an electrician for replacement of the obsolete outlet.<br />
10. Protect the power cord from being walked on or pinched particularly at<br />
plugs, convenience receptacles, and at the point where they exit from the<br />
apparatus.<br />
11. Only use attachments/accessories specified by the manufacturer.<br />
12. Use only with the stand, tripod, bracket, or table specified by the<br />
manufacturer, or sold with the apparatus.<br />
13. Unplug this apparatus during lightning storms or when unused for long<br />
periods of time.<br />
<strong>Majik</strong> <strong>140</strong><br />
14. Refer all servicing to qualified service personnel. Servicing is required when the<br />
apparatus has been damaged in any way, such as power-supply cord or plug has<br />
been damaged, liquid has been spilled or objects have fallen into the apparatus, the<br />
apparatus has been exposed to rain or moisture, does not operate normally, or has<br />
been dropped.<br />
15. Wall or ceiling mounting. Mount the apparatus to a wall or ceiling<br />
only as recommended by the manufacturer.<br />
16. Power sources. Connect the apparatus to a power supply only of the type<br />
described in the operating instructions or marked on the apparatus.<br />
17. Mains plug. Use the mains plug to disconnect the apparatus from the mains<br />
supply. The mains plug must be accessible at all times. Use the mains switch (if<br />
applicable) when the apparatus is not in use.<br />
18. Power lines. An outdoor antenna should be located away from power lines.<br />
19. Outdoor antenna grounding. If an outdoor antenna is connected to the<br />
apparatus, ensure that the antenna system is grounded to provide some protection<br />
against voltage surges and static build up. In the USA see article 810 of the National<br />
Electrical Code ANSI/NFPA 70 concerning installation requirements.<br />
20. Telephone line. Do not connect the apparatus to a telephone line except where<br />
specifically instructed to do so.<br />
21. Objects and liquid entry. Do not let objects or liquids fall into the apparatus. Do<br />
not expose the apparatus to dripping or splashing.<br />
Do not place a vessel containing liquid on top of the apparatus.<br />
22. No naked flame sources, such as lighted candles, should be placed on the<br />
apparatus.<br />
23. The apparatus has been designed for use in moderate and tropical climates.
CE Declaration of Conformity<br />
<strong>Linn</strong> Products Ltd declare that this product is in conformance with the Low Voltage<br />
Directive 73/23/EEC and Electromagnetic Compatibility 89/336/EEC as amended<br />
by 92/31/EEC and 93/68/EEC.<br />
The conformity of the designated product with the provisions of Directive number<br />
73/23/EEC (LVD) is proved by full compliance with the following standards:<br />
Standard number Date of issue Test type<br />
EN60065 2002 General requirements<br />
Marking<br />
Hazardous radiation<br />
Heating under normal conditions<br />
Shock hazards under normal<br />
operating conditions<br />
Insulation requirements<br />
Fault conditions<br />
Mechanical strength<br />
Parts connected to the mains<br />
supply<br />
Components<br />
Terminal devices<br />
External flexible cords<br />
Electrical connections and<br />
mechanical fixings<br />
Protection against electric shock<br />
Stability and mechanical hazards<br />
Resistance to fire<br />
The conformity of the designated product with the provisions of Directive number<br />
89/336/EEC (EMC) is proved by full compliance with the following standards:<br />
Standard number Date of issue Test type<br />
EN55013 2001 Conducted emissions<br />
EN55013 2001 Absorbed emissions<br />
EN55020 2002 Immunity<br />
FCC notice<br />
Note: This equipment has been tested and found to comply with the limits for<br />
a Class B digital device, pursuant to Part 15 of the FCC Rules. These limits<br />
are designed to provide reasonable protection against harmful interference<br />
in a residential installation. This equipment generates, uses and can radiate<br />
radio frequency energy and, if not installed and used in accordance with the<br />
instructions, may cause harmful interference to radio communications. However,<br />
there is no guarantee that interference will not occur in a particular installation. If<br />
this equipment does cause harmful interference to radio or television reception,<br />
which can be determined by turning the equipment off and on, the user is<br />
encouraged to try to correct the interference by one or more of the following<br />
measures:<br />
• Reorient or relocate the receiving antenna.<br />
• Increase the separation between the equipment and receiver.<br />
• Connect the equipment into an outlet on a circuit different from that to which<br />
the receiver is connected.<br />
• Consult the dealer or an experienced radio/TV technician for help.<br />
<strong>Majik</strong> <strong>140</strong><br />
iii
iv<br />
Waste Electrical and Electronic Equipment<br />
(WEEE) Directive<br />
Waste Electrical and Electronic Equipment Directive Directive 2002/96/EC<br />
of the European Parliament and of the Council<br />
The symbol (right) is shown on this product. It indicates that the product<br />
should not be disposed of with regular household waste, but should be<br />
disposed of separately.<br />
Electrical and electronic equipment can contain materials that are hazardous<br />
to the environment and human health and therefore should be disposed of at a<br />
designated waste facility or returned to your retailer for the appropriate recycling to<br />
take place (see www.linn.co.uk for further information).<br />
If you wish to dispose of this product and the product still functions, please<br />
consider recycling/reusing it by donating it to a charity shop, selling it or partexchanging<br />
it with your retailer.<br />
<strong>Majik</strong> <strong>140</strong><br />
Copyright and Acknowledgements<br />
Copyright © 2007 <strong>Linn</strong> Products Ltd. First edition September 2007.<br />
<strong>Linn</strong> Products Limited, Glasgow Road, Waterfoot, Eaglesham, Glasgow,<br />
G76 OEQ, Scotland, United Kingdom<br />
All rights reserved. No part of this publication may be reproduced, stored in<br />
a retrieval system, or transmitted, in any form or by any means, electronic,<br />
mechanical, photocopying, recording, or otherwise, without the prior written<br />
permission of the publisher.<br />
The content of this manual is furnished for information use only, is subject to<br />
change without notice, and should not be construed as a commitment by <strong>Linn</strong><br />
Products Limited. <strong>Linn</strong> Products Limited assumes no responsibility or liability for<br />
any errors or inaccuracies that may appear in this manual.<br />
Trade marks used in this publication: <strong>Linn</strong> and the <strong>Linn</strong> logo are registered<br />
trade marks of <strong>Linn</strong> Products Limited. <strong>Majik</strong>, Aktiv and Skeets are trade marks<br />
of <strong>Linn</strong> Products Limited.<br />
The information in this manual is furnished for informational use only, is subject to<br />
change without notice, and should not be construed as a commitment by <strong>Linn</strong><br />
Products Limited. <strong>Linn</strong> Products Limited assumes no responsibility or liability for<br />
any errors or inaccuracies that may appear in this manual.<br />
UK Registered Design No: 4003656<br />
Printed in the United Kingdom.<br />
Pack 1320/1
CONTENTS<br />
INTRODUCTION 1<br />
INSTALLATION 2<br />
Unpacking 2<br />
Cleaning 2<br />
Accessories 2<br />
Positioning and levelling 2<br />
Positioning 3<br />
Bass reduction 3<br />
Levelling 4<br />
Connecting 5<br />
General 5<br />
Terminals 5<br />
Configuration options 5<br />
Wiring and amping configurations 8<br />
Fitting and levelling the upgrade stand 10<br />
TECHNICAL SPECIFICATIONS 13<br />
GUARANTEE AND SERVICE 14<br />
<strong>Majik</strong> <strong>140</strong><br />
v
INTRODUCTION<br />
<strong>Linn</strong>’s <strong>Majik</strong> <strong>140</strong>, full-range, floor-standing loudspeaker combines<br />
knowledge built-up over thirty years of loudspeaker design and<br />
manufacture. Among its features the <strong>Majik</strong> <strong>140</strong> includes <strong>Linn</strong>’s patented<br />
driver array technology – found in our highest performing loudspeakers<br />
– which not only delivers complete clarity in high frequency reproduction,<br />
but also an even dispersion to give great performance wherever you<br />
position the loudspeakers in your room. The composite-cone design<br />
used for the bass drive unit, delivers pitch accurate, musical bass<br />
extension, while a wide range of possible connection configurations<br />
provides great flexibility to meet your future requirements.<br />
The <strong>Majik</strong> <strong>140</strong> loudspeakers are the perfect partner for the other products<br />
in <strong>Linn</strong>’s <strong>Majik</strong> range. Whether as part of a complete <strong>Majik</strong> system or<br />
as the loudspeakers in your current hi-fi, we’re sure the <strong>Majik</strong> <strong>140</strong>s will<br />
provide you with many years of exceptional performance.<br />
<strong>Majik</strong> <strong>140</strong><br />
1
2<br />
INSTALLATION<br />
Unpacking<br />
The <strong>Majik</strong> <strong>140</strong> loudspeakers are heavy: take care when removing them from<br />
their packaging. Do not lay the loudspeakers on their face as this will damage the<br />
2K speaker array.<br />
The <strong>Majik</strong> <strong>140</strong> loudspeakers are supplied with the following:<br />
• 2 loudspeaker stands (factory fitted)<br />
• 4 terminal link strips (2 factory fitted to each loudspeaker)<br />
• stand spike kit<br />
• stand locknut tool with Allen key<br />
• 2 foam bungs (fitted to each loudspeaker)<br />
We recommend that you retain the packaging in case you need to transport your<br />
loudspeakers at a later date.<br />
<strong>Majik</strong> <strong>140</strong><br />
x 8<br />
x 1<br />
x 4<br />
x 2 x 2<br />
Cleaning<br />
Remove dust and fingerprints from the cabinets with a soft, dry, lint-free cloth.<br />
Avoid using domestic cleaning products as they may damage the veneer. Fabric<br />
grilles (if fitted) should be removed from the cabinets and cleaned carefully with a<br />
soft brush.<br />
Accessories<br />
An upgrade stand for the <strong>Majik</strong> <strong>140</strong>, providing greater stability and improved audio<br />
performance, is available from your <strong>Linn</strong> retailer. Fabric grilles are also available<br />
from your <strong>Linn</strong> retailer.
Positioning and levelling<br />
To get the best from your <strong>Linn</strong> <strong>Majik</strong> <strong>140</strong> loudspeakers, it is important that they are<br />
positioned and levelled correctly. The acoustics of a room are dependent on many<br />
factors, including volume, shape and even furniture. The information below will<br />
assist in helping you find the best position in your room for your loudspeakers and<br />
will tell you how to level them correctly.<br />
Positioning<br />
It pays dividends to experiment with loudspeaker positioning. However, the very<br />
nature of the 2K super-tweeter and tweeter array and its close driver proximity,<br />
ensures uniform dispersion characteristics and therefore the loudspeakers should<br />
not require any significant degree of toeing-in to improve performance.<br />
Bass reduction<br />
A loudspeaker placed too close to a wall will tend to over-emphasise bass<br />
definition, so a minimum of 9” (23 cm) is recommended between the back of<br />
a <strong>Majik</strong> <strong>140</strong> and the closest wall. If space is an issue, foam bungs are provided<br />
for insertion into the loudspeaker’s rear reflex ports to seal the cabinet, which will<br />
result in reduced bass.<br />
An alternative method for reducing bass output is to make an internal modification<br />
to the loudspeaker which will drop the bass by 2 dB. This modification can be<br />
carried out by your <strong>Linn</strong> retailer.<br />
<strong>Majik</strong> <strong>140</strong><br />
3
4<br />
Levelling<br />
A properly levelled loudspeaker will always perform more effectively than an<br />
unstable one; the actual loudspeaker cabinet can remain fixed whilst the drive<br />
units are allowed to move as precisely determined by the playback signal from the<br />
amplifier(s). Adjustable spikes enable levelling on uneven floors; however, these<br />
adjustments are subtle and will not compensate for an excessively irregular floor.<br />
<strong>Majik</strong> <strong>140</strong><br />
The procedure for levelling a <strong>Majik</strong> <strong>140</strong> should be as follows:<br />
• Use a spirit level on the top of the loudspeaker to check if it is sitting level.<br />
If it is, gently rock the cabinet from front to back, side to side and diagonally<br />
to check for any movement. If none is present and the loudspeaker is sitting<br />
level, no adjustment is necessary.<br />
• If the loudspeaker is not level, or moves when you rock it, loosen the<br />
appropriate lock nut with the tool provided and turn the spike to adjust<br />
its height.<br />
• Press down firmly on the top of the loudspeaker to ensure it is in close<br />
contact with your flooring.<br />
• Use the spirit level as before and continue to adjust the spikes as required.<br />
• When the loudspeaker is level and does not rock, tighten the lock nuts using<br />
the tool provided.<br />
Note:<br />
To protect wooden or tiled floors, the spikes can be placed on <strong>Linn</strong> Skeets, which<br />
are available from your <strong>Linn</strong> retailer.
Connecting<br />
General<br />
IMPORTANT:<br />
Before making any connections, switch off your power amplifier(s).<br />
Ensure the positive (+) or red coloured connectors from your amplifier(s), connect<br />
to the positive (+) connectors on your loudspeakers, and that the negative (-)<br />
or black coloured connectors from your amplifier(s), connect to the negative (-)<br />
connectors on your loudspeakers.<br />
Terminals<br />
The loudspeakers are fitted with binding-post terminals. These terminals can be<br />
used as sockets for the connection of 4 mm banana plugs, bared wires or spadeterminated<br />
cables. To connect bared wire or spade-terminated cables, loosen the<br />
outer section of the binding post, insert the wire or terminal and firmly retighten the<br />
binding post to clamp the wire in place and provide a good electrical connection.<br />
Configuration options<br />
The <strong>Majik</strong> <strong>140</strong> loudspeakers offer an array of configuration options, as described<br />
below. Connections for each of the methods are shown in the Wiring and amping<br />
configurations section, page 8.<br />
The options are listed in order of increasing sonic performance. Multi-wiring and<br />
multi-amping options offer improvements in sound quality over single-wiring. The<br />
greater the separation of the frequency bands in the power amplifiers, crossover<br />
and cables, the more precise the quality of the playback performance, with<br />
Aktiv operation representing the ultimate configuration (see Aktiv operation, next<br />
page).<br />
Passive single-wiring:<br />
A single amplifier channel connects to the loudspeaker using a single cable.<br />
Passive multi-wiring (bi-wire, tri-wire or quad-wire):<br />
A single amplifier channel connects to the loudspeaker using two, three or<br />
four cables.<br />
Passive multi-amping (bi-amp, tri-amp or quad-amp):<br />
Two, three or four amplifier channels connect to the loudspeaker.<br />
Note:<br />
Multi-amping can be combined with multi-wiring, e.g. bi-amping could employ<br />
quad-wiring.<br />
<strong>Majik</strong> <strong>140</strong><br />
5
6<br />
Aktiv operation<br />
The term ‘Aktiv’ refers to the proprietary <strong>Linn</strong> active crossover and loudspeaker<br />
configuration, whereby a loudspeaker’s internal passive crossover is replaced<br />
with external crossovers.<br />
In a passive system, the output from the power amplifier is passed through the<br />
crossover inside the loudspeaker. A portion of the signal’s energy is dissipated in<br />
the crossover circuitry and is therefore lost. Also, the behaviour of the crossover<br />
and the drive units will differ depending on the listening volume.<br />
In an Aktiv system, one channel of amplification is required for each drive unit in<br />
a loudspeaker, and the crossover circuitry is located before the amplifier circuitry.<br />
After the audio signal is filtered by the crossovers the amplifier then supplies power<br />
to the loudspeaker drive unit in the frequency band required by that particular<br />
driver (e.g. midrange frequencies for the midrange driver), allowing each amplifier<br />
channel to provide a greater degree of control over the loudspeaker.<br />
So in Aktiv mode, the crossovers provide a more precise means of filtering the<br />
signal into the required frequency bands, while allowing the amplifiers to exert<br />
more control over the drive units. This results in significantly improved sonic<br />
performance compared with passive operation.<br />
Important note:<br />
Aktiv operation requires a modification to your loudspeakers and your<br />
<strong>Linn</strong> amplifiers, which must be carried out by an authorised <strong>Linn</strong> retailer.<br />
<strong>Majik</strong> <strong>140</strong><br />
Link strip information<br />
To remove / fit the link strips:<br />
• Loosen the outer section of each binding post on both rows of terminals.<br />
• Slide the link strips outwards to remove them.<br />
• When refitting the strips, ensure that they are fully and correctly inserted.<br />
• Ensure that all the binding posts are tight (whether the strips are being<br />
refitted or not).
To modify the link strips for multi-wiring or multi-amping applications:<br />
• Remove the link strips from the loudspeaker, as explained opposite.<br />
• Break the links by using a strong pair of snips, a small hacksaw or snap them<br />
at the break-points by carefully bending the strips back and forth with pliers.<br />
• File down any sharp edges to prevent the possibility of injury.<br />
Note:<br />
If you will be using both sides of the separated link, ensure your break creates<br />
a definite gap in order to eradicate the possibility of the links accidentally<br />
re-connecting when fitted to the loudspeaker.<br />
Important notes on using the link strips<br />
• Never use the strips to link positive (+) and negative (-) terminals together.<br />
• When multi-amping, ensure that the link strips do not short-circuit amplifier<br />
channels together. Shorting the outputs of separate amplifier channels<br />
together can damage the amplifier(s) and loudspeaker drive units.<br />
• Do not connect more than one strip per terminal.<br />
<strong>Majik</strong> <strong>140</strong><br />
7
8<br />
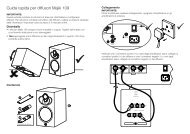
Wiring and amping configurations<br />
Single-wiring<br />
Illustration shows position of link strips if single-wiring (i.e. using a single speaker<br />
cable from one power amplifier channel). No link strip adjustments or cuts are<br />
required.<br />
For optimum sound quality, connect the cable from the power amplifier to the<br />
terminals shown.<br />
Bi-wiring or bi-amping<br />
Illustration shows position of separated link strips if bi-wiring (i.e. using two<br />
speaker cables from one power amplifier channel) or bi-amping (i.e. using two<br />
power amplifier channels.<br />
For optimum sound quality, connect the cables from the power amplifier(s) to the<br />
terminals shown.<br />
<strong>Majik</strong> <strong>140</strong><br />
Tri-wiring or tri-amping<br />
Illustration shows suggested position of separated link strips if tri-wiring (i.e. using<br />
three speaker cables from one power amplifier channel) or tri-amping (i.e. using<br />
three power amplifier channels).<br />
For optimum sound quality, connect the cables from the power amplifier(s) to the<br />
terminals shown.<br />
Quad-wiring or quad-amping<br />
Link strips must be removed when quad-wiring (i.e. using four speaker cables<br />
from one power amplifier channel) or quad-amping (i.e. using four power amplifier<br />
channels).
Aktiv configuration<br />
Aktiv operation requires a modification to your <strong>Majik</strong> <strong>140</strong>s and your <strong>Linn</strong> amplifiers,<br />
which must be carried out by an authorised <strong>Linn</strong> retailer.<br />
In Aktiv mode, please be very careful to connect all speaker cables from the<br />
amplifier(s) to the correct sockets on the loudspeaker. Wrong connection could<br />
result in damage to your loudspeaker drive units and amplifier(s).<br />
FROM “BASS”<br />
POWER AMPLIFIER<br />
FROM “MIDRANGE”<br />
POWER AMPLIFIER<br />
FROM “TWEETER”<br />
POWER AMPLIFIER<br />
FROM “SUPER-TWEETER”<br />
POWER AMPLIFIER<br />
IMPORTANT NOTES ON AKTIV SYSTEMS<br />
Do not use your amplifiers with any other loudspeakers –<br />
you may damage the loudspeakers.<br />
Do not use your loudspeakers with any other amplifiers –<br />
their internal crossovers will be bypassed and the drivers could be severely<br />
damaged.<br />
Do not use the terminal link plates –<br />
they can only be used in a passive system.<br />
<strong>Majik</strong> <strong>140</strong><br />
9
10<br />
Fitting and levelling the upgrade stand<br />
• Unpack the contents of the upgrade stand kit.<br />
• Lay the loudspeaker on its side (never lay the speaker on its face) on a<br />
smooth surface. (a)<br />
• Use the handholds in the base to raise the loudspeaker onto its top. (b)<br />
• The stand’s spikes are sharp; be careful not to cause injury or damage.<br />
<strong>Majik</strong> <strong>140</strong><br />
(a)<br />
(b)<br />
• Using the Allen key on the supplied tool, unscrew the original stand. Set the<br />
four screws aside.<br />
• Lift the stand off, carefully – it is heavy.<br />
• Place the upgrade stand on to the loudspeaker, carefully – it is very heavy.
• Insert four new washers.<br />
• Insert the four screws removed from the original stand.<br />
• Tighten the screws with the Allen key.<br />
• Open the spike kit.<br />
• Screw the four floor spikes through the stand so that they just protrude<br />
through the other side.<br />
• Carefully turn the loudspeaker the right way up.<br />
<strong>Majik</strong> <strong>140</strong><br />
11
12<br />
• Screw a locknut on to each spike.<br />
• Leave finger tight to make adjusting easier later.<br />
<strong>Majik</strong> <strong>140</strong><br />
The procedure for levelling a <strong>Majik</strong> <strong>140</strong> fitted with the upgrade stand,<br />
should be as follows:<br />
• Use a spirit level on the top of the loudspeaker to check if it is sitting level. If<br />
it is, gently rock the speaker from front to back, side to side and diagonally<br />
to check for any movement. If none is present and the loudspeaker is sitting<br />
level, no adjustment to the spikes is necessary.<br />
• If the loudspeaker is not level, or moves when you rock it, loosen the<br />
appropriate lock nut with the tool provided and using the supplied Allen key,<br />
turn the spike to adjust its height.
• Press down firmly on the top of the loudspeaker to ensure it is in close<br />
contact with your flooring.<br />
• Use the spirit level as before and continue to adjust the spikes as required.<br />
• When the loudspeaker is level and does not rock, hold the spikes in place<br />
with the Allen key and tighten the lock nuts.<br />
TECHNICAL SPECIFICATIONS<br />
Cabinet volume 40 litres<br />
Impedance (passive) 4 Ω<br />
Impedance (Aktiv bass) 8 Ω<br />
Impedance (Aktiv midrange) 8 Ω<br />
Impedance (Aktiv tweeter) 7 Ω<br />
Impedance (Aktiv super-tweeter) 7 Ω<br />
Efficiency 88 dB for 1 watt at 1 metre (1 kHz)<br />
Frequency response (passive) 55 Hz - 20 kHz<br />
Frequency response (Aktiv) 55 Hz - 20 kHz<br />
Magnetic shielding No<br />
Crossover options Fully passive or fully Aktiv<br />
Connection options Up to four-way multi-wire/amp passive;<br />
four-way Aktiv<br />
Optional bass reduction 2 dB<br />
Overall sizes (with supplied<br />
stand)<br />
Weight (with supplied stand) 21.3 kg<br />
47 lbs<br />
975 mm (H) x 250 mm (W) x 335 mm (D)<br />
38 3/8” (H) x 9 3/4” (W) x 13 1/8” (D)<br />
<strong>Majik</strong> <strong>140</strong><br />
13
14<br />
GUARANTEE AND SERVICE<br />
This product is guaranteed under the conditions which apply in the country of<br />
purchase and your statutory rights are not limited. In addition to any statutory<br />
rights you may have, <strong>Linn</strong> undertake to replace any parts which have failed due<br />
to faulty manufacture. To help us, please ask your <strong>Linn</strong> retailer about the <strong>Linn</strong><br />
warranty scheme in operation in your country.<br />
In parts of Europe, the United States of America and some other markets,<br />
extended warranty may be available to customers who register their purchase<br />
with <strong>Linn</strong>. A warranty registration card is included with the product and should be<br />
returned to <strong>Linn</strong> as soon as possible. Alternatively, you can register your warranty<br />
online at www.linn.co.uk.<br />
WARNING<br />
Unauthorised servicing or dismantling of the product invalidates the<br />
manufacturer’s warranty. There are no user serviceable parts inside the product<br />
and all enquiries relating to product servicing should be referred to authorised<br />
retailers only.<br />
Technical support and information<br />
For technical support, product queries and information, please contact either your<br />
local retailer or one of the <strong>Linn</strong> offices opposite.<br />
Full details of your local retailer/distributor can be found on the <strong>Linn</strong> web site:<br />
www.linn.co.uk.<br />
Important<br />
Please keep a copy of the sales receipt to verify the purchase date of the product.<br />
Please ensure that your equipment is insured by you during any transit or<br />
shipment for repair.<br />
<strong>Majik</strong> <strong>140</strong><br />
<strong>Linn</strong> Products Limited<br />
Glasgow Road, Waterfoot, Eaglesham, Glasgow G76 0EQ, Scotland, UK<br />
Phone: +44 (0)141 307 7777<br />
Fax: +44 (0)141 644 4262<br />
Helpline: 0500 888909<br />
Email: helpline@linn.co.uk<br />
www.linn.co.uk<br />
<strong>Linn</strong> Incorporated<br />
8787 Perimeter Park Boulevard, Jacksonville, FL 32216 USA<br />
Phone: +1 (904) 645 5242<br />
Fax: +1 (904) 645 7275<br />
Helpline: 888-671-LINN<br />
Email: helpline@linninc.com<br />
www.linninc.com<br />
<strong>Linn</strong> Deutschland GmbH<br />
Hühnerposten 1d, D-20097 Hamburg, Deutschland<br />
Phone: +49-(0) 40-890 660-0<br />
Fax: +49-(0) 40-890 660-29<br />
Email: info@linngmbh.de<br />
www.linn.co.uk
Pack 1320