
You also want an ePaper? Increase the reach of your titles
YUMPU automatically turns print PDFs into web optimized ePapers that Google loves.
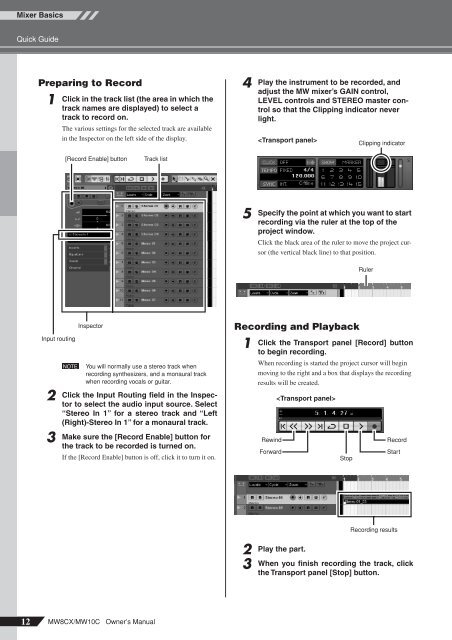
Mixer BasicsQuick GuidePreparing to Record1Click in the track list (the area in which thetrack names are displayed) to select atrack to record on.The various settings for the selected track are availablein the Inspector on the left side of the display.4Play the instrument to be recorded, andadjust the MW mixer’s GAIN control,LEVEL controls and STEREO master controlso that the Clipping indicator neverlight.Clipping indicator[Record Enable] buttonTrack list5Specify the point at which you want to startrecording via the ruler at the top of theproject window.Click the black area of the ruler to move the project cursor(the vertical black line) to that position.RulerInput routing23NOTEInspectorYou will normally use a stereo track whenrecording synthesizers, and a monaural trackwhen recording vocals or guitar.Click the Input Routing field in the Inspectorto select the audio input source. Select“Stereo In 1” for a stereo track and “Left(Right)-Stereo In 1” for a monaural track.Make sure the [Record Enable] button forthe track to be recorded is turned on.If the [Record Enable] button is off, click it to turn it on.Recording and Playback1Click the Transport panel [Record] buttonto begin recording.When recording is started the project cursor will beginmoving to the right and a box that displays the recordingresults will be created.RewindForwardStopRecordStartRecording results23Play the part.When you finish recording the track, clickthe Transport panel [Stop] button.12<strong>MW8CX</strong>/<strong>MW10C</strong> Owner’s <strong>Manual</strong>