Mounting Instructions - Ãhlins
Mounting Instructions - Ãhlins
Mounting Instructions - Ãhlins

Create successful ePaper yourself
Turn your PDF publications into a flip-book with our unique Google optimized e-Paper software.
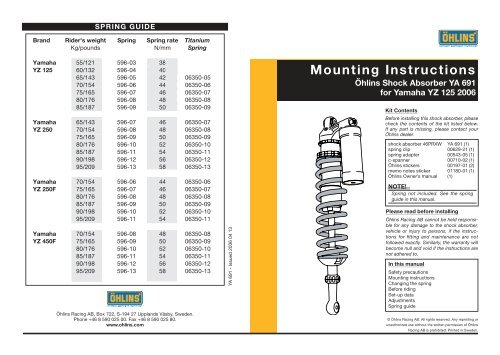
YA 691 - Issued 2006 04 13SPRING GUIDEBrand Rider's weight Spring Spring rate TitaniumKg/pounds N/mm SpringYamaha 55/121 596-03 38YZ 125 60/132 596-04 4065/143 596-05 42 06350-0570/154 596-06 44 06350-0675/165 596-07 46 06350-0780/176 596-08 48 06350-0885/187 596-09 50 06350-09Yamaha 65/143 596-07 46 06350-07YZ 250 70/154 596-08 48 06350-0875/165 596-09 50 06350-0980/176 596-10 52 06350-1085/187 596-11 54 06350-1190/198 596-12 56 06350-1295/209 596-13 58 06350-13Yamaha 70/154 596-06 44 06350-06YZ 250F 75/165 596-07 46 06350-0780/176 596-08 48 06350-0885/187 596-09 50 06350-0990/198 596-10 52 06350-1095/209 596-11 54 06350-11Yamaha 70/154 596-08 48 06350-08YZ 450F 75/165 596-09 50 06350-0980/176 596-10 52 06350-1085/187 596-11 54 06350-1190/198 596-12 56 06350-1295/209 596-13 58 06350-13Öhlins Racing AB, Box 722, S-194 27 Upplands Väsby, Sweden.Phone +46 8 590 025 00. Fax +46 8 590 025 80.www.ohlins.com<strong>Mounting</strong> <strong>Instructions</strong>Öhlins Shock Absorber YA 691for Yamaha YZ 125 2006Kit ContentsBefore installing this shock absorber, pleasecheck the contents of the kit listed below.If any part is missing, please contact yourÖhlins dealer.shock absorber 46PRXW YA 691 (1)spring clip 00629-21 (1)spring adapter 00543-05 (1)c-spanner 00710-02 (1)Öhlins stickers 00197-01 (2)memo notes sticker 01180-01 (1)Öhlins Owner’s manual (1)NOTE!Spring not included. See the springguide in this manual.Please read before installingÖhlins Racing AB cannot be held responsiblefor any damage to the shock absorber,vehicle or injury to persons, if the instructionsfor fi tting and maintenance are notfollowed exactly. Similarly, the warranty willbecome null and void if the instructions arenot adhered to.In this manualSafety precautions<strong>Mounting</strong> instructionsChanging the springBefore ridingSet-up dataAdjustmentsSpring guide© Öhlins Racing AB. All rights reserved. Any reprinting orunauthorized use without the written permission of ÖhlinsRacing AB is prohibited. Printed in Sweden.
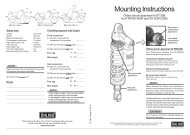
1Read this manual carefully!Pay special attention to statements procededby the following notations:!The Safety alert symbol means: Attention!Your safety is involved!! WARNINGFailure to follow these warning instructionsmay result in severe or fatal injury to anyoneworking with, inspecting or using thisshock absorber, or to bystanders.CAUTION!Caution indicates that special precautionsmust be taken to avoid damage to theshock absorber.NOTE!Indicates information that is of importanceregarding mounting procedures.NOTE!Öhlins products are subject to continuousimprovement and development. Therefore,although these instructions include the mostup-to-date information available at the timeof printing, there may be minor differencesbetween your shock absorber and this manual.Please consult your Öhlins dealer if youhave any questions regarding the contentsof this manual.NOTE!During storage and transportation, especiallyat high ambient temperature, the oiland grease used for assembling may run outinside the packing and damage the expandedpolystyrene packing material. This is notunusual and is in no way detrimental to theshock absorber.SAFETY PRECAUTIONS! WARNING!1. Installing a shock absorber, that is notapproved by the vehicle manufacturer,may affect the vehicle’s stability. ÖhlinsRacing AB cannot be held responsible forany personal injury or damage that may occurafter fitting the shock absorber.2. The vehicle service manual must bereferred to when installing this shockabsorber.3. Please study and make certain you fullyunderstand the mounting instructions andthe owner’s manual before handling thisshock absorber. If you have any questionsregarding proper installation procedures,contact an Öhlins dealer.Owner’s ManualÖhlins shock absorbers, MX/ENDURO/OFF ROADIncluding:SafetyTuning thesuspensionDesignfeaturesFunctionBasicadjustmentsYour vehicle OEMFine tuningInspection,maintenanceThe Öhlins shock absorber YA 691 features thefollowing adjusters:Spring preload adjustmentTurn the rings on the shock absorber bodyusing the C-spanner provided in this kit. Turnclockwise for harder adjustment, turn counterclockwiseto release the preload.Compression damping adjustmentAdjustments are made on top of the reservoir.Low speed adjustment: Slotted centre screw.High speed adjustment: Hexagon screw.Rebound damping adjustmentAdjust by turning the wheel below the springclip.NOTE!When delivered, the Öhlins shock absorberis dialed to recommended settings for thespecific brand and make of the motorcycle. Ifyou have changed the setting, reset accordingto the following description:Turn adjusters have a normal right handthread. Turn the damping adjusters clockwiseto fully closed (position zero [0]). Turn counterclockwise to open and count the clicks untilyou reach the recommended number ofclicks. See setup data in this manual.CAUTION!Do not use too much force, delicate sealingsurfaces can be damaged.ADJUSTMENTSSpringpreloadadjustment-- + +High speedcompressionadjustmentLow speedcompressionadjustmentReboundadjustmentNOTE!Read more about compression, reboundand spring pre-load in your Öhlins Owner’smanual.1 6
BEFORE RIDINGMOUNTING INSTRUCTIONS?? kg? lbs?IMPORTANT NOTICE!Before riding your bike, check sag and rideheight according to your Öhlins Owner’smanual.To get the most out of your suspension componentit is of great importance to make propersettings and to use the correct spring for yourweight - full riding equipment on!We recommend you to read your ÖhlinsOwner’s manual carefully to understand thedifferent effects of the different settings.Step 1 - Assembly of Öhlins Shock Absorber with springWARNING!!1. It is advisable to have an Öhlins dealer install theshock absorber.2. Follow the instructions in the vehicle servicemanual when changing the shock absorber.3. When working on a raised vehicle, make surethat it is securely supported to prevent it from tippingover.1Measure the free length of the spring (A).NOTE!The spring adapter should only be used forthe original titanium spring, or an Öhlins titaniumspring. Contact your Öhlins dealer formore information.Lock nutSpringplatformWasherSpring adapter(alternative 1)2orRebound adjustmentLow speed compressionHigh speed compressionFree sag, rearFree sag, frontRide height, rearRide height, frontShock absorber lengthStroke25 clicks15 clicks1.5 turnsSET-UP DATA30 + 5 mm30 + 5 mm102 - 107 mm80 + 5 mm492 mm132 mmNOTE!Read more about compression and reboundin your Öhlins Owner’s manual.NOTE!If your measured sag and ride height differ fromthis set-up data, change the preload accordingto the section “Adjustments” in this manual.If, after changing the preload, ride heightis still higher than recommended, softerspring/springs must be used. If ride heightis lower than recommended, harder spring/springs must be used. Contact your Öhlinsdealer for advice.Place the spring adapter where the spring innerdiameter is largest. See alternative 1 and 2 in thefigure. The adapter reduces the freeplay betweenthe spring and the shock absorber body.3Fit the spring clip and turn the shock absorberso the spring rests against the spring platform.Turn the lock nut and spring platform so theytouch the upper surface of the spring.4 - Setting the spring pre-loadWith a C-spanner, turn the upper spring platformapproximately 9 turns (14 mm) clockwise to preloadthe spring before fitting the shock absorberto the motorcycle.SpringSpring clipA - B = Pre-loadAASpring adapter(alternative 2)B52
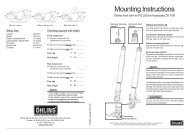
MOUNTING INSTRUCTIONSStep 2 - Installing the shock absorberWARNING!!1. It is advisable to have an Öhlins dealer install theshock absorber.2. Follow the instructions in the vehicle servicemanual when changing the shock absorber.3. When working on a raised vehicle, make surethat it is securely supported to prevent it from tippingover.1Put the motorcycle on a workstand to raise therear wheel off the ground.3Remove the number plate by loosening thelower screw. Remove the silencer by removingthe two screws (3b).4Remove the two lower screws (one from eachside) holding the sub frame (4a). Loosen the upperscrew holding the sub frame (4b).5Loosen the hose clamp and remove the subframe and the air box from the carburetor.7Fit the Öhlins shock absorber in the sameway as the original unit. Fasten it with the twooriginal bolts.8Place the air box, sub frame and seat back inposition and fasten them.NOTE!Put the motorcycle back on the floor beforetightening the bolts. Make sure the vehicle issecure and will not fall over. You may needan assistant for this.NOTE!Make sure that all bolts are tightenedto the correct torque and that nothingfouls or restricts movement of the shockabsorber when the suspension is being fullycompressed or extended.2Remove the seat by loosening the two rear attachmentscrews.6Loosen the upper and the lower screws of theoriginal shock absorber and remove it.CHANGING THE SPRING24b1To remove the original spring you must fi rstloosen the spring pre-load by turning theupper spring platform counter clockwise witha C-spanner.3Change spring and set the new spring pre-loadaccording to page 2.3b32Remove the spring clip (and adapter if used) andthen the original spring.4a61!3 4