Piece Montering - Edsbyn
Piece Montering - Edsbyn
Piece Montering - Edsbyn

You also want an ePaper? Increase the reach of your titles
YUMPU automatically turns print PDFs into web optimized ePapers that Google loves.
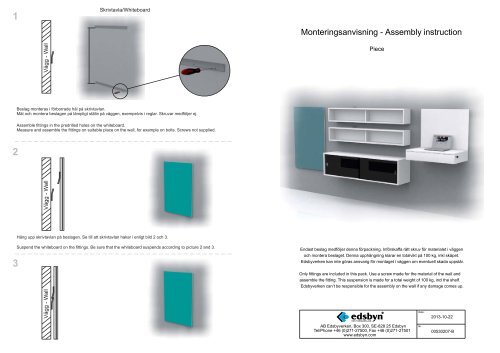
1Skrivtavla/Whiteboard<strong>Montering</strong>sanvisning - Assembly instruction<strong>Piece</strong>Beslag monteras i förborrade hål på skrivtavlan.Mät och montera beslagen på lämpligt ställe på väggen, exempelvis i reglar. Skruvar medföljer ej.Assemble fittings in the predrilled holes on the whiteboard.Measure and assemble the fittings on suitable place on the wall, for example on bolts. Screws not supplied.2Häng upp skrivtavlan på beslagen. Se till att skrivtavlan hakar i enligt bild 2 och 3.3Suspend the whiteboard on the fittings. Be sure that the whiteboard suspends according to picture 2 and 3.Endast beslag medföljer denna förpackning. Införskaffa rätt skruv för materialet i väggenoch montera beslaget. Denna upphängning klarar en totalvikt på 100 kg, inkl skåpet.Edsbyverken kan inte göras ansvarig för montaget i väggen om eventuell skada uppstår.Only fittings are included in this pack. Use a screw made for the material of the wall andassemble the fitting. This suspension is made for a total weight of 100 kg, incl the shelf.Edsbyverken can’t be responsible for the assembly on the wall if any damage comes up.AB Edsbyverken, Box 300, SE-828 25 <strong>Edsbyn</strong>Tel/Phone +46 (0)271-27500, Fax +46 (0)271-27501www.edsbyn.comDate:Nr:2013-10-2200530207-B
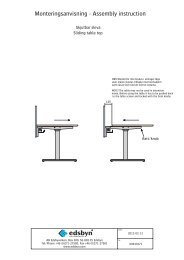
1Skåp/Cabinet1Laptophylla/Laptop shelfMontera beslaget på lämpligt ställe, exempelvis i reglar. Tänk på att skåpet hamnar högre upp, se punkt 3.Skruvar medföljer ej.Montera beslaget på lämpligt ställe, exempelvis i reglar.Skruvar medföljer ej.Assemble the fitting on suitable place, for example on bolts. See point 3 to get the total height of the cabinet.Screws not supplied.Assemble the fitting on suitable place, for example on bolts.Screws not supplied.22Häng upp skåpet på beslaget. Se till att skåpet hakar i enligt bild 2 och 3.Häng upp hyllan på beslaget. Se till att hyllan hakar i enligt bild 2 och 3.Suspend the cabinet on the fitting. Be sure that the cabinet suspends according to picture 2 and 3.Suspend the shelf on the fitting. Be sure that the shelf suspends according to picture 2 and 3.33xx = 92 mm utan glas på toppskivan (98 mm med glas)x = 92 mm without glass on the top (98 mm with glass)Öppna luckan för att skruva fast de nedre beslagen i väggen.Open the door to secure the bottom bracket to the wall.