Spirometer Manual and Experiments
Spirometer Manual and Experiments
Spirometer Manual and Experiments

You also want an ePaper? Increase the reach of your titles
YUMPU automatically turns print PDFs into web optimized ePapers that Google loves.
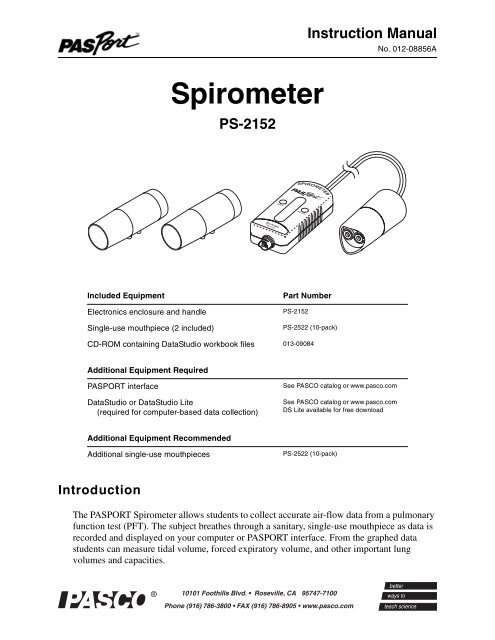
PS-2152äInstruction <strong>Manual</strong>No. 012-08856A<strong>Spirometer</strong>PS-2152SPIROMETERWAIT READYIncluded EquipmentElectronics enclosure <strong>and</strong> h<strong>and</strong>leSingle-use mouthpiece (2 included)Part NumberPS-2152PS-2522 (10-pack)CD-ROM containing DataStudio workbook files 013-09084Additional Equipment RequiredPASPORT interfaceDataStudio or DataStudio Lite(required for computer-based data collection)See PASCO catalog or www.pasco.comSee PASCO catalog or www.pasco.comDS Lite available for free downloadAdditional Equipment RecommendedAdditional single-use mouthpiecesPS-2522 (10-pack)IntroductionThe PASPORT <strong>Spirometer</strong> allows students to collect accurate air-flow data from a pulmonaryfunction test (PFT). The subject breathes through a sanitary, single-use mouthpiece as data isrecorded <strong>and</strong> displayed on your computer or PASPORT interface. From the graphed datastudents can measure tidal volume, forced expiratory volume, <strong>and</strong> other important lungvolumes <strong>and</strong> capacities.
<strong>Spirometer</strong>How it worksHow it worksWhen the test subject breathes through the mouthpiece, a screen in themouthpiece induces a minute resistance to the air flow. This resistanceleads to a pressure differential across the screen that is measured via two airlines that lead to a differential pressure transducer in the electronicsenclosure. The <strong>Spirometer</strong> contains onboard reference data of differentialpressures from known flow rates (a non-linear relationship). It determinesthe test subject's flow rate by comparing the measured differential pressureto the stored reference data. It calculates volume exchanged by integratingthe flow rate over time.Sensor SetupConnect a mouthpiece to the h<strong>and</strong>le; note the small pin on the mouthpiece<strong>and</strong> the aligning notch on the h<strong>and</strong>le. Connect the electronics enclosure ofthe sensor to your PASPORT interface.(When you remove a used mouthpiece, pull it straight out from the h<strong>and</strong>lewithout rocking or wiggling it.)Mouthpiece <strong>and</strong>H<strong>and</strong>leData CollectionOption 1: DataStudio Workbook FileOn your computer, open the DataStudio file “<strong>Spirometer</strong> PFT.”* This file isconfigured to collect <strong>and</strong> display data for a pulmonary function test. Onscreeninstructions will guide students through data collection <strong>and</strong> analysis.Students can review the test procedure <strong>and</strong> interpretation of PFT data bycompleting the workbook, “<strong>Spirometer</strong> Background” before starting“<strong>Spirometer</strong> PFT.”Option 2: If you are not using the workbook fileYour PASPORT interface will record Flow Rate <strong>and</strong> Max Flow Rate (inliters/second) <strong>and</strong> Total Flow (in liters), at a sampling rate of 50 Hz.Flow Rate is the rate at which air flows through the mouthpiece. Airexpired from the lungs is measured as positive flow, inspired air asnegative. Max Flow Rate is the maximum exhaled flow rate measuredduring the test. The sensor calculates Flow Volume by integrating FlowRate data over time. Flow Volume is the net volume of expired air (totalexpired volume minus total inspired volume).Plug in the sensor <strong>and</strong> launch DataStudio (if you are using a computer.)The sensor will automatically be set up to record PFT data.*The <strong>Spirometer</strong>workbook files arelocated on theincluded CD-ROM.If you have installedDataStudio version1.9.5 or later, theworkbook files havealready been copiedto your computer.Plug in the<strong>Spirometer</strong> (withDataStudio notrunning) <strong>and</strong> selectthe workbook fromthe list that appears.2 ®
Model No. PS-2152 Data CollectionPulmonary Function Test Procedure1. Use a nose clip or have the testsubject hold his or her nose toensure that all breathing isdone through the mouth.2. Hold the mouthpiece of the<strong>Spirometer</strong> stationary <strong>and</strong>away from air currents(including expired air). Startdata collection; note theflashing red WAIT indicator onthe sensor. Wait until the greenREADY indicator isilluminated before you movethe mouthpiece or expose it toair currents.3. After the green READYindicator has illuminated, placethe tapered end of themouthpiece between the testsubjects’s front teeth with thelips creating a seal to ensurethat all inspired <strong>and</strong> expired airflows through the mouthpiece.4. Have the test subject performthe following sequence ofbreathing:SPIROMETERäWAITREADYPS-2152IndicatorLights• Breathe quietly for about four breaths.• Perform a forced inspiration followed immediatelyby a maximum-effort forced expiration.*• Breath quietly for two breaths.*When performing the forcedinspiration <strong>and</strong> expiration, thesubject should try to fill his orher lungs to maximum capacity,then exhale as fast <strong>and</strong>completely as possible.5. Stop data collection.®3
<strong>Spirometer</strong>Data CollectionProcedure NotesObserving the following conditions will allow you to collect consistent <strong>and</strong>accurate data.• You may need to run the test a few times in order to get satisfactorydata.• The subject should sit up or st<strong>and</strong> comfortably.• Talk the subject through each inspiration <strong>and</strong> expiration (this willprevent the subject from being distracted by counting breathes orremembering the sequence.)• Do not allow the test subject to see the data as it is collected.• Use a nose clip, or have the subject pinch his or her nose during thetest.• Place the mouthpiece <strong>and</strong> h<strong>and</strong>le on a table before you start datacollection. Do not pick it up until the red WAIT indicator has stoppedblinking <strong>and</strong> the green READY indicator is illuminated. While theWAIT indicator is blinking, the sensor is measuring the ambientpressure in order to establish a baseline reading. It is important not toexpose the sensor to any pressure change or airflow during the waitperiod.• The electronics enclosure contains a high-resolution differentialpressure sensing element that is sensitive to orientation. The orientationwith respect to vertical or horizontal is not important, but it mustremain constant during the wait period <strong>and</strong> data collecting.• Single-use mouthpieces are intended for a single test occasion, whichmay include several tests with the same individual. However, with eachtest, liquid <strong>and</strong> particles can accumulate on the screen of themouthpiece, which increase the resistance to air flow, leading tounrealistically high readings of Flow Rate <strong>and</strong> Total Volume insubsequent tests. Replace the mouthpiece if you observe evidence ofscreen contamination. For the most accurate results, use a newmouthpiece for every test.4 ®
Model No. PS-2152 Interpretation of PFT DataInterpretation of PFT DataTotal Flow vs. TimeERVTVFEV 1.0VCICIRV1 sec.Total Flow is the net volume of air that flows out from the lungs throughthe <strong>Spirometer</strong>, equal to the total expired volume minus the total inspiredvolume. View the graph of Total Flow vs. Time. Four specific lungvolumes <strong>and</strong> two lung capacities can be interpreted from this graph.*Tidal Volume (TV) is the volume of one breath, or the amount of airmoved into <strong>and</strong> out of the lungs during quiet breathing (breathing withouteffort).Expiratory Reserve Volume (ERV) is the amount of air moved out of thelungs during a forced expiration, beyond the level of tidal expiration.Inspiratory Reserve Volume (IRV) is the amount of air moved into thelungs during a forced inspiration, beyond the level of tidal inspiration.Forced Expiratory Volume in One Second (FEV 1.0) is the volume of airmoved out of the lungs in the first second of a forceful expiration followinga maximal inspiration.Inspiratory Capacity (IC) is the maximum amount of air that can beinspired after a normal expiration (IC = TV + IRV).Vital Capacity (VC) is the maximum movable amount of air contained bythe lungs (VC = TV + IRV + ERV).FEV 1.0% = FEV 1.0÷ VC × 100% is a common comparison of FEV 1.0to VC.®*To measure thesequantities from thegraph in DataStudio,click the Smart Toolbutton:If you are viewingthe data on theXplorer GLX(without acomputer), selectSmart Tool or DeltaTool from the Toolsmenu.5
<strong>Spirometer</strong>Interpretation of PFT DataLung Volume vs. Time1 sec.ICIRVFEV 1.0VCTLCTVERVFRCRVLung Volume is the constantly-changing amount of air in the lungs. Aspirometer can measure how it changes, but cannot directly measure itsabsolute value. Lung volume can be calculated if one of two specificabsolute volumes, residual volume (RV) or functional residual capacity(FRC), is known or estimated.Residual volume (RV) is the amount of air remaining in the lungs at theend of a forced expiration. A typical RV is 1.2 L.Functional Residual Capacity (FRC) is the amount of air left in the lungsafter a normal expiration (FRC = RV + ERV). A typical FRC is 2.5 liters.The formula for Lung Volume is:Lung Volume = V 0- TotalFlowV 0is the lung volume when the subject first starts to breath through the<strong>Spirometer</strong>. Set V 0equal to the subject's FRC, or 2.5 L. Once you haveacquired data, you may need to adjust V 0 so that the graph reflects thesubject's known or estimated FRC or RV.**See DataStudioOnline Help, or theXplorer GLX manualfor instructions onentering <strong>and</strong>graphing thiscalculation.6 ®
Model No. PS-2152 Factors That May Affect ResultsFactors That May Affect ResultsIn your graphs of Total Flow <strong>and</strong> Lung Volume, you may notice a slowdrift or slight fluctuation in the baseline. These can be eliminated, in mostcases, as described below. Note that slow baseline changes usually do notsignificantly affect the measurements of volumes <strong>and</strong> capacities that youtake from the graphs.• Air pressure changes in the environment during the measurementperiod can influence the sensor readings. Sources of such pressurechanges include doors opening or closing, heating/cooling/ventilationsystems starting or stopping, <strong>and</strong> air movement within the testing room.In most cases environmental pressure variation is tolerably low overthe typical 30-second test period.• The sensor calculates Total Flow by integrating the measured FlowRate over time. Because of this time integration, a very small offset inthe Flow Rate measurement may result in a noticeable upward ordownward trend in the baseline of the Total Flow (or Lung Volume)data. This trend usually does not have a significant effect on the volume<strong>and</strong> capacity measurements taken from the graph, since eachmeasurement is made between two data points recorded within a fewseconds. In DataStudio you can eliminate the trend with thiscalculation:Total Flow = integral((1 - inrange(0, .03, abs(smooth(10, R)))) * R)Define R as the Flow Rate. Use the calculated data in place of the datadirectly from the sensor. If the trend is still apparent, increase the “.03”parameter so that it is slightly larger than Flow Rate offset.TroubleshootingProblemDrift or fluctuationin the baseline ofTotal Flow or LungVolumeLarge shift inbaseline of TotalFlow or LungVolume after forcedexpirationUnrealistically highTotal Flow or FlowRate readingsSolutionsSlow drift (less than 0.3 L in 30 s) is insignificant <strong>and</strong> can be ignored.Protect the mouthpiece from movement, air currents <strong>and</strong> pressurechanges while the WAIT indicator is blinking.Do not move the electronics enclosure during the entire test.Use the calculation described above.Use a nose clip or have the subject pinch his or her nose to preventairflow through the nose.Ensure a good seal of the subject's lips around the mouthpiece.Replace the mouthpiece with an unused one.Protect the mouthpiece from movement, air currents <strong>and</strong> pressurechanges while the WAIT indicator is blinking.Replace the mouthpiece with an unused one.®7
Model No. PS-2152<strong>Spirometer</strong>SpecificationsTechnical SupportThe spirometer is an educational instrument.It is not designed, tested, or intended formedical use.SafetyTotal FlowDefaultSampling RateFlexible AirLinesRead the instructions before using thisproduct. Students should be supervisedby their instructors. When using thisproduct, follow the instructions in thismanual <strong>and</strong> all local safety guidelinesthat apply to you.Do not share mouthpieces.5% accuracy whenused as describedabove50 Hz90 cmIn medical settings, pulmonary functiontests are performed under the supervisionof a medical professional. When using aspirometer without medical supervision,use extra caution. A person with amedical condition that may be affectedby a pulmonary function test should notuse the PASCO <strong>Spirometer</strong>. Discontinueuse if the subject encounters breathingdifficulty or discomfort.For assistance with any PASCO product,contact PASCO at:Address: PASCO scientific10101 Foothills Blvd.Roseville, CA 95747-7100Phone: (916) 786-3800(800) 772-8700Fax: (916) 786-3292Web: www.pasco.comEmail: techsupp@pasco.comCopyright NoticeThe PASCO scientific 012-08856A<strong>Spirometer</strong> Instruction <strong>Manual</strong> iscopyrighted with all rights reserved.Permission is granted to non-profiteducational institutions for reproduction ofany part of this manual, providing thereproductions are used only in theirlaboratories <strong>and</strong> classrooms, <strong>and</strong> are not soldfor profit. Reproduction under any othercircumstances, without the written consentof PASCO scientific, is prohibited.Limited WarrantyFor a description of the product warranty,see the PASCO catalog.Authors: Steve Pon, Alec OgstonDataStudio workbooks <strong>and</strong> portions of this manual reviewedby A. Greenwell <strong>and</strong> T. Kjos, Sacramento City College,Biology Department