

yOKOMO B-MAx4 4WD 1/10th Off ROAD - Radio Race Car ...
yOKOMO B-MAx4 4WD 1/10th Off ROAD - Radio Race Car ...
yOKOMO B-MAx4 4WD 1/10th Off ROAD - Radio Race Car ...

You also want an ePaper? Increase the reach of your titles
YUMPU automatically turns print PDFs into web optimized ePapers that Google loves.
Yokomo B-Max4 <strong>4WD</strong> 1/<strong>10th</strong> <strong>Off</strong> Road BuggyBy Keith Robertson22 WWW.RADIORACECAR.COM 03/09
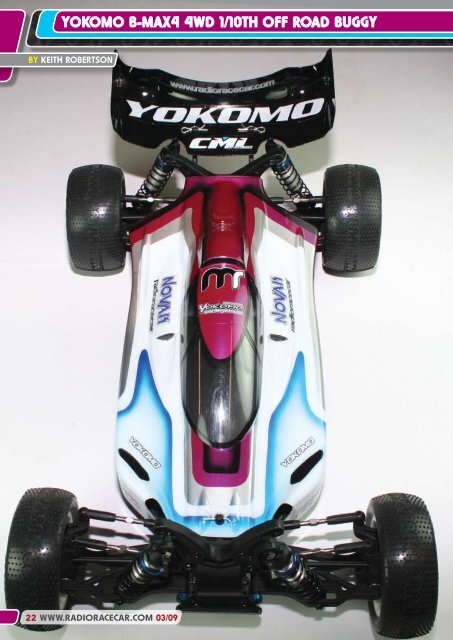
ci featurechampionpackageYokomo B-Max4, Euro ChampYokomo are a well known name in the R/C racing and driftworld, as a company that has achieved success at manylevels, their first World Championship title coming in 1985and now with ten titles in all, many with the legendry MasamiHirosaka at the sticks. They dominated <strong>4WD</strong> off-road in the late ‘80sand ‘90s both in results and numbers of cars, and are now looking toget back to that level with the release of their new car – the B-Max4.The B-Max4 first came to light during the summer. Yokomo’stop European off-road racer Neil Cragg arrived at the EuropeanChampionships in Italy to be met by a team of Yokomo engineersarmed with a totally new car. After trying it in practice Neil feltconfident enough to commit to race with it. And in case you didn’tknow already, he only went and won the championship! A great start,which was followed up by a win at the Japanese Nationals and thenwinning on its first UK appearance at Southport during the BRCAevent held there.The reason the B-Max4 has really captured the attention of bothnational and club racer alike is because its new design bucks thetrend of exotic materials such as carbon fibre and extensive use ofanodised alloy everywhere. Instead it is based around a plastic tubchassis, which, for starters means the cost is a fair bit lower than itspredecessor the BX. The layout has changed too with the B-Max4now a shaft drive car with fitting for saddle pack batteries at the rearand ‘appears’ like most of its competition – but of course we knowlooks are one thing and performance is another.CHOOSE YOUR WEAPONThere are two different versions available, one is the standard kit ofcourse and the other the ‘Champions Package’ which adds an upgradeset of alloy shock absorbers, titanium turnbuckles, an alternative spurgear, anti-roll bar, front alloy wheel hexes and a set of optional kingpins.This to me is a good move by Yokomo and their distributors CML,as it allows those who wish to go racing ‘seriously’ to have what isessentially the same specification kit Neil has used to win with, whilststill giving the cheaper option which will still be more than competitiveand can of course be upgraded at a later date if so wished. I intend touse this car at club, regional and national meetings so RRCi decided togo with the Champions Package kit version for this review.First thing to do as always with a new kit is familiarise yourself withthe instructions and pay attention to the update for the ChampionsPackage if you are building that version. The instructions themselvesare standard fare for this level of kit and easy to follow.The first thing I noticed was that the screws utilise a crossheadrather than the more common hex. I will admit to being concerned bythis to start with, expecting lots of stripped heads and blisters on myhand but thankfully that didn’t happen and my preconceptions provedunfounded as once I got building I forgot I was using crossheads,helped I believe by the mouldings being made to the correct size sowhilst tight, you didn’t need to be ‘The Hulk’ to fit them.The mouldings themselves are good quality and only require aminimal of flash removing and the first part of the build, the mountingof the bulkheads and (ballraced) steering was a doddle.Next came the differentials and what can I say – they took no timeat all to build! Okay so they come pre-built which was a very pleasantsurprise, so I left them alone trusting the Yokomo mechanics whopackaged the car. When fitting the diffs into the gearbox housingsthe instructions give two different ways to shim the drive pinion gear.Take a bit of time and feel how taut the gearbox is to find the correctsetting – remember they WILL bed in after some use. I went with theslightly looser shimming option and after two hard meetings havehad no problems at all.The driveshafts also come pre-built but I decided to take oneapart to have a look, as having one of those fall apart is bad newsand generally just comes down to bad maintenance. Design is fairlystandard and the CV grub screw on all the driveshafts in this kithad been thread locked already, so my concerns that hadn’t beendone proved unfounded, again, but I still needed to check! The restof the transmission builds just fine, but be aware when assemblingthe slipper clutch to make sure the pads are sat square in the spurgear or it will not build straight. This slots into the centre of the carand with the fitting of the long top deck the transmission tunnel iscomplete. If you do need to remove the slipper assembly for anyreason, a gear cover is attached to the top deck that removes withonly four screws allowing quick access.MAKE IT EASY ON YOURSELFWhen it came to the shock towers I did cheat a little; the screwsthat go through the towers to mount the top of the shocks, are 25mm long, and unfortunately they have to be threaded through thetower, so I just took a 3 mm drill bit and cleared the holes so they slidstraight through. Just to save time and it might be worth doing all theholes if you plan on changing the shock positions whilst out. The wingsupport has the option of two mounting holes allowing the wing to beraised or lowered for handling, balancing down force against drag, soI haven’t worked out which yet…The front suspension is quick to build, just pay attention to thedirection of the hub carriers. This is where the optional king-pinscome in, giving the option to raise or lower the steering block inrelation to the wishbone itself. I ran with the hub in the upper positionto mirror the kit set-up and apparently it makes the car more stable.The rear hub/wishbone assembly also goes together with no issues.When fitting the suspension I noticed a fair amount of play allowingthe wishbones to slide forward/backward on the hinge-pin, both atthe front and rear so I quickly and simply shimmed out the gap toperfection. The arms should still fall under their own weight, with nostiction or drag on the hinge pins, but with no fore/aft movement onthe inner hinge pins.The turnbuckles go together well and as with other Yokomo cars,the ball ends have a small hole in them to allow a tool to go throughnegating the need to pop a joint off if you wish to change camber link03/09 WWW.RADIORACECAR.COM 23
Yokomo B-Max4 <strong>4WD</strong> 1/<strong>10th</strong> <strong>Off</strong> Road Buggysettings. Another handy tip is to make sure you put all the turnbuckleson the car the same way round, I always put the left hand threads onthe left side of the car and that way you can remember which wayto turn them to get the desired change without having to look at thethread.Now for the bouncy bits, the shock absorbers. Again, if you havethe Champions Package make sure to check the correct instructionsas they differ in build and set-up. One thing I have always liked aboutthe Yokomo shocks is the bleed hole in the moulded shock top, in myexperience this makes it much easier to build consistent shocks bychasing out the excess oil and any final air bubbles as you tighten thecap down. Perfect time after time.A BRIGHT SPARKThe battery mounting is a piece of intelligent but simple design. Builtto take NiMH batteries, a battery tray slots into the holes on the chassisto give a strong location and then a flexible (but strong!) strap curvesover the top of the cells to be secured by a single body clip. Yokomoeven supply thick strips of foam to fit to the inside and outside of thechassis for a safer/tighter fit. With the increasing popularity of LiPocells, including saddle packs these days, I don’t think it would be toodifficult a job to create a safe fit for these. The chassis pretty muchstops any side float so just a set of posts and flat straps should do it.Fitting the electrics proved to be no great shakes. The servo boltsstraight into the chassis with details given on spacing to make sure thesteering arm operates at the correct angle. For this test I used an INO-LAB D750MG servo, with plenty of speed and torque it was more thanman enough for the job.Like all Yokomo shaft drive touring/drift cars, the motor is fitted toa cam, which then slots into the motor mount and is secured with ascrew down clamp. This is different from other cars I have seen in thisclass which use standard mounting screws with access for the toolthrough the rear suspension, which also requires the cells to be out toallow access. Well, with the B-Max4 you can leave the cells in, loosenthe screws, change the motor/pinion, re-fit and then tighten theclamp again. Additionally there is a plastic cover that will prevent anymuck getting into the centre assembly. Yokomo really have thought ofeverything!Be sure to check the ratio you are after as the cam does not give ahuge amount of movement so you need to be sure the pinion you wishto run will fit, otherwise a spur change may be needed. As I would berunning the B-Max4 indoors with a Novak 4.5 light brushless motor Istuck with the standard 87-tooth spur (rather than the optional 81t)and a 17t pinion. This would be interesting having never run anythingquicker than a 5.5t in a buggy before!Positioning of the receiver and speedo will depend on the equipmentyou have. I fitted a Novak GTB speed controller to manage all thatpower, along with a Spektrum micro receiver, so finding space on thechassis was no problem at all. Even with a larger receiver, a simpleposition swap for the speedo and receiver should make sure there isenough room.As is usual with racing kits, the tyres supplied are designed for USstyle ‘Blue Groove’ clay tracks and as such not really suitable for thesurfaces we use in the UK, but fine for bashing around and setting thecar up initially. The wheels are a new design and come complete withthe ‘Yokomo’ logo moulded into them. The front and rears use thecross pin like most American cars, but this is where the hexes in theChampions Package come into play. Simply remove the pin from theAbove: Turnbuckles andball ends, note accessholes for hex drive soyou never have to popthem off again!Left: Transmission allfitted and ready for thegearboxes to be sealedAbove: Fully ball raced front steering assembly,robust and accurateBelow: Centre assembly showing slipper adjuster ringon left-hand side24 WWW.RADIORACECAR.COM 03/09
ci featureAbove: Easy access port for slipper clutch adjustmentAbove: Fuel tank is 125 cc, engineis .21 so all BRCA legal but for theexhaust silencerLeft: 15 mm big bore shocks asstandard keep wheels firmly on track.Camber needed setting for better trackperformanceAbove: Battery mounting is a breeze,with foam pads supplied for a great fitAbove: The Yokomo B-Max4 with all the electrics,plenty of room for a tidy brushless installationLeft: Champions Package roll bar fitted,which have tags for easy identification03/09 WWW.RADIORACECAR.COM 25
Yokomo B-Max4 <strong>4WD</strong> 1/<strong>10th</strong> <strong>Off</strong> Road BuggyAbove: Rear suspension hasadjustable wheelbase witha small shim either side ofthe hubAbove: Front suspension follows thecurrent trends in design, circlip free andcaptured hinge pinsAbove: Motor cam makes it easy to changemotors, and alter the meshing once locatedBelow: Sturdyfront – end, withbig bore shocksthat are supersmooth and easy tobuildAbove: The batteries are very snugly heldin thanks to the shaped battery strap andfoam padsAbove: The front hexes fromthe Champions Packageallow the use of mostcurrently available wheelsRight: No under-tray neededwith such a smooth and solidchassisBelow: Completed rear endwith plenty of geometryadjustment options26 WWW.RADIORACECAR.COM 03/09
ci featurefront axles, slide the hex on and refit another pin to allow the use of thehex drive wheels as well.The bodyshell for the B-Max4 has a very modern look to it, whilst stillcarrying a Yokomo family resemblance and is a definite improvementover their more recent shells. The lexan wing is an elaborate shapeand looks great but could prove to be a little thin in use, designed tobe efficient and lightweight rather than crash resistant. The paint jobfollowed the trend of my usual colours set by the Associated 10R5from RRCi a couple of months ago and this time was painted by Markat Stylish Designs (at rather short notice too, thanks Mark). Velcro issupplied for the fitting of shell to chassis, with a body clip at the front ifyou require some extra security.IN AT THE DEEP END – THE RACE TESTWith the shell cut and mounted, a set of Schumacher mini-pins fittedand the batteries charged it was time for the test. A trip to NewburyRC Club one foggy Friday night saw a nice, gentle start for the B-Max4– not! The club has just re-started running buggies and they certainlydo a fine job building their tracks. Mostly carpet with some woodedsections, a big ‘kicker’ jump and a fair few other smaller jumps it wouldcertainly be a test!I had checked the diffs before the car hit the track and found them tomy liking. If you do wish to change their tension, just fix a 2 mm Allenkey into the drive cup and turn the other wheel. After a quick practicethe slipper was a little loose and fortunately adjusting this is also rathereasy; a small access port on top of the centre point pivots to allowaccess for the same 2 mm Allen key which you sit into one of the slippernut slots so that it locks, then just rotate the rear wheels the correctway (in this case forward to tighten) until the correct setting is reached.This had the B-Max4 all ready to go for the first round. Fine tuning diffsand slippers is what makes all the difference between a perfect run tosuit track conditions and having to drive around a less than perfect setup, being able to adjust both crucial settings so quickly and easily isdefinitely one of the B-Max4’s best design features. There are not manycars you can fine tune as you walk to the grid!The first round was all about learning the car, and trying hard not tocrash so I had at least one clean run under my belt and no maintenanceto do afterwards. It was well behaved and instilled me with confidence,handling was pleasingly neutral. The second run saw me push a littleharder, resulting in a couple of hard tumbles as I pushed the limit andfound the boundary between fast and failure more than once, butnothing was broken much to my surprise. A quick look over the car afterthe run showed a slight bend in a shock mount screw but after what ithad been through that was excellent, the plastic parts didn’t even lookmarked!For the third run I tightened the slipper a little more to give the car abit more stick. This time brain fade didn’t kick in and I put in a quick runwith no crashes (although I rarely got near full throttle with the 4.5tmotor…)For the final run I took to experimenting with different throttlepercentages for the track features and found the B-Max4 to beresponsive and quick, yet still safe to drive. If I wanted to lose the backend on the more slippery parts I could, but it would be a progressiveslide. The car responded well to throttle changes in flight and if anythinginstilled me with even more confidence. The net result being a TQ andwin on its first outing! Score!There were other B-Max4’s at the meeting and the drivers were alsopraising the stability and the fact they had put the car through somecrashes they weren’t expecting to come out the other side of unscathed– but they did.When it first surfaced I think it’s fair to say the racers were a littlesceptical, thinking ‘It’s plastic so that will be a great club car, but notfor proper racing’. Now admittedly Neil Cragg can drive anything fastbut now people have seen the car in the hands of a mere mortal, ithas changed their perception. They can now see how it can be a greatclub car AND compete at World level. In my experience rarely does thepublic change their mind on a car, but here it seems they have and aremore than happy to embrace the car. This truly speaks volumes aboutthe quality and value of the Yokomo B-Max4. RRCiQUICK SPECClass: <strong>4WD</strong> 1/<strong>10th</strong> <strong>Off</strong> Road BuggyType: Self-assembly chassis kitManufacturer: YokomoPrice: B–Max4 Buggy Kit £174.99 RRPB–Max4-CP (incl Champ Pack)£249.99 RRPREQUIRED TO COMPLETEESC: Novak GTBMotor: Novak 4.5 LightBattery: 4600 mAh NiMHCharger: Eagle Racing CDC V6B<strong>Radio</strong>: KO SpektrumServo: INO-LAB D750MGPaint: ‘Stylish Designs’DislikesPhilips head fastenersLikesPricePerformanceReliabilityFactory pedigreeEuro Champ qualityCONTACTCML DistributionTel: 01527 575349or visit: www.cmldistribution.co.ukAbove: Neil Crag in his familiar colours, took the B-max4to the Euro Championship title on its maiden voyage03/09 WWW.RADIORACECAR.COM 27


