Christmas Stockings - Priscilla's Crochet
Christmas Stockings - Priscilla's Crochet
Christmas Stockings - Priscilla's Crochet
- No tags were found...

Create successful ePaper yourself
Turn your PDF publications into a flip-book with our unique Google optimized e-Paper software.
CHAPTER 1<strong>Christmas</strong><strong>Stockings</strong>
CHRISTMAS STOCKINGS SECTION 1Baby Boy’s First <strong>Christmas</strong>StockingThis stocking doesn't necessarily have to be used for baby'sfirst <strong>Christmas</strong>...done in Victorian <strong>Christmas</strong> colors insteadof pastels, it makes a nice stocking for anyone!Materials:Worsted weight acrylic yarn: about 4-5 ounces color A(mint, or the color of your choice), about 1 ounce color B (softwhite or the color of your choice)<strong>Crochet</strong> Hook size IOptional: About 2 yards of 1/2” satin ribbonFinished size: About 17” long x 7 1/2 across the topBABY BOY’S FIRST CHRISTMAS STOCKINGDesigned by Priscilla HewittCopyright © 2000 Priscilla’s <strong>Crochet</strong>HeelThis stocking is worked vertically from heel to toe. Make 2 ofthese pieces Starting at the heel with color A, ch 10.Row 1: Sc in the 2nd ch from hook, (ch 1, skip next ch, sc inthe next ch) 4 times, ch 30, turn. (5 sc)Row 2: Sc in the 2nd ch from hook, (ch 1, skip next ch, sc inthe next ch) 14 times, (ch 1, sc in the next ch-1 sp) 4 times, ch1, sc in the last sc; ch 1, turn. (20 sc)2
Row 3: Sc in the first sc, (ch 1, sc in the next ch-1 sp) 19times, sc in the last sc; ch 1, turn. (21 sc)Row 4: Sc in the first sc, (ch 1, sc in the next ch-1 sp) 19times, ch 1, sc in the last sc; ch 1, turn. (21 sc)Row 5: Sc in the first sc, (ch 1, sc in the next ch-1 sp) 20times, sc in the last sc; ch 1, turn. (22 sc)Row 6: Sc in the first sc, (ch 1, sc in the next ch-1 sp) 20times, ch 1, sc in the last sc; ch 1, turn. (22 sc)Row 7: Sc in the first sc, (ch 1, sc in the next ch-1 sp) 21 times,sc in the last sc; ch 1, turn. (23 sc)Row 8: Sc in the first sc, (ch 1, sc in the next ch-1 sp) 21times, ch 1, sc in the last sc; ch 1, turn. (23 sc)Row 9: Sc in the first sc, (ch 1, sc in the next ch-1 sp) 22times, sc in the last sc; ch 1, turn. (24 sc)Row 10: Sc in the first sc, (ch 1, sc in the next ch-1 sp) 22times, ch 1, sc in the last sc; ch 1, turn. (24 sc)Row 11: Sc in the first sc, (ch 1, sc in the next ch-1 sp) 23times, sc in the last sc; ch 1, turn. (25 sc)Row 12: Sc in the first sc, (ch 1, sc in the next ch-1 sp) 23times, ch 1, sc in the last sc; ch 1, turn. (25 sc)Row 13: Sc in the first sc, (ch 1, sc in the next ch-1 sp) 24times, sc in the last sc; ch 1, turn. (26 sc)Row 14: Sc in the first sc, (ch 1, sc in the next ch-1 sp) 24times, ch 1, sc in the last sc; ch 1, turn. (26 sc)Row 15: Sc in the first sc, (ch 1, sc in the next ch-1 sp) 25times, sc in the last sc; ch 1, turn. (27 sc)Row 16: Sc in the first sc, (ch 1, sc in the next ch-1 sp) 25times, ch 1, sc in the last sc; ch 1, turn. (27 sc)Row 17: Sc in the first sc, (ch 1, sc in the next ch-1 sp) 26times, sc in the last sc; ch 1, turn. (28 sc)Row 18: Sc in the first sc, (ch 1, sc in the next ch-1 sp) 26times, ch 1, sc in the last sc; ch 1, turn. (28 sc)Row 19: Sc in the first sc, (ch 1, sc in the next ch-1 sp) 27times, sc in the last sc; ch 1, turn. (29 sc)Row 20: Sc in the first sc, (ch 1, sc in the next ch-1 sp) 27times, ch 1, sc in the last sc; ch 1, turn. (29 sc)Row 21: Sc in the first sc, (ch 1, sc in the next ch-1 sp) 28times, sc in the last sc; ch 1, turn. (30 sc)3
Row 22: Sc in the first sc, (ch 1, sc in the next ch-1 sp) 28times, ch 1, sc in the last sc; ch 1, turn. (30 sc)FootRow 23: Sc in the first sc, sc in the next ch-1 sp, (ch 1, sc inthe next ch 1 sp) 9 times, ch 1, insert hook into the next ch-1 spand pull up a loop, insert hook into next sc and pull up a loop,yo and pull through all 3 remaining loops on the hook to decrease;ch 1, turn. (12 sc, counting the decrease as 1 sc)Row 24: Insert hook in the first sc dec and pull up a loop, inserthook in the next ch-1 sp and pull up a loop, yo and pullthrough all 3 remaining loops on the hook to decrease, (ch 1,sc in the next ch-1 sp) 9 times, ch 1, sc in the last sc; ch 1, turn.(11 sc, counting the decrease as 1 sc)Row 25: Sc in the first sc, sc in the next ch-1 sp, (ch 1, sc inthe next ch 1 sp) 8 times, ch 1, insert hook into the next ch-1sp and pull up a loop, insert hook into next sc dec and pull upa loop, yo and pull through all 3 remaining loops on the hookto decrease; ch 1, turn. (11 sc, counting the decrease as 1 sc)Row 26: Insert hook in the first sc dec and pull up a loop, inserthook in the next ch-1 sp and pull up a loop, yo and pullthrough all 3 remaining loops on the hook to decrease, (ch 1,sc in the next ch-1 sp) 8 times, ch 1, sc in the last sc; ch 1, turn.(10 sc, counting the decrease as 1 sc)Row 27: Sc in the first sc, sc in the next ch-1 sp, (ch 1, sc inthe next ch 1 sp) 7 times, ch 1, insert hook into the next ch-1 spand pull up a loop, insert hook into next sc dec and pull up aloop, yo and pull through all 3 remaining loops on the hook todecrease; ch 1, turn. (10 sc, counting the decrease as 1 sc)Row 28: Insert hook in the first sc dec and pull up a loop, inserthook in the next ch-1 sp and pull up a loop, yo and pullthrough all 3 remaining loops on the hook to decrease, (ch 1,sc in the next ch-1 sp) 7 times, ch 1, sc in the last sc; ch 1, turn.(9 sc, counting the decrease as 1 sc)Row 29: Insert hook in the first sc and pull up a loop, inserthook in the next ch-1 sp and pull up a loop, yo and pullthrough all 3 remaining loops on the hook to decrease, (ch 1,sc in the next ch-1 sp) 6 times, insert hook into the next ch-1sp and pull up a loop, insert hook into next sc dec and pull upa loop, yo and pull through all 3 remaining loops on the hookto decrease; ch 1, turn. (8 sc, counting each decrease as 1 sc)Row 30: Insert hook in the first sc dec and pull up a loop, inserthook in the next ch-1 sp and pull up a loop, yo and pullthrough all 3 remaining loops on the hook to decrease, (ch 1,sc in the next ch-1 sp) 5 times, insert hook into the next ch-1sp and pull up a loop, insert hook into next sc dec and pull upa loop, yo and pull through all 3 remaining loops on the hookto decrease; ch 1, turn. (7 sc, counting each decrease as 1 sc)4
Row 31: Insert hook in the first sc dec and pull up a loop, inserthook in the next ch-1 sp and pull up a loop, yo and pullthrough all 3 remaining loops on the hook to decrease, (ch 1,sc in the next ch-1 sp) 4 times, insert hook into the next ch-1sp and pull up a loop, insert hook into next sc dec and pull upa loop, yo and pull through all 3 remaining loops on the hookto decrease; ch 1, turn. (6 sc, counting each decrease as 1 sc)Row 32: Insert hook in the first sc dec and pull up a loop, inserthook in the next ch-1 sp and pull up a loop, yo and pullthrough all 3 remaining loops on the hook to decrease, (ch 1,sc in the next ch-1 sp) 3 times, insert hook into the next ch-1sp and pull up a loop, insert hook into next sc dec and pull upa loop, yo and pull through all 3 remaining loops on the hookto decrease; ch 1, turn. (5 sc, counting each decrease as 1 sc)Row 33: Insert hook in the first sc dec and pull up a loop, inserthook in the next ch-1 sp and pull up a loop, yo and pullthrough all 3 remaining loops on the hook to decrease, (ch 1,sc in the next ch-1 sp) 2 times, insert hook into the next ch-1sp and pull up a loop, insert hook into next sc dec and pull upa loop, yo and pull through all 3 remaining loops on the hookto decrease; ch 1, turn. (4 sc, counting each decrease as 1 sc)Fasten off.Finishing: Lay one piece of the stocking over the other. Startingon the toe side of the stocking sc together through boththicknesses, leaving the top of the stocking open and ending atthe heel side of the stocking.Hanging loop and edging: Ch 15; join with a sl st in the15th ch from hook, work 44 sc around the top opening of thestocking, then sl st in each of the 15 ch’s of the hanging loop;join with a sl st to the first sc. Fasten off.CuffRound 1: With outside of stocking facing you, attach color Bwith a sc in the first sc of the top edging, sc in each of the next43 sc; join with a sl st to the first sc; ch 1, turn. (44 sc)Round 2: Sc in the back loop only of each sc around; joinwith a sl st to the first sc; ch 1, turn. (44 sc)Round 3: Sc in the same st as joining, trc in the next sc, (scin the next sc, trc in the next sc) 21 times; join with a sl st tothe first sc; ch 4, turn. (44 sts)Round 4: (The ch 4 at the end of row 3 counts as the first dcand the first ch 1) (Skip the next trc, sc in the next sc) 21times; join with a sl st in the 3rd ch of the beginning ch 4. (22dc)Round 5: Ch 1, sc in the same st as joining, sc in the next ch-1sp, (sc in the next dc, sc in the next ch-1 sp) 21 times; join witha sl st to the first sc. (44 sc)5
Rounds 6-11: Ch 1, sc in the same st as joining, sc in each remainingsc around; join with a sl st to the first sc. (44 sc) Ch 1,turn at the end of round 11.Round 12: Sc in the same st as joining, trc in the next sc, (scin the next sc, trc in the next sc) 21 times; join with a sl st tothe first sc; ch 1, turn. (44 sts)Round 13: Sc in the same st as joining, ch 3, skip next trc (scin the next trc, ch 3, skip next trc) 21 times; join with a sl st tothe first sc. (22 sc) Fasten off.Cuff edging: Attach color B with a sc in the first unworkedfront loop of round 2; sc in each remaining unworked frontloop around; join with a sl st to the first sc. (44 sc) Fasten off.Weave in ends.Finishing: If desired, weave ribbon through round 4 and tiea bow just below the hanging loop.Happy <strong>Crochet</strong>ing!6
CHRISTMAS STOCKINGS SECTION 2Baby Girl’s First <strong>Christmas</strong>This stocking doesn't necessarily have to be used for baby'sfirst <strong>Christmas</strong>...done in Victorian <strong>Christmas</strong> colors insteadof pastels, it makes a nice stocking for anyone!Materials:About 4-5 ounces pink worsted weight acrylic yarn (or thecolor of your choice) for stockingAbout 1 ounce of white worsted weight acrylic yarn (or thecolor of your choice) for stocking cuff<strong>Crochet</strong> hook size JAbout 2 yards of 5/8” satin ribbon (optional)Finished size: About 17” long x 7 1/2” across topBABY GIRL'S FIRST CHRISTMAS STOCKINGDesigned by Priscilla HewittCopyright © 2000 Priscilla’s <strong>Crochet</strong>This stocking is worked vertically from heel to toe. Make 2 ofthese pieces. Starting at the heel, ch 8.Row 1: Sc in the 2nd ch from hook (dc in the next ch, sc inthe next ch) 3 times; ch 24, turn. (7 sts)Row 2: Sc in the 2nd ch from hook (dc in the next ch, sc inthe next ch) 11 times, (dc in the next sc, sc in the next dc) 3times, (dc, sc) in the last sc; ch 1, turn. (31 sts)7
Row 3: (Sc, dc) in the first sc, (sc in the next dc, dc in thenext sc) across; ch 1, turn. (32 sts)Row 4: Sc in the first dc, (dc in the next sc, sc in the next dc)across to within the last sc, (dc, sc) in the last sc. (33 sts)Rows 5-16: (Repeat rows 3-4) 6 times. You should have 45stitches at the end of row 16.Row 17: Hdc in the first sc, (sc in the next dc, dc in the nextsc) 8 times, sc dec over the next 2 sts; ch 1, turn. (18 sts countingthe sc dec as one st)Row 18: Sc dec over the first 2 sts, (dc in the next sc, sc in thenext dc) 7 times, dc in the next sc, sc in the next hdc; ch 1,turn. (17 sts counting the sc dec as one st)Row 19: Hdc in the first sc, (sc in the next dc, dc in the nextsc) 7 times, sc dec over the next 2 sts; ch 1, turn. (16 sts countingthe sc dec as one st)Row 20: Sc dec over the first 2 sts, (dc in the next sc, sc inthe next dc) 6 times, dc in the next sc, sc in the next hdc; ch 1,turn. (15 sts counting the sc dec as one st)Row 21: Sc dec over the first 2 sts, (dc in the next sc, sc in thenext dc) 5 times, dc in the next sc, sc dec over the next 2 sts.(13 sts counting each sc dec as one st)Row 22: Sc dec over the first 2 sts, (dc in the next sc, sc in thenext dc) 4 times, dc in the next sc, sc dec over the next 2 sts.(11 sts counting each sc dec as one st)Row 23: Sc dec over the first 2 sts, (dc in the next sc, sc in thenext dc) 3 times, dc in the next sc, sc dec over the next 2 sts. (9sts counting each sc dec as one st)Row 24: Sc dec over the first 2 sts, (dc in the next sc, sc in thenext dc) 2 times, dc in the next sc, sc dec over the next 2 sts. (7sts counting each sc dec as one st)Row 25: Sc dec over the first 2 sts, dc in the next sc, sc in thenext dc, dc in the next sc, sc dec over the next 2 sts. (5 stscounting each sc dec as one st)Finishing: Lay one piece of the stocking over the other. Startingon the toe side of the stocking (sl st, ch 1) together throughboth thicknesses, leaving the top of the stocking open and endingat the heel side of the stocking.Hanging loop and edging: Ch 12; join with a sl st in the12th ch from hook, work 36 sc around the top opening of thestocking, then sl st in each of the 12 ch’s of the hanging loop;join with a sl st to the first sc. Fasten off.Round 1: With outside of stocking facing you, attach whiteyarn with a sc in the first sc of the top edging, sc in each of the8
next 35 sc; join with a sl st to the front loop only of the first sc;ch 1, turn. (36 sc)Round 2: Sc in the front loop only of each sc around; joinwith a sl st to the first sc; do not turn. (36 sc)Round 3: Ch 4 to count as the first trc, trc in the next sc andin each remaining sc around; join with a sl st to the top of thebeginning ch 4. (36 trc)Rounds 4-8: Ch 1, sc in the same st as joining and in each remainingst around; join with a sl st to the first sc. (36 sc)Round 9: Ch 1, sc in the same st as joining, skip next 2 sc, 5dc shell in the next sc, skip next 2 sc, (sc in the next sc, skipnext 2 sc, 5 dc shell in the next sc, skip next 2 sc) 5 times; joinwith a sl st in the first sc. (6 shells)Round 10: *(Sl st in the next dc, ch 2, sl st in the same dc) 5times, sl st in the next sc* repeat from * to * 4 times, (sl st inthe next dc, ch 2, sl st in the same dc) 5 times; join with a sl stin the joining sl st. Fasten off.Cuff edging: Attach white with a sl st in the first unworkedfront loop of round 2, ch 1, (sl st, ch 1) in each remaining unworkedfront loop around; join with a sl st to the first sl st. Fastenoff. Weave in ends.Finishing: If desired, weave ribbon through round 3 and tiea bow just below the hanging loop.Happy <strong>Crochet</strong>ing!9
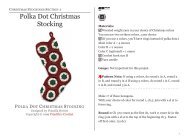
CHRISTMAS STOCKINGS SECTION 3Polka Dot <strong>Christmas</strong>StockingMaterials:Worsted weight yarn in your choice of <strong>Christmas</strong> colorsYou can use two or three colors...your choice(If you use 2 colors, you'll have rings instead of polka dots.)Main color A = 4 ouncesColor B = 2 ouncesColor C (optional) = 1 ounce<strong>Crochet</strong> hook size HYarn needleGauge: Not important for this project.Pattern Note: If using 2 colors, do round 1 in A, round 2in B, and round 3 in A If using 3 colors, do round 1 in C, round2 in B, and round 3 in A.POLKA DOT CHRISTMAS STOCKINGDesigned by Priscilla HewittCopyright © 1999 Priscilla’s <strong>Crochet</strong>Make 17 of these hexagons.With your choice of color for round 1, ch 5; join with a sl st toform ring.Round 1: Ch 3 to count as the first dc, work 11 more dc in thering; join with a sl st to the top of the beginning ch 3. Fastenoff first color. (12 dc)10
Round 2: Attach round 2 color with a sl st in any dc; ch 3 tocount as the first dc, (3 dc in the next dc, dc in the next dc) 5times, 3 dc in the last dc; join with a sl st to the top of the beginningch 3. Fasten off. (24 dc)Round 3: Attach color A with a sl st to the middle dc of any 3dc group; ch 3 to count as the first dc, work 2 more dc in thesame st, (dc in each of the next 3 dc, 3 dc in the next dc) 5times, dc in each of the last 3 dc; join with a sl st to the top ofthe beginning ch 3. (36 dc) Fasten off. Weave in ends.Assembly: With color A sc, sl st or sew the hexagons togetherfollowing the picture. (Sides of each hexagon are fromthe center dc of a 3 dc group to the next center dc of a 3 dcgroup.) I sc'ed mine together just to make it a little easier tosee where the hexagons are joined. Also, I found it easier to assembleif you start at the top.11
Finishing: With color A sc evenly around the top of thestocking, starting at the heel side, then chain 18 for hangingloop. Join with a sl st to the first ch, then work a sl st in eachch around; join with a sl st to the first sc. Fasten off. Weave inends.12
Happy <strong>Crochet</strong>ing!13
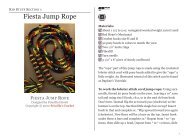
CHRISTMAS STOCKINGS SECTION 4Quick ‘n Easy <strong>Christmas</strong>StockingThis basic stocking takes just a little over an hour to crochetand assemble. Options for decorating the stocking are givenfollowing the pattern.QUICK 'N EASY CHRISTMAS STOCKINGDesigned by Priscilla HewittCopyright © 1999 Priscilla’s <strong>Crochet</strong>Materials:You can get different looks for the basic stocking using differentyarns.*My favorite* for a “crushed velvet” look: 1 1/2 skeins of LionBrand Chenille “Thick & Quick”For a homespun look: 1 1/2 skeins Lion Brand Wool-Ease"Thick & Quick"For a feminine, “boucle” look: 1 1/2 skeins Lion Brand TerrySpunAlternate yarn: 2 or 3 strands of worsted weight yarn held togetherBoye crochet hook size N (9.00 mm), or size needed toachieve gaugeGauge: 6 stitches = 3 1/2”; 4 rows = 2” (using Chenille Quick& Thick) (Gauge note: Be sure to check gauge. It’s OK for yourwork to be a little bigger than gauge, but if your work is measuringsmaller than gauge the stocking will be too narrow.)14
Finished size: About 19” from toe to top; about 8” across thetop using Chenille Quick & Thick. Size may vary with differentyarns.To work sc dec (single crochet decrease): Insert hookinto the indicated stitch, yo, pull loop through. Keeping these2 loops on the hook, insert the hook in the next stitch, yo, pullloop through; YO and draw through the 3 loops on the hookleaving 1 loop on the hook.Basic Stocking PatternStocking is worked vertically, beginning at the heel and endingat the toe.Make 2.Ch 6.Row 1: 2 sc in the 2nd ch from hook, sc in each of the next 4chs; ch 20, turnRow 2: Sc in the 2nd ch from hook and in each of the next 18chs, sc in the next 5 sc, 2 sc in the last sc, ch 1, turn. (26 sc)Row 3: 2 sc in the first sc, sc in the next 25 sc; ch 1, turn. (27sc) Row 4: Sc in 26 sc, 2 sc in the last sc; ch 1, turn. (28 sc)Row 5: 2 sc in the first sc, sc in the next 27 sc; ch 1, turn. (29sc)Row 6: Sc in 28 sc, 2 sc in the last sc; ch 1, turn. (30 sc)Row 7: 2 sc in the first sc, sc in the next 29 sc; ch 1, turn. (31sc)Row 8: Sc in 30 sc, 2 sc in the last sc; ch 1, turn. (32 sc)Row 9: 2 sc in the first sc, sc in the next 31 sc; ch 1, turn. (33sc)Row 10: Sc in 32 sc, 2 sc in the last sc; ch 1, turn. (34 sc)Row 11: 2 sc in the first sc, sc in the next 33 sc; ch 1, turn. (35sc)Row12: Sc in 34 sc, 2 sc in the last sc; ch 1, turn. (36 sc)Row 13: 2 sc in the first sc, sc in the next 35 sc; ch 1, turn. (37sc)Row 14: Sc in 36 sc, 2 sc in the last sc; ch 1, turn. (38 sc)Row 15: Sc in 14 sc, sc dec over the next 2 sc; ch 1, turn. (15sc)15
Row 16: Sc dec over the first 2 sts, sc in the next 13 sc; ch 1,turn. (14 sc)Happy <strong>Crochet</strong>ing!Row 17: Sc dec over the first 2 sts, sc in the next 10 sc, sc decover the last 2 sts; ch 1, turn. (12 sc)Row 18: Sc dec over the first 2 sts, sc in the next 8 sc, sc decover the last2 sts; ch 1, turn. (10 sc)Row 19: Sc dec over the first 2 sts, sc in the next 6 sc, sc decover the last2 sts; ch 1, turn. (8 sc)Row 20: Sc dec over the first 2 sts, sc in the next 4 sc, sc decover the last2 sts; ch 1, turn. (6 sc)Row 21: Sc dec over the first 2 sts, sc in the next 2 sc, sc decover the last 2 sts; ch 1, turn. (4 sc) Fasten off. Weave in endsAssemblyPlace one piece over the other piece, and line-up stitchesevenly. With the toe pointing in the direction you prefer, scthrough both pieces around the stocking, starting at the top ofthe toe side, and finishing at the top of the heel side, then ch10, join with a sl st to the first ch, sl st in the next 9 chs; joinwith a sl st to the last sc; continue working 28 sc evenlyaround the top opening of the stocking; join with a sl st to thefirst sc. Fasten off. Weave in ends. You can use your stockingas is, or you can decorate it with ribbon, ribbon16