Quick Instructions for Fluke (yellow) Multimeters
Quick Instructions for Fluke (yellow) Multimeters
Quick Instructions for Fluke (yellow) Multimeters
You also want an ePaper? Increase the reach of your titles
YUMPU automatically turns print PDFs into web optimized ePapers that Google loves.
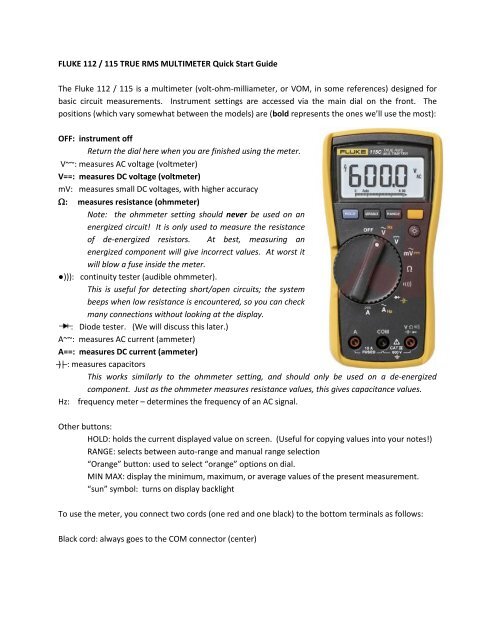
FLUKE 112 / 115 TRUE RMS MULTIMETER <strong>Quick</strong> Start GuideThe <strong>Fluke</strong> 112 / 115 is a multimeter (volt-ohm-milliameter, or VOM, in some references) designed <strong>for</strong>basic circuit measurements. Instrument settings are accessed via the main dial on the front. Thepositions (which vary somewhat between the models) are (bold represents the ones we’ll use the most):OFF: instrument offReturn the dial here when you are finished using the meter.V~~: measures AC voltage (voltmeter)V==: measures DC voltage (voltmeter)mV: measures small DC voltages, with higher accuracyΩ: measures resistance (ohmmeter)Note: the ohmmeter setting should never be used on anenergized circuit! It is only used to measure the resistanceof de-energized resistors. At best, measuring anenergized component will give incorrect values. At worst itwill blow a fuse inside the meter.●))): continuity tester (audible ohmmeter).This is useful <strong>for</strong> detecting short/open circuits; the systembeeps when low resistance is encountered, so you can checkmany connections without looking at the display.: Diode tester. (We will discuss this later.)A~~: measures AC current (ammeter)A==: measures DC current (ammeter)̶)|̶ : measures capacitorsThis works similarly to the ohmmeter setting, and should only be used on a de-energizedcomponent. Just as the ohmmeter measures resistance values, this gives capacitance values.Hz: frequency meter – determines the frequency of an AC signal.Other buttons:HOLD: holds the current displayed value on screen. (Useful <strong>for</strong> copying values into your notes!)RANGE: selects between auto-range and manual range selection“Orange” button: used to select “orange” options on dial.MIN MAX: display the minimum, maximum, or average values of the present measurement.“sun” symbol: turns on display backlightTo use the meter, you connect two cords (one red and one black) to the bottom terminals as follows:Black cord: always goes to the COM connector (center)
When measuring voltage, resistance, diodes, capacitors, resistance or frequency (everything butcurrent!), connect the red cord to the ”V Ω” (etc.) terminal at right. When the red cord is in this positionthe meter should always be connected IN PARALLEL (i.e. across, not in line with) what you are trying tomeasure, and the dial should never be on one of the “A” positions.When measuring current (and current only!) connect the red cord to the “A” terminal at left. When themeter is connected in this fashion, it should be connected IN SERIES (i.e. in line with) what you are tryingto measure, and the dial should be on one of the “A” positions.There are four types of lead tips you can use, depending on preference:“banana plugs” – tubular metal end, good <strong>for</strong> plugging into other devices“probes” – pointy metal ends, good <strong>for</strong> poking around into circuits“alligator clips” – grab on to what you want to measure (probably have very few of these)“hook leads” – a springloaded hook that latches on to what you want. Better than alligator clipsin tight spaces.The LCD display contains in<strong>for</strong>mation about:-what is being measured (volts, amps, ohms, farads, hertz; DC, AC),-range settings being used (auto, or manual and the present range setting),-display settings (Hold, Min, Max, Avg),-instrument settings (e.g. low battery warning), and-a bar graph along the bottom which gives a quicker (but less accurate) readout of measured values.If you want to see every symbol displayed at once, press the “HOLD” button as you switch the meter on.For further in<strong>for</strong>mation, there are a number of manuals on the cart next to the meters.


