Quick Glove RingsâArt. No. 60230 - Ocean Equipment
Quick Glove RingsâArt. No. 60230 - Ocean Equipment
Quick Glove RingsâArt. No. 60230 - Ocean Equipment
- No tags were found...

You also want an ePaper? Increase the reach of your titles
YUMPU automatically turns print PDFs into web optimized ePapers that Google loves.
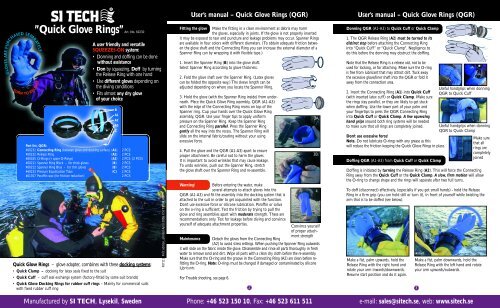
User’s manual – <strong>Quick</strong> <strong>Glove</strong> Rings (QGR)User’s manual – <strong>Quick</strong> <strong>Glove</strong> Rings (QGR)GLOVES ARE PURCHASEDSEPARATELYTURN TO RELEASE”<strong>Quick</strong> <strong>Glove</strong> Rings” Art. <strong>No</strong>. <strong>60230</strong>A user friendly and versatileSQUEEZES-ON system:• Donning and doffing can be donewithout assistance• Don by squeezing. Doff by turningthe Release Ring with one hand• Use different gloves depending onthe diving conditions• Fits almost any dry gloveof your choicePart list, QGR:#60231 Connecting Ring (between glove and docking surface) (A1) 2 PCS#60232 Release Ring (A2) 2 PCS#80185 O-Rings (+ spare O-Rings) (A3) 2 PCS (2 PCS)#60211 Spanner Ring Black – for thick gloves (B) 2 PCS#60212 Spanner Ring Blue – for thin gloves (B) 2 PCS#60233 Pressure Equalization Tube (C) 2 PCS#61357 Paraffin wax (for friction reduction) 2 PCS<strong>Quick</strong> <strong>Glove</strong> Rings – glove adapter, combines with these docking systems:• <strong>Quick</strong> Clamp – docking for latex seals fixed to the suit• <strong>Quick</strong> Cuff – cuff seal exchange system (factory-fitted by some suit brands)• <strong>Quick</strong> <strong>Glove</strong> Docking Rings for rubber cuff rings – Mainly for commercial suitswith fixed rubber cuff ringManufactured by SI TECH, Lysekil, SwedenBA1A2A3C#87111 First edition, printed April 2006 ©SI TECH ABFitting the glove Make the fitting in a clean environment as debris may harmthe gloves, especially in joints. If the glove is not properly insertedit may be exposed to tear and puncture and leakage problems may occur. Spanner Ringsare available in four colors with different diameters. (To obtain adequate friction betweenthe glove shaft and the Connecting Ring you can increase the external diameter of aSpanner Ring can by wrapping it with flexible tape.)1. Insert the Spanner Ring (B) into the glove shaft.Select Spanner Ring according to glove thickness.2. Fold the glove shaft over the Spanner Ring. (Latex glovescan be folded the opposite way.) The sleeve length can beadjusted depending on where you locate the Spanner Ring.3. Hold the glove (with the Spanner Ring inside) from underneath.Place the <strong>Quick</strong> <strong>Glove</strong> Ring assembly, QGR (A1-A3)with the edge of the Connecting Ring recess on top of theSpanner ring. Cup your hands over the <strong>Quick</strong> <strong>Glove</strong> Ringassembly, QGR. Use your finger tips to apply uniformpressure on the Spanner Ring. Keep the Spanner Ringand Connecting Ring parallel. Press the Spanner Ringgently all the way into the recess. The Spanner Ring willslide on the internal fabric/coating without your usingexcessive force.4. Pull the glove and the QGR (A1-A3) apart to ensureproper attachment. Be careful not to harm the gloves.It is important to avoid wrinkles that may cause leakage.To undo wrinkles, push out the Spanner Ring, stretchthe glove shaft over the Spanner Ring and re-assemble.Warning! Before entering the water, makeseveral attempts to attach gloves into theQGR (A1-A3) and fit the assembly into the docking system that isattached to the suit in order to get acquainted with the function.Don’t use excessive force or silicone lubrication. Paraffin or salivaon the o-ring is sufficient. Test the friction by trying to pull theglove and ring assemblies apart with moderate strength. These arerecommendations only. Test for leakage before diving and convinceyourself of adequate attachment properties.MaintenanceDetach the gloves from the Connecting Ring(A2) to avoid stress settings. When pushing the Spanner Ring outwardsit will slide on the fabric inside the glove. Disassemble and rinse all parts thoroughly in freshwater to remove sand and dirt. Wipe all parts with a clean dry cloth before the re-assembly.Make sure that the O-ring and the groove in the Connecting Ring (A2) are clean before refittingthe O-ring. <strong>No</strong>te: O-rings must be changed if damaged or contaminated by siliconelubricants.For Trouble shooting, see page 6.23A.3B.4.Convince yourselfof proper attachmentstrengthPhone: +46 523 150 10, Fax: +46 523 611 511Donning QGR (A1-A3) to <strong>Quick</strong> Cuff or <strong>Quick</strong> Clamp1. The QGR Release Ring (A2) must be turned to itsdistinct stop before attaching the Connecting Ringinto “<strong>Quick</strong> Cuff” or “<strong>Quick</strong> Clamp”. Negligence todo this before the donning may obstruct the doffing.<strong>No</strong>te that the Release Ring is a release aid, not to beused for locking, or for attaching. Make sure the O-ringis free from lubricant that may attract dirt. Tuck awaythe excessive glove/liner shaft into the QGR or fold itaway from the connection area.2. Insert the Connecting Ring (A1) into <strong>Quick</strong> Cuff(with inserted latex cuff) or <strong>Quick</strong> Clamp. Make surethe rings stay parallel, or they are likely to get stuckwhen doffing. Use the lower part of your palm andyour fingertips to press the QGR Connecting Ringinto <strong>Quick</strong> Cuff or <strong>Quick</strong> Clamp. A few squeezinghand grips around both ring systems will be neededto make sure that all rings are completely joined.Don’t use excessive force!<strong>No</strong>te. Do not lubricate O-rings with any grease as thiswill reduce the friction keeping the <strong>Quick</strong> <strong>Glove</strong> Rings in place.Doffing QGR (A1-A3) from <strong>Quick</strong> Cuff or <strong>Quick</strong> ClampDoffing is initiated by turning the Release Ring (A2). This will force the ConnectingRing away from the <strong>Quick</strong> Cuff or the <strong>Quick</strong> Clamp. A slow, firm motion will allowthe O-ring to change shape and the rings will separate after two full turns.To doff (disconnect) effectively, (especially if you got small hands) - hold the ReleaseRing in a firm grip (you can hold still or turn it), in front of yourself while twisting thearm that is to be doffed (see below).LEFTMake a fist, palm upwards, hold theRelease Ring with the right hand androtate your arm inwards/downwards.Resume start position and do it again.RIGHTMake a fist, palm downwards, hold theRelease Ring with the left hand and rotateyour arm upwards/outwards.3Useful handgrips when donningQGR to <strong>Quick</strong> CuffUseful handgrips when donningQGR to <strong>Quick</strong> Clampe-mail: sales@sitech.se, web: www.sitech.seMake surethat allrings arecompletelyjoined
User’s manual – <strong>Quick</strong> Clamp<strong>Quick</strong> <strong>Glove</strong> Rings – Description<strong>Quick</strong> Clamp is the SQUEEZES-ON dockingsystem for SI TECH <strong>Quick</strong> <strong>Glove</strong> RingsClamps instantly over the drysuit latex sealSpanner rings in various colors withdifferent diameters allows adaptationto variations in seal thickness<strong>Quick</strong> Clamp and <strong>Quick</strong> <strong>Glove</strong> Ringsare available in a COMBO SET.D”<strong>Quick</strong> Clamp” Art. <strong>No</strong>. 60930PURCHASEDARE GLOVESSEPARATELYSEPARATELYBAssembly – <strong>Quick</strong> Clamp1. Make sure the seal is clean and free from lubricants. Insertthe Spanner Ring (B) into the latex wrist seal. Place it where itmatches the seal circumference. (The further back the better.)Try to install the Spanner Ring in a straight angle to the centreline of the sleeve. Tapered seals can be tricky as the SpannerRing is likely to slide inside the stretched seal.2. To prevent the Spanner Ring from sliding you can tuck awaythe seal opening into the suit.Fix the seal and Spanner Ring from underneath before placingthe Docking Ring (D) parallel on top of the Spanner Ring.3. Cup the Docking Ring in both hands with the outer edgeresting in your palms. Keep the Spanner Ring parallel to theDocking Ring. Force it a little further in with your fingertips.Rotate the Docking Ring often and repeat. Work segment bysegment.4. The inside of the Docking Ring is tapered, ending with awell defined edge. Try to make the Spanner Ring meet, butnot go beyond the edge. If it can be pushed over the edge, usea larger Spanner Ring or wrap a Spanner Ring with flexible(or duct) tape to increase the diameter.5. Convince yourself of proper fitting and adequate friction bypulling the Docking Ring outwards from the sleeve.1.2A.2B.3A.Description Friction between materials is the key feature of SI TECH’s<strong>Quick</strong> Dry <strong>Glove</strong> System. The glove is fixed in the recess in theQGR Connecting Ring (A1) by means of an inner Spanner Ring (B). The <strong>Quick</strong> <strong>Glove</strong>Rings set (#<strong>60230</strong>) comes with Spanner Rings in two different diameters to provide attachmentregardless of glove material thickness. Any type of dry glove can be used as longas they have at least one smooth external surface which allows watertight sealing. (Thegreen and yellow Spanner Rings from the docking system <strong>Quick</strong> Clamp may also beused to fix the gloves.)The O-ring (A3) seals against (D) the Docking Ring (#60931) of <strong>Quick</strong> Clamp.Use the paraffin zip wax supplied with the QGR set on this surface.(The wax will provide an adequate reduction of the friction.)The O-ring and the Connecting Ring must not be lubricatedwith silicone agent in order to maintain adequatefriction. Keep the O-ring free from debris. If contaminatedThe corresponding parts in theother two docking systems thatalso need to be waxed are:• the Stiff Ring (#60200) of thedocking system <strong>Quick</strong> Cuff• the Cuff Attachment Ring(#60216) of the docking system<strong>Quick</strong> <strong>Glove</strong> Docking Rings forrubber cuff ringswith silicone agent or other lubricant that is difficult to remove, all contact surfaces haveto be cleansed with appropriate solvent and the O-ring has to be replaced.The Connecting Ring has double threads to guide the Release Ring (A2). <strong>No</strong>te that theRelease Ring is used for doffing only and should be turned to its full stop prior to donning.Negligence to do so may obstruct the doffing! When doffing, the Release Ring istwisted until the Connecting Ring separates from the docking system attached to the suit.Useful infoPart list, <strong>Quick</strong> Clamp:#60931 Docking Ring (meets QGR O-ring) (D) 2 PCS#60212 Spanner Ring Blue (B) 2 PCS (for medium to thin seals)#60214 Spanner Ring Yellow (B) 2 PCS (for thick to medium seals)#60219 Spanner Ring Green (B) 2 PCS (for very thin seals)All types of latex seals (fixed to a drysuit) can accommodate a <strong>Quick</strong> Clamp.(Most neoprene seals will not be compatible with <strong>Quick</strong> Clamp.)6. Use the paraffin wax supplied with the QGR set to reducefriction prior to donning the QGR (see drawing, page 6).Maintenance – <strong>Quick</strong> ClampTo avoid stress settings and promote the longevity of yourlatex seals we recommend you to remove the <strong>Quick</strong> Clampwhen storing the suit for longer periods.After each dive: remove body fat on the seals with soap andrinse seal and <strong>Quick</strong> Clamp with fresh water. Avoid exposingthe suit to high temperatures when <strong>Quick</strong> Clamp is fitted.3B.DisassemblyPressure equalization of the glove<strong>Glove</strong>s may be punctured or torn during a dive. Therefore SI TECHrecommends you to always use a well trimmed seal when using your<strong>Quick</strong> <strong>Glove</strong> Rings (whether in combination with <strong>Quick</strong> Clamp or<strong>Quick</strong> Cuff). The sealing surface of the latex seal in a <strong>Quick</strong> Cuffassembly should be minimum 1.0 mm thick.Creating an air channel between skin and latex seal for equalization of the pressure in theglove is essential when diving deeper than 15-20 meter (50-65 ft). Use the PressureEqualization Tubes supplied with the QGR set or a similar thread/tube, or wear the innerglove under the seal.Trouble shooting<strong>Quick</strong> Clamp can be used for field-repair, to mend a ripped/broken seal at the dive site.Several Spanner Rings are supplied with the <strong>Quick</strong> Clamp and <strong>Quick</strong> <strong>Glove</strong> Rings sets.Use the Spanner Ring that gives adequate resistance, but still can be removed at will.Keep your surplus Spanner Rings handy as they might might prove useful later on.Use green Spanner Ring for thin seals, blue for medium or yellow for thick seals. If thewrist seal is extremely thick (heavy duty), use the black Spanner Ring supplied with the<strong>Quick</strong> <strong>Glove</strong> Rings sets. The outer diameter of a Spanner Ring can be adjusted withflexible tape or Duct Tape.Disassembly – <strong>Quick</strong> ClampTo remove, place the sleeve opening towards yourself. Use boththumbs to push (the latex seal and) the Spanner Ring outwards,segment by segment. Make sure that the Spanner Ring remainsparallel with the Docking Ring or else it might get stuck.As an alternative, the seal can be pushed with the inside out.5Water in the glove: • Punctures • <strong>Glove</strong> wrinkles between A1 and B • Leakage betweeno-ring (A3) and the connecting surface (due to inadequate lubrication of that connectingsurface) • Material stress in joints (due to sand, creases, too rough handling when fittingor damaging the glove by pulling)Release Ring stuck: Let it rest a few seconds, then turn it very slowly. If thatdoesn’t help, ask your buddy to hold on to the Release Ring, while you rotate your arm.After a difficult doffing, disassemble and rinse all parts in fresh water. Examine the O-ring groove in the Connecting Ring for irregularities and debris. Lubricate the connectingsurface with the wax supplied with the QGR set.6Manufactured by SI TECH, Lysekil, SwedenPhone: +46 523 150 10, Fax: +46 523 611 511e-mail: sales@sitech.se, web: www.sitech.se