Advanced field calibrator and communicator - Control Global
Advanced field calibrator and communicator - Control Global
Advanced field calibrator and communicator - Control Global
Create successful ePaper yourself
Turn your PDF publications into a flip-book with our unique Google optimized e-Paper software.
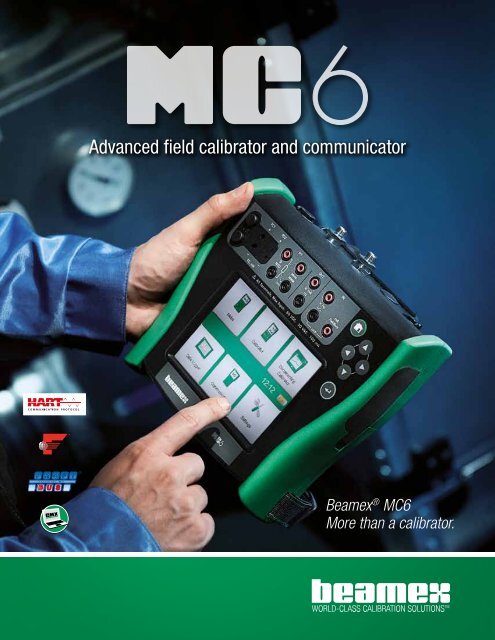
The impossible made possible:combining advanced functionalitywith ease-of-use.Beamex ® MC6 is an advanced, high-accuracy <strong>field</strong> <strong>calibrator</strong><strong>and</strong> <strong>communicator</strong>. It offers calibration capabilities for pressure,temperature <strong>and</strong> various electrical signals. The MC6 alsocontains a full <strong>field</strong>bus <strong>communicator</strong> for HART, FOUNDATIONFieldbus <strong>and</strong> Profibus PA instruments.The usability <strong>and</strong> ease-of-use are among the main featuresof the MC6. It has a large 5.7” color touch-screen with amultilingual user interface. The robust IP65-rated dust- <strong>and</strong>water-proof casing, ergonomic design <strong>and</strong> light weight make itan ideal measurement device for <strong>field</strong> use in various industries,such as the pharmaceutical, energy, oil <strong>and</strong> gas, food <strong>and</strong>beverage, service as well as the petrochemical <strong>and</strong> chemicalindustries.The MC6 is one device with five different operational modes,which means that it is fast <strong>and</strong> easy to use, <strong>and</strong> you can carryless equipment in the <strong>field</strong>. The operation modes are: Meter,Calibrator, Documenting Calibrator, Data Logger <strong>and</strong> FieldbusCommunicator. In addition, the MC6 communicates withBeamex ® CMX Calibration Software, enabling fully automated<strong>and</strong> paperless calibration <strong>and</strong> documentation.In conclusion, the MC6 is more than a <strong>calibrator</strong>.MC6 Main FeaturesAccuracyHigh-accuracy, advanced <strong>field</strong> <strong>calibrator</strong> <strong>and</strong> <strong>communicator</strong>.UsabilityCombines advanced functionality with ease-of-use.VersatilityVersatile functionality beyond traditional calibrationapplications.CommunicatorFull multi-bus <strong>communicator</strong> for HART,FOUNDATION Fieldbus <strong>and</strong> Profibus PA instruments.IntegrationAutomates calibration procedures for paperless calibrationmanagement.3
4Accuracy
High-accuracy, advanced <strong>field</strong> <strong>calibrator</strong><strong>and</strong> <strong>communicator</strong>Unmatched accuracyToday’s process instrumentation is becoming more <strong>and</strong> moreaccurate. Therefore, calibration equipment must also haveimproved accuracy. When Beamex develops new measurementequipment, it makes no compromises in terms of accuracy – itmust be best-in-class. The MC6 makes no exceptions. Accuracyis one of the main features of the MC6. It is among the mostaccurate, advanced <strong>field</strong> <strong>calibrator</strong>s available on the market.Accuracy that tolerates dem<strong>and</strong>ing conditionsField <strong>calibrator</strong>s <strong>and</strong> <strong>communicator</strong>s must toleratedem<strong>and</strong>ing environmental conditions, such as cold or warmweather, moisture <strong>and</strong> dust. The MC6 is designed to h<strong>and</strong>ledem<strong>and</strong>ing <strong>and</strong> variable environmental conditions. All of thepressure, electrical <strong>and</strong> temperature ranges are temperaturecompensated, <strong>and</strong> therefore the accuracy of the <strong>calibrator</strong> is notjeopardized when used in given types of extreme environments.Accredited calibration certificate as st<strong>and</strong>ardEvery MC6 <strong>calibrator</strong> is calibrated in the Beamex accreditedlaboratory before delivery. As proof of how accurate it is,each MC6 is delivered with a traceable, accredited calibrationcertificate as st<strong>and</strong>ard. The certificate includes calibration <strong>and</strong>uncertainty data from the calibration laboratory. The calibrationlaboratory’s Scope of Accreditation can be found on Beamex’swebsite (www.beamex.com).Summary of accuracy figuresThe MC6 has specifications for short-term accuracy <strong>and</strong> for1-year total uncertainty.Brief summary of the Accuracy figures:• Pressure accuracy starting from±(0.005 % FS + 0.00125% of reading).• Temperature - RTD temperature measurement accuracystarting from ±0.011 °C.• Electric - Current measurement accuracy starting from±(0.75 µA + 0.0075% of reading).5
6Usability
Designed for <strong>field</strong> useUser-friendly interfaceThe MC6 has a large 5.7” color touch-screen with highresolution <strong>and</strong> an effective adjustable backlight. The buttonson the touch-screen have been designed large enough touse with bare fingers, so there is no need for a stylus – it caneven be used with gloved h<strong>and</strong>s! In addition, the MC6 has amembrane keypad. The multi-lingual user interface has beendivided into different operational modes. A soft number keypad<strong>and</strong> alphabetical QWERTY text keypad will appear whenevernecessary for easy number/text entries.Automated proceduresWhenever a certain measurement or generation is selected,the user interface shows where to make the connections, whichallows you to use a device with several connections. The MC6is also a documenting <strong>calibrator</strong> <strong>and</strong> it communicates with theBeamex ® CMX Calibration Software enabling fully automated<strong>and</strong> paperless calibration data management. This makes thecalibration <strong>and</strong> documenting of calibration results automatic<strong>and</strong> much easier. Since the MC6 is a measurement device thatreplaces several individual devices, there’s no need to carryseveral units in the <strong>field</strong>. What’s more, the MC6 is also a <strong>field</strong>bus<strong>communicator</strong>, <strong>and</strong> therefore there is no need to carry anadditional <strong>communicator</strong>.Robust, lightweight <strong>and</strong> ergonomic designThe MC6 has the latest, rechargeable lithium-ion polymerbatteries, which are durable <strong>and</strong> charge up quickly. The userinterface keeps you up to date on the remaining operation timein hours <strong>and</strong> minutes, making it easy to follow how long thebattery will last. Once the unit is switched on, it is ready to use injust a few seconds. The case is ergonomic <strong>and</strong> water-/dust-proof(IP65). There are two types of cases available: a slim case wheninternal pressure modules are not needed <strong>and</strong> an extendedversion, which provides room for the internal pressure modules.The wrist strap makes it easy to hold the device in your h<strong>and</strong>,while the neck strap makes it easy to carry <strong>and</strong> use the device.User-interface modesThe MC6 is a unique measurement device, as it combinesadvanced functionality with ease-of-use. How is it possibleto combine these two features? The solution is that the MC6contains various operational modes all in one device, each ofwhich is optimized for different uses. The operational modes areMeter, Calibrator, Documenting Calibrator, Communicator <strong>and</strong>Data Logger.7
User-interface modesMeterThe Meter mode is designed forsimple <strong>and</strong> easy measurement ofsignals. Oftentimes, you may needto measure something quickly <strong>and</strong>easily. Often a simple multi-meteris used for this purpose, as it iseasy to use. Some multifunctional<strong>calibrator</strong>s may be too slow <strong>and</strong>difficult to use, so it is easier tojust choose the simpler meter.The Meter mode in MC6 isoptimized for this type of simple<strong>and</strong> easy metering.Data LoggerThe Data Logger is designed forlogging various measurementresults. Often in industry, thereis a need to measure signals forshorter or longer periods <strong>and</strong> tosave the results in a memory forlater analysis. This may be relatedto trouble-shooting, surveillanceor calibration. The Data Loggermode in MC6 is optimized for thistype of use.CalibratorThe Calibrator mode is designedfor calibrating various processinstruments. Oftentimes, youneed to check <strong>and</strong> calibratea certain process instrument/transmitter. Transmitters typicallyhave an input <strong>and</strong> an output.So you either need to have twodevices, or a device capable ofdoing two things simultaneously.The Calibrator mode in MC6 isoptimized for this type of use.8
12Field Communicator
Full multi-bus <strong>field</strong> <strong>communicator</strong> forHART, FOUNDATION Fieldbus <strong>and</strong> ProfibusPA instrumentsSmart instrumentation is becoming more <strong>and</strong> more commonin today’s process plants. The most widely used smartinstrument protocols are HART, FOUNDATION Fieldbus <strong>and</strong>Profibus PA. Therefore, in addition to a <strong>calibrator</strong>, an engineeroften needs to use a <strong>field</strong> <strong>communicator</strong>. The MC6 combinesthese two; it’s a <strong>calibrator</strong> <strong>and</strong> a <strong>communicator</strong>.CommunicatorThe Communicator mode is a full multi-bus <strong>communicator</strong> forHART, FOUNDATION Fieldbus <strong>and</strong> Profibus PA instruments.Therefore, it eliminates the need to carry a separate<strong>communicator</strong> with you. All of the <strong>communicator</strong> electronicsfor all protocols are built into the MC6, including internal looppower supply with various required impedances for differentbuses, which means there is no need to use any external loopsupply or resistors. The connections are extremely easy tomake - just connect two leads from the MC6 to the instrument.Multi-bus CommunicatorThe MC6 <strong>communicator</strong> can be used with all types of Fieldbusinstruments, not only pressure <strong>and</strong> temperature transmitters.All 3 protocols can be simultaneously installed into an MC6,<strong>and</strong> therefore the very same device can be used as a HART,FOUNDATION Fieldbus <strong>and</strong> Profibus PA <strong>communicator</strong>. Withthe MC6, you can access all parameters in all blocks of aFieldbus instrument. Its memory stores device descriptionsfor the Fieldbus instruments. When new instruments areintroduced on the market, new device description fileswill be made available <strong>and</strong> can be easily downloaded intothe memory. For example, the MC6 DD library supportsapproximately 1,000 different Device Descriptions for theHART protocol.Communicator <strong>and</strong> CalibratorThe MC6 is not only a <strong>communicator</strong>; it is also amultifunctional <strong>calibrator</strong>, which allows you to make traceablemetrological calibration <strong>and</strong> trimming for Fieldbus instruments.What’s more, the Fieldbus parameters can be configured, thevariables logged into the Data Logger mode or measured inthe Calibrator mode <strong>and</strong> calibrated <strong>and</strong> documented in theDocumenting Calibrator mode.13
Seamless Integration.Automate calibration procedures forpaperless calibration managementAccording to some studies, instrument technicians use up to50 % of their time doing paperwork, i.e. preparing calibrationinstructions, making notes of calibration results in the <strong>field</strong> <strong>and</strong>documenting <strong>and</strong> archiving calibration results.All of the above tasks are extremely important <strong>and</strong> necessary,but doing them in the “Beamex way”, with seamlesslycommunicating documenting <strong>calibrator</strong>s <strong>and</strong> calibrationsoftware, remarkably improves the quality, efficiency <strong>and</strong>accuracy of the entire calibration process <strong>and</strong> savescosts compared to traditional pen <strong>and</strong> paper systems or“do-it-yourself” computer databases. The Beamex ® MC6communicates with Beamex ® CMX Calibration Softwareenabling fully automated <strong>and</strong> paperless calibration <strong>and</strong>documentation! Beamex <strong>calibrator</strong>s, workstations, calibrationsoftware <strong>and</strong> professional services form the most integrated,automated calibration system available.Benefits of an automated calibration system withseamlessly communicating documenting <strong>calibrator</strong>s <strong>and</strong>calibration software:• Preparing calibration schedules <strong>and</strong> documentation is fast <strong>and</strong>efficient.• No more typing errors related to calibration documentation.• Planning optimal interval for performing calibrations is easy.• Quality <strong>and</strong> accuracy of calibration records are dramaticallyimproved.• Calibration data is easily accessible for audits.• System integration with maintenance management systems ispossible.KUVA14
BEAMEX ® INTEGRATED CALIBRATIONSOLUTION, STEP-BY-STEPThe Beamex ® CMX Calibration Software indicates whatneeds to be calibrated <strong>and</strong> when.Download calibration procedures <strong>and</strong> instructionsfrom the software to the MC6.• Easy, fast <strong>and</strong> efficient• No need to search archived paper files• Fast procedure• No pen, paper or notepads neededPerform instrument calibration <strong>and</strong> data collectionwith the MC6.Upload calibration results to the software.• The MC6 replaces many individual measurementdevices <strong>and</strong> <strong>calibrator</strong>s• Automated calibration is fast• Automatically download calibration results back to software• Data transfer is fast <strong>and</strong> efficient, writing mistakes are eliminatedCreate, store <strong>and</strong> manage calibration information safely<strong>and</strong> efficiently with the software.Integration to a maintenance management system.• All calibration data is stored <strong>and</strong> managed in the CMX database• Calibration certificates, reports <strong>and</strong> labels in electronic format, onpaper or both• All documentation in the CMX is in auditable <strong>and</strong> traceable(e.g. ISO17025, cGMP, 21 CFR Part 11)• Plant hierarchy <strong>and</strong> work orders are stored in MMS(e.g. SAP ® , Maximo ® ) <strong>and</strong> from there transferred to the CMX, whichstores all calibration procedures, st<strong>and</strong>ards <strong>and</strong> results• When calibration work has been performed, the CMX sendsacknowledgement of the calibration back to MMS.15
Additional FeaturesFeatureScalingAlarmLeak testDampingResolutionStepRampQuick accessSpinnerAdditional infoFunction infoConnection diagramsCalibration referencesUsersCustom pressure unitCustom RTD sensorCustom point setsCustom transfer functionSpecificationA versatile programmable scaling function allows user to scale any measurement or generation unit into any other unit. Supports also rootingtransfer function for flow applications. Also, custom units <strong>and</strong> custom transfer functions are supported.An alarm that can be programmed with high or low limit, as well as slow rate or fast rate limit.A dedicated function that can be used to analyse a change in any measurement. Can be used for pressure leak testing as well as any stabilitytesting.A programmable damping allows user to filter any measurement.Possibility to change the resolution of any measurement by reducing or adding decimals.A programmable step function for any generation or simulation.A programmable ramp function for any generation or simulation.Possibility to set four (4) quick access buttons in generation to easily generate the programmed values.Possibility to easily step any digit in the generation value up or down.Allow user to see additional information in the screen such as: Min, Max, Rate, Average, Internal temperature, RTD sensor’s resistance,thermocouple’s thermovoltage, range min/max, etc.Displays more information on the selected function.Displays a picture showing where to connect the test leads with the selected function.Allows you to document the additional references that were used during the calibration <strong>and</strong> passes on the information to Beamex CMX calibrationsoftware.Possibility to create a list of persons in the documenting <strong>calibrator</strong> in order to easily select who did the calibration.Large number of custom pressure units can be created.Unlimited number of custom RTD sensors can be created using the Callendar van Dusen coefficients.Unlimited number of custom point sets can be created in calibration of an instrument, or step generation.Unlimited number of custom transfer functions can be created in calibration of an instrument or in scaling function.Note; All functions are not available in all user interface modes.16
SpecificationsGeneral SpecificationsFeatureDisplayTouch PanelKeyboardBacklightWeightDimensionsValue5.7” Diagonal 640 x 480 TFT LCD Module5-wire resistive touch screenMembrane keyboardLED backlight, adjustable brightnessExtended case: 1.5 ... 2.0 kg (3.3 ... 4.4 lb)Flat case: 1.5 kg (3.3 lb)Extended case: 200 mm × 230 mm × 70 mm (D × W × H) ( 7.87 in × 9.06 in × 2.76 in)Flat case: 200 mm × 230 mm × 57 mm (D × W × H) ( 7.87 in × 9.06 in × 2.24 in)Battery type Rechargeable lithium-ion polymer, 4200 mAh, 11.1VCharging timeCharger supplyBattery operationOperating temperatureOperating temperature while charging batteriesStorage temperatureSpecifications validHumidityWarmup timeMax. input voltageDisplay update rateApproximately 4 hours100 ... 240 VAC, 50-60 Hz10 ... 16 hours-10 ... 45 °C (14 ... 113 °F)0 ... 30 °C (32 ... 86 °F)-20 ... 60 °C (-4 ... 113 °F)0 ... 45 °C, unless other mentioned0 ... 80% R.H. non condensingSpecifications valid after a 5 minute warmup period.30 V AC, 60 V DC3 readings/secondSafety Directive 2006/95/EC, EN 61010-1:2001EMC Directive 2004/108/EC, EN 61326-1:2006Ingress protectionDropVibrationMax altitudeWarrantyIP65IEC 60068-2-32. 1 meter (3.28 ft)IEC 60068-2-64. R<strong>and</strong>om, 2 g, 5 ... 500Hz.3000 m (9842 ft)Warranty 3 Years. 1 year for battery pack. Warranty extension programs are also available.Measurement, generation <strong>and</strong> simulation functions• Pressure measurement(internal/external pressure modules)• Voltage measurement (±1 V <strong>and</strong> -1 ... 60 VDC)• Current measurement (±100 mA)(internal or external supply)• Frequency measurement (0 ... 50 kHz)• Pulse counting (0 ... 10 Mpulse)• Switch state sensing (dry/wet switch)• Built-in 24 VDC Loop Supply(low impedance, HART impedance orFF/PA impedance)• Voltage generation ( ±1 V <strong>and</strong> -3 ... 24 VDC)• Current generation (0 ... 55 mA)(active/passive, i.e. Internal or external supply)• Resistance measurement,two simultaneous channels (0 ... 4 kΩ)• Resistance simulation (0 ... 4 kΩ)• RTD measurement, two simultaneous channels• RTD simulation• TC measurement, two simultaneous channels(universal connector/mini-plug)• TC simulation• Frequency generation (0 ... 50 kHz)• Pulse queue generation (0 ... 10 Mpulse)• HART Communicator• FOUNDATION Fieldbus Communicator• Profibus PA Communicator(Some of the above functions are optional)17
Pressure measurementInternalModules18ExternalModulesP B EXT B kPa ambar apsi aP10mD EXT10mD KPa diffmbar diffiwc diffP100m EXT100m kPambariwcP400mC EXT400mC kPambariwcP1C EXT1C kPabarpsiP2C EXT2C kPabarpsiP6C EXT6C kPabarpsiP20C EXT20C kPabarpsiP60 EXT60 kPabarpsiP100 EXT100 MPabarpsiP160 EXT160 MPabarpsi- EXT250 MPabarpsi- EXT600 MPabarpsi- EXT1000 MPabarpsiUnit Range (3 Resolution Accuracy (1 (±) 1 Year Uncertainty (2 (±)70 to 120700 to 120010.15 to 17.4± 1± 10± 40 to 100 to 1000 to 40± 40± 400± 160± 100± 1-14.5 to 15-100 to 200-1 to 2-14.5 to 30-100 to 600-1 to 6-14.5 to 90-100 to 2000-1 to 20-14.5 to 3000 to 60000 to 600 to 9000 to 100 to 1000 to 15000 to 160 to 1600 to 24000 to 250 to 2500 to 37000 to 600 to 6000 to 90000 to 1000 to 10000 to 150000.010.10.0010.00010.0010.00010.00010.0010.0010.0010.010.0010.0010.000010.00010.0010.000010.00010.010.00010.0010.010.00010.0010.10.0010.010.00010.0010.010.00010.0010.010.0010.010.10.0010.010.10.0010.010.10.3 mbar 0.05 kPa0.5 mbar0.0073 psi0.05 % Span 0.05 % Span + 0.1 % RDG0.015 % FS + 0.0125 % RDG 0.025 % FS + 0.025% RDG0.01 % FS + 0.0125 % RDG 0.02 % FS + 0.025% RDG0.007 % FS + 0.0125 % RDG 0.015 % FS + 0.025% RDG0.005 % FS + 0.01 % RDG 0.01 % FS + 0.025% RDG0.005 % FS + 0.01 % RDG 0.01 % FS + 0.025% RDG0.005 % FS + 0.01 % RDG 0.01 % FS + 0.025% RDG0.005 % FS + 0.0125 % RDG 0.01 % FS + 0.025% RDG0.005 % FS + 0.0125 % RDG 0.01 % FS + 0.025% RDG0.005 % FS + 0.0125 % RDG 0.01 % FS + 0.025% RDG0.007 % FS + 0.0125 % RDG 0.015 % FS + 0.025% RDG0.007 % FS + 0.01 % RDG 0.015 % FS + 0.025% RDG0.007 % FS + 0.01 % RDG 0.015 % FS + 0.025% RDG1)Accuracy includes hysteresis, nonlinearity <strong>and</strong> repeatability (k=2).2)Uncertainty includes reference st<strong>and</strong>ard uncertainty, hysteresis, nonlinearity, repeatability <strong>and</strong> typical long term stability for mentioned period. (k=2)3)Every internal/external gauge pressure module’s range may be displayed also in absolute pressure if the Barometric Module (PB or EXT B) is installed/connected.Maximum number of internal pressure modules is 3 gauge/differential pressure modules <strong>and</strong> one Barometric (PB) module in the extended case. The flat case has room forinternal Barometric module only. Both cases have connection for external pressure modules.External pressure modules are also compatible with Beamex MC2, MC4 <strong>and</strong> MC5 family <strong>calibrator</strong>s.Supported pressure units:Pa, kPa, hPa, MPa, mbar, bar, gf/cm 2 , kgf/cm 2 , kgf/m 2 , kp/cm 2 , lbf/ft 2 , psi, at, torr,atm, ozf/in 2 , iwc, inH2O, ftH2O, mmH2O, cmH2O, mH2O, mmHg, cmHg, mHg, inHg,mmHg(0°C), inHg(0°C), mmH2O(60°F), mmH2O(68°F), mmH2O(4°C), cmH2O(60°F),cmH2O(68°F), cmH2O(4°C), inH2O(60°F), inH2O(68°F), inH2O(4°C), ftH2O(60°F),ftH2O(68°F), ftH2O(4°C).Large number of user pressure units can be created.Temperature coefficient:
TC measurement & simulationTC1 measurement & simulation / TC2 measurementType Range (°C) Range (°C) Accuracy (1 1 Year Uncertainty (2 (±)B (3 0 ... 1820R (3 -50 ... 1768S (3 -50 ... 1768E (3 -270 ... 1000J (3 -210 ... 1200K (3 -270 ... 1372N (3 -270 ... 1300T (3 -270 ... 400U (5 -200 ... 600L (5 -200 ... 900C (6 0 ... 2315G (7 0 ... 2315D (6 0 ... 23150 ... 200200 ... 500500 ... 800800 ... 1820-50 ... 00 ... 150150 ... 400400 ... 1768-50 ... 00 ... 100100 ... 300300 ... 1768-270 ... -200-200 ... 00 ... 1000-210 ... -200-200 ... 00 ... 1200-270 ... -200-200 ... 00 ... 10001000 ... 1372-270 ... -200-200 ... -100-100 ... 00 ... 800800 ... 1300-270 ... -200-200 ... 00 ... 400-200 ... 00 ... 600-200 ... 00 ... 9000 ... 10001000 ... 23150 ... 6060 ... 200200 ... 400400 ... 15001500 ... 23150 ... 140140 ... 12001200 ... 21002100 ... 2315Resolution 0.01 °C.With internal reference junction please see separate specification.Also other thermocouple types available as option, please contact Beamex.(81.5 °C0.6 °C0.4 °C0.8 °C0.6 °C0.35 °C0.3 °C0.7 °C0.6 °C0.4 °C0.35 °C(80.05 °C + 0.04% RDG0.05 °C + 0.003% RDG(80.06 °C + 0.05% RDG0.06 °C + 0.003% RDG(80.08 °C + 0.07% RDG0.08 °C + 0.004% RDG0.012% RDG(80.15% RDG0.11 °C + 0.04% RDG0.11 °C0.06 °C + 0.006% RDG(80.07 °C + 0.07% RDG0.07 °C0.07 °C + 0.05% RDG0.07 °C0.06 °C + 0.025% RDG0.06 °C + 0.002% RDG0.22 °C0.018% RDG(80.9 °C0.4 °C0.2 °C0.014% RDG0.3 °C0.2 °C0.016% RDG0.45 °C(42.0 °C0.8 °C0.5 °C1.0 °C0.7 °C0.45 °C0.4 °C0.9 °C0.7 °C0.55 °C0.45 °C(40.07 °C + 0.06% RDG0.07 °C + 0.005% RDG(40.08 °C + 0.06% RDG0.08 °C + 0.006% RDG(40.1 °C + 0.1% RDG0.1 °C + 0.007% RDG0.017% RDG(40.2% RDG0.15 °C + 0.05% RDG0.15 °C0.07 °C + 0.01% RDG(40.1 °C + 0.1% RDG0.1 °C0.1 °C + 0.07% RDG0.1 °C0.08 °C + 0.04% RDG0.08 °C + 0.005% RDG0.3 °C0.027% RDG(41.0 °C0.5 °C0.3 °C0.02% RDG0.4 °C0.3 °C0.024% RDG0.65 °C1)Accuracy includes hysteresis, nonlinearity <strong>and</strong> repeatability (k=2).2)Uncertainty includes reference st<strong>and</strong>ard uncertainty, hysteresis, nonlinearity, repeatability <strong>and</strong> typical long term stability for mentioned period. (k=2)3)IEC 584, NIST MN 175, BS 4937, ANSI MC96.14)±0.007% of thermovoltage + 4 µV5)DIN 437106)ASTM E 988 - 967)ASTM E 1751 - 95e18)±0.004% of thermovoltage + 3 µVMeasurement input impedanceSimulation maximum load currentSimulation load effectSupported unitsConnector> 10 MΩ5 mA< 5 μV/mA°C, °F, Kelvin, °Ré, °RaTC1: Universal TC connector , TC2: TC Miniplug19
RTD measurement & simulationR1 & R2 measurementSensor Type Range (°C) Range (°C) Accuracy (1 1 Year Uncertainty (2 (±)Pt50(385) -200 ... 850Pt100(375)Pt100(385)Pt100(389)Pt100(391)Pt100(3926)-200 ... 850Pt100(3923) -200 ... 600Pt200(385) -200 ... 850Pt400(385) -200 ... 850Pt500(385) -200 ... 850Pt1000(385) -200 ... 850Ni100(618) -60 ... 180Ni120(672) -80 ... 260-200 ... 270270 ... 850-200 ... 00 ... 850-200 ... 00 ... 600-200 ... -80-80 ... 00 ... 260260 ... 850-200 ... -100-100 ... 00 ... 850-200 ... -120-120 ... -50-50 ... 00 ... 850-200 ... -150-150 ... -50-50 ... 00 ... 850-60 ... 00 ... 180-80 ... 00 ... 2600.025 °C0.009% RDG0.011 °C0.011 °C + 0.009% RDG0.011 °C0.011 °C + 0.009% RDG0.007 °C0.016 °C0.016 °C + 0.009% RDG0.03 °C + 0.011% RDG0.007 °C0.015 °C0.026 °C + 0.01% RDG0.008 °C0.013 °C0.025 °C0.025 °C + 0.01% RDG0.007 °C0.018 °C0.022 °C0.022 °C + 0.01% RDG0.009 °C0.009 °C + 0.005% RDG0.009 °C0.009 °C + 0.005% RDG0.03 °C0.012% RDGCu10(427) -200 ... 260 -200 ... 260 0.012 °C 0.16 °C0.015 °C0.015 ° + 0.012% RDG0.015 °C0.015 °C + 0.012% RDG0.01 °C0.02 °C0.02 °C + 0.012% RDG0.045 °C + 0.02% RDG0.01 °C0.02 °C0.045 °C + 0.019% RDG0.01 °C0.02 °C0.045 °C0.045 °C + 0.019% RDG0.008°C0.03 °C0.04 °C0.04 °C + 0.019% RDG0.012 °C0.012 °C + 0.006% RDG0.012 °C0.012 °C + 0.006% RDGR1 SimulationSensor Type Range (°C) Range (°C) Accuracy (1 1 Year Uncertainty (2 (±)Pt50(385) -200 ... 850Pt100(375)Pt100(385)Pt100(389)Pt100(391)Pt100(3926)-200 ... 850Pt100(3923) -200 ... 600Pt200(385) -200 ... 850Pt400(385) -200 ... 850Pt500(385) -200 ... 850Pt1000(385) -200 ... 850Ni100(618) -60 ... 180Ni120(672) -80 ... 260-200 ... 270270 ... 850-200 ... 00 ... 850-200 ... 00 ... 600-200 ... -80-80 ... 00 ... 260260 ... 850-200 ... -100-100 ... 00 ... 850-200 ... -120-120 ... -50-50 ... 00 ... 850-200 ... -150-150 ... -50-50 ... 00 ... 850-60 ... 00 ... 180-80 ... 00 ... 2600.055 °C0.035 °C + 0.008% RDG0.025 °C0.025 °C + 0.007% RDG0.025 °C0.025 °C + 0.007% RDG0.012 °C0.02 °C0.02 °C + 0.006% RDG0.03 °C + 0.011% RDG0.01 °C0.015 °C0.027 °C + 0.01% RDG0.008 °C0.012 °C0.026 °C0.026 °C + 0.01% RDG0.006 °C0.017 °C0.023 °C0.023 °C + 0.01% RDG0.021 °C0.019 °C0.021 °C0.019 °CCu10(427) -200 ... 260 -200 ... 260 0.26 °C 0.52 °CFor Platinum sensors Callendar van Dusen coefficients can be programmed. Also other RTD types available as option, please contact Beamex.0.11 °C0.11°C + 0.015% RDG0.05 °C0.05 °C + 0.014% RDG0.05 °C0.05 °C + 0.014% RDG0.025 °C0.035 °C0.04 °C + 0.011% RDG0.06 °C + 0.02% RDG0.015 °C0.03 °C0.05 °C + 0.019% RDG0.015 °C0.025 °C0.05 °C0.05 °C + 0.019% RDG0.011 °C0.03 °C0.043 °C0.043 °C + 0.019% RDG0.042 °C0.037 °C + 0.001% RDG0.042 °C0.037 °C + 0.001% RDG20
RTD Measurement current4-wire connection3-wire measurementMax resistance excitation currentMin resistance excitation currentSimulation settling time with pulsed excitation currentSupported unitsPulsed, bi-directional 1 mA (0..500 Ω), 0.2 mA (>500 Ω).Measurement specifications validAdd 10 mΩ5 mA (0...650 Ω). Iexc * Rsim < 3.25 V (650...4000 Ω).> 0.2 mA (0...400 Ω). >0.1 mA (400...4000 Ω).< 1 ms°C, °F, Kelvin, °Ré, °RaInternal Reference Junction TC1 & TC2Range (°C) Accuracy (1 1 Year Uncertainty (2-10 … 45 °C ±0.10 °C ±0.15 °CSpecifications valid in temperature range: 15 ... 35 °C.Temperature coefficient outside of 15 ... 35 °C: ±0.005 °C/°C.Specifications assumes that <strong>calibrator</strong> has stabilized in environmental condition, being switched on, for minimum of 90 minutes. For a measurement or simulation done soonerthan that, please add uncertainty of 0.15 °C.In order to calculate the total uncertainty of thermocouple measurement or simulation with internal reference junction used, please add the relevant thermocouple uncertainty <strong>and</strong>the Internal Reference Junction uncertainty together as a root sum of the squares.Voltage measurementIN (-1 … 60 V)Range Resolution Accuracy (1 1 Year Uncertainty (2-1.01 ... 1 V 0.001 mV 3 µV + 0.003% RDG 5 µV + 0.006% RDG1 ... 60.6 V 0.01 mV 0.125 mV + 0.003% RDG 0.25 mV + 0.006% RDGInput impedance> 2 MΩSupported units V, mV, µVTC1 & TC2 (-1 … 1 V)Range Resolution Accuracy (1 1 Year Uncertainty (2-1.01 ... 1.01 V 0.001 mV 3 µV + 0.004% RDG 4 µV + 0.007% RDGInput impedance> 10 MΩSupported units V, mV, µVConnectorTC1: Universal TC connector , TC2: TC Miniplug1)Accuracy includes hysteresis, nonlinearity <strong>and</strong> repeatability (k=2).2)Uncertainty includes reference st<strong>and</strong>ard uncertainty, hysteresis, nonlinearity, repeatability <strong>and</strong> typical long term stability for mentioned period. (k=2)21
Voltage generationOUT (-3 ... 24 V)Range Resolution Accuracy (1 1 Year Uncertainty (2-3 … 10 V 0.00001 0.05 mV + 0.004% RDG 0.1 mV + 0.007% RDG10 … 24 V 0.0001 V 0.05 mV + 0.004% RDG 0.1 mV + 0.007% RDGMaximum load currentShort circuit currentLoad effect10 mA>100 mA< 50 µV/mASupported units V, mV, µVTC1 (-1 ... 1 V)Range Resolution Accuracy (1 1 Year Uncertainty (2-1 … 1 V 0.001 mV 3 µV + 0.004% RDG 4 µV + 0.007% RDGMaximum load current5 mALoad effect< 5 µV/mASupported units V, mV, µVCurrent measurementIN (-100 ... 100 mA)Range Resolution Accuracy (1 1 Year Uncertainty (2-25 … 25 mA 0.0001 mA 0.75 µA + 0.0075% RDG 1 µA + 0.01% RDG±(25 … 101 mA) 0.001 mA 0.75 µA + 0.0075% RDG 1 µA + 0.01% RDGInput impedance< 10 ΩSupported units mA, µALoop supplyInternal 24 V ±10% (max 55 mA), or external max 60 VDC.Current generationOUT (0 ... 55 mA)Range Resolution Accuracy (1 1 Year Uncertainty (20 … 25 mA 0.0001 mA 0.75 µA + 0.0075% RDG 1 µA + 0.01% RDG25 … 55 mA 0.001 mA 1.5 µA + 0.0075% RDG 2 µA + 0.01% RDGInternal loop supplyMax load impedance w. internal supplyMax external loop supply24 V ±5%. Max 55 mA.24 V / (generated current). 1140 Ω @ 20 mA, 450 Ω @ 50 mA60 VDCSupported units mA, µA1)Accuracy includes hysteresis, nonlinearity <strong>and</strong> repeatability (k=2).2)Uncertainty includes reference st<strong>and</strong>ard uncertainty, hysteresis, nonlinearity, repeatability <strong>and</strong> typical long term stability for mentioned period. (k=2)22
Frequency measurementIN (0.0027 … 51000 Hz)Range Resolution Accuracy (1 1 Year Uncertainty (20.0027 … 0.5 Hz 0.000001 Hz 0.000002 Hz + 0.001% RDG 0.000002 Hz + 0.002% RDG0.5 … 5 Hz 0.00001 Hz 0.00002 Hz + 0.001% RDG 0.00002 Hz + 0.002% RDG5 … 50 Hz 0.0001 Hz 0.0002 Hz + 0.001% RDG 0.0002 Hz + 0.002% RDG50 … 500 Hz 0.001 Hz 0.002 Hz + 0.001% RDG 0.002 Hz + 0.002% RDG500 … 5000 Hz 0.01 Hz 0.02 Hz + 0.001% RDG 0.02 Hz + 0.002% RDG5000 … 51000 Hz 0.1 Hz 0.2 Hz + 0.001% RDG 0.2 Hz + 0.002% RDGInput impedanceSupported unitsTrigger levelMinimum signal amplitude> 1 MΩHz, kHz, cph, cpm, 1/Hz(s), 1/kHz(ms), 1/MHz(µs)Dry contact, wet contact -1 … 14 V1.0 Vpp ( 1 MΩTrigger levelDry contact, wet contact -1 … 14 VMinimum signal amplitude 1 Vpp (< 10 kHz), 1.2 Vpp (10 ... 50 kHz).Max frequency50 kHzTrigger edgeRising, falling1)Accuracy includes hysteresis, nonlinearity <strong>and</strong> repeatability (k=2).2)Uncertainty includes reference st<strong>and</strong>ard uncertainty, hysteresis, nonlinearity, repeatability <strong>and</strong> typical long term stability for mentioned period. (k=2)23
Pulse generationOUT (0 ... 9 999 999 pulses)Resolution1 pulseMaximum load current10 mAOutput amplitude positive pulse0 … 24 VppOutput amplitude symmetric pulse0 … 6 VppPulse frequency range0.0005 … 10000 HzDuty Cycle 1 … 99%Resistance measurementR1 & R2 (0 ... 4000 Ω)Range Resolution Accuracy (1 1 Year Uncertainty (2-1 ... 100 Ω 0.001 Ω 4.5 mΩ 6 mΩ100 ... 110 Ω 0.001 Ω 0.0045% RDG 0.006% RDG110 ... 150 Ω 0.001 Ω 0.005% RDG 0.007% RDG150 ... 300 Ω 0.001 Ω 0.006% RDG 0.008% RDG300 ... 400 Ω 0.001 Ω 0.007% RDG 0.009% RDG400 ... 4040 Ω 0.01 Ω 9 mΩ + 0.008% RDG 12 mΩ + 0.015% RDGMeasurement currentSupported units4-wire connection3-wire measurementPulsed, bi-directional 1 mA (0..500 Ω), 0.2 mA (>500 Ω).Ω, kΩMeasurement specifications validAdd 10 mΩResistance simulationR1 (0 ... 4000 Ω)Range Resolution Accuracy (1 1 Year Uncertainty (20 … 100 Ω 0.001 Ω 10 mΩ 20 mΩ100 … 400 Ω 0.001 Ω 5 mΩ + 0.005% RDG 10 mΩ + 0.01% RDG400 … 4000 Ω 0.01 Ω 10 mΩ + 0.008% RDG 20 mΩ + 0.015% RDGMax resistance excitation currentMin resistance excitation currentSettling time with pulsed exitation currentSupported units5 mA (0 ... 650 Ω). Iexc * Rsim < 3.25 V (650 ... 4000 Ω).> 0.2 mA (0 ... 400 Ω). >0.1 mA (400 ... 4000 Ω).< 1msΩ, kΩ1)Accuracy includes hysteresis, nonlinearity <strong>and</strong> repeatability (k=2).2)Uncertainty includes reference st<strong>and</strong>ard uncertainty, hysteresis, nonlinearity, repeatability <strong>and</strong> typical long term stability for mentioned period. (k=2)24
Modularity, options <strong>and</strong> accessoriesModularity <strong>and</strong> options• All electrical / temperature functions are included as st<strong>and</strong>ard• Two case bottom choices:- flat (no room for internal pressure modules, only Barometer)- extended (room for internal pressure modules)• Optional internal pressure modules (up to four internalpressure modules; three st<strong>and</strong>ard <strong>and</strong> one barometric)• Optional user-interface modes:- Documenting Calibrator- Data Logger- HART Communicator- FOUNDATION Fieldbus Communicator- Profibus PA Communicator• Pressure / Temperature <strong>Control</strong>ler CommunicationsSt<strong>and</strong>ard Accessories• Accredited calibration certificate• User guide• Computer cable (USB)• Battery charger / eliminator• Internal LiPO battery pack• Test leads <strong>and</strong> clips• Appropriate pressure T-hose with internal low pressuremodules• CD-ROM with user manual, software tools <strong>and</strong> productinformationOptional Accessories• Soft Carrying Case• Soft Accessory Case• Hard Carrying Case• Spare battery pack• Adapter cables for the second RTD channel• Cable for pressure <strong>and</strong> temperature controllers25
Related products <strong>and</strong> servicesPortable <strong>calibrator</strong>sBeamex’s range of portable MC-<strong>calibrator</strong>s for <strong>field</strong> calibration is known for their accuracy, versatility <strong>and</strong> also for meeting both high<strong>and</strong> uncompromised quality st<strong>and</strong>ards.WorkstationsA workstation can be considered ideal when most of the maintenance <strong>and</strong> calibration tasks are performed in the workshop.Beamex’s workstation is a modular testing <strong>and</strong> calibration system designed for use in workshops <strong>and</strong> laboratories.Temperature dry blocksBeamex offers two different dry block series: the Beamex ® FB Series Field Temperature Blocks <strong>and</strong> the Beamex ® MB SeriesMetrology Temperature Blocks. The dry blocks in the FB Series are lightweight, high-accuracy temperature dry blocks for industrialuse. The dry blocks in the MB Series deliver bath-level accuracy for industrial applications as well.Calibration softwareBeamex ® CMX Calibration Management SoftwareThe Beamex ® CMX is calibration management software that assists in documenting, planning, analyzing <strong>and</strong>, finally, optimizingcalibration work. The CMX’s scalable technology <strong>and</strong> user configuration allows you to integrate it easily into other systems for a oneof-kindcalibration system that fits your specific needs completely. The CMX also helps to meet the regulatory requirements, whetheryour plant’s calibration system needs to comply with ISO 17025, cGMP or 21 CFR Part 11. By using the CMX, you will have all yourcalibration results in a traceable <strong>and</strong> auditable form, either printed on paper or stored in electronic format in a database.Professional servicesRecalibration <strong>and</strong> serviceThere are many benefits from using the services provided by Beamex’s accredited calibration laboratory on a regular basis. Itensures that the calibration equipment remains in excellent condition <strong>and</strong> you are also able to provide, if needed, up-to-date proofof the <strong>calibrator</strong>’s measurement accuracy. The Beamex Calibration Laboratory provides traceable calibration services in pressure,temperature, DC current, DC voltage, resistance <strong>and</strong> frequency.Training <strong>and</strong> installationBeamex provides worldwide services for installation <strong>and</strong> training. This way you are able to have your new calibration system up <strong>and</strong>running in no time. You also learn about the capabilities of Beamex calibration equipment, how to use it <strong>and</strong> how your organizationwill benefit the most from it.AccessoriesPG series of calibration pumpsThe PG series includes h<strong>and</strong>-held, lightweight pressure <strong>and</strong> vacuum sources for <strong>field</strong> use. The PG series of h<strong>and</strong> pumps are idealpressure/vacuum generators to be used as accessories for pressure <strong>and</strong> vacuum calibration.External pressure modulesThe external pressure modules introduce new configuration possibilities <strong>and</strong> add flexibility, as it is possible to calibrate even morepressure ranges with the same <strong>calibrator</strong>. This way, the Beamex calibration equipment meets your needs even better.26
PORTABLE CALIBRATORSWORKSTATIONSPROFESSIONAL SERVICESCALIBRATION SOFTWARE27
28Beamex Oy Ab 082012


