MultiHandy 3050 - Hydrotechnik
MultiHandy 3050 - Hydrotechnik
MultiHandy 3050 - Hydrotechnik

You also want an ePaper? Increase the reach of your titles
YUMPU automatically turns print PDFs into web optimized ePapers that Google loves.
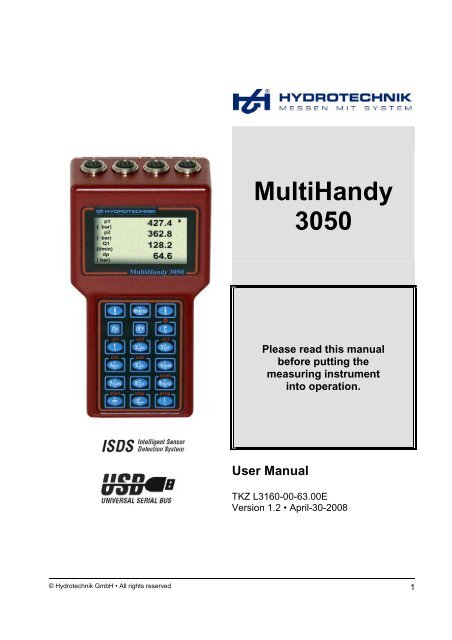
<strong>MultiHandy</strong><strong>3050</strong>Please read this manualbefore putting themeasuring instrumentinto operation.User ManualTKZ L3160-00-63.00EVersion 1.2 • April-30-2008© <strong>Hydrotechnik</strong> GmbH • All rights reserved 1
User ManualContents1 Safety ...............................................................................................................31.1 General safety and warning hints......................................................................31.2 Hints for the use of the <strong>MultiHandy</strong> .................................................................31.3 Hints for the treatment of sensors and wires.....................................................41.4 Hints for the treatment of storage batteries.......................................................42 Introduction ....................................................................................................52.1 Range of validity ..............................................................................................52.2 Copyright..........................................................................................................52.3 Limitation of liability........................................................................................52.4 Use as agreed....................................................................................................62.5 Warranty regulations ........................................................................................62.6 Obligations of the customer..............................................................................72.7 Authorized staff................................................................................................73 Description of the measuring instrument .....................................................83.1 Features of the <strong>MultiHandy</strong> <strong>3050</strong> .....................................................................83.2 Connectors........................................................................................................93.3 Display ...........................................................................................................123.4 Keyboard ........................................................................................................123.5 Evaluation software ........................................................................................133.6 Technical data.................................................................................................144 Startup...........................................................................................................164.1 Check delivery................................................................................................164.2 Range of delivery ...........................................................................................164.3 Charge batteries..............................................................................................175 Operation ......................................................................................................185.1 Switch the instrument on and off....................................................................185.2 Select language...............................................................................................195.3 Connect sensors..............................................................................................195.4 Program sensor parameters.............................................................................195.5 Record measurement data...............................................................................205.6 Connect a PC..................................................................................................215.7 Delete measurement data................................................................................215.8 Set date and time ............................................................................................225.9 Print measuring data .......................................................................................225.10 Reset instrument .............................................................................................235.11 Operation software .........................................................................................235.12 Menu tree........................................................................................................406 Cleaning and maintenance...........................................................................416.1 Cleaning .........................................................................................................416.2 Maintenance ...................................................................................................416.3 Repair .............................................................................................................422 Version 1.2 • Apr-30-2008 • TKZ L3160-00-63.00E
<strong>MultiHandy</strong> <strong>3050</strong>1 SafetyPlease obtain the following regulations when operating the instrument.1.1 General safety and warning hints• Never cut, damage or modify the connection cables of the power pack anddo not place things on it.• Never touch the power pack with wet or moist hands.• Only connect the power pack to power supplies for which it is suited (seetechnical data).• Unplug the mains cable during a thunderstorm.• Unplug the mains cable if you determine smoke or smell, or if the mainscable is damaged.• Assure sufficient grounding of your installations. Inadequate groundingmay lead to measuring peaks.1.2 Hints for the use of the <strong>MultiHandy</strong>• Never expose the instrument to excessive heat or moisture; obtain thetechnical data.• Do not store the instrument in humid or dusty locations or at temperaturesbelow freezing point.• Never dip the instrument into water or other liquids. Never let liquids comeinto the instrument.• Never open the instrument.• Do not use the instrument after it fell down or the housing is damaged.• Avoid strong magnetic fields. Keep distance of electric motors or other instrumentsthat generate electro-magnetic fields. Strong magnetic fieldsmay cause malfunctions and influence measuring values.• Avoid the formation of condensed water. If condensed water has formatedyou should let the instrument acclimate before you switch it on. Otherwiseit could be damaged.© <strong>Hydrotechnik</strong> GmbH • All rights reserved 3
User Manual1.3 Hints for the treatment of sensors and wires• Protect the sensors from exceeding the allowed power range, mechnicaloverload and wrong pin assignment.• Assure to enter the sensor parameters correctly when using sensors withoutISDS (Intelligent Sensor Detection System).• The measuring cables MK 01 and TKS may not be lengthened. Otherwisethe shielding will be interrupted.• The data of an ISDS sensor are read into the measuring instrument duringswitch-on procedure. If you connect new sensors, you will have to switchthe instrument off and on.1.4 Hints for the treatment of storage batteries• Keep batteries away from heat sources and open fire.• Never dip batteries into water.• Never short-circuit the contacts of batteries.• Never dismount, repair or modify batteries.• Use only batteries that are mounted or delivered by <strong>Hydrotechnik</strong>.• Load only the battery while it is mounted in the instrument.• Dispose used batteries as special waste. Cover the contacts with insulationtape.4 Version 1.2 • Apr-30-2008 • TKZ L3160-00-63.00E
<strong>MultiHandy</strong> <strong>3050</strong>2 IntroductionThis chapter contains information on several legal issues. Please read thischapter completely to maintain possible rights.2.1 Range of validityThe manual on hand is valid for measuring instruments named "<strong>MultiHandy</strong><strong>3050</strong>". It adresses to the operator of this instrument, that means the person,who works with the instrument.The manual is not a technical manual. Please contact our service staff for questions,that exceed the contents of this manual.2.2 CopyrightThe measuring instrument and this manual are protected on copyright. Manufacturewithout license will be prosecuted by law. All rights reserved on thismanual, even the reproduction and/or duplication in any thinkable form, e.g.by photocopying, printing, on any data recording media or translated. Reproductionof this manual is only permitted with a written approval of <strong>Hydrotechnik</strong>GmbH.The technical state by the time of delivery of instrument and manual is decisive,if no other information is given. Technical changes without special announcementsare reserved. Earlier manuals are no longer valid.The general conditions of sale and delivery of <strong>Hydrotechnik</strong> GmbH are valid.2.3 Limitation of liabilityWe guarantee the faultless functioning of our product in accordance with ouradvertising, the product information edited by <strong>Hydrotechnik</strong> GmbH and thismanual. Further product features are not guaranteed. We take no liability forthe economy and faultless function if the product is used for a different purposethan that, described in the chapter „Use as agreed“.Compensation claims are generally impossible, except if intention or culpablenegligence by <strong>Hydrotechnik</strong> GmbH is proved, or if assured product featuresare not provided. If the product is used in environments, for which it is notsuited or which do not represent the technical standard, we are not responsiblefor the consequences.We are not responsible for damages at installations and systems in the surroundingsof the product, which are caused by a fault of the product or an errorin this manual.We are not responsible for the violation of patents and/or other rights of thirdpersons outside the Federal Republic of Germany.© <strong>Hydrotechnik</strong> GmbH • All rights reserved 5
User ManualWe are not liable for damages, which result from improper operation accordingto this manual. We are not liable for missed profit and for consecutingdamages due to non regardance of safety advice and warning hints. We don’taccept liability for damages which result from the use of accessoires which arenot delivered and/or approved by <strong>Hydrotechnik</strong> GmbH.The products of <strong>Hydrotechnik</strong> GmbH are designed for a long life. They representthe standard of technique and science and were checked on all functionsindividually before delivery. The electrical and mechanical construction correspondsto the current norms and regulations. <strong>Hydrotechnik</strong> GmbH is doingproduct and market research for the further development and permanent improvementof their products.In case of faults and/or technical trouble please contact the <strong>Hydrotechnik</strong>GmbH service staff. We assure that suitable measures will be taken immediately.<strong>Hydrotechnik</strong> GmbH guarantee regulations are valid, which we willsend to you on demand.2.4 Use as agreedThe measuring instrument "<strong>MultiHandy</strong> <strong>3050</strong>" is a hand-held instrument forthe recording, storage and evaluation of measuring data, recorded by sensorsconnected to the measuring instrument.You can connect a great variety of different sensors to the measuring instrumentif they meet the requirements defined in the section "Technical data".The instrument is preferably used for the recording of measuring data likepressure, temperature and volume flow rates.Any other use of the product is considered as not agreed.If you have any question or want to use the measuring instrument for a differentpurpose, please do not hesitate to contact our service staff. We are pleasedto help you.2.5 Warranty regulationsIn accordance to our warranty regulations we guarantee the condition withoutdefects for this measuring instrument for a duration of six months. Wearingparts and storage batteries are excepted from this warranty. The warranty isspoiled if repair work or interventions are executed by unauthorized persons.Within the warranty period we repair damage or defects which are caused by amanufacturing fault. We only accept warranty claims if they are reported to usimmediately after their discovery, but latest six months after delivery. Thewarranty benefit is by our choice through repair of defective parts or replacementby intact parts.Send your instrument with an invoice copy or delivery note copy to <strong>Hydrotechnik</strong>.The adress is mentioned in section 6.2.6 Version 1.2 • Apr-30-2008 • TKZ L3160-00-63.00E
<strong>MultiHandy</strong> <strong>3050</strong>2.6 Obligations of the customerThe operating authority of this product has to assure, that only persons who• know the regulations on working safety and accident prevention• have been instructed in the operation of this product• have read and understood this manualcan operate this product. Persons who operate this instrument are obliged to• obey all regulations on working safety and accident prevention• read this manual completely, especially the safety instructions in the firstchapter.2.7 Authorized staffPersons are authorized if they have a professional education, technical experience,knowledge of the important norms and regulations and if they are able toestimate their duties and recognize possible danger at an early time.Operator of the instrumentPersons are authorized if they are trained in the operation of the instrumentand have read and understood this manual completely.Personell for installation and maintenancePersons are authorized if they are trained in all aspects of the instrument andhave read and understood this manual completely.© <strong>Hydrotechnik</strong> GmbH • All rights reserved 7
User Manual3 Description of the measuring instrumentConnectorsDisplayKeyboardPic. 1:Components of the measuring instrument3.1 Features of the <strong>MultiHandy</strong> <strong>3050</strong>The <strong>MultiHandy</strong> <strong>3050</strong> is a suitable, user-friendly hand-held measuring instrumentsupporting the user in his daily measuring jobs.When using ISDS sensors the <strong>MultiHandy</strong> detects the connected sensors automaticallyduring initialization and takes over all parameters: measuring range,physical measured variable, units, signal output and characteristic curve(linearization). A confusion of the sensor is avoided and the entry of specificspecial characteristic data is no longer necessary.Of course you can also connect sensors without ISDS designation to your<strong>MultiHandy</strong>. Then you enter the sensor parameters in the operation menus.All measurements can be transferred via an USB connection to a PC. Thesoftware "HydroComSys" delivered free of charge offers comprehensive supportwith functions for evaluation, presentation and printing of the measuredvalues.8 Version 1.2 • Apr-30-2008 • TKZ L3160-00-63.00E
<strong>MultiHandy</strong> <strong>3050</strong>You can connect up to four sensors and store all measured values. Calculationswith the values as difference, sum and performance, and a first differentiation(e.g. speed out of distance) are available as a fifth channel (pseudomeasuring channel) for display and storage.An extreme value buffer of the minimal and maximal measured variables isactive all the time and can be displayed by pressing the corresponding keycombination.3.2 Connectors1 2 3 4 5 6 7 8Pic. 2: Connectors of the measuring instrument1 Power supply (power pack) 5 Ch3 (channel 3, analog)2 RS 232 6 Ch4 (channel 4, frequency)3 Ch1 (channel 1, analog) 7 parallel (Centronics)4 Ch2 (channel 2, analog) 8 USB3.2.1 Sensor connectorsAll inputs and outputs are not isolated. They are connected with the negativepole of the power supply, respectively with the measuring connection of thesensors.© <strong>Hydrotechnik</strong> GmbH • All rights reserved 9
User Manual3.2.2 Channels 1–3 analog inputsSignal input0–20 mA switchable per software to 4–20 mAR i = 105 Ω, C i = 10 nFMeasuring rateMeasuring accuracyResolutionTemperature rangeCrosstalkExceeding of end valuePlug connectorISDSSensor supplyPin assignment1 ms± 0,2 % of end value12 Bit± 0,1 % of end value at 10° Cinto neighbour channel at max. resolution 1 digit> 10 % of end value (max. 82 mA)6 pol. instrument socketcompany-specific, serial data transmissionwith battery power 14 – 17 VDCwith external power supply 24 VDC - 2 Vmax. 100 mA both3214651 20mA signal – Ri = 105 Ω – Ci = 10 nF – limitation: 5,6 VDC – protectiontype: VDR, transile diode2 Ground3 Sensor supply – limitation: 100 mA – protection type: current limitationPTC4 –5 Shield6 ISDS – limitation: 5,6 VDC – protection type: transile diode10 Version 1.2 • Apr-30-2008 • TKZ L3160-00-63.00E
<strong>MultiHandy</strong> <strong>3050</strong>3.2.3 Channel 4 frequency inputFrequency signal > 0,5 Hz – 5 kHzInput level> 4,5 – 30 VDC rectangleMeasuring accuracy ± 0,2 %ConnectorISDSPower supplyPin assignment6 pol. instrument socketcompany-specific, serial data transmissionwith battery power 14 – 17 VDCwith external power supply 24 VDC - 2 Vmax. 100 mA both3214651 Frequency signal – Ri = 4,7 kΩ – Ci = 10o pF – limitation: 30 VDC – protectiontype: VDR, Zener diode2 Ground3 Sensor supply – limitation: 100 mA – protection type: current limitationPTC4 –5 Shield6 ISDS – limitation: 5,6 VDC – protection type: transile diode3.2.4 USB / RS 232The data exchange between PC and measuring instrument is done via the USBor the RS 232 interface.• Data exchange: the online data transmission via USB is supported up to ascan rate of ≥ 10ms.• Firmware update: RS 232 interface programmable to 9,600, 19,200,38,400 and 57,600 Baud.3.2.5 CentronicsTo connect a printer with parallel interface.Several needle and ink jet printers are pre-set: Epson 9- and 24-needleprinters,Epson Color, HP mono-chrome and color, Canon.© <strong>Hydrotechnik</strong> GmbH • All rights reserved 11
User Manual3.3 DisplayThe measuring instrument is equipped with a mono-chrome 3.2"-display,where all information and measuring values are displayed alpha-numerically.The display of curves is not supported.3.4 KeyboardThe measuring instrument is equippedwith a membrane keyboard. The keyshave the following occupations:Pic. 3:Keyboard[ ] one level up or increase a value[menu] open operation menues or accept modified values or settings[ ] one level down or decrease a value[ON] switch on the instrument[OFF] switch off the instrument off (keep pressed for two seconds)[ C ] delete displayed value or cancel entry without storing themodifications[ 1 ] ... [ 9 ] entry of numbers and letters[ – ] entry of a stroke[ 0 ] entry of a zero or a space[ . ] entry of a point or open sensor parameters of a channel (seefurther below)12 Version 1.2 • Apr-30-2008 • TKZ L3160-00-63.00E
<strong>MultiHandy</strong> <strong>3050</strong>Some keys have a second assignment that is printed in red color above thekey. These functions can be used during the measuring display is active.[ C ] switches the illumination of the display on and off[ 1 ] ch1 display of measured value of channel 1 on and off[ 2 ] ch2 display of measured value of channel 2 on and off[ 3 ] ch3 display of measured value of channel 3 on and off[ 4 ] ch4 display of measured value of channel 4 on and off[ 5 ] calc display of the calculation channel 5 on and off[ 9 ] peak press [ 9 ] + [chn], to switch on/off the peak display of theselected channel[ – ] start starts the storing of a series of measurement[ 0 ] stop stopps the storing of a series of measurement[ . ] prog press [ . ] + [chn], to program/display the sensor parameters ofthe selected channeln stands for the number of a channel (e.g. ch1)3.5 Evaluation softwareThe measurement data evaluation software "HydroComsys Win32" is part ofthe delivery. After transferring the measurement data via the USB interface toa PC, you can evaluate, process and display them graphically with this software.© <strong>Hydrotechnik</strong> GmbH • All rights reserved 13
User Manual3.6 Technical dataHardwareHousingWeight (incl. batteries)Dimensions (H x W x D)DisplayMeasurement displayMenu displayInterfacesProtective installationsBatteryConnectorReal-time clockOperation conditionsAmbient temperatureRelative humidityStorage temperatureABS plastic0.8 kg203 x 107 x 76 mm3,2" LCD with background illumination4-digit, 2 or 4 lines8 linesUSB for data transmissionRS 232 for Flash-updateparallel as printer connectorreverse polarity protection, overvoltageprotection, self-reversive fuseresistors (PTC)230 VAC / 24 VDC, 340 mApower pack socket 6.3 mminternal, battery-buffered0° ... 50° C0 ... 80 %, not condensing-20° ... 70° C14 Version 1.2 • Apr-30-2008 • TKZ L3160-00-63.00E
<strong>MultiHandy</strong> <strong>3050</strong>Performance dataMeasured variablesMeasuring value memoryProgram memorye.g. pressure, temperature, volumetricflow, rotational speed, current, voltage,power, rotation moment, speed0.9 MB, max. 450,000 measuring val.frequency max. 150,000 meas. val.512 kB Flash memoryTrigger programmable: channel 1, 2, 3, 4,none or keyScanning rate1 ms ... 10 min. (programmable)Measuring rate analog inputs 1 msMeasuring rate frequency input period measurement from 0.5 Hz to56 Hz; measurement time from 56 Hz= 17.7 msSeries of measurement max. 14Peak value bufferingmin./max.-values of all analog channelsin background 1 msError limit analog± 0.2 % of end valueError limit digital± 0.2 % of measured valueInternal power supplybattery max. 17.5 V / 2 Ah© <strong>Hydrotechnik</strong> GmbH • All rights reserved 15
User Manual4 Startup4.1 Check deliveryThe measuring instrument is delivered by <strong>Hydrotechnik</strong> and transported bysuited shipping companies. At the time of delivery you should check:• Does the number of delivered items corresponds with the <strong>Hydrotechnik</strong>delivery note?• Is the packing free of visible damage?• Are measuring instrument and accessories free of visible damage?• Are there any indications of rough treatment during transportation (e.g.burn marks, scratches, color)?To maintain all demands against the shipping company you should documentall possible transportation damage (e.g. by taking photos and signing a writtenprotocol), before you put the instrument into operation.<strong>Hydrotechnik</strong> is not responsible for transportation damage and will take no liability.4.2 Range of deliveryCarefully remove the transportation packing. Please obtain all rules and regulationsfor the disposal of packing materials. After unpacking you should findthe following parts:• Measuring instrument <strong>MultiHandy</strong> <strong>3050</strong> 3160-00-63.00• Battery, 14.4 VDC, 1,100 mAh• CD with software HydroComsys Win32 8874-16-00.01Due to your order you could optionally find:• Table power supply, 230 VAC / 24 VDC, 340 mAh 8812-00-00.28• Car charging cable 8824-64-05.00• Measuring cable MKS (ISDS) 8824-S1-02.50z• USB data transmission cable 8824-F4-02.00• Boot loader cable 8874-00-06.01• CD with boot loader software –Check the range of delivery in accordance to the delivery note and the orderdocuments. Report differences instantly to <strong>Hydrotechnik</strong>. Later claims on incompletedelivery cannot be accepted.16 Version 1.2 • Apr-30-2008 • TKZ L3160-00-63.00E
<strong>MultiHandy</strong> <strong>3050</strong>4.3 Charge batteriesAttentionBattery performance endangered!Charge the instrument batteries for 14 to 16 hours before you put the instrumentinto operation. Otherwise there is the danger of excessive discharge,which would influence the battery performance negatively.HintThe battery integrated in the measuring instrument will be charged, as soonas the instrument is supplied by a <strong>Hydrotechnik</strong> power pack.The instrument is equipped with an internal battery. This is pre-charged by<strong>Hydrotechnik</strong> and must be charged for at least 14 to 16 hours, before the instrumentcan be used.Hints for the treatment of the batteriesThe life cycle of NiCd cells can be very long, but it depends on the conditionsof use.Avoid a complete discharge, continuous charging and immediate re-chargingafter every use. This triggers the memory effect with a minimization of thebattery capacity and possible remanent damage. You can regenerate the batteryby several discharge and charge cycles.In case of low battery power a hint "Load batteries" will be displayed. In thiscase you should maintain a 16 hour charging time. In case of longer periodswithout use you should discharge and charge the batteries monthly.© <strong>Hydrotechnik</strong> GmbH • All rights reserved 17
User Manual5 OperationIn this section you get all information on the daily use of the measuring instrument.The following operations are explained:• Switch the instrument on and off• Select operation language• Connect sensors• Program sensor parameters• Collect measurement data• Connect a PC• Delete measurement data• Reset instrumentAt the end of this chapter you will find a complete description of the instrumentsoftware with a chronological explanation of all menues.HintThe software HydroComsys which is part of delivery will not be explainedin this manual. Please refer to the online help and the separate softwaredocumentation.HintIn the following sections we will often mention keys of the measuring instrumentin the text. They can be recognized since they are printed in [square]brackets. [menu] means the menu key.5.1 Switch the instrument on and off1. Assure that the desired sensors are connected correctly (see 5.2).2. Press the key [ ON ] to switch the instrument on. After a short self-testyou will see the display of the measured values.3. Program the required settings and execute the required measurements.4. Press the key [ OFF ] for more than 2 seconds to switch off the instrument.HintIf you use ISDS sensors, the sensor parameters will be set automatically. Ifyou use other sensors, you have to program the sensor parameters beforeyou can carry out measurements.18 Version 1.2 • Apr-30-2008 • TKZ L3160-00-63.00E
<strong>MultiHandy</strong> <strong>3050</strong>5.2 Select language1. Switch the instrument on.2. Press the key [menu].3. Press the key [ ] three times, until the "Device menu" is highlighted.4. Press the key [menu].5. The entry "Language" is highlighted in the device menu. Press [menu].6. Press the keys [ ] or [ ] (repeatedly), until the desired operation languageis highlighted.7. Press the key [menu]. A * will be displayed beside the selected language.8. Press the key [C] three times, to return to the measurement display.5.3 Connect sensorsPic. 4: Sensor connectors1. Switch off the instrument.2. Connect the desired sensors to the inputs.3. Switch on the instrument.HintThe channels 1 to 3 (positions Ch1, Ch2 and Ch3) are analog inputs. Channel4 (position Ch4) is a frequency input.5.4 Program sensor parametersIf you have connected ISDS sensors, the sensor parameters will be detectedautomatically when the instrument is switched on. Then you can skip this section.If you have connected sensors without ISDS function, you will have to programthe sensor parameters manually. You find the required information e.g.on the type plate of the calibration protocol of your sensor.© <strong>Hydrotechnik</strong> GmbH • All rights reserved 19
User Manual1. Press [menu]. The main menu will be displayed, the entry "Channel menu"is highlighted.2. Press [menu] to open the channel menu. A list of the five measuring channelswill be displayed.3. Press [ ] or [ ] to highlight the desired measuring channel.4. Press [menu] to select the highlighted measuring channel. A list of thesensor parameters will be displayed.5. Highlight the parameter you want to modify.6. Press [menu] to select the parameter. The set value will be highlighted.7. Enter the new value with the numeric key pad (e.g. [2] [5] [.] [5] [0] for25.50) or press [ ] or [ ] to select a setting.8. Press [menu] to accept the entered/selected value. If you press [C], youcancel the programming, the prior value will be restored.9. Repeat this for all parameters and measuring channels.10. Press [C] repeatedly to return to the measurement display.5.5 Record measurement dataThe recording of measurement data is caried out by a series of measurement.These can be configured in the memory menu.1. Press [menu], the main menu will be displayed.2. Press [ ] twice, the entry "Memory menu" will be highlighted.3. Press [menu] to open the memory menu.4. Press [ ] three times to highlight the entry "View parameter".5. Press [menu] to display the memory parameters.HintPlease see section 5.11 for further information on the meaning and modificationof the memory parameters.6. Press [C] to display the memory menu.7. Press [ ] three times to highlight the entry "Start memory".8. Press [menu] to display the name of the series of measurement.9. Press [ ] twice to highlight the item "Start".10. Press [menu] to start the recording of the series of measurement.11. Press [ 0 ] (stop) during the display of the measurement data to stop therecording of measurement data.20 Version 1.2 • Apr-30-2008 • TKZ L3160-00-63.00E
<strong>MultiHandy</strong> <strong>3050</strong>5.6 Connect a PC1Pic. 4:PC connection (USB)ImportantThe software HydroComsys has to be installed on your PC, before you cantransfer measuring data from the instrument.1. Switch measurement instrument and PC on.2. Connect the USB cable to socket (1) at the left side of the instrument.3. Connect the USB cable to a USB socket at your PC.4. Wait until the measurement instrument has been detected by the PC.5. Carry out the data transfer as described in the software documentation.5.7 Delete measurement data1. Press [menu] to display the main menu.2. Press [ ] twice to highlight the entry "Memory menu".3. Press [menu] to display the memory menu.4. Press [ ] to highlight the entry "Delete memory".5. Press [menu] to display the delete memory menu.6. If you want to delete all series of measurement, press [menu] while theitem "All" is highlighted. Continue with step 9.7. If you want to delete a single series of measurement, press [ ] repeatedly,until the desired series of measurement is highlighted.8. Press [menu].9. Press [menu] to delete the selected data. If you press [C], the deletion willbe cancelled.10. You are back in the delete memory menu.© <strong>Hydrotechnik</strong> GmbH • All rights reserved 21
User Manual5.8 Set date and time1. Press [menu] to display the main menu.2. Press [ ] three times to highlight the entry "Device menu".3. Press [menu] to display the device menu.4. Press [ ] to highlight the entry "Date/Time".5. Press [menu] to display date and time in two lines.6. Press [menu] to edit the date.7. Enter the day (e.g. [2] [5]) and confirm with [menu].8. Enter the month (e.g. [0] [8]) and confirm with [menu].10. Enter the year (e.g. [2] [0] [0] [5]) and confirm with [menu].11. Press [ ] to highlight the line "Time".12. Press [menu].13. Enter the hour (e.g. [1] [2]) and confirm with [menu].14. Enter the minutes (e.g. [2] [0]) and confirm with [menu].15. Press [C] three times to return to the display of measured values.In this example you have set August, 25, 2005 at 12:20.5.9 Print measuring dataImportantYou have to connect and select a printer before you can print measuringdata.1. Press [menu] to display the main menu.2. Press [ ] four times to highlight the entry "Presentation menu".3. Press [menu] to display the presentation menu; the line "Series" will behighlighted.5. Highlight the desired series of measurement and press [menu].6. Press [C] to return to the presentation menu.7. Select the desired settings in the menu entries "Presentation" (Graph orTable", "Channels" (selection of the channels to be printed), "Scaling"(Auto or Manual) and "Size" (Total or Part).8. Highlight the menu entry "Start print".9. Press [menu] to print the measuring data.22 Version 1.2 • Apr-30-2008 • TKZ L3160-00-63.00E
<strong>MultiHandy</strong> <strong>3050</strong>5.10 Reset instrumentAttentionPossible loss of data!All user-programmed settings and all measured values are deleted by resettingthe instrument. This cannot be undone.It is possible to reset the instrument to the factory settings. This deletes alluser-programmed settings and adaptions. All measuring data are deleted, too.1. Press [OFF] to switch off the instrument.2. Press [ON] and immediately [1] [2] and [3]. You will see a confirmationinquiry "init complete – yes/no".3. Press [menu] to reset the instrument, or press [C] to cancel the resetting.After cancelling, data remain undeleted and the measurement display appears.4. After reset, a list of the possible languages will be displayed. Press [ ] or[ ] to highlight the desired language and confirm with[menu]. Then the measurement display will appear.5.11 Operation software5.11.1 Short command keysThe operation of the measuring instrument can be done completely with theoperation menues explained in section 5.11.2. Experienced users can benefitfrom several short command keys.Quick access to operation menusAll screens of the operation menues contain a number in the second line. Thefour numbers are separated by strokes. After opening the main menu with[menu], you can enter these numbers to access a certain function quickly.Example: if you enter [3] [3] [4] [2], you can instantly select the desired triggertype with [ ] or [ ].HintThis function is also active, if the display of the chapter numbers has beendisabled in the device menu.KeyboardPlease refer to section 3.4 where the keyboard is explained.© <strong>Hydrotechnik</strong> GmbH • All rights reserved 23
User ManualHintIn the following sections we will often mention keys of the measuring instrumentin the text. They can be recognized since they are printed in [square]brackets. [menu] means the menu key.5.11.2 Operation menuesSwitch on[ ON ] <strong>MultiHandy</strong> <strong>3050</strong>( 4 5 0 2 5 6 M easuring valInit1.1eSN: 66<strong>Hydrotechnik</strong>GmbH... after initializationthe look of the measurement display may differ,due to the number of selected channels and whetherpeak values shall be displayed.p1[bar] 0.0p2[bar]0.0[menu] to open the main menu ***** MAIN-MENU *****1-0-0-0Channel menu >Display menuMemory menuDevice menuPresentation menu1-0-0 Channel menumenu for the programming of the sensor parameters (sensors without ISDS)[ ] / [ ] until "Channel menu" is highlighted[menu][ ] / [ ] until channel is highlighted[menu]*** CHANNEL MENU ***1-1-0-0K1: p1 (bar) >K2: p2 (bar)K3: p3 (bar)K4: n1 (U/min)K5: dp1 (bar)24 Version 1.2 • Apr-30-2008 • TKZ L3160-00-63.00E
<strong>MultiHandy</strong> <strong>3050</strong>1-1-0 For channels 1 to 3[ ] / [ ] until parameter is highlighted[menu]**** CHANNEL 1 ****1-1-1-0Meas.var.: p1 (bar)Sens.Type: (0-20mA)M.Rng.min: 0.000M.Rng.max: 200.0Zero Point 0.000[menu][ ] / [ ] until setting is displayed... or ...[2] [0] [0] [.] [0] entry of a value... then ...[menu] to save the value or[ C ] to cancelMeasured variablesPressure: p(mbar), p(bar), p(psi), p(Pa)Temperature: T(°C), T(°F)Volume flow rate: Q(l/min), Q(GPM)Rotational speed: n(U/min), n(rpm)Voltage: U(mV), U(V)Current: I(mA), I(A)Power:F(kN)Mass:M(Nm)Distance: s(mm)Speed:v(m/s), v(°/s)Weight: m(kg), m(t)**** CHANNEL 1 ****1-1-1-0Meas.var.: p(bar)Sens.Type: (0-20mA)M.Rng.min: 0.000M.Rng.max: 200.0Zero Point 0.000Sensor types0-20 mA: Minimal value of the sensor measuring range at a current of 0 mA4-20 mA: Minimal value of the sensor measuring range at a current of 4 mAMeasuring rangemin:Measuring value to be displayed at minimal current (0 or 4 mA)max:Measuring value to be displayed at maximal current (20 mA)Zero pointHighlight this item and press [menu] to carry out an automatic zeropoint alignment of the connected sensor© <strong>Hydrotechnik</strong> GmbH • All rights reserved 25
User Manual1-4-0 For channel 4[ ] / [ ] until parameter is highlighted[menu]**** CHANNEL 4 ****1-4-1-0Meas.var.: n1 (U/min)Sens.Type w/o direct.Cal.value: 650.5[menu][ ] / [ ] until setting is displayed... then ...[menu] to save the value or[ C ] to cancel**** CHANNEL 4 ****1-4-1-0Meas.var.: n(U/min)Sens.Type w/o direct.Cal.value: 650.5Measured variablesVolume flow rate: Q(l/min), Q(GPM)Rotational speed: n(U/min), n(RPM)Frequency: f(Hz)Sensor typew/o direct.: fixed setting that cannot be modifiedCal. valueVolume flow rate: enter calibration value in accordance to measuring record;calibration value contained on type plate (Q-sensor <strong>Hydrotechnik</strong>)Rotational speed: enter impulses per turnFrequency: enter always 11-5-0 For channel 5[ ] / [ ] until parameter highlighted[menu]**** CHANNEL 5 ****1-5-1-0Meas.var.: K1-K2Align.diff: 000.0[menu][ ] / [ ] until setting is displayed... then ...[menu] to save the value or[ C ] to cancel**** CHANNEL 5 ****1-5-1-0Meas.var.: K1-K2Align.diff: 000.026 Version 1.2 • Apr-30-2008 • TKZ L3160-00-63.00E
<strong>MultiHandy</strong> <strong>3050</strong>Measured variables (Calculation channel)K1-K2, K1+K2, dk1/dt, dk4/dt, K1*K4/600, K2-K3, K2+K3, UNDEFDifference alignmentMenu item to align two sensors (e.g. measuring of pressure difference):1. Connect both sensors to the measuring instrument (e.g. K1 and K2) and the locationto be measured (equal pressure for both sensors required).2. Program the measured variables for K1 and K2.3. Program for K5 e.g. the measured variable K1-K2.4. Highlight the item "Align.diff".5. Press [menu]; possible measuring differences between the two sensors will becompensated during the following automatic measuring.2-0-0 Display menuSelection for the measuring value display: channels and peak values[ ] / [ ] until "Display menu" is highlighted[menu]*** DISPLAY MENU ***2-1-0-0Select.chan. >Def. MinMaxdelete MinMaxContrast :50%Display rate :0.23s2-1-0 Select channels[ ] / [ ] until "Select chan." is highlighted[menu][ ] / [ ] until channel is highlighted[menu][menu][ ] / [ ] changes between yes and no... then ...[menu] to save or[ C ] to cancelall channels with "yes" are shown in the display*** DISPLAY MENU ***2-1-1-0K1 (p1 ) : yesK2 (p2 ) : noK3 (p3 ) : yesK4 (n1 ) : noK5 (dp1) : noK1 - K5 : all*** DISPLAY MENU ***2-1-1-0K1 (p1 ) : yesK2 (p2 ) : noK3 (p3 ) : yesK4 (n1 ) : noK5 (dp1) : noK1 - K5 : all© <strong>Hydrotechnik</strong> GmbH • All rights reserved 27
User Manual2-2-0 Define MinMax values[ ] / [ ] until "Def. MinMax" is highlighted[menu][ ] / [ ] until channel is highlighted[menu]**** DEF. MINMAX ****2-2-1-0K1 (p1 ) : yesK2 (p2 ) : noK3 (p3 ) : noK4 (n1 ) : noK5 (dp1) : noK1 - K5 : all[menu][ ] / [ ] changes between yes and no... then ...[menu] to save or[ C ] to cancelthe MinMax values of all channels with "yes" willbe displayed2-3-0 Delete MinMax values[ ] / [ ] until "Delete MinMax" is highlighted[menu]**** DEF. MINMAX ****2-2-1-0K1 (p1 ) : yesK2 (p2 ) : noK3 (p3 ) : noK4 (n1 ) : noK5 (dp1) : noK1 - K5 : all*** DISPLAY MENU ***2-3-0-0Select.chan.Def. MinMaxdelete MinMaxContrast :50%Display rate :0.23sduring the deletion process the line "Delete Min-Max" is replaced by strokesthen the display menu will be shown*** DISPLAY MENU ***2-3-0-0Select.chan.Def. MinMax------------ xContrast :50%Display rate :0.23s2-4-0 Change contrastuseful in poor light conditions[ ] / [ ] until "Contrast" is highlighted[menu]*** DISPLAY MENU ***2-4-0-0Select.chan.Def. MinMaxdelete MinMaxContrast :50%Display rate :0.23s28 Version 1.2 • Apr-30-2008 • TKZ L3160-00-63.00E
<strong>MultiHandy</strong> <strong>3050</strong>[ ] / [ ] until contrast is set properly[menu] to save the setting or[ C ] to cancel*** DISPLAY MENU ***2-4-0-0Select.chan.Def. MinMaxdelete MinMaxContrast : 50%Display rate :0.23s2-5-0 Modify display ratetime between the actualisations of the measurement display[ ] / [ ] until "Display rate" is highlighted[menu]*** DISPLAY MENU ***2-5-0-0Select.chan.Def. MinMaxdelete MinMaxContrast :50%Display rate :0.23s[ ] / [ ] until display rate is set properly[menu] to save the setting or[ C ] to cancel*** DISPLAY MENU ***2-5-0-0Select.chan.Def. MinMaxdelete MinMaxContrast :50%Display rate : 0.23s3-0-0 Memory menustart series of measurement, delete memory, define/view memory parameters[ ] / [ ] until "Memory menu" is highlighted **** MEMORY MENU ****[menu]3-1-0-0start memorydelete memoryINPUT PARAMETERVIEW PARAMETERmemory status3-1-0 Start data recordingstarts the recording of the measuring values of the selected channels[ ] / [ ] until "Start memory" is highlighted *** START MEMORY ****[menu]M02: 091105-15:02Note :start© <strong>Hydrotechnik</strong> GmbH • All rights reserved 29
User ManualM02: name of the series of measurement; date and time are proposed; press [menu]and enter a description (letters and numbers)Note: press [menu] and enter a short text (numbers and letters)start press [menu] to start the data recording3-2-0 Delete memorydelete a single or all series of measurement[ ] / [ ] until "Delete memory" is highlighted[menu]*** DELETE MEMORY **3-2-1-0allM01: 091105-14:08M02: 091105-15:02M03: ------------M04: ------------M05: ------------ |[ ] / [ ] until "all" or a single series of measurementis highlighted[menu][menu] to delete the data or[ C ] to cancelthe screen "Delete memory" will be displayedDelete Memory ?YES --> Key MENUNO --> Key C3-3-0 Program memory parametersselect channels for data recording and program memory parameters[ ] / [ ] until "Input parameters" is highlighted[menu]* MEMORY PARAMETERS *3-3-1-0Memory channel >Scanning rateStoring timeTrigger3-3-1 Select memory channelsdetermines the channels to be recorded in series of measurement[ ] / [ ] until "Memory channel" is highlighted[menu][ ] / [ ] until desired channel is highlighted[menu]* MEMORY PARAMETERS *3-3-1-1K1 (p1 ) : yesK2 (p2 ) : yesK3 (p3 ) : noK4 (n1 ) : noK5 (dp1) : yesK1 - K5 : all30 Version 1.2 • Apr-30-2008 • TKZ L3160-00-63.00E
<strong>MultiHandy</strong> <strong>3050</strong>[ ] / [ ] to change between yes and no[menu]* MEMORY PARAMETERS *3-3-1-1K1 (p1 ) : yesK2 (p2 ) : yesK3 (p3 ) : noK4 (n1 ) : noK5 (dp1) : yesK1 - K5 : all3-3-2 Set scan ratedetermines the time intervals between the measuring value recordings[ ] / [ ] until "Scanning rate" is highlighted * MEMORY PARAMETERS *[menu]3-3-2-0Memory channelScanning rate >Storing timeTrigger[ ] / [ ] to highlight "Time base" – [menu][ ] / [ ] to select unit (ms/sec/min)[menu][ ] to highlight "Value" – [menu][0] [5] [0] enter time value – [menu]* MEMORY PARAMETERS *3-3-2-1Time base : msValue : 0013-3-3 Set storing timedefines how long values shall be recorded[ ] / [ ] to highlight "Storing time"[menu]* MEMORY PARAMETERS *3-3-3-0Memory channelScanning rateStoring time >Trigger[ ] / [ ] to highlight "Time base" – [menu][ ] / [ ] to select unit (sec/min/h)[menu][ ] to highlight "Value" – [menu][0] [5] [0] enter time value – [menu]*** STORING TIME ****3-3-3-1Time base : secValue : 001Max-time withprinting : 43Max time withoutprinting : 74"Max time with/without printing" shows the available memory time; if this is tooshort, you have to delete series of measurement to increase free memory© <strong>Hydrotechnik</strong> GmbH • All rights reserved 31
User Manual3-3-4 Select triggerallows the selection of a condition, after that the storing starts[ ] / [ ] to highlight "Trigger"* MEMORY PARAMETERS *[menu]3-3-4-0Memory channelScanning rateStoring timeTrigger >[ ] / [ ] to highlight "Trigger" – [menu][ ] / [ ] to select trigger – [menu][ ] to highlight "Type trig." – [menu][ ] / [ ] to select trigger type – [menu][ ] to highlight "Trig. value" – [menu][1] [5] [0] [.] [0] enter trigger value – [menu][ ] to highlight "Pretrigger" – [menu][0] [7] [5] enter percentage – [menu]****** TRIGGER ******3-3-4-1Trigger : p1Type trig. : LOWERTrig. value: 050.0Pretrigger : 0%Available trigger:NONE: no trigger selected, data recording starts without perconditionTASTE: data recording starts after pressing a keyp1/p2/...: measurement channels 1 to 4; data recording starts, if measuring value of thechannel is lower/greater than the trigger valueTrigger types:Lower: recording starts if measuring value is smaller than trigger valueGreater: recording starts is measuring value is greater than trigger valueTrigger value:threshold value; data recording starts if measuring values are lower/greaterPretrigger:possibility to store measuring values which appeared before fulfilling the trigger condition;percentage of the maximal available memory that shall be used for pretriggering32 Version 1.2 • Apr-30-2008 • TKZ L3160-00-63.00E
<strong>MultiHandy</strong> <strong>3050</strong>3-4-0 View memory parametersdisplay of the programmed memory parameters[ ] / [ ] to highlight "View parameter"[menu]Programmed memory parameters are displayedand cannot be modified.[ ] switched to the second pageSecond page of memory parameters.[ ] back to the first page[C] back to the memory menu**** MEMORY MENU ****3-4-0-0Start memoryDelete memoryInput parameterView parameterMemory status* MEMORY PARAMETERS *3-4-1-0Channels: p1 p2 p3n1Scanning rate 1 msStor. time : 1 secTrigger : p1>* MEMORY PARAMETERS *3-4-1-0Trigger : p1Type trig. : LOWERTrig. value : 050.0Pretrigger : 0%
User Manual4-0-0 Device menudisplay and modify several instrument settings[ ] / [ ] to highlight "Device menu"[menu]**** DEVICE MENU ****4-1-0-0Language >Date / TimeISDSPrinterCompany NameRS 232 |[ ] repeatedly to display two more menu items **** DEVICE MENU ****4-8-0-0ISDS |PrinterCompany NameRS 232IlluminationChapter number: yes4-1-0 Select languageselection of the language[ ] / [ ] to highlight "Language"[menu][ ] / [ ] until desired language is highlighted[menu][C] to return to the device menu****** LANGUAGE *****4-1-1-0deutsch* englishfrancaisespanolitalianonederlands |4-2-0 Set date and time[ ] / [ ] to highlight "Date/Time"[menu]**** DATE / TIME ****4-2-1-0Date : 09.11.2005Time : 18:4334 Version 1.2 • Apr-30-2008 • TKZ L3160-00-63.00E
<strong>MultiHandy</strong> <strong>3050</strong>[ ] / [ ] to highlight "Date"[menu][0] [8] enter day – [menu][1] [0] enter month – [menu][2] [0] [0] [5] enter year – [menu]**** DATE / TIME ****4-2-1-0Date : 09.11.2005Time : 18:43[ ] / [ ] to highlight "Time"[menu][1] [2] enter hour – [menu][2] [5] enter minutes – [menu]**** DATE / TIME ****4-2-2-0Date : 09.11.2005Time : 18:434-3-0 ISDS settingsactivate ISDS and select unit[ ] / [ ] to highlight "ISDS"[menu]******* ISDS ********4-3-1-0SensID?: yesUnit : SI[ ] / [ ] to highlight "SensID"[menu][ ] select "yes" (ISDS activated) or "no"[menu]******* ISDS ********4-3-1-0SensID?: yesUnit : SI[ ] / [ ] to highlight "Unit"[menu][ ] select "SI" or "US"[menu]******* ISDS ********4-3-2-0SensID?: yesUnit : SI© <strong>Hydrotechnik</strong> GmbH • All rights reserved 35
User Manual4-4-0 Printer settingsselect a printer[ ] / [ ] to highlight "Printer"[menu][ ] / [ ] to highlight printer type[menu][ ] / [ ] to highlight printer modell[menu][C] back to printer menu***** PRINTER *******4-4-1-0EPSON 9 pin >* EPSON 24 pinEPSON colorHP monoHP colorCanon***** PRINTER *******4-4-1-1* DPU_414NEC P2XEPSON LQ500other4-5-0 Company name[ ] / [ ] to highlight "Company name"[menu]You can use three lines with 17 digits each.*** COMPANY NAME ****4-5-1-0Company<strong>Hydrotechnik</strong> GmbH65549 LimburgHolzheimerstr. 94[ ] to highlight first line – [menu][M] [u] [s] [t] [e] [r] enter name – [menu][ ] to highlight second line – [menu][G] [m] [b] [H] enter name – [menu][ ] to highlight third line – [menu][B] [e] [r] [l] [i] [n] enter name – [menu][C] back to device menu4-6-0 RS 232set transmission rate for RS 232 interface[ ] / [ ] to highlight "RS 232"[menu][ ] / [ ] to highlight transmission rate[menu][C] back to the device menu*** COMPANY NAME ****4-5-2-0Company<strong>Hydrotechnik</strong> GmbH65549 LimburgHolzheimerstr. 94******* RS 232 ******4-6-1-09600* 19200384005760036 Version 1.2 • Apr-30-2008 • TKZ L3160-00-63.00E
<strong>MultiHandy</strong> <strong>3050</strong>4-7-0 Illuminationselect the display illumination settings[ ] / [ ] to highlight "Illumination" – [menu][ ] to highlight "Mode" – [menu][ ] / [ ] to select mode – [menu][ ] to highlight "Deceleration" – [menu][1] [5] enter delay time – [menu][C] back to device menu**** ILLUMINATION ***4-7-1-0Mode : KEYDeceleration: 15 secYou can choose from the illumination modes "On", "Off" and "Key". The delay timeis only displayed for the mode "Key". Here the illumination is switched on with everykey pressure and lights until delay time has run out.4-8-0 Chapter numberactivate or disable the display of the chapter number[ ] / [ ] to highlight "Chapter number"[menu][ ] / [ ] to change between "Yes" and "No"[menu]If "No" is selected, the chapter number in the secondline is not displayed.5-0-0 Presentation menuseveral settings for the printing of series of measurement[ ] / [ ] to highlight "Presentation menu"[menu]5-1-0 Select series of measurementselect last series of measurement directly or choose from a listLast series of measurement is displayed and selectedfor printing; or select another one:[menu][ ] / [ ] to highlight series of measurement[menu][C] back to presentation menu**** DEVICE MENU ****4-8-0-0ISDS |PrinterCompany NameRS 232IlluminationChapter number: yes* PRESENTATION MENU *5-1-0-0Series: 071005-18:38>Presentation:GRAPHChannels p1p2p3Q1Scaling :AUTOSize:TOTALStart print*** SELECT SERIES ***5-1-1-0M01:*071005-18:38M02: 071005-18:55M03: 071005-19:42M04: ------------M05: ------------M06: ------------© <strong>Hydrotechnik</strong> GmbH • All rights reserved 37
User Manual5-2-0 Select presentationchoose between table and graphical presentation[ ] / [ ] to highlight "Presentation"[menu][ ] / [ ] changes between "Table" and "Graph"[menu]* PRESENTATION MENU *5-2-0-0Series: 071005-18:38Presentation:GRAPHChannels p1p2p3Q1Scaling :AUTOSize:TOTALStart print5-3-0 Select channelsselection of one or several channels for printing[ ] / [ ] to highlight "Channels"; the channels selectedfor printing are displayed; to change:[menu]* PRESENTATION MENU *5-3-0-0Series: 071005-18:38Presentation:GRAPHChannels p1p2p3Q1 >ScalingSizeStart print:AUTO:TOTAL[ ] / [ ] to highlight a channel[menu][ ] / [ ] changes between "Yes" and "No"[menu][C] back to presentation menu***** CHANNELS ******5-3-1-0(p1 ) : yes(p2 ) : yes(p3 ) : yes(p4 ) : yes5-4-0 Set scalinguse the automatic scaling or define your own scalings[ ] / [ ] to highlight "Scaling"[menu][menu][ ] / [ ] changes between Auto and Manualwith Manual, four more lines will be displayed:****** SCALING ******5-4-1-0Type scal. : AUTO38 Version 1.2 • Apr-30-2008 • TKZ L3160-00-63.00E
<strong>MultiHandy</strong> <strong>3050</strong>[ ] / [ ] to highlight a line – [menu][1] [1] [0] [.] [0] enter lower value – [menu][2] [0] [0] [.] [0] enter upper value – [menu]repeat for all desired lines[C] back to the presentation menu****** SCALING ******5-4-1-0Type scal. : MANUALp1 : 110.0 200.0p2 : 110.0 200.0p3 : -10.5 10.5Q1 : 2450.0 5760.05-5-0 Define sizeprint complete series of measurement or limited period only[ ] / [ ] to highlight "Size"****** SIZE *******[menu]5-5-1-0Size : TOTAL[menu][ ] / [ ] changes between Total and Partwith Part, two more lines will be displayed:[ ] / [ ] to highlight a line – [menu][1] [2] [.] [3] enter start time – [menu][2] [1] [.] [0] enter end time – [menu][C] back to presentation menu****** SIZE *******5-5-1-0Size : PARTfrom : 0.0 secto : 10.0 sec5-5-0 Print[ ] / [ ] to highlight "Start print"[menu]****** PRINT *******Auto scaling: 44%after auto-scaling (if activated) **** PRINT HEAD *****© <strong>Hydrotechnik</strong> GmbH • All rights reserved 39
User Manual5.12 Menu tree40 Version 1.2 • Apr-30-2008 • TKZ L3160-00-63.00E
<strong>MultiHandy</strong> <strong>3050</strong>6 Cleaning and maintenance6.1 CleaningAttentionPossible damage to the measurement instrument!Switch off the instrument and disconnect the power supply before you startwith cleaning. Otherwise a short-circuit could happen, which could damagethe instrument.AttentionPossible damage to the measurement instrument!Never use aggressive cleaners, solvents or similar chemicals for the cleaningof the instrument. This would damage the casing and make the display opaque.Clean the housing with a soft cloth which is slightly dampened with a mildhousehold cleaner.6.2 MaintenanceThis measurement instrument works maintenance-free. But it is required tocalibrate it regularly. In the case of frequent use we recommend a calibrationevery two years.<strong>Hydrotechnik</strong> has an efficient calibration laboratory. Please contact us:<strong>Hydrotechnik</strong> GmbHHolzheimer Straße 94-96 • 65549 Limburg • GermanyPhone: +49 (0) 6431 400 40 • Fax: +49 (0) 6431 453 08E-Mail: info@hydrotechnik.com • Internet: www.hydrotechnik.com© <strong>Hydrotechnik</strong> GmbH • All rights reserved 41
User Manual6.3 RepairPlease contact our service staff in case of a repair. Please keep the followinginformation ready before you contact us. If you send in the instrument, the informationshould be given in written form:• Company• Department• Contact person• Address• Phone and fax number• E-mail address• Defective assembly (measuring instrument, sensor, cable, power supplyunit)• Used PC (Pentium 1, Pentium 2, Pentium 3, Pentium 4, other)• Operation system (Windows 95/98/SE/2000/NT/XP, other)• HydroComsys software version• Fault description (please leave the settings of the measuring instrument likethey were when the fault ocurred; describe the measurement duty, sensorconnection, instrument settings: like e.g. memory parameter, trigger,how many values recorded, printer type, a.s.o.)Adress of customer serviceContact the <strong>Hydrotechnik</strong> customer service with the following adress:<strong>Hydrotechnik</strong> GmbHHolzheimer Straße 94-96 • 65549 Limburg • GermanyPhone: +49 (0) 6431 400 40 • Fax: +49 (0) 6431 453 08E-Mail: info@hydrotechnik.com • Internet: www.hydrotechnik.com42 Version 1.2 • Apr-30-2008 • TKZ L3160-00-63.00E