The Wall Mount (WM1) - Kim Lighting
The Wall Mount (WM1) - Kim Lighting
The Wall Mount (WM1) - Kim Lighting

You also want an ePaper? Increase the reach of your titles
YUMPU automatically turns print PDFs into web optimized ePapers that Google loves.
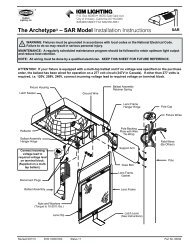
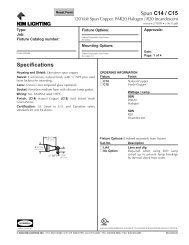
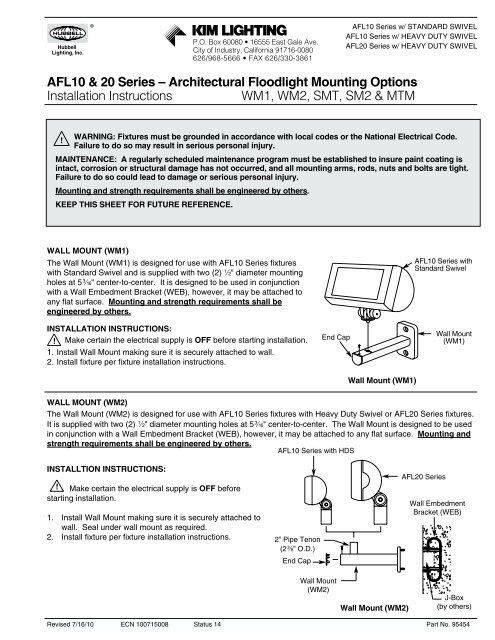
P.O. Box 60080 • 16555 East Gale Ave.City of Industry, California 91716-0080626/968-5666 • FAX 626/330-3861AFL10 Series W/ STANDARD SWIVELAFL10 Series W/ HEAVY DUTY SWIVELAFL20 Series w/ HEAVY DUTY SWIVELAFL10 & 20 Series – Architectural Floodlight <strong>Mount</strong>ing OptionsInstallation Instructions<strong>WM1</strong>, WM2, SMT, SM2 & MTM!WARNING: Fixtures must be grounded in accordance with local codes or the National Electrical Code.Failure to do so may result in serious personal injury.MAINTENANCE: A regularly scheduled maintenance program must be established to insure paint coating isintact, corrosion or structural damage has not occurred, and all mounting arms, rods, nuts and bolts are tight.Failure to do so could lead to damage or serious personal injury.<strong>Mount</strong>ing and strength requirements shall be engineered by others.KEEP THIS SHEET FOR FUTURE REFERENCE.WALL MOUNT (<strong>WM1</strong>)<strong>The</strong> <strong>Wall</strong> <strong>Mount</strong> (<strong>WM1</strong>) is designed for use with AFL10 Series fixtureswith Standard Swivel and is supplied with two (2) K" diameter mountingholes at 5F" center-to-center. It is designed to be used in conjunctionwith a <strong>Wall</strong> Embedment Bracket (WEB), however, it may be attached toany flat surface. <strong>Mount</strong>ing and strength requirements shall beengineered by others.INSTALLATION INSTRUCTIONS:! Make certain the electrical supply is OFF before starting installation.1. Install <strong>Wall</strong> <strong>Mount</strong> making sure it is securely attached to wall.2. Install fixture per fixture installation instructions.End CapAFL10 Series withStandard Swivel<strong>Wall</strong> <strong>Mount</strong>(<strong>WM1</strong>)<strong>Wall</strong> <strong>Mount</strong> (<strong>WM1</strong>)WALL MOUNT (WM2)<strong>The</strong> <strong>Wall</strong> <strong>Mount</strong> (WM2) is designed for use with AFL10 Series fixtures with Heavy Duty Swivel or AFL20 Series fixtures.It is supplied with two (2) K" diameter mounting holes at 5F" center-to-center. <strong>The</strong> <strong>Wall</strong> <strong>Mount</strong> is designed to be usedin conjunction with a <strong>Wall</strong> Embedment Bracket (WEB), however, it may be attached to any flat surface. <strong>Mount</strong>ing andstrength requirements shall be engineered by others.AFL10 Series with HDSINSTALLTION INSTRUCTIONS:! Make certain the electrical supply is OFF beforestarting installation.1. Install <strong>Wall</strong> <strong>Mount</strong> making sure it is securely attached towall. Seal under wall mount as required.2. Install fixture per fixture installation instructions.2” Pipe Tenon(2C” O.D.)End CapAFL20 Series<strong>Wall</strong> EmbedmentBracket (WEB)<strong>Wall</strong> <strong>Mount</strong>(WM2)<strong>Wall</strong> <strong>Mount</strong> (WM2)J-Box(by others)Revised 7/16/10 ECN 100715008 Status 14 Part No. 95454
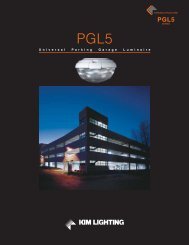
AFL10 & 20 SeriesArchitectural Floodlight <strong>Mount</strong>ing OptionsInstallation Instructions <strong>WM1</strong>, WM2, SMT, SM2 & MTMAFL10 Series W/STANDARD SWIVELAFL10 Series W/HEAVY DUTY SWIVELAFL20 Series w/HEAVY DUTY SWIVELSURFACE MOUNT (SMT)<strong>The</strong> Surface <strong>Mount</strong> (SMT) is designed for use with AFL10 Series fixtures with Heavy Duty Swivel or AFL20 Seriesfixtures; it can be used with AFL10 Series fixtures with Standard Swivel using a post mount (PT). It is supplied withfour (4) K" diameter mounting holes evenly spaced on a 5" bolt circle diameter and K" NPT tapping on side forconduit entry. It will attach to any flat surface. <strong>Mount</strong>ing and strength requirements shall be engineered by others.INSTALLALTION INSTRUCTIONS:! Make certain the electrical supply is OFF before starting installation.1. Install Surface <strong>Mount</strong> in desired location. Seal underwall mount as required. Route conduit as required.Fish wires through conduit system.AFL10 Series with PT2. Install fixture per fixture installation instructions.AFL10 Series with HDSAFL20 Series<strong>Mount</strong>ing and strength requirementsshall be engineered by others.2" Pipe Tenon(2C" O.D.)Conduit System(by others)Surface <strong>Mount</strong>Surface <strong>Mount</strong> (SMT)Stanchion <strong>Mount</strong> (SM2)<strong>The</strong> Stanchion <strong>Mount</strong> (SM2) is designed for use with AFL10 Series fixtures with Heavy Duty Swivel or AFL20 Seriesfixtures; it can be used with AFL10 Series fixtures with Standard Swivel using a post mount (PT). It is made to be setdirectly into concrete. Inside diameter of stanchion is 3K" inches and will accommodate up to two (2) 1" diameterconduits. Concrete and soil engineering by others.AFL10 Series with PTINSTALLATION INSTRUCTIONS:! Make certain the electrical supply isOFF before starting installation.1. Dig hole to obtain desired mounting heightand adequate strength for local soil conditions.2. Route conduit as required.3. Embed stanchion directly into concrete.4. Fish wires (by others) out through top ofstanchion.5. Install fixture per fixture installationinstructions.2" Pipe Tenon(2C" O.D.)AFL10 Series with HDSStanchion;;;;;;; ;;;;;;;;;CONCRETE AND SOILConduit (by others)ENGINEERING BY OTHERS.;;Page 2 <strong>Kim</strong> <strong>Lighting</strong> • 16555 E. Gale Ave. • P.O. Box 60080 • City of Industry, CA 91716-0080 • 626/968-5666 • FAX 626/330-3861AFL20Series
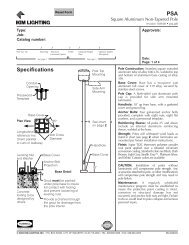
AFL10 & 20 SeriesArchitecturial Floodlight <strong>Mount</strong>ing OptionsInstallation Instructions <strong>WM1</strong>, WM2, SMT, SMT2, & MTMMultiple Top <strong>Mount</strong> (MTM)Mulitiple Top <strong>Mount</strong> (MTM) can be used with AFL10 Series fixtures with HDS or AFL20 Series fixtures. MTMs attachto any 2" pipe tenon (2C" O.D. x 4K" inches long). Steel tenons are suggested for all Multiple Top <strong>Mount</strong>s to assureadequate strength. <strong>Mount</strong>ing and strength requirements to be engineered by others.INSTALLATION INSTRUCTIONS:AFL20 Series! Make certain the electrical supply is OFFbefore starting installation.1. Fish wires (by others) through MTM and installMTM over tenon being careful not topinch wires.2. Orient to desired direction and tighten (4) C-16 set screws. Torque set screws to 10 footpounds.3. To prevent windmilling, remove tenon setscrew, drill recess in tenon for screw point,and replace screw.4. Install fixture per fixture installationinstructions.End CapMOUNTING AND STRENGTHREQUIREMENTS SHALL BEENGINEERED BY OTHERS.AFL10 Series w/STANDARD SWIVELAFL10 Series w/HEAVY DUTY SWIVELAFL20 Series w/HEAVY DUTY SWIVEL2” Pipe TenonAFL10 Serieswith HDSMultiple Top<strong>Mount</strong> (MTM)(4) C - 16 Set ScrewsKIM LIGHTING LIMITED WARRANTYWhen installed in accordance with <strong>Kim</strong> Installation Instructions and accepted trade practices, the following shall apply:General Product Limited Warranty CoverageAll material and component parts used in the manufacture of <strong>Kim</strong> Products, are warranted to be free from defects of materialand/or workmanship for a period of 1 year from date of sale, with the following exceptions:Auxiliary EquipmentAll auxiliary equipment (such as lamps, ballasts, and transformers) provided by and/or included in <strong>Kim</strong> Products shall carry thecomponent manufacturer's warranty.Copper and Bronze Landscape ComponentsCopper and Bronze Landscape fixture components shall be warranted against defects of material and/or workmanship, and failuredue to corrosion, for a period of 25 years from date of sale.Composite In-Grade ComponentsComposite In-Grade fixture components installed below grade, shall be warranted against defects of material and/orworkmanship, and failure due to corrosion, for a period of 7 years from date of sale.Aluminum Landscape ComponentsAluminum Landscape fixture components not in direct contact with soil, shall be warranted against defects of material and/orworkmanship for a period of 3 years from date of sale. Aluminum fixture components in direct contact with soil shall be warrantedfrom defects of material and failure from corrosion for a period of 1 year from date of sale.Limit of Liability and General ConditionsOnly products which are installed, used and maintained in accordance with applicable <strong>Kim</strong> instructions, specifications andaccepted trade practices, are covered by the <strong>Kim</strong> Warranty. During the warranty period, with proof of purchase, <strong>Kim</strong> will repair orreplace with the same or similar product, at <strong>Kim</strong>'s option, without charge. Labor costs are the owner's responsibility and areexcluded from this warranty. This warranty is void if the product is modified, tampered with, misapplied, poorly installed,improperly maintained, or subjected to abnormal conditions.Repair or replacement as provided under this warranty is the exclusive remedy of the purchaser. This warranty is in lieu of allother warranties, expressed or implied, including any implied warranty of fitness for a particular application. <strong>Kim</strong> <strong>Lighting</strong> shall notbe liable to the purchaser for indirect or consequential damages.How may we serve you better?Please let us know. Visit our website at:www.kimlighting.comYour concerns are important to us.Page 3 <strong>Kim</strong> <strong>Lighting</strong> • 16555 E. Gale Ave. • P.O. Box 60080 • City of Industry, CA 91716-0080 • 626/968-5666 • FAX 626/3303861