a printable Freedom Isn't Free Bookmark pattern. - Better Cross ...
a printable Freedom Isn't Free Bookmark pattern. - Better Cross ...
a printable Freedom Isn't Free Bookmark pattern. - Better Cross ...

Create successful ePaper yourself
Turn your PDF publications into a flip-book with our unique Google optimized e-Paper software.
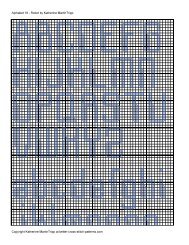
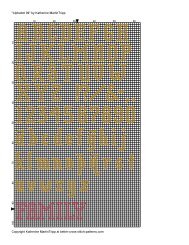
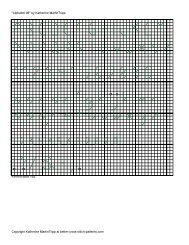
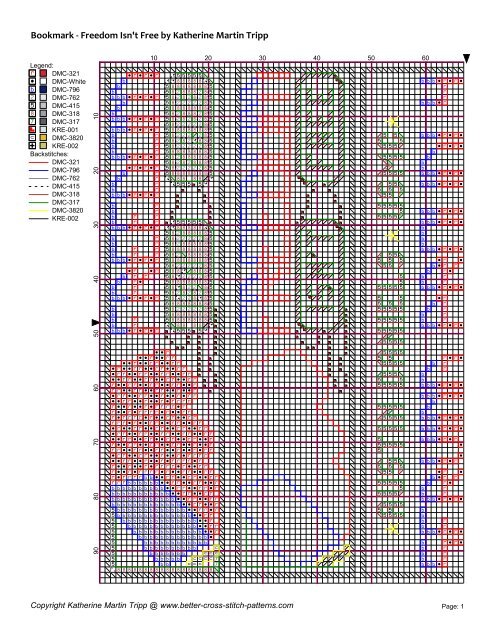
<strong>Bookmark</strong> ‐ <strong><strong>Free</strong>dom</strong> <strong>Isn't</strong> <strong>Free</strong> by Katherine Martin TrippCopyright Katherine Martin Tripp @ www.better-cross-stitch-<strong>pattern</strong>s.com Page: 2!rrrrrrrrrrrrrrrrrrrrrr!!!!!!!!!!!!!!!!!!!!!!!!!!rrrrrrrrrrrrrrrrrrrrrrrrrrrrrrrrrrrrrrrrrrrrrrrrrrrrr!!!!!!!!!!!!!!!!!!!!!!!!!!!!!!!!!!!!!!!!!!!!!!!!!!!!!!!!!!!!!!!!!!!!!!!!!!!!!!!!!!!!!!!!!!!!!!!!!!!!!!!!!!!!!!!!!!!!!!!!!!!!!!!!!!!!!!!!!!!!!!!!!!!!!!!!!!!!!!!!!!!!!!!!!!!!!!!!!!!!!!!!!!!!!!!!!!!!%%%%%%%%%%%%%%%%%%%%%%%%%%%%%%%%%%%%%%%!!%%%%%%%%%%%%%%%%%%%%%%%%%%%%%%!!%%%%%%%%%%%%%%%%%%%%%%%%%%%%%%%%%%%%%%!!%%%%%%%%%%%%%%%%%%%%%%%%%%!!%%%%%%%%%%%%%%%%%%%%%%%%%%%%%%%%%%%%%%%%!!!!!!!!!!!!!!!!!!!!!!!!!!!!!!!!!!!!!!!!!!!!!!!!!!!!!!!!!!!!!!!!!!!!!!!!!!!!!!!!!!!!!!!!!!!!!!!!!!!!!!!!!!!!!!!!!!!!!!!!!!bbbbbbbbbbbbbbbbbbbbbbbbbbbbbbbbbbbbbbbbbbbbbbbbbbbbbbbbbbbbbbbbbbbbbbbbbbbbbbbbbbbbbbbbbbbb!!!!!!!!!!!!!!!!!!!!!!!!!rrrrrrrrrrrrrrrrrrrrrrrrrrrrrrrrrrrrrrrrrrrrrrr!!!!!!!!!!!!!!!!!!!!!!rrrrrrrrrrrrrrrrrrrrrr!!!!!!!!!!!!!!!!!!!!!!rrrrrrrrrrrrrrrrrrrrrrrrrrrrrrrrrrrrrrrrrrrrrrrrrrrrrbbbbbbbbbbbbbbbbbbbbbbbbbbbbbbbbbbbbbbbbbbbbbbbbbbbbbbbbbbbbbbbbbbbbbbbbbbbbbbbbbbbbbbb!!!!!!!!!!!!!!!!!!!!!!!!rrrrrrrrrrrrrrrrrrrrrrrrrrrrrrrrrrrrrrrrrrrrr!!!!!!!!!!!!!!!!!!!!rrrrrrrrrrrrrrrrrrrr!!!!!!!!!!!!!!!!!!!!rrrrrrrrrrrrrrrrrrrrrrrrrrrrrrrrrrrrrrrrrrrrrrrrrrrrrrrbbbbbbbbbbbbbbbbbbbbbbbbbbbbbbbbbbbbbbbbbbbbbbbbbbbbbbbbbbbbbb!!!!!!!!!!!!!!!!rrrrrrrrrrrrrrrrrrrrrrrrrrrrr!!!!!!!!!!!!!rrrrrrrrrrrrr!!!!!!!!!!!!!rrrrrrrrrrrrrrrrrrrrrrrrrrrrrrrrrrr5555555555555555555555555555555555555555555555555555555555555555555555555555555555555555555555555555555555555555555555555555555555555555555555555555555555 5 55555 5 5555 5 55555 5 55 5 55 5 55555555 5 5555555 5 555570 80 90 100 110 120 130102030405060708090
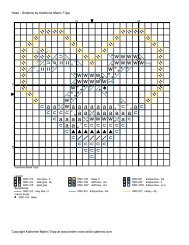
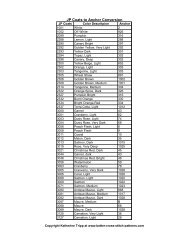
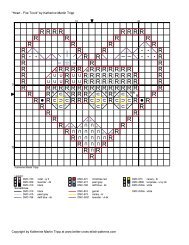
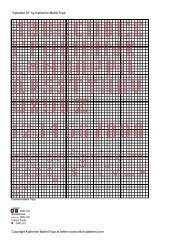
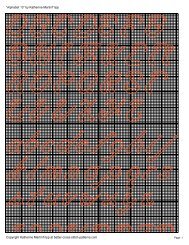
<strong>Bookmark</strong> ‐ <strong><strong>Free</strong>dom</strong> <strong>Isn't</strong> <strong>Free</strong>Author:Company:Copyright:Website:Grid Size:Design Area:Katherine Martin TrippExtra Mile MercantileKatherine Martin Trippwww.better-cross-stitch-<strong>pattern</strong>s.com135W x 96H9.50" x 6.71" (133 x 94 stitches)Legend:r [2] DMC 321 christmas red 5 [2] DMC 415 pearl gray % [2] DMC 3820 straw - dk! [2] DMC White white 8 [2] DMC 318 steel gray - lt ~ [1] KRE 002 Goldb [2] DMC 796 royal blue - dk 7 [2] DMC 317 pewter gray2 [2] DMC 762 pearl gray - vy lt % [1] KRE 001 SilverBackstitch Lines:DMC-321 christmas red DMC-415 pearl gray DMC-3820 straw - dkDMC-796 royal blue - dk DMC-318 steel gray - lt KRE-002 GoldDMC-762 pearl gray - vy lt DMC-317 pewter grayIn the Photograph:I embroidered "<strong><strong>Free</strong>dom</strong> <strong>Isn't</strong> <strong>Free</strong>" on 14-count Aida using DMC 6-strand cotton floss. Selected stitches are then highlighted withKreinik Blending Filament.This bookmark is made by stitching a front and back design on two separate pieces of fabric, then sewing them together. The frontcombines the American flag with a set of dog tags. The back is customized with your soldier's name and branch of the service. Thesentiment "Serving Proudly" can be changed to reflect the status - "Served Proudly" for a person no longer on active duty; "Sacrificed"for the soldier who has paid the ultimate price to protect our freedom. The white fringe is accented with red and blue; the curved endscarry through the theme of our flag proudly waving.This design can be adapted to stitch on similarly-sized, precut bookmarks.What You'll Need:• Fabric• DMC (or other 6-strand cotton) Floss• Kreinik Blending Filaments #001 & 002.• Alphabet 30 - Dog Tags and Alphabet 31 - <strong><strong>Free</strong>dom</strong> to customize the back of your bookmark• 10 count graph paper (Under "Resources" on the left menu) to use with your alphabets to customize the back of your bookmark.Stitch Complexity:• Full cross stitches• 1/4, 1/2 and 3/4 cross stitches• BackstitchesIf you are unfamiliar with any of these stitches, click on the buttons under the "Tutorials" section of the left menu. There, you will finddetailed diagrams and instructions for each stitch.How to <strong>Cross</strong> Stitch this Design:If you already know how to cross stitch, the Quick Start checklist below will get you on your way. Just learning? Simply click on the"Getting Started" button on the left menu.Step 1 - Review this ChartEliminate surprises by reading these instructions and reviewing the chart thoroughly before you begin stitching. Identify and learn anyunfamiliar stitches listed in "Stitch Complexity" above.Disregard the fabric and design measurements listed under "Grid Size" and "Design Area" at the top of this page. The actualdimensions are described in Step 2 below.You will use two separate pieces of fabric for this bookmark.The first chart (<strong><strong>Free</strong>dom</strong> <strong>Isn't</strong> <strong>Free</strong>):• Shows all of the stitching to be done with DMC floss for the front of the bookmark.• The white half stitches surrounding the perimeter are the stitches you will use to "sew" the front piece to the back piece.
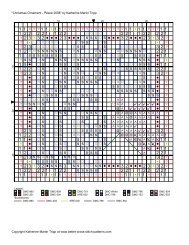
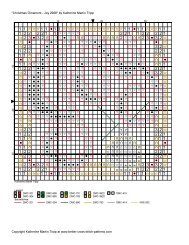
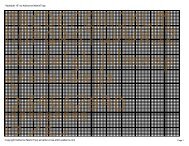
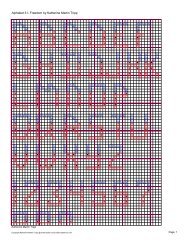
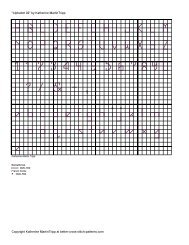
The second chart (<strong><strong>Free</strong>dom</strong> <strong>Isn't</strong> <strong>Free</strong>):• The second chart: shows where to use Kreinik metallic blending filament. Place half stitches in the same direction as the topdiagonal of your DMC cross stitches.• Use a single strand of gold for the flagpole.• Use a single strand of silver for the half stitches making up the outside raised "border" of the dog tags and for the letters "<strong>Isn't</strong> <strong>Free</strong>."• To complete the beads of the dog tag chain, use silver quarter stitches in the upper left corner of each square already stitched with a3/4 stitch. NOTE: Some of the existing outline stitches are left in the chart to help you keep your place.The third chart (Serving Proudly):• Shows the DMC stitching for the for the back of the bookmark, using the sentiment "Serving Proudly." You can substitute one of thealternates or use "Alphabet 31 - <strong><strong>Free</strong>dom</strong>" to chart your own words.• "Austin Daniels, USMC" is shown only for placement and floss color purposes. Use "Alphabet 30 - Dog Tags" to chart your ownname and service branch. NOTE: The floss color used for the letters in the name on the back is not the same as that used for theletters in the dog tags on the front. DMC 762, used to create an embossed look to "<strong>Isn't</strong> <strong>Free</strong>," is too light to use on the stand-aloneletters when stitched on a white backgroud.• Each separating gold star is created with either five straight stitches or five daisy stitches. Start by coming up through the middlehole and down through each tip.• The white half stitches surrounding the edge are the stitches that "sew" the sides together later.The fourth chart (Serving Proudly):• Shows where to use Kreinik metallic blending filament. Place half stitches in the same direction as the top diagonal of your DMCcross stitches.• Use a single strand of silver for the name and branch.• Use a single strand of gold to place a straight stitch over each stitch for the stars (even if you have used daisy stitches with theDMC).Below these charts are other possible sentiments, as well as the more common branches of the military.Since the white half stitches surrounding the perimeter are used to sew the sides together, they will be the last stitches you will do.These stitches are not meant to be an integral part of the design. So, if you are embroidering this bookmark on a different color offabric, you may want to change this floss to a color that will blend, or "disappear" into the background. On the left menu, click on "JoinSides" and "Make Fringe" to see how this process works.Step 2 - Select and Prepare Your FabricSize: For a bookmark exactly like the photograph, you will need two identical pieces of 14-count Aida, 38 stitches x 136 stitches,calculated in this way:The width is 38 rows• 20 rows for the cross stitched design• plus 2 rows - 1 on each side to join the front to the back• plus 2 rows - 1 on each side where you'll trim the bookmark after joining• plus 14 rows - 7 on each side for a 1/2 inch fudge factorThe length is 136 rows• 92 rows for the cross stitched design• plus 2 rows - 1 on each side to join the front to the back• plus 28 rows - 14 on each side for the fringe• plus 14 rows - 7 on each side for a 1/2 inch fudge factorTo stitch the design exactly as it is in the photgraph, simply use the materials described. If you have a favorite fabric type and threadcount, or if you have a specific size in mind for the finished piece, translate inches to thread count to determine your initial fabric size. Ifyou'd like help converting, click on the "Stitch Counts" button on the left menu for an easy formula and a handy table.Type: Because bookmarks are handled a lot, I prefer using Aida cloth for durability. It also supports the metallic stitches, whereas alightweight fabric can be too easily distorted.Preparation: Find the center, secure the edges and baste in gridlines. For more details, click on "Preparing Fabric" from the left menu.Step 3 - Select and Prepare Your FlossUse the colors listed above or substitute ones of your own.If using fabric with a different thread count, you may need to adjust the number of strands of floss you'll use. Select "Coverage" on theleft menu to help you decide.Prepare your floss as described in Step 3 from the "Getting Started" button on the left menu. "Separating Floss" will show you a quickand easy method for separating your floss strands.To duplicate the bookmark in the photograph on 14-count Aida, use standard cotton floss• Full cross stitches - 2 strands
• 1/4 and 3/4 partial stitches - 2 strands• 1/2 stitches joining the front to the back - 2 strands• Backstitches in the dog tags using DMC 317 - 2 strands• All other backstitches - 1 strand• Daisy stitches (one method for creating stars)- 2 strands• Straight stitches (alternate method for creating stars) - 2 strandsKreinik Metallic Blending Filament• 1/2 stitches (stitched over DMC standard floss) - 1 strand• Straight stitches in the stars - 1 strandStep 4 - Stitch the DesignEach square containing a symbol represents one stitch; the legend indicates which color to use. Squares with a smaller symbol tuckedinto one corner represent partial stitches. Review the stitching guidelines in Step 4 of the "Getting Started" page.Follow this order when stitching this bookmark:• Full and partial cross stitches, straight stitches, daisy stitches in DMC• Stitches with KRE - Kreinik Metallic (1 strand) over existing stitches• BackstitchesSpecialty flosses often require a little extra care when handling. For tips on successfully stitching with metallic floss or blendingfilaments, choose "Metallic Floss" under "Tutorials" on the left menu.Step 5 - Finishing TouchesAssembly is the final step in finishing your bookmark. If you want to duplicate the bookmark in the photo, add blue and red flossaccents to the fringe. Select "Make Fringe" from the menu on the left, then click on "add floss accents to your fringe" in paragraph 2.Since you want to end up with four strands of blue and four strands of red in each accent location, thread your needle with two strandsof each and follow the step-by-step instructions.When finished, click on the "Join Sides" button on the left menu. When you reach Step 7, only trim and Fray Block the fabric on thelong (or fringe-less) sides.Leave the fabric on the ends that will have the long fringe. Decide if you'd like it straight or curved, then return to "Make Fringe" on theleft menu. Follow the instructions and diagrams to finish off your bookmark.