Download PDF Instructions - Alex Toys
Download PDF Instructions - Alex Toys
Download PDF Instructions - Alex Toys
- No tags were found...

Create successful ePaper yourself
Turn your PDF publications into a flip-book with our unique Google optimized e-Paper software.
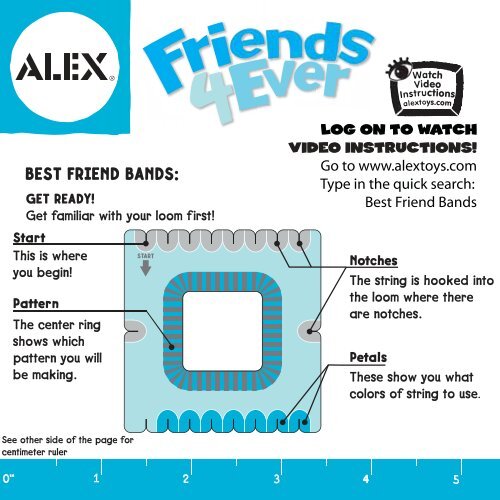
BEST FRIEND BANDS:GET READY!Get familiar with your loom first!StartThis is whereyou begin!PatternThe center ringshows whichpattern you willbe making.Log on to watchVIDEOINSTRUCTIONS!Go to www.alextoys.comType in the quick search:Best Friend BandsNotchesThe string is hooked intothe loom where thereare notches.PetalsThese show you whatcolors of string to use.See other side of the page forcentimeter ruler0“ 4
You can make a bracelet using the colors shown on the loom or create your owncolor combinations. Simply use the colors on the loom as a guide. For example,the loom shown here has pink and yellow stripes. To make blue and greenstripes, just put blue string where you see pink petals and put green string whereyou see yellow petals.GET SET!Now that you know how the loom works, let's set it up with string!Start with the horizontal stripe pattern. ALL THE PATTERNS WILL BE SET UP INTHE SAME WAY.Cut a 20” (50cm) length of string (2 lengths of the ruler on the bottom) for eachof the petals on the top and bottom of the loom in the corresponding color. Cut40” (100cm) lengths for the 2 middle strings. For example, for the horizontalstripes cut 8 pink strings and 7 yellow strings all 20” (50cm) long. Cut 2 yellowstrings each 40” (100cm) long.Line up the ends ofall the strings andtie them in a knot.Divide the strings Take all of theinto 2 groups and strings together andput them around a tie them in a knotpencil.close to the pencil.Slip the loop you justmade off the pencil.This loop will hold thebracelet on your wrist!6 910”
Place the loop in the center of the loom. Now pull out each strand and hookit into the notch of the matching colored petal. You've just strung your loom!GO!To create your bracelet you will need to unhook one strand at a time andrehook it in another notch.EVERY PATTERN IS MADE THE SAME WAY!12Move the string from the STARTarrow into the empty notch directlybelow it.Now move the next stringon the bottom up to theempty notch on top.
34Now move the next top string to theempty notch on the bottom.Continue moving the strings in thisway: move the bottom strings up andthen move the top strings down intothe empty notches below.56Now all of the pink strings shouldbe on the top and all the yellowstrings should be on the bottom.Switch the positions of the yellowstrings. (The right string will move intothe left notch and the left string willmove into the right notch.)
Rotate your loom so thebottom is now on the top.Notice that you have an emptynotch in the lower left handcorner, just like when youstarted.Repeat steps 1-6until your bracelet islong enough.TIPS AND TRICKSKeep your strings nice and tight!Before you switch the middle strings in Step 6, pull them away from each other. Pulluntil you see the top and bottom strings all touch at the center point.IMPORTANT!Untangle the loose strings often!Comb them straight with your fingers.
Break Time: If you take a break beforeyour bracelet is done, place the end of thestring into the notch where you will startwhen you return!Add Beads! • Add beads to the middlestrings to place beads along the sides ofyour bracelet. • Add beads to the end ofthe loop side of your bracelet to make afancy tassel!FINISH! When your braceletis long enough, unhook all ofthe strings from the notches.Smooth the strands in thesame direction, making surethey are not tangled, anddouble knot. Trim the endsof the string in a neat tasseland trim the strings close tothe loop on the other side.Pass the knot through theloop to wear your bracelet!RepeatRepeatColor in this grid tomake your own patterns!Top Petals of LoomBottom Petals of LoomExamples:
FRIENDSHIP WHEEL:GET READY!Get familiar with your Friendship Wheel first!StartPatternThis is where you begin!The center ringshows whichpattern you willbe making.Log on to watchVIDEO INSTRUCTIONS!Go to www.alextoys.comType in the quick search:Friendship WheelNotchesThe string is hooked intothe wheel where thereare notches.PetalsThese show you whatcolors of string to use.See other side of the page forinches ruler0cm 1 2 3 4 5 6 7 8 9 10 11 12 13
You can make a bracelet using the colors shown on the wheel or create your owncolor combinations. Simply use the colors on the wheel as a guide. For example,the wheel shown here has yellow hearts on a pink background. To make bluehearts on a red background just put blue string where you see yellow petals andput red string where you see pink petals.GET SET!Now that you know how the wheel works, let's set it up with string!Start with the heart pattern. All patterns are set up in the same way. Look at thepattern ring and count how many colors it uses. The heart pattern uses twocolors.Cut a 20" (50cm) length of string (2 lengths of the ruler on the bottom) for eachnotch in the petals on the wheel in the corresponding color. For example, for theheart design cut 10 red strings that are 20” (50cm) long and 6 yellow strings thatare 20” (50cm) long.Line up the ends ofall the strings andtie them in a knot.Divide the stringsinto 2 groups andput them arounda pencil.Take all of thestrings together andtie them in a knotclose to the pencil.Slip the loop you justmade off the pencil.This loop will hold thebracelet on your wrist!14 15 16 17 18 19 20 21 22 23 24 25
Place the loop in the center of the wheel. Now pull out each strand and hook itinto the notch of the matching colored petal. You've just strung your wheel!GO!To create your bracelet you will need to unhook one strand at a time and rehookit in another notch.EVERY PATTERN WORKS THE SAME WAY!1TOP2Find the start arrow and rotateit to the top of the wheel.Unhook the string fromthe right notch...
Counter-clockwise3Notice that youskipped threepetals to getto the bottompetal!...and rehook itinto the notch to theright of the petal directly below the top one.132group of 3See how the strings createa group of three?4 5Unhook the string onthe left of the group......and rehook it up to the notchon the left of the single string.Rotate your wheel counter-clockwise so that the next petal isat the top.Repeat steps 1-5 and watch your bracelet grow like magic!
TIPS AND TRICKSStringing Tip: Remember:When taking the string from the top:take from the right and replace to theright!When taking the string from the bottom:take from the left and replace to theleft!LEFTtoLEFT!RIGHTtoRIGHT!Holding Tip: To keep trackof your place while you arehooking, hold the wheel withyour thumb to the left of thestrings you are working with!