USER MANUAL FOR PDA HP iPAQ 614C - VideoTesty.pl
USER MANUAL FOR PDA HP iPAQ 614C - VideoTesty.pl
USER MANUAL FOR PDA HP iPAQ 614C - VideoTesty.pl

Create successful ePaper yourself
Turn your PDF publications into a flip-book with our unique Google optimized e-Paper software.
Rev. 3.02<br />
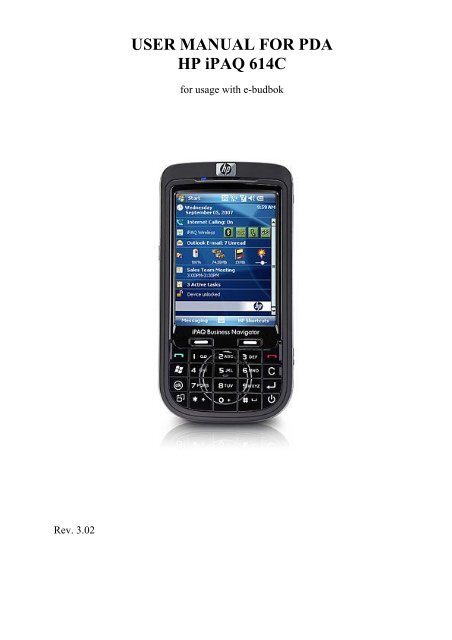
<strong>USER</strong> <strong>MANUAL</strong> <strong>FOR</strong> <strong>PDA</strong><br />
<strong>HP</strong> <strong>iPAQ</strong> <strong>614C</strong><br />
for usage with e-budbok
When receiving the <strong>PDA</strong>, it is set with a SIM card, and with the correct settings for connection to<br />
a mobile network.<br />
Internet button<br />
Scrolling button<br />
(up/down tap)<br />
Pointer<br />
Scrolling function.<br />
Move your finger round the<br />
circle. Moving it clockwise is<br />
scrolling down, and counter<br />
clockwise is scrolling up.<br />
On/Off-button<br />
On – sim<strong>pl</strong>e press<br />
Standby – sim<strong>pl</strong>e press<br />
Off – hold down the button until a<br />
turn off notification appears on<br />
the screen. Press OK.
Charging:<br />
- A charging cable is enclosed. Contact point is at the bottom of the <strong>PDA</strong>.<br />
- When not in use, the <strong>PDA</strong> should be connected to power.<br />
Getting started:<br />
- Press the on/off button quick and easy. The <strong>PDA</strong> will start like any other mobile<br />
phone.<br />
- When requested a PIN-code, enter the PIN-code provided with the <strong>PDA</strong>. The PINcode<br />
may be entered using the pointer pressing the numbers on the screen, or by using<br />
the keyboard. Then press the green button on the screen, or the enter button on the<br />
keyboard ( ).<br />
Keyboard:<br />
- The keyboard on the screen can be accessed at any time by putting the pointer on the<br />
keyboard sign at the bottom of the screen.<br />
Internet:<br />
- E-budboken is on the web. Start internet by clicking the internet button on the top left<br />
of the <strong>PDA</strong>.<br />
- Internet may also be started by clicking the START-button on the top left corner of<br />
the screen, and then choose Internet Ex<strong>pl</strong>orer.<br />
- The <strong>PDA</strong> will then connect to internet, and will show the logon page for budbok.no<br />
when connected.<br />
- Use the pointer and click the field "Route" and enter the route number.<br />
- The do the same for entering your phone number in the next area "Tel:".<br />
- Then press "Login" on the screen.
When logged in:<br />
- When logged in you are given several options.<br />
o Ready: - shows the estimated time of arrival of the papers<br />
o Start – Press to start the route<br />
o (Stopp – Press to end the route. Only available after registering Start first))<br />
o New: – Press to show TILGANG. The digit shows the amount of tilgang<br />
o Stop: - Press to show who has stopped<br />
o Msg: - Press to see com<strong>pl</strong>aints/messages<br />
o Show (XXX) – Press to show the route in walking order.<br />
o Change route – Switching between routes, if you have more than one.<br />
o Log out – Press to log out from the route you are logged in to.
Show (XXX) –Dis<strong>pl</strong>aying the route in walking order.<br />
On the top of the page you'll see which route number you are looking at, and which date this list<br />
is valid for. Below this, you'll find five buttons..<br />
– Home. This leads you back to the start page.<br />
– Settings. To adjust wether you want to see only the modules and changes in the list, it<br />
can be adjusted here.<br />
- Walking order. Choose which walking order you prefer, or change the name of a<br />
walking order. "Default" is the company's walking order, and it will be chosen unless<br />
you have chosen a different order.<br />
- Save. Save a copy of today's list. You can show it at anytime by opening it from<br />
"mine dokumenter".<br />
- Help. Description of symbols used.
In this exam<strong>pl</strong>e you'll find it listed "Usorterte". This are the subscribers not arranged in walking<br />
order. This could be due to several reasons, but it is important that it is reported to your manager,<br />
so it can be adjusted. Tap on to se the subscribers in question.<br />
Then you see the first module with the module name (NTNUI Dragvoll, husk pakker) and any<br />
description if available. The modules are marked with a grey background.<br />
You can also see the amount of papers in the module, followed by the first delivery.<br />
The street name is listed with bold letters first. The street name will appear only once, with the<br />
house numbers reflecting to that street, as well as the floor number and apartment number. The<br />
street name will only appear when you are moving from one street to another.<br />
Note that there is a stip<strong>pl</strong>ed line separating the subscribers. Everything between two stip<strong>pl</strong>ed<br />
lines, concerns only one subscriber.<br />
By clicking the pencil ( ) , you can retrieve further information, as well as editing the floor<br />
number, apartment number and the description. You can also report back on customers not found<br />
this way, but only on those new subscribers, subscribers that stops or have messages.<br />
Subscriber with message Subscriber without message
- Full screen and changing text size for the internet<br />
o Press "Meny" (menu) at the bottom right on the screen. Then press "Vis"<br />
(show) in the menu that appears.<br />
� Choose "Full skjerm" for full screen viewing.<br />
� To get back to normal showing again, put the pointer to the<br />
screen for about a second. A menu will appear. Mark "Full<br />
skjerm" again.<br />
� To change text size, press "Tekststørrelse" in the same menu, and then<br />
choose the preferred size. Biggest on top.<br />
- When viewing the list, you will need to scroll down to view all subscribers. This can<br />
be done in several ways.<br />
o You may use the pointer and use the scrolling marker on the right side of the<br />
screen, in Internet Ex<strong>pl</strong>orer. Push it up or down, or use the small arrows on the<br />
top or bottom to move it up or down.<br />
o You can also let your finger slide around the circle to move the page up or<br />
down.<br />
o There is also the scrolling button on the left side of the <strong>PDA</strong>.<br />
� By pushing the button quickly up or down, you are scrolling one page<br />
for each quick push.<br />
- Going forward or back between the internet pages can be done by putting the pointer<br />
to the screen for about one second, and then choose "fram" for forward, or "tilbake" to<br />
go back.<br />
Calling using <strong>PDA</strong><br />
- This <strong>PDA</strong> is also working as a cellular phone. Dial the number you want to call by<br />
pressing the buttons on the keyboard, as when you are using any other phone. Press<br />
the green button to make the call, and the red button to hang up.<br />
Turning off <strong>PDA</strong><br />
- Press the on/off-button, and hold it in until you get a confirmation message on the<br />
screen. Press "Ja" on the screen to turn it off.<br />
- By using a short, quick press on the on/off-button, you are leaving the <strong>PDA</strong> in standby<br />
mode. It is then still using a little power, but is quickly returnable to working mode.