


Create successful ePaper yourself
Turn your PDF publications into a flip-book with our unique Google optimized e-Paper software.
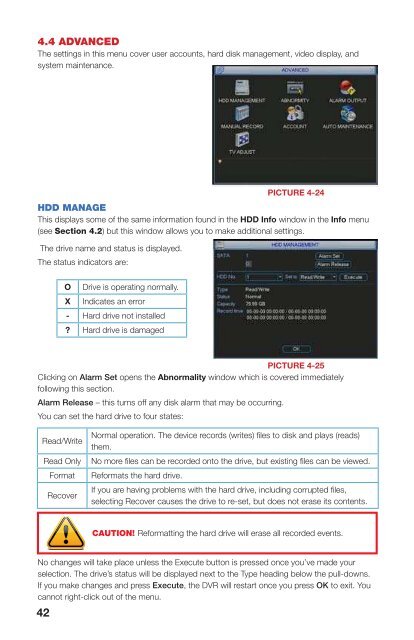
4.4 ADVANCEDThe settings in this menu cover user accounts, hard disk management, video display, andsystem maintenance.ABNORMALITYThis window allows you to set up alarms for disk and system disconnection errors as well ashow these alarms are handled. Each type of alarm can be independently enabled along withwhat events that type of alarm will trigger.PICTURE 4-24HDD MANAGEThis displays some of the same information found in the HDD Info window in the Info menu(see Section 4.2) but this window allows you to make additional settings.The drive name and status is displayed.The status indicators are:O Drive is operating normally.X Indicates an error- Hard drive not installed? Hard drive is damagedEvent type – Chose from No Disk, Disk Error,Disk No Space, Net Disconnectedand IP Conflict.Latch – This is the “hold time” that the DVRwill wait before issuing another alarm.The delay can be set to between 1 to300 seconds (5 minutes).Show Message – When enabled, this willdisplay the event notification on theDVR’s screen.Alarm Upload – This feature is not availableon this model.Event TypeEnableABNORMALITYShow Message Alarm upload Send EmailBuzzerNo DiskPICTURE 4-26Send E-mail – this will send an e-mail notification to the recipient address set up in theNetwork menu (see Section 1.2 Advanced Network Setup in the RemoteMonitoring Guide).RECORDThis is the <strong>Manual</strong> Recording window covered in Section 3.4.SaveCancelCHAPTER 4 MENUSPICTURE 4-25Clicking on Alarm Set opens the Abnormality window which is covered immediatelyfollowing this section.Alarm Release – this turns off any disk alarm that may be occurring.You can set the hard drive to four states:Read/WriteRead OnlyFormatRecoverNormal operation. The device records (writes) files to disk and plays (reads)them.No more files can be recorded onto the drive, but existing files can be viewed.Reformats the hard drive.If you are having problems with the hard drive, including corrupted files,selecting Recover causes the drive to re-set, but does not erase its contents.CAUTION! Reformatting the hard drive will erase all recorded events.ACCOUNTThis is the account management window which allows you to add or delete users, create usergroups, modify the access privileges of users, and create or change passwords.There are three pre-configured default users;Admin, 888888 and 666666. The first twohave administrator rights.When adding a user, you not only create theiruser name and password, but you can grantor deny control over specific activities on theDVR, including which cameras that user canview or play back. These privileges can bechanged later by an administrator-level userusing the Modify <strong>User</strong> button. Administrator<strong>User</strong>s have control over 60 different functionswhile basic <strong>User</strong>s have 35 functions that canbe allowed or denied.PICTURE 4-27No changes will take place unless the Execute button is pressed once you’ve made yourselection. The drive’s status will be displayed next to the Type heading below the pull-downs.If you make changes and press Execute, the DVR will restart once you press OK to exit. Youcannot right-click out of the menu.A user or group name can consist of at most eight characters and no two users may have thesame user name. There is no limit to the number of users or groups.42 43


