11n WLAN Outdoor CPE
11n WLAN Outdoor CPE
11n WLAN Outdoor CPE

Create successful ePaper yourself
Turn your PDF publications into a flip-book with our unique Google optimized e-Paper software.
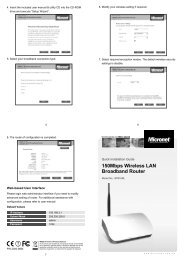
Software Configuration1. Assign a static IP address to your PC which should be in the1. same network segment with the SP9015N/SP9012NL. As the1. default IP address of the SP9015N/SP9015NL is 192.168.1.200,1. you may choose from192.168.1.2 to 192.168.1.254.1. Then click OK.Note: In the example here, we only change the “Wireless NetworkNote: Name (SSID)” as “Join_me”, and later, we will show you if APNote: mode works correctly. In addition, for better coverage of theNote: AP, you may also use an external antenna; if so, remember toNote: set the antenna setting from “Internal” to “External (SMA)”Note: after your external antenna is successfully installed.2. Open the web browser on your2. PC, key in the IP address2. (192.168.1.200) of the2. SP9012NL/ SP9015N in the2. address bar, and then enter.3. Now, you will see the log-in2. page of the SP9015N/2. SP9012NL. The default2. “name” and “password” are2. “admin” and “admin”2. respectively. Enter them and2. then click Login.* Since the SP9015N/SP9012NL covers “AP mode” as well as “APClient mode”, the following steps are categorized for conveniencereading to describe how to set each mode after successful log-in.AP Mode1. Choose Wireless Settings > Basic. Then you will see the1. “Basic Wireless Settings” page. The default is AP mode1. already. However, you still can set the parameters to optimize1. your application if you want. Click Apply to save the parameters.52. Choose Security in the left column, and here comes the2. “Security” page. You may set the parameters like “WPA2/ AES”2. for more secure network communication in your application. Click2. Apply to save the parameters.The following screenshotshows the availableaccess points in thewireless network fromanother PC aside. Now,you can see “Join_me” inthe list.6AP Client Mode1. Choose Wireless Settings > Basic. Then you will see the1. “Wireless Basic Settings” page. Choose “AP Client” from1. Wireless Mode, and click Apply to save it. Feel free to change1. the other parameters to optimize your application before clicking1. Apply and Reboot Now.2. Click Site Survey, and a “Site Survey/ Scan AP” window will pop1. up. The window lists all the available access points / routers in1. the wireless network. Select the one you prefer to connect to,1. and click Selected to build the connection.Communicate viaQuick Installation Guide<strong>11n</strong> <strong>WLAN</strong> <strong>Outdoor</strong> <strong>CPE</strong>Model No.: SP9012NL/SP9015N3. If the AP you connect to needs authentication or password, click1. Next and Security Mode in the left column, fill out the1. corresponding items, and click Apply to build the connection;1. otherwise, the connection is already built and you can start to1. enjoy your speedy wireless connection.P/N 2300-0681WEEE Directive & Product DisposalAt the end its serviceable life ,this product should not be treatedas household or general waste. It should be handed over to theapplicable collection point for the recycling of electrical andelectronic equipment, or returned to the supplier for disposal.7w w w . m i c r o n e t . c o m . t w
IntroductionSP9015N/SP9012NL is a long range outdoor wireless Access Pointof 802.<strong>11n</strong> mode, operating under 5.8GHz/2.4GHz frequency. Itsupports output power up to 22dBm/26dBm and equips a16dBi/10dBi embedded panel antenna. With extraordinary design,SP9015N/SP9012NLcan be installed outdoor, its working range isextended up to 5Km with stable wireless connection than ever.Meanwhile, this model comes with PoE injector and advancedfunctions for easy installation and user management.Tour of the ProductMounting Kit, Power adapter and PoE InjectorPackage ContentsPlease verify the following items are in the package:1 x SP9015N/SP9012NL <strong>Outdoor</strong> Wireless <strong>CPE</strong>1 x PoE Injector & Power Adapter1 x Quick Installation Guide1 x Product CDUsers MUST use the “Power cord & PoE Injector” shipped in thebox with the SP9015N/SP9012NL. Use of other options will causedamage to the SP9015N/SP9012NL <strong>CPE</strong>.1. The bottom of the SP9015N/SP9012NL is the moveable cover.1. Push the button in the side to remove upper housing. Grab the1. cover and pull it back harder to take it out as the figure1. shown below.1 x Mounting KitNote: Contact your dealer immediately if any of the above items areNote: missing, damaged, or if the unit does not work.1 22. Plug a standard Ethernet cable into2. the RJ45 port.7. Mount the SP9015N/4. SP9012NL steadily to the pole by4. locking the Mounting Kit tightly.3. Slide the cover back to seal the bottom of the SP9015N/4. SP9012NL.4. Take out the power cord and PoE injector, and plug the power4. cord into the DC port of the PoE injector.5. Put what in the Step.3 and Step.4 together by plugging the other4. side of the Ethernet cable in the Step.3 into the PoE port of the4. PoE injector in the Step.4. When you finish the Step.5, the4. complete set will be like4. the following picture.8. Now you successfully4. finished your hardware4. installation.Using the external antennaIf you prefer to use the external antenna with SMA connector foryour application instead of the built-in directional antenna, pleasefollow the steps below.1. Push the button in the side to1. remove upper housing. Grab the1. cover and pull it back harder to1. take it out. The metal SMA1. connector will appear.6. Turn the SP9015N/SP9012NL over. Put4. the cable tie through the middle hole of the4. SP9015N/SP9012NL.4.1 Wall Mount2 Pole Mount212. Connect your antenna with the SMA connector on the button of1. the SP9015N/SP9012NL. Connect the SP9015N/SP9012NL1. with your PC by an Ethernet cable plugging in LAN port of PoE1. injector in one side and in LAN port of PC in the other side.1. Power on the SP9015N/SP9012NL by PoE from PoE injector.34