
You also want an ePaper? Increase the reach of your titles
YUMPU automatically turns print PDFs into web optimized ePapers that Google loves.
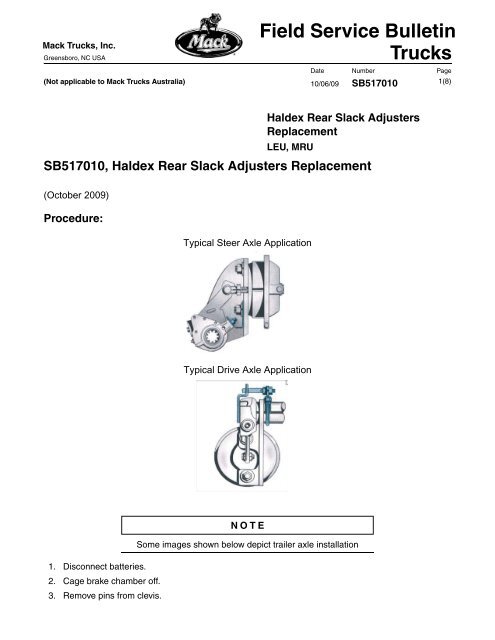
Mack <strong>Trucks</strong>, Inc.Greensboro, NC USA(Not applicable to Mack <strong>Trucks</strong> Australia)<strong>Field</strong> <strong>Service</strong> <strong>Bulletin</strong><strong>Trucks</strong>Date Number Page10/06/091(8)SB517010Haldex Rear Slack AdjustersReplacementLEU, MRUSB517010, Haldex Rear Slack Adjusters Replacement(October 2009)Procedure:Typical Steer Axle ApplicationTypical Drive Axle ApplicationSome images shown below depict trailer axle installation1. Disconnect batteries.2. Cage brake chamber off.3. Remove pins from clevis.
Mack <strong>Trucks</strong>, Inc. Date Number Page<strong>Field</strong> <strong>Service</strong> <strong>Bulletin</strong> 10/06/09 SB5170102(8)4. Back off slack adjuster.5. Remove snap ring and defective slack adjuster.6. Place at least one inner cam washer on shaft then install adjuster with the 7/16" adjusting hexpointing away from the air chamber.7. Secure adjuster to shaft with snap ring. Install enough washers (per TMC recommended practice)to reduce end play to less than .060" maximum. Zero end play is not acceptable.8. Rotate the 7/16" hex clockwise to move adjuster into clevis. (Do not pull push rod out to meetclevis).
Mack <strong>Trucks</strong>, Inc. Date Number Page<strong>Field</strong> <strong>Service</strong> <strong>Bulletin</strong> 10/06/09 SB5170103(8)9. Coat clevis pin with anti-seize type lubricant and install. Secure clevis pin with a cotter pin. Bendeach cotter pin 90 degrees away to ensure it does not slip out of the clevis pin. Both ends of thecotter pin should form a 180 degree angle.Left Rear Drive AxleRight Rear Drive AxleItem Part Number Qty Description Usage1 21446722 2 SLACK ADJUSTER Second Driven Axle2 25624709 2 BRACKET, RETAINER Both Driven Axles3 20370396 2 PIN Both Driven Axles4 NA 2 COTTER PIN Both Driven Axles5 25156842 2 Slack Adjuster First Driven Axle (Not Shown)BACRefABCValue10-25 mm to Axle HousingTorque to 27-40 Nm (20-30 ft lbs)Torque to 54-67 Nm (40-50 ft lbs)
Mack <strong>Trucks</strong>, Inc. Date Number Page<strong>Field</strong> <strong>Service</strong> <strong>Bulletin</strong> 10/06/09 SB5170104(8)10. Installation of S-ABA slack adjuster on a rear, rear axle, high mount brake. The purpose of the S-ABA slack adjuster on the second driven axle is so the control arm and retainer hardware can belocated as close to the axle housing as possible. The reason for this specific control arm location isto have enough clearance to the Ridewell suspension. A Haldex AA1 slack adjuster with fixedcontrol arm must NOT be used on the second driven axle with a high mount brake.11. With the AA1 Model Brake Adjuster, (Steer axle slack, first driven axle slack) rotate the control armaway from adjustment hex, toward the air chamber until it comes to an internal stop. The“Installation Indicator” must fall within the slotted area with the brake fully released. The view of theindicator varies from side to side. Haldex AA1 Adjusters are unhanded and are used on both axlesides.12. Insert the flat end of the anchor stud through the control arm bushing. Push the threaded end intothe anchor plate slot and loosely install flange nut.13. After positioning control arm and anchor pin to desired location, tighten the flange nut to 54-68 Nm(40-50 ft-lb).14. Adjust brakes by rotating the 7/16" adjustment hex clock-wise until the lining just contacts the drum.
Mack <strong>Trucks</strong>, Inc. Date Number Page<strong>Field</strong> <strong>Service</strong> <strong>Bulletin</strong> 10/06/09 SB5170105(8)15. Rotate adjustment hex counter clockwise 1/2 turn. A ratcheting sound will occur on backoff. This isnormal. Recheck all fasteners for proper installation.Final push rod stroke may not be reached until the vehicle is put into serviceand the brakes are burnished.16. Uncage brake chamber.17. Reconnect the Batteries18. Measure free stroke. Verify that free stroke is within the manufacturer’s guidelines (3/8 - 3/4 inches)then record the measurements on the brake stroke sheet on the following page. Measurepowerstroke on the front steer axle. The front steer axle measurement must be less than 2 inches.19. Adjust brakes to specifications.
Mack <strong>Trucks</strong>, Inc. Date Number Page<strong>Field</strong> <strong>Service</strong> <strong>Bulletin</strong> 10/06/09 SB5170106(8)Recommended procedure for the Brake Stroke Sheet:1. Cage the Rear Brakes (prevents air bleeding when working alone)2. Install all slack adjusters3. Check the free stroke on all wheelsa. Perform 20 brake applications (apply service brake then full release) at full system pressure of 120 psi. Recheck thefree strokeb. Check that the indicator is within the notched areac. Check that the control arm is fastened correctlyd. If tires are removed, ensure that two lugs hold the drum in placee. Recheck the camshaft end play4. Check power stroke5. uncage the brakes
Mack <strong>Trucks</strong>, Inc. Date Number Page<strong>Field</strong> <strong>Service</strong> <strong>Bulletin</strong> 10/06/09 SB5170107(8)Parts List:Front Steer Axle: Kit number 85123225(2) 20484486 / 25QD361 Slack Adjuster(2) 25624544 / 73RU3988 Retainer Strap(2) 20370396 / 25QD363 Pin(2) 8086596 / 25QD368 ClipFirst Driven Axle: Kit number 85123224(2) 25156842 / 25QD412 Slack Adjuster(2) 25624709 / 72RU3572 Retainer Bracket Hardware(2) 20370396 / 25QD363 Pin(2) 8086596 / 25QD368 ClipSecond Driven Axle: Kit number 85123223(2) 21446722 / 25QD421 Haldex S-ABA 409-20006 Slack Adjuster(2) 25624709 / 72RU3572 Retainer Bracket Hardware(2) 20370396 / 25QD363 Pin(2) 8086596 / 25QD368 Clip
Mack <strong>Trucks</strong>, Inc. Date Number Page<strong>Field</strong> <strong>Service</strong> <strong>Bulletin</strong> 10/06/09 SB5170108(8)(2) 3/8" x 1-¼" Long Bolt (Meritor)(1) 5/16" x 1" Long Bolt (Fruehauf)(1) 3/8" x 1-¼" Long Bolt (Fruehauf)(2) 1/4"x 1-¼" Long Bolt (Dana)(2) 1/4" Flat Washer (Dana)(1) 1/4"x 1-¼" Long Bolt (Eaton)Torque Chart3/8" - 16: 27-34 Nm (20-25 ft-lb)5/16" - 18: 14-20 Nm (10-15 ft-lb)1/4" - 20: 7-9 Nm (5-7 ft-lb)ReimbursementThis Repair may be eligible for reimbursement if a product failure was experienced within the time and mileage limitsof the applicable warranty coverage. Reimbursement is obtained via normal claim handling process.01Claim Type (used only when uploading from the Dealer Bus.Sys.)Labor CodePrimary Labor CodeCausal Part5173D-KA-80 - 0.4 hrs.25QD419P4Mack <strong>Trucks</strong>, Inc. engages in a continuous program of testing and evaluating to provide the best possibleproduct. Mack <strong>Trucks</strong>, Inc., however, is not committed to, or liable for updating existing chassis.