Инструкция по установке платы FX-IOC - ESMI FX NET
Инструкция по установке платы FX-IOC - ESMI FX NET
Инструкция по установке платы FX-IOC - ESMI FX NET
- No tags were found...

You also want an ePaper? Increase the reach of your titles
YUMPU automatically turns print PDFs into web optimized ePapers that Google loves.
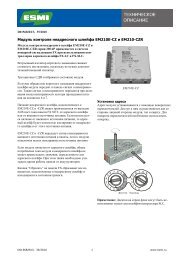
СборкаВыберите любое свободное место в шасси дляэлектроники и осторожно вставьте плату так, чтобыона <strong>по</strong>дключилась к разъему.Закрепите плату двумя винтами.MountingSelect any of the free places in the electronics rack andcarefully enter the board so it attaches to theconnector.Fasten the two retaining screws.Внешние <strong>по</strong>дключенияПодключите входные и выходные цепи к разъемамсогласно Руководству <strong>по</strong> Установке и Вводу вЭксплуатацию.External connectionsConnect the input and output circuits to the terminalsaccording to the Installation and Commissioning Guide+ 4 - + 3 - + 2 - + 1 -4k74k74k74k7PO 1+24V-+24V-24VDC / 500mAPO 2CO 2 CO 124VDC / 500mANCCNONOCNCIN 4 IN 3 IN 2 IN 1+ - + - + - + -IN 1IN 2IN 3IN 4КонфигурацияСконфигурируйте входы и выходы с <strong>по</strong>мощьюПрограммы конфигурации Win<strong>FX</strong>.ConfigurationConfigure the inputs and the outputs with the Win<strong>FX</strong>Configuration Tool.O1491-1RU 2 42-2005