Инструкция по установке платы FX-IOC - ESMI FX NET
Инструкция по установке платы FX-IOC - ESMI FX NET
Инструкция по установке платы FX-IOC - ESMI FX NET
- No tags were found...

Create successful ePaper yourself
Turn your PDF publications into a flip-book with our unique Google optimized e-Paper software.
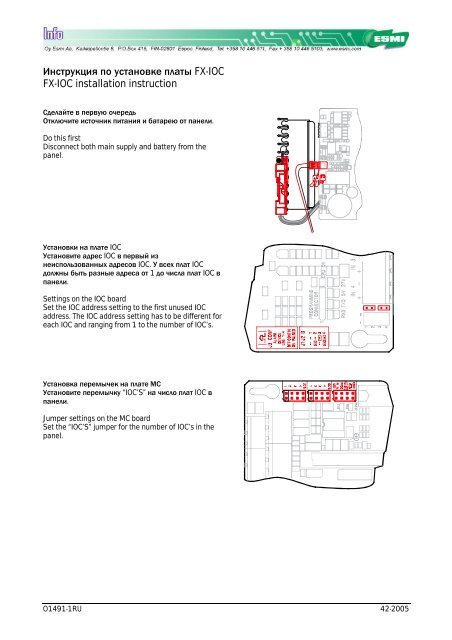
<strong>Инструкция</strong> <strong>по</strong> <strong>установке</strong> <strong>платы</strong> <strong>FX</strong>-<strong>IOC</strong><strong>FX</strong>-<strong>IOC</strong> installation instructionСделайте в первую очередьОтключите источник питания и батарею от панели.Do this firstDisconnect both main supply and battery from thepanel.+24V-+24V-PO 2PO 1BAT T+ -Установки на плате <strong>IOC</strong>Установите адрес <strong>IOC</strong> в первый изнеис<strong>по</strong>льзованных адресов <strong>IOC</strong>. У всех плат <strong>IOC</strong>должны быть разные адреса от 1 до числа плат <strong>IOC</strong> впанели.Settings on the <strong>IOC</strong> boardSet the <strong>IOC</strong> address setting to the first unused <strong>IOC</strong>address. The <strong>IOC</strong> address setting has to be different foreach <strong>IOC</strong> and ranging from 1 to the number of <strong>IOC</strong>’s.Установка перемычек на плате МСУстановите перемычку “<strong>IOC</strong>’S” на число плат <strong>IOC</strong> впанели.Jumper settings on the MC boardSet the “<strong>IOC</strong>’S” jumper for the number of <strong>IOC</strong>’s in thepanel.O1491-1RU 42-2005
СборкаВыберите любое свободное место в шасси дляэлектроники и осторожно вставьте плату так, чтобыона <strong>по</strong>дключилась к разъему.Закрепите плату двумя винтами.MountingSelect any of the free places in the electronics rack andcarefully enter the board so it attaches to theconnector.Fasten the two retaining screws.Внешние <strong>по</strong>дключенияПодключите входные и выходные цепи к разъемамсогласно Руководству <strong>по</strong> Установке и Вводу вЭксплуатацию.External connectionsConnect the input and output circuits to the terminalsaccording to the Installation and Commissioning Guide+ 4 - + 3 - + 2 - + 1 -4k74k74k74k7PO 1+24V-+24V-24VDC / 500mAPO 2CO 2 CO 124VDC / 500mANCCNONOCNCIN 4 IN 3 IN 2 IN 1+ - + - + - + -IN 1IN 2IN 3IN 4КонфигурацияСконфигурируйте входы и выходы с <strong>по</strong>мощьюПрограммы конфигурации Win<strong>FX</strong>.ConfigurationConfigure the inputs and the outputs with the Win<strong>FX</strong>Configuration Tool.O1491-1RU 2 42-2005