DACIA Duster (4x2 + 4x4) TMB PS 078 - tazak.cz
DACIA Duster (4x2 + 4x4) TMB PS 078 - tazak.cz
DACIA Duster (4x2 + 4x4) TMB PS 078 - tazak.cz

Create successful ePaper yourself
Turn your PDF publications into a flip-book with our unique Google optimized e-Paper software.
© 5.4.2011<br />
1<br />
<strong>DACIA</strong> <strong>Duster</strong><br />
(<strong>4x2</strong> + <strong>4x4</strong>)<br />
Návod k obsluze a montáži<br />
Betriebs und Montageanleitung<br />
Owner’s and fitting Manual<br />
<strong>TMB</strong> <strong>PS</strong> <strong>078</strong><br />
Tažné zařízení<br />
s přišroubovaným ramenem<br />
Towing equipment<br />
with bolt-on tow arm<br />
Anhängerkupplung<br />
mit angeschraubten Kugelhals<br />
E9-55R-01.1009
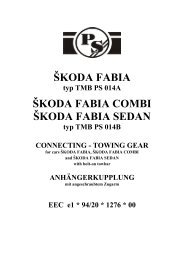
Obrázek 2 / Bild 2 / Figure 2<br />
Seznam dílů tažného zařízení:<br />
Verzeichnis der Teile der Anhängerkupplung:<br />
List of components:<br />
Název dílu Kusů Pozice<br />
Bezeichnung des Teils, Name of the part Stück, Quantity Position, Positon<br />
Nosník úplný (s identifikačním štítkem)<br />
Träger vollständig (mit Identifikationsschild)<br />
Beam assembly (with ID plate) 1 1<br />
Tažné rameno (Kugelhals, Towarm) 1 2<br />
Držák zásuvky (Steckdosenhalter, Plug box holder) 1 3<br />
Šroub (Schraube, Bolt) M12 x 65 2 4<br />
Matice (Mutter, Nut) M12 2 5<br />
Šroub (Schraube, Bolt) M10 x 85 4 6<br />
Rozpěrka (Distanzrohr, Spacer) 4 7<br />
Podložka (Unterlegscheibe, Washer) ø10,5 4 8<br />
Matice (Mutter, Nut) M10 4 9<br />
Krytka kul. čepu (Kugelbolzendeckel, Cover of the ball) 1 10<br />
Samolepící štítek (Selbstklebeetikette,<br />
Self-adhesive sticker) „50 kg“ – vesion <strong>4x4</strong> „75 kg“ 1 -<br />
2<br />
Obrázek 1 / Bild 1 / Figure 1
3<br />
TAŽNÉ ZAŘÍZENÍ - <strong>DACIA</strong> <strong>Duster</strong><br />
typ <strong>TMB</strong> <strong>PS</strong> <strong>078</strong><br />
Tažné zařízení, typové označení <strong>TMB</strong> <strong>PS</strong> <strong>078</strong>, je určeno pro připojení přívěsů o celkové hmotnosti do<br />
1 500 kg za osobní automobily Dacia <strong>Duster</strong>.<br />
Popis<br />
Tažné zařízení je svařeno z masivního ocelového nosníku v jehož středu je dvěma držáky uchyceno<br />
tažné rameno. K vozidlu je nosník připojen pomocí dvou konzol, které jsou s ním přivařeny.<br />
Všeobecné údaje<br />
Konstrukce zařízení odpovídá všem českým i mezinárodním předpisům. Tažné rameno je opatřeno<br />
kulovým čepem o průměru 50 mm dle normy ISO 3853.. Zařízení prošlo pevnostními zkouškami dle<br />
evropského předpisu EHK č.55.<br />
Parametry<br />
Maximální celková hmotnost brzděného přívěsu 1 500 kg<br />
Maximální celková hmotnost nebrzděného přívěsu<br />
Platí omezení hmotnosti přívěsu dle technického průkazu vozidla!<br />
680 kg<br />
Maximální svislé statické zatížení na kouli 50 kg (verze <strong>4x4</strong> – 75 kg)<br />
Maximální zatížení tažného zařízení se liší podle typu vozidla, na kterém je namontováno.<br />
Průměr kulového čepu 50 mm<br />
T � C<br />
Vztažná síla DC DC � g �<br />
T � C<br />
g – tíhové zrychlení (g = 9,81 ms<br />
9,0 kN<br />
-2 )<br />
T – hmotnost tažného vozidla [t]<br />
C – hmotnost přívěsu [t]<br />
Celková hmotnost tažného zařízení 16 kg<br />
Rozměry 1074 x 584 x 336 mm<br />
Seznam speciálního nářadí<br />
Pila pro vyříznutí otvoru do nárazníku<br />
Momentový klíč<br />
Návod k montáži na vozidlo<br />
Podle seznamu zkontrolujte jednotlivé součásti tažného zařízení.<br />
1. Ustavte vozidlo na ramena dílenského zvedáku.<br />
2. U modelu <strong>4x2</strong>:<br />
Odstraňte rezervní kolo. Svěste výfuk z pryžového uložení. Odmontujte tepelný štít.<br />
U modelu <strong>4x4</strong>:<br />
Svěste výfuk z pryžového uložení.
4<br />
3. Vyšroubujte dva spodní prostřední šrouby z nárazníku.<br />
4. V zavazadlovém prostoru (vnější strana rámu podvozku) odstraňte ochranné zátky a lepidlo z rámu<br />
podvozku. Pokud je to nezbytné, strhněte záslepky otvorů pro uchycení tažného zařízení a<br />
odstraňte části plastizolu na vnitřní straně rámu podvozku (vně vozidla).<br />
5. Vyřízněte nárazník podle šablony (obr.2).<br />
6. Volně namontujte nosník tažného zařízení pomocí šroubů M10x85 (6) z vnitřní strany rámu<br />
podvozku a pomocí rozpěrek (7), podložek (8) a matic M10 (9) z vnější strany rámu podvozku.<br />
Tažné zařízení zatáhněte směrem dozadu od vozidla a šrouby (střídavě) na obou stranách<br />
dotáhněte na utahovací moment 70 Nm.<br />
7. Pokračujte montáží elektrické instalace tažného zařízeni na vozidlo (viz. návod k montáži elektrické<br />
instalace pro tažné zařízení). Zásuvku elektroinstalace přišroubujte až s montáží tažného ramena.<br />
Po skončení montáže elektrické instalace namontujte zpět všechny demontované díly a příslušné<br />
spoje utáhněte předepsanými utahovacími momenty.<br />
8. Nasaďte tažné rameno (2) mezi držáky a upevněte pomocí šroubů M12x65 (4), držáku zásuvky (3)<br />
a matic M12 (5) (viz obrázek 1) mezi držáky a utáhněte momentovým klíčem na utahovací moment<br />
80 Nm.<br />
9. Na zadní nárazník nad výřez pro tažné rameno nalepte samolepící štítek „50 kg“ – verze <strong>4x4</strong> „75<br />
kg“ (příslušné místo před nalepením očistěte a odmastěte).<br />
10. Na kulový čep tažného ramena nasaďte krytku (10).<br />
Montáž tažného zařízení vyžaduje použití dílenské příručky, proto ji může provést pouze<br />
autorizovaný servis.<br />
Elektrická instalace pro tažné zařízení není součástí dodávky a je třeba ji objednat<br />
samostatně.<br />
Upozornění pro zákazníka<br />
- Dotažení šroubů (4) upevňujících tažné rameno (2) zkontrolujte po ujetí cca 1000 km<br />
s přívěsem!<br />
- Kulový čep dle potřeby namažte vhodným mazacím tukem.<br />
- Po připojení přívěsu a propojení el. instalace zkontrolujte funkci světel.<br />
- Veškeré změny a úpravy tažného zařízení jsou nepřípustné.<br />
- Při používání tažného zařízení dodržujte pokyny uvedené v tomto návodu.<br />
- Výrobce na sebe nebere zodpovědnost za škody způsobené chybně namontovaným tažným<br />
ramenem, jeho přetěžováním nebo jiným mechanickým poškozením.<br />
- Tažné zařízení nesmí být provozováno je-li poškozeno nebo je neúplné.<br />
- Není-li připojen přívěsný vozík k tažnému zařízení, musí být kulový čep chráněn krytkou!<br />
- Tažné rameno (pokud ho budete demontovat) uložte a zajistěte v zavazadlovém prostoru tak,<br />
aby při náhlém zabrždění nemohlo ohrozit bezpečnost cestujících a způsobit poškození<br />
zavazadlového prostoru. Na kulový čep tažného ramena nasaďte krytku.<br />
- Po ujetí prvních cca 500 km s přívěsem je nutné zkontrolovat dotažení upínacích šroubů<br />
nosníku k podvozku vozidla, dotažení šroubů tažného ramena a případně je dotáhnout<br />
předepsanými utahovacími momenty! Tuto kontrolu Vám doporučujeme provést v nejbližším<br />
autorizovaném servisu.
Záruční list<br />
5<br />
Výrobce tažného zařízení poskytuje záruku na konstrukci, použitý materiál, výrobní provedení a funkci<br />
dodaného tažného zařízení 24 měsíců od data prodeje.<br />
Reklamaci výrobku v zákonné lhůtě uplatní kupující u prodávajícího. Oprávněnost reklamace posoudí<br />
zástupce prodávajícího spolu se zástupcem výrobce v souladu s platnými předpisy.<br />
Podmínkou platnosti záruky je, aby tažné zařízení bylo používáno pouze k účelům, ke kterým je<br />
určeno.<br />
Kupující je povinen prověřit stav zboží při jeho převzetí. V případě poškození zboží, nedodání části<br />
tažného zařízení apod. je kupující povinen tuto skutečnost neprodleně ohlásit prodávajícímu a to bez<br />
zbytečného odkladu po převzetí zboží.<br />
Všechny součásti a příslušenství tažného zařízení musí být před odbornou montáží, zkontrolovány ve<br />
vztahu k jejich kompaktibilitě na odpovídající typ vozidla. Tažná zařízení, smí být použita pouze na<br />
výrobcem uvedený typ vozidla. V případě neodborné montáže či montáže tažného zařízení na typ<br />
vozidla, pro který není tažné zařízení určeno, neodpovídá výrobce za případné poškození tažného<br />
zařízení, způsobené vadnou montáží či jeho nesprávným použitím.<br />
Prodávající odpovídá za vady, které mělo tažné zařízení při jeho převzetí kupujícím.<br />
Záruka se nevztahuje na škody mající původ v běžném opotřebení, v přetěžování a neodborném<br />
používáním tažného zařízení, dále pokud není užíváno v souladu s pokyny uvednými v návodu<br />
k obsluze. Záruka se dále nevztahuje na škody způsobené živelnými vlivy. Prodávající rovněž<br />
neodpovídá za škodu v případě, kdy bylo tažné zařízení změněno či jinak upraveno.<br />
Záruka zaniká, bylo-li tažné zařízení poškozeno havárií (kromě havárie vyvolané samotným tažným<br />
zařízením) nebo zásahy do jeho mechanismu a konstrukce.<br />
Typové osvědčení<br />
Výrobce potvrzuje, že tažné zařízení bylo vyrobeno podle schválené dokumentace a odpovídá<br />
homologaci E9-55R-01.1009.
6<br />
ANHÄNGERKUPPLUNG FÜR<br />
<strong>DACIA</strong> <strong>Duster</strong><br />
Typ <strong>TMB</strong> <strong>PS</strong> <strong>078</strong><br />
Die Anhängerkupplung Typ <strong>TMB</strong> <strong>PS</strong> <strong>078</strong> ist für das Ankuppeln von Anhängern mit einer Masse bis<br />
1500 kg an die Pkw <strong>DACIA</strong> <strong>Duster</strong> bestimmt.<br />
Allgemeine Angaben<br />
Die Konstruktion der Einrichtung entspricht der Verordnung des Ministeriums für Verkehr der CR,<br />
sowie auch allen anderen relevanten nationalen und internationalen Vorschriften. Der Zugarm ist mit<br />
einem Kugelbolzen von Durchmesser 50 mm laut dem Standard ISO 3853 versehen. Die Vorrichtung<br />
wurde auf Festigkeit laut der europäischen Reglement ECE 55 geprüft.<br />
Parameter<br />
Max.Anhängermasse, gebremst 1500 kg<br />
Max.Anhängermasse, ungebremst 680 kg<br />
Es gilt die Gewichtseinschränkung gemäß des Fahrzeugszulassungsscheines!<br />
Stütztlast 50 kg (die Version <strong>4x4</strong> „75 kg“)<br />
Durchmesser des Kugelbolzens 50 mm<br />
DC-Wert 9,0 kN<br />
T � C<br />
DC � g �<br />
T � C<br />
g – Fallbeschleunigung (g = 9,81 ms-2)<br />
T – Gewicht des Zugfahrzeugs [t]<br />
C – Anhängergewicht [t]<br />
AHK Gesamtgewicht 16 kg<br />
Maße 1074 x 584 x 336 mm<br />
Verzeichnis Spezialwerkzeug<br />
Säge für das Ausschneiden einer Öffnung in den Stoßfänger<br />
Drehmomentschlüssel<br />
Anleitung zur Montage der Anhängerkupplung an das<br />
Fahrzeug<br />
Überprüfen Sie Die Befestigungsteile auf Vollständigkeit.<br />
1. Fahrzeug mit dem Werkstattheber hochheben.<br />
2. Beim <strong>4x2</strong> Modell:<br />
Das Ersatzrad herunterlassen. Den Auspuff aushängen. Die Wärmeschutzplatte demontieren.<br />
Beim <strong>4x4</strong> Modell:<br />
Den Auspuff aushängen.<br />
3. Die unteren mittleren Schrauben (2 Stück) des Stoßfängers entfernen.
7<br />
4. Im Kofferraum (Externeseite des Chassisrahmens) die Schutzstopfen und den Schutzkleber von die<br />
Chassisrahmens entfernen. Im Bereich Reißen Sie die Verblendungen der Öffnungen für die<br />
Befestigung der Anhängerkupplung und Entfernen Sie im Bedarfsfall Plastisolteile (Innenseite des<br />
Chassisrahmens – außen des Wagen).<br />
5. Den Stoßfänger entsprechend der beiliegenden Schnittschablone ausschneiden (Bild 2).<br />
6. Die Anhängevorrichtung lose montieren, an der Innenseite des Chassisrahmens mit Schrauben M10<br />
x 85 (6) und an der Außenseite des Chassisrahmens mit Distanzröhre (7), Unterlegscheiben (8), und<br />
Muttern M10 (9) verwenden. Ziehen Sie die AHK nach hinten vom Fahrzeug und ziehen Sie die<br />
Schrauben (wechselseitig) auf beiden Seiten mit dem Drehmoment 70 Nm an.<br />
7. Setzen Sie mit der Elektroinstallation bei dem Fahrzeug fort (siehe die Montageanleitung – Elektrik<br />
für Zugvorrichtung). Schrauben Sie die Steckdose erst nach dem Einbau dem Zugarm fest. Nach<br />
Beendung der Montage der Elektroinstallation sind alle demontierten Teile wieder anzubauen und<br />
die zuständigen Verbindungen mit den vorgeschriebenen Drehmomenten anzuziehen.<br />
8. Den Zugarm (2) befestigen Sie zwischen die Halter mit zwei Schrauben M12x65 (4),<br />
Steckdosenhalter (3), und Muttern M12 (5) (siehe Bild 1) und die Schrauben ziehen Sie mit dem<br />
Drehmoment 80 Nm fest.<br />
9. Kleben Sie auf den Hinterstoßfänger über die AHK den Aufkleber „50 kg“ – die Version <strong>4x4</strong> „75<br />
kg“ (die zuständige Stelle ist vor dem Aufkleben zu säubern und zu entfetten).<br />
10. Setzen Sie eine Haube auf den Kugelbolzen auf (10).<br />
Vor der Montage der Kupplung sollte man das Handbuch lesen, daher sollte die Montage eine<br />
Vertragswerkstatt durchführen.<br />
Die elektrische Installation ist nicht ein Bestandsteil der Lieferung und sie muss separat bestellt<br />
werden.<br />
Hinweis für den Kunden<br />
- Überprüfen Sie nach dem Zurücklegen von ca. 1000 km mit Anhänger die Drehmomente der<br />
Schrauben (4) mit denen der Kugelhals befestigt ist (2)!<br />
- Schmieren Sie den Kugelbolzen bei Bedarf mit einem geeigneten Schmierfett ein.<br />
- Überprüfen Sie nach dem Anschluss des Anhängers und der Verbindung der<br />
Elektroinstallation die Funktion der Scheinwerfer.<br />
- Es sind keinerlei Änderungen und Modifikationen der Anhängerkupplung zulässig.<br />
- Halten Sie die in dieser Anleitung angeführten Anweisungen bei der Verwendung der<br />
Anhängerkupplung ein.<br />
- Der Hersteller nimmt keine Schadensverantwortung auf sich, die durch fehlerhaft<br />
angebauten Kugelhals, seine Überbelastung oder sonstige mechanische Beschädigungen<br />
verursacht werden.<br />
- Die Anhängerkupplung darf nicht in Betrieb genommen werden, falls sie beschädigt oder<br />
unvollständig ist.<br />
- Falls der Anhänger nicht an der Anhängerkupplung angeschlossen ist, ist der Kugelbolzen<br />
mit einer Kappe zu versehen!<br />
- Lagern und sichern Sie den Kugelhals (falls Sie ihn abnehmen) im Gepäckraum so, dass beim<br />
plötzlichen Bremsen die Sicherheit der Reisenden nicht gefährdet, und keine Beschädigungen<br />
des Gepäckraums verursacht wird. Setzen Sie eine Kappe auf den Kugelbolzen des<br />
Kugelhalses auf.<br />
- Nach dem Zurücklegen der ersten ca. 500 km mit Anhänger ist der Drehmoment der<br />
Spannschrauben des Trägers zum Fahrgestell des Fahrzeugs und die Schrauben des<br />
Kugelhalses zu überprüfen und gegebenenfalls mit dem vorgeschriebenen Drehmoment<br />
nachzuziehen! Wir empfehlen diese Kontrolle im nächstgelegenen autorisierten Service<br />
vornehmen zu lassen.
Garantieinformationen und Bedingungen<br />
8<br />
Der Hersteller der Anhängerkupplung gewährt auf Konstruktion, verwendetes Material,<br />
Produktionsausführung und Funktion der gelieferten Anhängerkupplung eine Garantie von 24<br />
Monaten ab Verkaufsdatum.<br />
Die Reklamation des Produkts in der gesetzlichen Frist macht der Käufer beim Verkäufer geltend. Die<br />
Berechtigung der Reklamation beurteilt ein Vertreter des Verkäufers zusammen mit einem Vertreter<br />
des Herstellers entsprechend der gültigen Vorschriften.<br />
Bedingung für die Gültigkeit der Garantie ist, dass die Anhängerkupplung zum für sie bestimmten<br />
Zweck angewendet wurde.<br />
Der Käufer ist verpflichtet, den Zustand der Ware bei Übernahme zu überprüfen. Bei Beschädigung der<br />
Ware, fehlendem Teil der Anhängerkupplung, u.ä. ist der Käufer verpflichtet, diese Tatsache<br />
unverzüglich dem Verkäufer zu melden, dies ohne unnötigen Verzug nach Warenübernahme.<br />
Alle Teile und das Zubehör der Anhängerkupplung muss vor der fachgerechten Montage in Beziehung<br />
zur Kompatibilität für den entsprechenden Fahrzeugtyp kontrolliert werden. Anhängerkupplungen<br />
dürfen nur am vom Hersteller angeführten Fahrzeugtyp benutzt werden. Bei nicht fachgerechter<br />
Montage oder Montage der Anhängerkupplung an einen Fahrzeugtyp, für welchen sie nicht bestimmt<br />
ist, haftet der Hersteller nicht für eventuelle Beschädigungen der Anhängerkupplung, verursacht durch<br />
fehlerhafte Montage oder falsche Benutzung.<br />
Der Verkäufer haftet für Mängel, welche die Anhängerkupplung bei Übernahme durch den Käufer<br />
hatte.<br />
Die Garantie bezieht sich nicht auf Schäden, die ihre Ursache in normalem Verschleiß, Überlastung<br />
und nicht fachgerechter Benutzung der Anhängerkupplung haben, weiter wenn sie nicht gemäß der<br />
Anweisungen in der Gebrauchsanleitung benutzt wurde. Die Garantie bezieht sich weiter nicht auf<br />
durch Naturkatastrophen verursachte Schäden. Der Verkäufer haftet ebenfalls nicht für Schaden, wenn<br />
die Anhängerkupplung geändert oder angepasst wurde.<br />
Die Garantie erlischt, wenn die Anhängerkupplung durch einen Unfall beschädigt wurde (außer einem<br />
Unfall, hervorgerufen durch die Anhängerkupplung) oder bei Eingriff in ihren Mechanismus und<br />
Konstruktion.B<br />
Typengenehmigung<br />
Der Hersteller bestätigt, dass die Anhängerkupplung laut der genehmigten Dokumentation<br />
hergestellt wurd und folgender Typenzulassung entspricht E9-55R-01.1009.
9<br />
TOWING DEVICE - <strong>DACIA</strong> <strong>Duster</strong><br />
Type <strong>TMB</strong> <strong>PS</strong> <strong>078</strong><br />
The towing device, type designation <strong>TMB</strong> <strong>PS</strong> <strong>078</strong>, is designed for coupling of trailers with the total<br />
weight up to 1500 kg behind the passenger cars <strong>DACIA</strong> <strong>Duster</strong>.<br />
General data<br />
The structure of the device corresponds to the Decree of the Ministry of Transportation of the Czech<br />
Republic and to all Czech and international regulations. The towing arm has a ball stud with the<br />
diameter of 50 mm according to the ISO 3853 standard. The device passed the tests according to the<br />
European Regulation No.55 Revision 1.<br />
Parameters<br />
Maximum total weight of the braked trailer 1500 kg<br />
Maximum total weight of the not braked trailer 680 kg<br />
Limited by registration book of the car!<br />
Maximum vertical static load on the ball 50 kg (version <strong>4x4</strong> „75 kg“)<br />
Diameter of the ball stud 50 mm<br />
Theoretical relative force DC-value 9,0 kN<br />
T � C<br />
DC � g �<br />
T � C<br />
g – gravitational acceleration (g = 9,81 ms-2)<br />
T – towing car weight [t]<br />
C – trailer’s weight [t]<br />
Total weight of the towing equipment 16 kg<br />
Dimensions 1074 x 584 x 336 mm<br />
List of special tools and gadgets<br />
Cutter for making the hole in the bumper<br />
Torque spanner<br />
Instructions for mounting to the vehicle<br />
Check contents of the towbar package against the part list.<br />
1. Position the car over the workshop lift.<br />
2. For the <strong>4x2</strong> model:<br />
Lower the spare wheel. Unhook the exhaust. Dismount the heat shield.<br />
For the <strong>4x4</strong> model:<br />
Unhook the exhaust.<br />
3. Remove the lower middle screws of the bumper (2 pcs).<br />
4. Remove the protective plug and adhesive from external side of the frame member in the luggage<br />
compartment. If necessary, take out the blinds from the pre-bored holes in the sills and clean the
10<br />
interior of the holes from the deposits of plastic protection (internal side of the frame member –<br />
outside of vehicle).<br />
5. Cut out the opening in the rear bumper according to the figure 2.<br />
6. Loosely fix the beam assembly with bolts M10x85 (6) in the internal side of the frame member and<br />
with spacers (7), washers (8) and nuts M10 (9) in the external side of the frame member. Draw the<br />
structure backwards from the car and tighten the bolts in turns on both sides by the torque<br />
70 Nm.<br />
7. Go on with electrical installation of towing device on the car (see assembly instructions enclosed to<br />
wiring kit). Screw the socket holder with mounting of the tow arm. After completing the electric<br />
installation, mount back all dismantled parts and tighten all relative joints by prescribed torques.<br />
8. Fix the towing arm (2) between the holders by means of two bolts M12x65 (4), socket holder (3)<br />
and nuts M12 (5) (see figure 1) and tighten the bolts by the torque 80 Nm.<br />
9. On the rear bumper over the tow bar there is the place where you put the self-adhesive sticker “50<br />
kg” – version <strong>4x4</strong> “75 kg” (before sticking you must clean and degrease that place).<br />
10. Cover the ball pivot by its protective lid (10).<br />
For assembling of the towing device the workshop handbook is needed, therefore it can be done<br />
only by accredited service.<br />
Electrical installation is not delivery component and it must be ordered separately.<br />
Advise for the user<br />
- Check the bolts (4) fixing the tow arm (2) after driving the car with a coupled trailer for<br />
about 1000 km!<br />
- Grease the ball pivot as need be by a suitable lubricant.<br />
- Check the function of all the lights on the trailer after coupling and plugging in.<br />
- Any adjustments and modifications of the towing equipment are not allowed.<br />
- Follow all instructions for the use published in this leaflet.<br />
- The producer is not accountable for any damage resulting from incorrect installation of the<br />
equipment, overloading or any other mechanical impairment.<br />
- It is not allowed to use the equipment when it is damaged or incomplete.<br />
- The pivot ball must be protected by its cover when nou trailer is coupled !<br />
- The tow bar (in case it is dismounted) should be placed in the boot of the car in the way not to<br />
endanger the passengers or damage the interior of the boot. The ball pivot must have its cap<br />
on.<br />
- After driving the first approx. 500 km with a trailer it is necessary to check the bolts fixing<br />
the crossbeam to the underbody and the bolts fixing the tow bar by a tongue wrench at<br />
prescribed torques! We recommend to have this check done at your nearest authorized<br />
service station.
11<br />
Guarantee information and conditions<br />
The manufacturer of the towing coupling gives the guarantee for the construction, used material,<br />
manufacturing execution and function of the supplied towing coupling for 24 months from the date of<br />
sale.<br />
The complaints are to be presented by the buyer to the selling organization within the legal period. The<br />
rightfulness of the complaint will be judged by a representative of the selling organization together with<br />
a representative of the manufacturer in accordance with valid regulations.<br />
The prerequisite of validity of the guarantee is that the towing coupling has to be used only for those<br />
purposes for which it is designed.<br />
The buyer shall examine the condition of the goods at their reception. In case of any damage of the<br />
goods or failure to deliver any part of the towing coupling the buyer shall report such fact immediately<br />
to the selling organization without unnecessary delay after the reception of the goods.<br />
All parts and accessories of the towing coupling must be checked before professional fitting with<br />
regard to their compatibility with the respective type of vehicle. The towing couplings may be used<br />
only for the vehicle type stated by the manufacturer. In case of incompetent fitting or fitting of the<br />
towing coupling on a type of vehicle for which the towing coupling is not intended, the manufacturer<br />
shall not be responsible for any damage of the towing coupling caused by defective fitting or its<br />
incorrect use.<br />
The selling organization is responsible for defects the towing coupling had at its reception by the buyer.<br />
The guarantee does not cover any damages resulting from common wear and tear, overloading and<br />
unprofessional use, as well as damages caused by non-compliance with the instructions stated in the<br />
operating manual. The guarantee does not cover any damages due to natural disasters. The selling<br />
organization is not responsible for any damage in the case when the towing coupling was modified or<br />
otherwise altered.<br />
The guarantee also becomes void if the towing coupling has been damaged due to an<br />
accident (except accidents caused by the towing coupling itself) or by tampering with its mechanism<br />
and construction.<br />
Compliance declaration<br />
The producer of the towing equipment certifies hereby that it is produced according to the<br />
approved documentation and complies with homologation E9-55R-01.1009.
……………………………<br />
Výrobní číslo<br />
Produktionsnummer<br />
Manufacturing number<br />
……………………………<br />
Datum výroby<br />
Herstellungsdatum<br />
Date of manufacture<br />
…………………………………………<br />
Výstupní kontrola výrobce<br />
Ausganginspektion des Herstellers<br />
Manufacturer’s final inspection<br />
……………………………<br />
Datum prodeje<br />
Datum des Verkaufes<br />
Date of sales<br />
12<br />
……………………………………………<br />
Razítko a podpis prodávajícího<br />
Stempel und Unterschrift des Händlers<br />
Stamp and signature of seller<br />
Výrobce: Manufacturer: Hersteller:<br />
PROF SVAR s.r.o., Přestavlcká 1474, CZ - 295 01 Mnichovo Hradiště,<br />
Tel.: +420 326 771 704 Fax.: +420 326 771 230 E-mail: profsvar@profsvar.<strong>cz</strong><br />
4<br />
LDPE