Trebuchet Instructions - Prof Bunsen
Trebuchet Instructions - Prof Bunsen
Trebuchet Instructions - Prof Bunsen
- No tags were found...

Create successful ePaper yourself
Turn your PDF publications into a flip-book with our unique Google optimized e-Paper software.
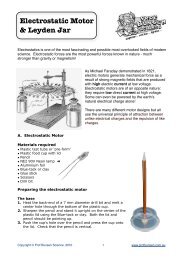
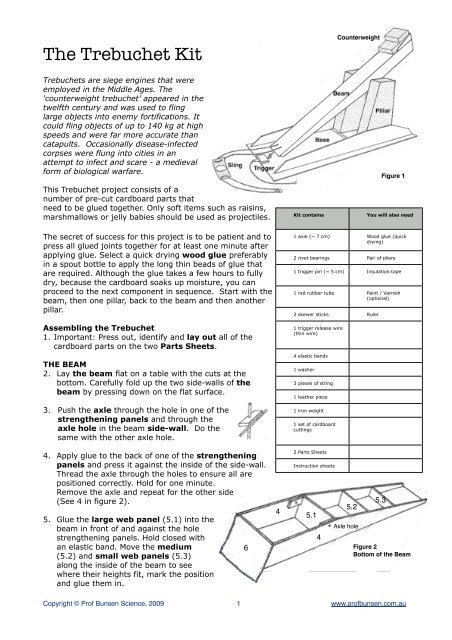
The <strong>Trebuchet</strong> KitCounterweight<strong>Trebuchet</strong>s are siege engines that wereemployed in the Middle Ages. The‘counterweight trebuchet’ appeared in thetwelfth century and was used to flinglarge objects into enemy fortifications. Itcould fling objects of up to 140 kg at highspeeds and were far more accurate thancatapults. Occasionally disease-infectedcorpses were flung into cities in anattempt to infect and scare - a medievalform of biological warfare.This <strong>Trebuchet</strong> project consists of anumber of pre-cut cardboard parts thatneed to be glued together. Only soft items such as raisins,marshmallows or jelly babies should be used as projectiles.Kit containsFigure 1You will also needThe secret of success for this project is to be patient and topress all glued joints together for at least one minute afterapplying glue. Select a quick drying wood glue preferablyin a spout bottle to apply the long thin beads of glue thatare required. Although the glue takes a few hours to fullydry, because the cardboard soaks up moisture, you canproceed to the next component in sequence. Start with thebeam, then one pillar, back to the beam and then anotherpillar.Assembling the <strong>Trebuchet</strong>1. Important: Press out, identify and lay out all of thecardboard parts on the two Parts Sheets.THE BEAM2. Lay the beam flat on a table with the cuts at thebottom. Carefully fold up the two side-walls of thebeam by pressing down on the flat surface.3. Push the axle through the hole in one of thestrengthening panels and through theaxle hole in the beam side-wall. Do thesame with the other axle hole.1 axle (~ 7 cm) Wood glue (quickdrying)2 rivet bearings Pair of pliers1 trigger pin (~ 5 cm) Insulation tape1 red rubber tube Paint / Varnish(optional)2 skewer sticks Ruler1 trigger release wire(thin wire)4 elastic bands1 washer3 pieces of string1 leather piece1 iron weight1 set of cardboardcuttings4. Apply glue to the back of one of the strengtheningpanels and press it against the inside of the side-wall.Thread the axle through the holes to ensure all arepositioned correctly. Hold for one minute.Remove the axle and repeat for the other side(See 4 in figure 2).5. Glue the large web panel (5.1) into thebeam in front of and against the holestrengthening panels. Hold closed withan elastic band. Move the medium(5.2) and small web panels (5.3)along the inside of the beam to seewhere their heights fit, mark the positionand glue them in.42 Parts SheetsInstruction sheets5.15.2Axle hole5.346 Figure 2Bottom of the BeamCopyright © <strong>Prof</strong> <strong>Bunsen</strong> Science, 2009 1 www.profbunsen.com.au
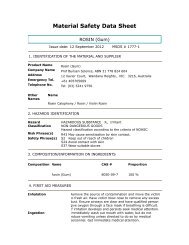
191817. Place the base on a flat surface to ensure itremains flat for the next step. Apply glue to thebottom edge of a long pointed17panel and to the loweredges of the pillar andglue it in position with theangled edges ending exactly at the pillar (17). Check thatthe long pointed front is parallel to the edge of the base.Glue on the other long pointed panel and weigh both endsdown with a heavy book.1718. Glue on the two pillar side covers and press closed byhand or use elastic bands for two minutes (18).19. To cross stiffen the base, glue in the two short skewer sticks as shown, one in front andone at the back of the pillars.20. The trigger release mechanism is glued to the centre of the base (See figure 1). Bendthe trigger release wire (40 cm long) as shown and cut off the excess tips. Apply someinsulation tape and poke a hole through the tape for the trigger string (22).2240 cm21A21A21B20insulation tape21. Apply glue to the two trigger release side panels (21A) and press them down onto thebase with the release wire in between. The wire should be able to slide back and fourth.Check that the release wire lines up with the trigger pin on the beam. Then glue on thetrigger release top panel (21B).22. Thread the shortest piece of string through the hole in the tape and tie a knot at thebottom of the tape (22).THE SLINGYou are supplied with a piece of leather, washer and another two lengths of string. Theleather forms the pouch of the sling.23. Use the medium length string. Fold lengthwise in half and thread the loop through the holein the washer and over the washer and then pull the string tight. The washer is now tied tothe string. Thread one end of the string through a hole in the leather and then trough theother hole next to it. Tie the two string ends together and adjust the knot so that thewasher is about 12 cm from the leather pouch. Cut off any excess string.242312 cmCopyright © <strong>Prof</strong> <strong>Bunsen</strong> Science, 2009 3 www.profbunsen.com.au
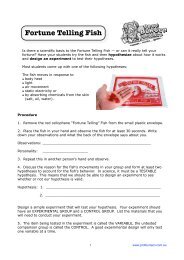
24. Use the longest piece of string. Thread this through the other two open holes in the pouch.Thread from the same side of the leather as before. Now thread the two loose endsthrough the two holes in the top end of the beam.25. Get someone to help you. Hook the washer on the trigger pin and pull the leather pouchbackwards away from the pin with one finger (25.1). When the two strings on both sides ofthe pouch is of equal length, stick the two loose ends of the string to the bottom side ofthe beam with insulation/masking tape (25.2).25.1 25.2Bottom side of beamOPERATING THE TREBUCHETAllow the glue to dry for a few hours.Wear protective glasses.See Figure 1.26. Place the weight provided in the cradle at the back of the beam and hold it in positionwith an elastic band. This is for safety.27. Push the release washer over the trigger pin on the beam, as in 25.1.28. Lower the beam to the base and insert the pin into the trigger release wire loop.29. Place the projectile (jelly baby, marshmallow) into the sling pouch and move this underthe beam towards the pillar. The load should be nestled in the pouch. Take up any slackin the string.292830. Move away from the trajectory of the projectile, warn observers by doing a countdown andgently pull the string to release the projectile.EXTENSIONSVary the weight, use different projectiles.Have fun!Copyright © <strong>Prof</strong> <strong>Bunsen</strong> Science, 2009 4 www.profbunsen.com.au