PARASOL EMERGER
PARASOL EMERGER
PARASOL EMERGER
- No tags were found...

You also want an ePaper? Increase the reach of your titles
YUMPU automatically turns print PDFs into web optimized ePapers that Google loves.
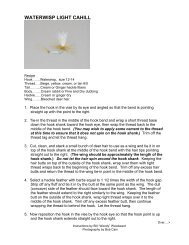
<strong>PARASOL</strong> <strong>EMERGER</strong>RecipeHook………………Curved Caddis, size 12-24Parasol……………White or Gray polypropylene yarnParasol Post……..Tippet, 4X or 5XThread………........Rusty Brown, 6/0 or 8/0Rib…………………Green stretch tubing, smallAbdomen...............Light Olive fine and dry dubbingThorax...................Rusty Brown dubbingHead......................Thread1. Cut a 6" piece of tippet material (4X for hooks size 16 and larger or 5X for hooks size 18or smaller).2. Cut two 1" pieces of poly yarn for hooks size 16 and larger or one piece for hooks size18 or smaller and put them together lengthwise and tie them together at their midpointwith the tippet using a clinch knot. Moisten the knot and pull it tight. Trim off the tagend. (You should now have a doubled piece of yarn on the end of a 2"-3" section oftippet "post".)3. Fold the yarn at the point where it is tied together and brush it with a comb , rotating it asyou brush it, until you have one combined bunch. Set this "parasol" aside.4. Put the hook in the vise and tie-in the thread behind the hook eye and wrap a tightthread base back to the middle of the hook shank, then reverse direction and wrap thethread half-way back toward the hook eye. This should put the thread approximately1/4 of the hook shank behind the hook eye. Trim off any thread tag and let the threadhang.5. Measure the parasol tippet "post' from the base of the parasol down the length of thetippet for the length of the hook shank and tie the "post" in at that point on top of thehook shank at the point where you left the thread. The parasol should be pointing outover the hook eye. Now wrap the thread in tight touching turns over the butt of the postback to the middle of the hook bend. Keep the "post" butt on top of the hook shank.Trim off any excess post tag. Let the thread hang.Over….>Instructions by Bill “Woody” WoodwardPhotography by Bob Cain
6. Now cut a 3"-4" piece of stretch tubing and tie it in as a rib half way down the hook bendwhere you left the thread. The length of the tubing should extend back down the hookbend. Trim off any excess rib butt.7. Dub the thread and wrap a tapered dubbed abdomen up the hook shank to the base ofthe parasol post. Remove any excess dubbing.8. Grasp the rib tubing and palmer wrap it forward over the dubbed abdomen in 4-6 evenlyspaced wraps and tie it off at the front of the abdomen behind the parasol post. Removeany excess tubing.9. Lift the parasol post and make several tight thread wraps in front of it to make it standup.10. Dub the thread and wrap a thorax forward to behind the hook eye and remove anyexcess dubbing. Be sure to wrap the dubbing back tight against the "post" and the frontof the abdomen so that the "post" thread wraps are all covered and there is no spacebetween the abdomen and the thorax. The thorax should be slightly thicker than theabdomen.11. Form a neat thread head, whip finish, and cut the thread. Apply head cement to thehead wraps, if desired.12. Now grasp the parasol fibers and pull them up, similarly to forming an egg pattern, andcut the fibers straight across the top at least 3/16" up from the parasol base. This willgive a nice egg shape.Note: The "parasol" is more of an appendage you add to a fly than a fly in its own right.This idea originated with the famous Fran Betters and was intended to allow a fly to floatjust below the surface of the water in imitation of an emerging insect. This technique can beapplied to almost any nymph or wet fly pattern. You can alter the length of the parasol"post" to adjust the depth at which you wish to float the fly but making it too long can lead totangles on the cast. You can also adjust the angle at which the fly floats by where you tie inthe post. Tying it in behind the hook eye tends to "dangle" the fly hook vertically, while tyingit in the middle of the hook shank tends to float the fly horizontally.Instructions by Bill “Woody” WoodwardPhotography by Bob Cain