GROUND ARRAY INSTALLATION MANUAL June, 2010
GROUND ARRAY INSTALLATION MANUAL June, 2010
GROUND ARRAY INSTALLATION MANUAL June, 2010
- No tags were found...

Create successful ePaper yourself
Turn your PDF publications into a flip-book with our unique Google optimized e-Paper software.
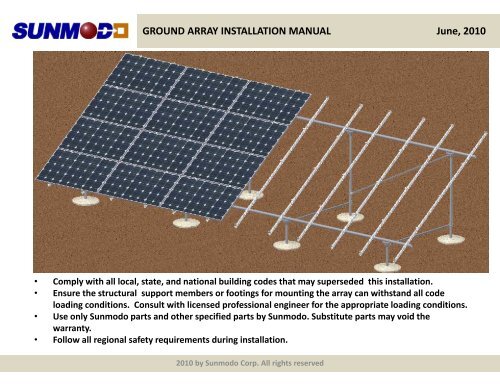
<strong>GROUND</strong> <strong>ARRAY</strong> <strong>INSTALLATION</strong> <strong>MANUAL</strong> <strong>June</strong>, <strong>2010</strong>Installer’s Responsibilities:• Comply with all local, state, and national building codes that may superseded this installation.• Ensure the structural support members or footings for mounting the array can withstand all codeloading conditions. Consult with licensed professional engineer for the appropriate loading conditions.• Use only Sunmodo parts and other specified parts by Sunmodo. Substitute parts may void thewarranty.• Follow all regional safety requirements during installation.<strong>2010</strong> by Sunmodo Corp. All rights reserved
<strong>GROUND</strong> <strong>ARRAY</strong> <strong>INSTALLATION</strong> <strong>MANUAL</strong> <strong>June</strong>, <strong>2010</strong>Typical Ground Mount System Without Solar Modules<strong>2010</strong> by Sunmodo Corp. All rights reserved
<strong>GROUND</strong> <strong>ARRAY</strong> <strong>INSTALLATION</strong> <strong>MANUAL</strong> <strong>June</strong>, <strong>2010</strong>Part list (Vertical Posts and Cross Pipes not in the liste):Pipe Cap Kit Pipe Slider Kit Front‐Rear or Rear Brace KitU‐bolt Kit Pipe Splice Kit Rail Mount Bracket KitAL Rail End Clamp Kit Mid Clamp Kit<strong>2010</strong> by Sunmodo Corp. All rights reserved
<strong>GROUND</strong> <strong>ARRAY</strong> <strong>INSTALLATION</strong> <strong>MANUAL</strong> <strong>June</strong>, <strong>2010</strong>Installation Procedures:1. Determine the post locations per Sunmodo layout drawing: east‐south spacing “X” and north‐south spacing “Y”.2. Dig the post holes to the diameter and depth as shown below, and then add about 3” deep of gravel to each hole.<strong>2010</strong> by Sunmodo Corp. All rights reserved
<strong>GROUND</strong> <strong>ARRAY</strong> <strong>INSTALLATION</strong> <strong>MANUAL</strong> <strong>June</strong>, <strong>2010</strong>3. Build two pairs of batterboards to hold the mason’s lines: one pair for front posts and other for rear posts.4. Measure the post heights and cut the posts :• Insert each post to hole and mark the post heights for cutting‐off.• Cut the posts to the marked kdlengths: the maximum allowable high h differences between all postsper row is 1.0”. Pipe Cap Kit can be adjusted upon to 1.0”.<strong>2010</strong> by Sunmodo Corp. All rights reserved
<strong>GROUND</strong> <strong>ARRAY</strong> <strong>INSTALLATION</strong> <strong>MANUAL</strong> <strong>June</strong>, <strong>2010</strong>5. Install the first four posts (two front posts and two rear posts) assembly at the lf left or right ihside of array first.Installation sequences are as follows:• Insert two #4X8” rebar s to each post.• Insert four posts to the holes as shown below:• Install the pipe cap to each front post: adjust the top surfaces of pipe caps at the same level , and thentighten up four setscrews per cap.• Insert the pipe sliders to the rear posts.• Install the pipe cap to each rear post: adjust the top surfaces of pipe caps at the same level , and then tightenup four setscrews per cap.<strong>2010</strong> by Sunmodo Corp. All rights reserved
<strong>GROUND</strong> <strong>ARRAY</strong> <strong>INSTALLATION</strong> <strong>MANUAL</strong> <strong>June</strong>, <strong>2010</strong>• Install front‐rear brace kits: slightly tighten up the brace kits.• Install rear diagonal brace kits: rear diagonal brace kits at both sides shall be at opposite direction, and one pipecap needs to be rotated 180° for mounting brace. Use the opposite diagonal lbrace kit every other post.• Install the front and rear cross pipe: temporary put the cross pipes in the middle position between two posts.Slightly tighten the pipes to pipe caps by using U‐bolts.• Partially assembled truss structure should be able to support by itself.6. Continue to install the remain truss structure. Connect all cross pipes by using pipe splice kits as shown below. Leaveabout 1/8” gap between two pipes.<strong>2010</strong> by Sunmodo Corp. All rights reserved
<strong>GROUND</strong> <strong>ARRAY</strong> <strong>INSTALLATION</strong> <strong>MANUAL</strong> <strong>June</strong>, <strong>2010</strong>7. Install at least three AL rail assemblies to pipes for array stability: one each side, and one at middle of array.8. Level up all top surfaces of pipe caps and cross pipes, and square up the array. Tighten all fasteners.9. After the array is assembled, pour concrete on footing holes.10. After concrete curing, install the remain AL rail assemblies: rail mount bracket may interfere with pipe cap. Toavoid his interference issue, move the rail toward to the edge of module, or turn rail assembly (with twobrackets) 180° and mount it to cross support pipe.11. Install the solar panels by using mid or end mount clamp kits<strong>2010</strong> by Sunmodo Corp. All rights reserved
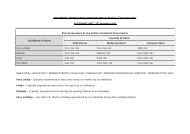
<strong>GROUND</strong> <strong>ARRAY</strong> <strong>INSTALLATION</strong> <strong>MANUAL</strong> <strong>June</strong>, <strong>2010</strong>Installation NotesFastener galling issueStainless steel fasteners can seize up. To avoid the galling , apply a small drop of one of the following anti seize lubricantsto the threads of the fasteners before installation: Loctite 38181, 80209, 76732, 76759, 80206 and 76775.Recommended torques for fastenersScrew Size Recommended Torque NoteM10 set screw 25 lbs-ft Pipe cap and sliderM12 U-bolt and nut 35 lbs-ft Pipe cap and cross pipe3/8” Flange Nut 20 lbs-ft Pipe splice kit and rail mount bracket kitM12 nut 20 lbs-ft Brace kits and rail mount bracket kit1/4 “ mount hardware 10 lbs-ft Solar module<strong>2010</strong> by Sunmodo Corp. All rights reserved
<strong>GROUND</strong> <strong>ARRAY</strong> <strong>INSTALLATION</strong> <strong>MANUAL</strong> <strong>June</strong>, <strong>2010</strong><strong>2010</strong> by Sunmodo Corp. All rights reserved