Invacare rechargeable patient lift battery manual - Mountainside ...
Invacare rechargeable patient lift battery manual - Mountainside ...
Invacare rechargeable patient lift battery manual - Mountainside ...
- No tags were found...

Create successful ePaper yourself
Turn your PDF publications into a flip-book with our unique Google optimized e-Paper software.
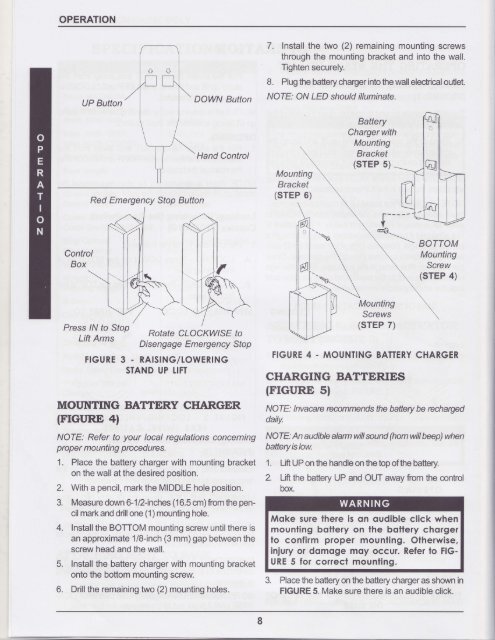
OPERATIONUP ButtonDOWN ButtonHand ControlRed Emergency Stop Button7. Install the two (2) remaining mounting screwsthrough the mounting bracket and into the wall.Tighten securely.8. Plug the <strong>battery</strong> charger into the wall electrical outlelNOTE: ON LED should illuminate,MountingBracket(srEP 6)BatteryCharger withMountingBracket(srEP 5)ControlBoxMountingScrew(srEP 4)Press lN to SfopLift ArmsRotate CLOCKWISE foDisengage Emergency SfopFIGURE 3 . RAISING/LOWERINGSTAND UP LIFTMOTTNTING BATTERY CI{ARGER(flGtrRE 4lNOTE: Refer to your local regulations concerningproper mou nti ng proced u res.1. Place the <strong>battery</strong> charger with mounting bracketon the wall at the desired position.2. With a pencil, mark the MIDDLE hole position.3. Measure down 6-112-inches (16.5 cm)from the pencilmark and drill one (1) mounting hole.4. Install the BOTTOM mounting screw until there isan approximate 1/8-inch (3 mm)gap between thescrew head and the wall.5. Install the <strong>battery</strong> charger with mounting bracketonto the bottom mounting screw.6. Drill the remaining two (2) mounting holes.MountingScreuzs(srEP 7)FIGURE 4 . MOUNTING BATTERY CHARGERCHARGING BATTERIES(FrcuRE slNOTE: lnvacare recommends the baftery be rechargeddaily.NOTE: An audible alarm will sound (hom will beep) when<strong>battery</strong> islow.1. Lift UP on the handle on the top of the <strong>battery</strong>.2. Lift the <strong>battery</strong> UP and OUT away from the controlbox.Mqke sure lhere is qn qudible click whenmounling boflery on lhe bottery chorgerlo confirm proper mounling. Olherwise,injury or dqmqge moy occur. Refer to FIG-URE 5 for correcl mounling.3. Place the <strong>battery</strong> on the <strong>battery</strong> charger as shown inFIGURE 5. Make sure there is an audible click.
OPERATIONNOTE: The charge LED will illuminate.When chargingis complete, the charge LED will stop illuminating.NOTE: A <strong>battery</strong> needing to be fully recharged will takeapproximately four (4) hours.4. Lift UP on the handle on the top of the <strong>battery</strong>.5. Lift the <strong>battery</strong> UP and OUT away from the <strong>battery</strong>charger.Mqke sure lhere is qn qudible clickwhen mounlingbottery on lhe conhol box lo confirm propermounfing. Othenrise, injury or dqmoge mqy occur.Refer to FIGURE 5 for conecl mounfing.6. Reinstall the <strong>battery</strong> onto the control box as shownin FIGURE 5. Make sure there is an audible click.BatteryCharger(STEP 3)Control Box(srEP 6)Handle(STEPS 1, 2,4 and 5)Audible Click(STEPS 3and 6)FIGURE 5 . CHARGING BATTERIESI