MOVIEtube ST Quick Guide - KINOMATIK
MOVIEtube ST Quick Guide - KINOMATIK
MOVIEtube ST Quick Guide - KINOMATIK
- No tags were found...

Create successful ePaper yourself
Turn your PDF publications into a flip-book with our unique Google optimized e-Paper software.
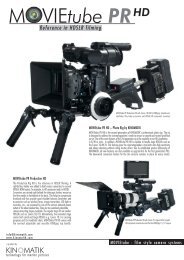
<strong>MOVIEtube</strong> <strong>ST</strong> <strong>Quick</strong> <strong>Guide</strong>The <strong>MOVIEtube</strong> <strong>ST</strong> is a full-blown production camera system, based on the <strong>MOVIEtube</strong> LT.The up- and downgrade procedure can be completed within 10 minutes by using Allan Keys.The <strong>MOVIEtube</strong> <strong>ST</strong> is a top of the line version for small video docking cameras and is equipped with following accessories:• An integrated Sony/ Panasonic tripod plate compatible shoulder set for living camera moves• Three WALTERgrip handles for low shots and handheld action• A socket for use with Sony/ Panasonic compatible professional viewfinders to provide a sharp image for controlling the focus• Standard Arri connectors for wireless focus control, wireless image transmitter and all the other Arri accessories such as a focus monitor etc.• 15mm standard video rods for video accessories• 19mm rods for connecting 35mm matteboxes and accessoriesAdjustment and fixation of the docking cameras correspond with the <strong>MOVIEtube</strong> LT (see <strong>MOVIEtube</strong> LT Manual).2
FeaturesA: Professional viewfinder mounts for usewith Sony/ Panasonic compatible finders.B: WALTERgrip top and side.For carrying the <strong>MOVIEtube</strong> or handheldshots like low shots/ low moves.C: Plate for Sony V-Mount or Anton Bauercompatible batteries.D: Integrated Sony/Panasonic tripod platecompatible shoulder set.E: ON/OFF Switch (Power).F: 19mm rods interface.3
G: Extendible battery plate with quickrelease to compensate for heavy lenses.H: 12V Arri-compatible(AUX PWR) out Fischer 11-pinVideo out (VID OUT) 1 BNC, 2 Fischer 4-pinwith 12Vpower for monitoring etc.I: WALTERgrip handles for handheld andon shoulder moves.4
Handling and ergonomics<strong>MOVIEtube</strong> <strong>ST</strong> is designed for use on shoulder.The quick release plate – compatible to Panasonic and Sony - guarantees a safe and fast installation on and off the tripod.The ergonomic position of the professional b/w viewfinder enables an optimal focus control at any time, and allows working smoothly even in critical situations.VERY IMPORTANT!!!To carry the Camera System please use the top handle grip of the <strong>MOVIEtube</strong> <strong>ST</strong> only. Never use the handle bar of the docking camera.For shoulder operation consider the following steps:The <strong>MOVIEtube</strong> <strong>ST</strong> is placed in front of you, lens left hand, battery right hand side.Grab the top handle of the <strong>MOVIEtube</strong> with your right hand from below and behind and lift it onto your right shoulder. Support it from the side with your left handon the front camera handle.When securely on shoulder, the right hand releases the upper handle grip to hold the second front handle grip. With your left hand you will control the focus.Power supplies and outputsIn addition, the b/w viewfinder can be adjusted in three axes to the cameraman’s eye position.A 14.4 Volt Lithium Ion Sony V-mount (or Anton Bauer) battery, supplies the viewfinder with power as well as the video distributors and the electronics.There is a fuse (8A/T, 5x20mm) inside the battery plate. This fuse blows in case of an electrical short. A spare fuse is enclosed. To change the fuse, release the 4screws and lift off the battery plate from the mounting base. You’ll find a fuse holder as well as a spare fuse.The battery is extendible up to a distance of 100mm from the body, which counterbalances heavy lenses allowing the whole Camera System to fit comfortably onthe shoulder.In addition to the viewfinder socket the following connectors are available:3 Video out: 1 BNC, 2 Fischer (Arri Mini Monitor)12 Aux PWR out (36Wmax) with Fischer connector 11-PinMany extra devices such as a wireless follow focus and a wireless image transmitter can be connected by high quality Fischer connectors. The Data sheetprovides information about technical details.To input the <strong>MOVIEtube</strong> the docking camera’s video signal , use the Y/C Output with a component splitting cable and feed only the Y-signal to the compositevideo cinch input of the <strong>MOVIEtube</strong> <strong>ST</strong> electronic module(Component splitting cable can be purchased from <strong>KINOMATIK</strong>).This prevents a disturbing colour graining in the b/w viewfinder and gains a sharper image.5
External microphone with cradle suspensionSome camcorders have an external microphone with cradle suspension. For example:Sony HDR-Z1, PD150 / PD170Panasonic AG-DVX100, AG-HVX200To fit this type of camcorder to the <strong>MOVIEtube</strong> <strong>ST</strong> please remove the cradle suspension with a screw driver.The images below are showing the cradle removing on a Panasonic AG-DVX100.6
AccessoriesSpecificationsThe 15mm rods on the <strong>MOVIEtube</strong> <strong>ST</strong> are extendible by screwing anextension rod on or off. This feature will be needed during shooting with wideangle lenses.The WALTERgrip system for 15mm rods are easily adjustable in 360° to theideal position by the quick release skewers allowing quick attachment of theGRIPbase to the rods. Hand grips are mountable sidewise.Each WALTERgrip has two extra 3/8“threads for further accessories.Grips can be removed quickly for low shots and packing.In addition to the 15mm rods, a 19mm rods interface comes with the<strong>MOVIEtube</strong> <strong>ST</strong> to support heavy zoom lenses and e.g. 6x6 Matteboxes.Imaging & focusOn the right (Focus Puller side) of the image tube there is a hook on theimage plane for precise tape measurements. The wider the iris is opened themore the depth of field is decreased. The depth of field and viewing anglecorresponds to the super 35mm format.* To achieve best results, pleaseread the 12 Golden rules carefully!Lens mountDocking bridgeGate/ FrameWeightPower requirementsPower consumptionOperating temperatureIntermediate ImageMeasurementsElectronic connectors<strong>MOVIEtube</strong> <strong>ST</strong> (Super Tube)Arri PL, Panavision PV, Mitchell BNC-R & Stillslensesto attach to various video camerasscalable S35mm/ Upright, Emulsion up11.9 lbs. / 5.4 kg w/o Docking Camera, battery &viewfinderDC 13.5V-17.0V6W with Sony DXF-801 viewfinder32°F-122°F / 0°C-50°Cstatic, found at infinityL:12.4”; W:6.7”; H:9.8”L:315mm; W:170mm; H:250mm4 Video Out: 1 VF, 1 BNC, 2 Fischer12V AUX PWR out (36W max.): Fischer 11-pin14,4V power in: Fischer 2-pin; Video in: FBAS-ChinchSpecifications are subject to change without notice* The primary goal while developing the film screen was not only to produce a video frame with less depth of field, but to create a truly film-like image on video. The <strong>MOVIEtube</strong> image reproducesthe look and feel of real film emulsion as well as 35mm depth of field with a film-like bokeh. It is warm and smooth with high detail resolution and no digital video coldness.7
Electronic connectors• Illuminated on/off switch (POWER)• 12V Arri-compatible (AUX PWR) Fischer 11-pin• Video out (VID OUT), 1 BNC, 2 Fischer 4-pinwith 12Vpower for Arri Mini Monitor• 12V power in (BATTERY) Fischer 2-pin• Video in (VID IN) Composite-Cinch• Viewfinder out (VF OUT) for Sony & Panasonic compatibleprofessional viewfinders. Connects to the viewfinderextension cable, which leads to the viewfinder socket.8
DOCKING cameras LENS mountThe intermediate image is found at infinity, to enable easy focusing of thedocking cameras without additional lens kits.Simply attach the docking camera on the camera sled by tighten the 1/4”thread screw. Adjust the docking camera to the ocular by using the side toside screw and the up to down quick release with fine adjustment. Severaltypes of docking rings with different filter threads ensure a secure connectionbetween Docking Camera Lens and the ocular (docking rings can bepurchased from <strong>KINOMATIK</strong>).<strong>MOVIEtube</strong> Approved Docking Cameras:Sony: HDR-FX1/ HVR-Z1, PD100, PDX10, PD150/ 170,VX1000/ 2000/ 2100, TRV890/ 900/ 950,Canon: XM2, MVX3i*Panasonic: MX3000*, DVX100, NVGS400* HVX200JVC: HD10U, DV300U*, PD1*Other cameras approximately the size of the cameras mentioned aboveshould work.Cinematography lenses from Arri PL, Panavision PV & Mitchell BNC-R, aswell as photo lenses from Nikon, Canon FD, Minolta MD,Pentax K, Pentax M42 Screw, Zeiss-Contax, Leica-R and Yassica/ OlympusOM can be used with the appropriate lens mount. To change the lens mount,release it by turning the MTbayonett ring counter clockwise. The ring isfound on the very front of the image tube near the film plane.Attention!- To carry the camera system please use only the handle grip of the<strong>MOVIEtube</strong> <strong>ST</strong>. Never use the handle bar of the docking camera.- Never open the red sealed screws or remove the protective glassinside the image tube. That voids your guaranty!!!- We found some differences in mounting Panasonic and Sonycamera models. For some models you need a longer screws forexample use ¼ “ Manfrotto screws. Attention: If you use a longerscrew in a shorter camera mount, you may brake through the mountand damage the electronic of the camera. Shorten the screw whileusing a washer between the screw head and the bottom of thecamera mounting table- Don’t remove both bars at once while <strong>MOVIEtube</strong> is attached to thetripod plate. The <strong>MOVIEtube</strong> may fall down. Understand that thebars are connecting the main-unit with the shoulder/support-unit.- Never use lenses with a rear element length (measured frombayonet flange to the far end) of more than 32mm. Using lenseslonger than 32mm breaks the protective glass.- Do not short the battery or the electronic module’s in- and outputs.9
12 Golden rules for shooting with<strong>MOVIEtube</strong> TM on HD1. Perform a gate check frequentlyCheck for dust and dirt on the clear protection filter behind the film lens inside the<strong>MOVIEtube</strong>. Use a lens brush and/ or an air duster, in clean environment so not to scratchthe surface. Check the surface by panning over bright background like a white card, whilstwatching the image on the viewfinder or monitor2. Watch T-stop on film lensThe film lens shouldn’t be closed down more than T=3.0. Best results are achieved withopen aperture on high-speed lenses (T=1.3) Notice that the more open the film lens, theless depth of field you will get.3. Watch out for grainCheck each shot for grain especially if you are filming with white and/or bright backgroundand doing slow camera movement. With the T-Stop down at 3.0, the grain of theFILMscreen may become visible. In that case fully open the aperture and or avoid the brightbackground and or restrict the camera movement.4. Zooming gate.If zooming in past the open size of the 35mm gate. Remember that the grain will slightlyincrease. Filming with movements (pan, tilt, travel…) fully open the aperture on your highspeedlenses to T=1.3. Also notice that zooming too close will close down the dockingcameras aperture even more and you’ll lose overall sensitivity.5. Check for gate-vignetingMake sure zoom is set to manual and your docking cameras zoom ring is fixed or markedwith tape at focal length 25mm on Sony HDV-Z1/ FX1. Frequently check if everything is stillas it should be. Important: Always check for vigneting with an underscan broadcastviewfinder (<strong>MOVIEtube</strong> <strong>ST</strong>) or with a control monitor set to underscan mode.6. Docking camera is set to infinity focusMake sure, the docking camera’s focus is set to infinity by pressing the infinity button. Aninfinity symbol will appear in the docking cameras viewfinder. This will set the back focallength of the docking camera to the correct position. Switch focus to manual and tape ormark the focus ring.7. Docking Camera image stabilizer turned offTo avoid the gate shifting into your image, image stabilizers like Steady-Shot or IOS haveto be switched off.8. Docking camera sensitivityTo shoot with the highest possible sensitivity, open the Iris completely. Consider shootingwith shutter speed 1/25 for cinematographic look and increasing the sensitivity by 1 Stop.Also 6db gain will gain 1 Stop. HD Video can handle high gain, due to its high resolution.Even 12db looks good. Remember shooting with celluloid? An 800 ASA film has a lot ofgrain and it looks good. Don’t be afraid to use gain, check it out. Use it as a tool, likechoosing different film sensitivity.9. Progressive 25p, Cine Gamma & other settingsProgressive mode (25 full frames/ sec) can support the film look. Nevertheless it’s loweringthe overall sensitivity of your system. In that case better use 1/25 shutter interlaced and dothe rest in postproduction. Since the <strong>MOVIEtube</strong> FILMscreen is design to achieve film lookwith video, the image has a warm film-look, which is not to colourful in appearance. CheckCine Gamma and other film presets on your docking camera with <strong>MOVIEtube</strong>. You mightnot need it. Also check the colour temperature of your image; sometimes you may need todo a white balance.10. Confirm the record turned onDon’t forget to start the docking camera by pressing the record button. If possible establisha voice command like “Speed” or “Running” to avoid shooting without recording.11. Neutral density filtersIf you have to deal with bright light intensity while shooting exteriors, use the dockingcameras build in ND filters. Don’t stop the docking camera lens down more than T=4.0.This will prevent seeing any dust on the outside of the ocular and a vertical black line fromthe prism. You can also use “real” ND filters in a mattebox in front of your film lens, thesetype of ND’s are offering the best quality. For shooting documentaries, you may need touse the auto iris. In this case just limit the auto iris in the menu to not close down more thanf4.0.12. Only use tested equipmentBefore shooting we advise that you test your equipment like; docking camera, lenses,matteboxes, filters, follow focus. Especially check the lenses for overall sharpness / qualityand for breathing ( zooming while changing focus). Wider lenses are softer than long lensesabove F40mm and tend to darken corners. Test Photo lenses, especial zoom lenses forholding focus while zooming. Also if a lens causes vigneting it may be a 35mm regular gatelens only! Or the lens is not centred properly anymore (old, damaged etc.) In that case justslightly zoom into the gate. 16m lenses may work, but are not recommended. Caution:Lenses, which measures more than 32mm from the bayonet flange to the end of the lastlens element, are not recommended. As it may crash into protection filter. Zoom lenseswhere the iris diaphragm is near the bayonet flange, such as Cooke T3.0 18-100, T3.9 25-250 and T3.1 20-100, are not supported10
Technical service and maintenance<strong>MOVIEtube</strong> world distributionHenner Befort-RiedelErnst Befort OHGBraunfelserstraße 2635578 WetzlarGermanyPhone: +49.6441-9241-0Fax: +49.6441-9241-33Carey DuffySouth London Filter LtdNo 3 Richborne TerraceLondonSW8 1ASUnited KingdomTel.+44 (0)20 7735 1900Fax: +44 (020) 7820 1718Office hours:Monday to Friday 8.00am to 4.00pm GMTEmail: hbr@befort-optic.comOffice hours:Monday to Friday 9.00am to 6.30pm GMTEmail: carey.duffy@camerafilters.co.ukFor more information and movies visit our WebPages www.movietube.com or send us an email to info@movietube.com.11