model 6065 12 volt parallel charger operator's manual - Associated ...
model 6065 12 volt parallel charger operator's manual - Associated ...
model 6065 12 volt parallel charger operator's manual - Associated ...

You also want an ePaper? Increase the reach of your titles
YUMPU automatically turns print PDFs into web optimized ePapers that Google loves.
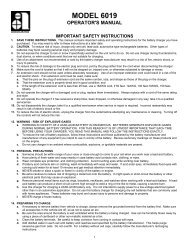
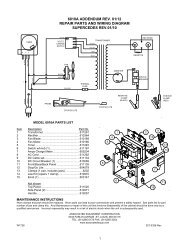
DANGER. Before using adapter as illustrated, be certain that center screw of outlet plate is grounded. The green-colored rigid ear of lugextending from adapter must be connected to a properly grounded outlet-make certain it is grounded. If necessary, replace original outlet cover platescrew with a longer screw that will secure adapter ear to lug to outlet cover plate and make ground connection to grounded outlet.MOUNTINGThe Battery Charger may be set on a table or a shelf. Do not set <strong>charger</strong> on floor. It should be mounted such that the air intake louvers are at least18” from the floor. Regardless of how t is placed, the top and side louvers of the unit must not be blocked. This is a convection cooled <strong>charger</strong> andblocking the louvers will damage the unit. When locating the unit. take into account the number of batteries to be recharged and location of the rechargingracks~ Never place the <strong>charger</strong> such that battery acid or water may be spilled in the top of the unit. Never place the unit directly over the batteries tobe charged Fumes caused by gassing batteries wilt be drawn through the <strong>charger</strong> by convection and cause damage to the unit. When connecting the<strong>charger</strong> to a charging rack, always be sure the connections are made in the correct polarity. The positive lead on the <strong>charger</strong> is marked with a red band.PARALLEL CHARGING:Connecting batteries in <strong>parallel</strong> (see illustration) allows a person to charge a number of batteries at one time using only one <strong>12</strong> <strong>volt</strong><strong>charger</strong>. The amount of charge being put in the batteries should not exceed the rating of the <strong>charger</strong>. The amount of charge that eachbattery received will depend on the state of charge of the batteries on the rack, condition of the batteries, temperature of the batteries,and other factors.Connecting discharged batteries to a rack of fully charged batteries will not cause the charged batteries to become discharged.With a rack of batteries in various states of charge, the most discharged battery will receive the largest amount of charge. As it ischarged up and becomes equal to another battery, the two will charge equally and come up together. (see illustration).PARALLEL CHARGINGDark area represents state of charge at:TO CHARGE 6 VOLT BATTERIES:Six <strong>volt</strong> batteries must be charged 2 at a time. The 6 <strong>volt</strong> batteries must be connected in series (positive post of one battery tonegative post of other battery) and then the pair of batteries must be connected in <strong>parallel</strong> with the other batteries.Never connect one, six <strong>volt</strong> battery to the <strong>charger</strong>. No other <strong>volt</strong>age battery may be charged with this <strong>charger</strong>.CONTROLS:Ammeter: The ammeter shows the total amount of charge that is being received by the batteries. The amount each battery willreceive depends on several factors (see <strong>parallel</strong> charging). The <strong>charger</strong>’s full output is 30 amps and that amount should never beexceeded.Voltmeter: The <strong>volt</strong>meter shows the <strong>volt</strong>age at which the batteries are being charged. The amount of <strong>volt</strong>age applied to a battery willdetermine the amount of current the battery will receive. See section on “charging batteries” for a complete description of the<strong>volt</strong>meter and its use. Switches: The <strong>charger</strong> has two switches used to adjust the ouput <strong>volt</strong>age and current. Moving the “fine” switchfrom La to Hi does not increase the charging <strong>volt</strong>age as much as moving the “coarse” switch from a low position to a higher position.This design allows you to have 16 distinct charge rates.
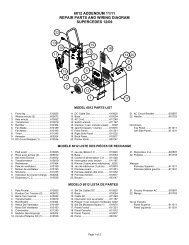
TO CHARGE BATTERIES:This <strong>charger</strong> is designed to charge all types of <strong>12</strong> <strong>volt</strong> automotive batteries. The <strong>volt</strong>meter scale is color coded to represent the threemost common types of batteries.The GREEN scale represents the proper <strong>volt</strong>ages for CONVENTIONAL batteries.The BLUE scale represents the proper charging <strong>volt</strong>ages for RECOMBINATION batteries and LOW MAINTENANCE batteries. TheYELLOW scale represents the proper charging <strong>volt</strong>age for MAINTENANCE FREE batteries.The RED scale areas indicate the charging <strong>volt</strong>age is too high and should be turned down, If not turned down, over charging canoccur to the batteries.A CONVENTIONAL battery is one that has accessible filler caps and the plates are lead-antimony construction. A RECOMBINATIONbattery is one that has no filler caps and no free electrolyte.A LOW MAINTENANCE battery is one that has filler caps and the plates are a combination of lead-antimony and lead-calcium. AMAINTENANCE FREE battery may or may not have filler caps and the plates are lead-calcium.If more than one type of battery is charged at one time, use the lowest suggested settings.To charge batteries overnight: Adjust charging <strong>volt</strong>age to 3/4-1 <strong>volt</strong> less than the recommended highest <strong>volt</strong>age. Do not exceed 30amps. As the batteries charge, the charging current will decrease and the charging <strong>volt</strong>age increase. The “end of charge” <strong>volt</strong>ageshould not exceed the maximum suggested value.The charging <strong>volt</strong>age bands are intended to be guidelines to enable the operator to have a starting point to charge batteries. The ageof the batteries, temperature, and type of batteries will affect the charging cycle. The best setting for your charging conditions willhave to be determined by experience.END OF CHARGE:Discontinue charging when specific gravity reading does not change in 3 consecutive readings, battery is freely gassing or when theelectrolyte reaches <strong>12</strong>0˚F. If your battery is sealed and these determinations cannot be made, see manufacturers instructions forcharging.MODEL <strong>6065</strong> PARTS LIST605675 Switch w/knob (1) 610057 Handle (Optional Accessory)605632 Ammeter 610253 Side Panels (1 Pr.)610058 Voltmeter 610075 Top Panel605206 A.C. Cord 610076 Base605628 D.C. Cable Set 610081 Front Panel610<strong>12</strong>2 Rectifier Assembly 610082 Back Panel610069 Circuit Breaker 610097 Transformer -If you elect to order parts from the factory you may do so by mail or phone. Minimum order from the factory is $25.00. Orders receivedthat are under the minimum will not be processed. Taxes and freight are extra and are not considered to be part of the dollar value ofthe order. We do not have a COD. policy. Cashier check, money order, Master Card or Visa are acceptable. If you use a Master Cardor Visa Card send only the number and expiration. Do not send the card.ASSOCIATED EQUIPMENT CORP.5110 Brown, St. Louis, Mo. 63115Phone (314) 385-5178027-0017ECN 17<strong>12</strong>Rev. 11/87