
You also want an ePaper? Increase the reach of your titles
YUMPU automatically turns print PDFs into web optimized ePapers that Google loves.
WMA / MP3 CD Receiver9482CM1231R345A 说 明 书 .indd 2 2010-1-29 10:23:28
SAFETY INFORMATIONThank you for purchasing this product. Pleaseread through these operating instructionsso you will know how to operate your modelproperly. After you have finished reading theinstructions, keep this manual in a safe placefor future reference.PRECAUTIONSUse only in a 12-volt DC negative-groundelectrical system.Disconnect the vehicle's negative batteryterminal while mounting and connecting theunit.When replacing the fuse, be sure to useone with an identical amperage rating.Using a fuse with a higher amperage ratingmay cause serious damage to the unit.DO NOT attempt to disassemble the unit.Laser beams from the optical pickup aredangerous to the eyes.Make sure those pins or other objects donot get inside the unit, they may causemalfunctions, or create safety hazards suchas electrical shock or laser beam exposure.If you have parked the car for a longtime in hot or cold weather, wait until thetemperature in the car become normalbefore operating the unit.Keep the volume at a level at which you canhear outside warning sounds (horns sirens,etc.).Stop the car before performing anycomplicated operation.CD NOTESPlaying a defective or dusty CD can causedropouts in sound.Handle the disc by holding its inner andouter edges. Do not touch the surface ofthe unlabeled side of the disc.Do not touch the unlabeled side.Do not attach any seal, label or dataprotection sheet to either side of a disc.Do not expose a CD to direct sunlight orexcessive heat.Wipe a dirty CD from the center outwardwith a cleaning cloth.Never use solvents such as benzine oralcohol.This unit can not play 3-inch ( 8cm ) CDs.Never insert a 3-inch CD contained in theadapter or an irregularly shaped CD. Theunit may not be able to eject it, resulting ina malfunction.In addition to ordinary CDs, this unit canplay back a CD-R/CD-RW/MP3/UDF/CD-TEXT.CAUTIONPlease power off this unit at once and send itback to the after-sales service center or thedealer /distributor you purchased from if oneof the following symptoms is found:(1) Water or other obstacle enters the unit;(2) Smoking;(3) Peculiar smell.CONTENTSSafety Information......................................... 1Panel Controls.............................................. 2General Operation........................................ 3CD Player Operation..................................... 4Tuner Operation............................................ 5Playing MP3/WMA Files............................ 5-6Menu Function.............................................. 7Electrical Connections.................................. 8Installation Guide.......................................... 9Anti-Theft System......................................... 9Troubleshooting.......................................... 10Specifications.............................................. 11To provide a clear demonstration and analternative for easy understanding of theoperation of this unit, graphic illustrationwas used. However, this illustration is notnecessary printed as the actual image foundon the unit.19482CM1231R345A 说 明 书 .indd 1 2010-1-29 10:23:28
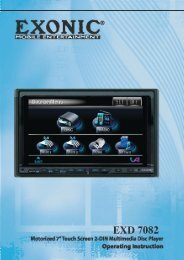
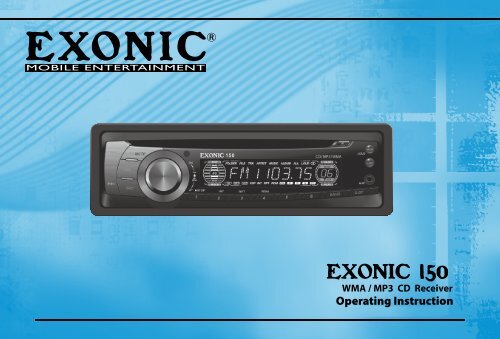
PANEL CONTROLSPower on : Press any button on the panel except and to turn on the unit.MONLOUDLOC1. - Power on / Power off (long press)- Mute2. - Radio tune- Track seek3. - Panel release4. SRC- Radio- Disc play (when disc inserted)- Aux-in5. - AMS: Radio preset scan/Radio autopreset- SEARCH: MP3 track/file/charactersearch6. - Rotate the knob to adjust volume level.- Push to select VOL/BAS/TRE/BAL/FAD, rotate the knob to adjust level.- Press more than 2 seconds to enter menumode.7. Disc playbackButton 1: - Play/Pause- Top play (press more than 2 sec.)Button 2: - Intro play (10 sec.)Button 3: - Track repeat playButton 4: - Track random playButton 5: - MP3 folder down (If there are morethan 1 folders)- MP3 track -10 down (long press)Button 6: - MP3 folder up (If there are morethan 1 folders)- MP3 track +10 up (long press)Radio preset 1~6- Press to tune in a preset station.- Hold for more than 2 seconds to storestation.8. - Band switch:FM1 -> FM2 -> FM3 -> AM1 -> AM29. - Display switch/Time adjust10. - Aux-in jack11.- Radio local/distant12. - FM stereo/mono- Loudness (long press)13. - Disc eject14. - Remote sensor29482CM1231R345A 说 明 书 .indd 2 2010-1-29 10:23:32
GENERAL OPERATIONPower On/Off ButtonPress the POWER button to turn the unit onwhen the vehicle ignition switch is on. Pressand hold the button to turn the unit off.Adjust Volume levelRotate the VOL/MENU control to adjustvolume level. Rotate it clockwise to increaseand anticlockwise to decrease the volume.<strong>Audio</strong> MutePress the MUTE button to mute the volumefrom the system. “MUTE” will appear on thedisplay panel and the volume will be muted.Press the MUTE button again, or rotate orpress the VOL/MENU control to return thevolume level to the setting in use before theMute function was activated.<strong>Audio</strong> ControlsTo adjust the bass, treble, balance andfader, press the VOL/MENU control until theappropriate audio control appears on thedisplay panel. Within five seconds, rotate theVOL/MENU control to adjust the audio settingsfor the selected function.Mode Button (SRC)Press the SRC button to change betweenRadio, DISC (when disc is in) or AUX play.Auxiliary InputTo access an auxiliary device:1. Connect the portable audio player to theAUX interface on the front panel.2. Press the SRC button to select Aux-Inmode.Press SRC again to cancel Aux-In mode andgo to the next mode.Display Selector (DISP)This unit can display either the clock timeor radio frequency/CD player functions.Ordinarily, the radio frequency or CD playertrack indication is displayed, but the unit willdisplay the time when the DISP button ispressed. The time will display until the DISPis pressed again.Setting the ClockThe correct time of day can be set by pressingand holding the DISP button.To set the clock, perform the following steps:1. Turn the vehicle ignition and radio on.2. Press the DISP button to view the clock.3. With the clock visible on the display, pressand hold the DISP button until the timedisplay flashes.4. Within 5 seconds, rotate the VOL/MENUcontrol counter clockwise to adjust theminutes to the desired setting. To changethe hour, rotate the VOL/MENU controlclockwise to adjust the hour to the desiredtime.39482CM1231R345A 说 明 书 .indd 3 2010-1-29 10:23:33
CD PLAYER OPERATIONInserting a DiscWith the label surface facing up, fully inserta compact disc into the disc slot until themechanism engages and pulls the disc in.Play will automatically begin from the firsttrack on the disc.NOTE: The unit is designed for play ofstandard 5” (12 cm.) compact discs only. Donot attempt to use 3” (8 cm.) CD singles inthis unit, either with or without an adaptor,as damage to the player and/or the disc mayoccur.Disc Eject ButtonPress the eject button to stop disc play andeject the disc. The unit will revert to radiooperation. Discs may be ejected with thevehicle ignition switch on or off. If an ejecteddisc is not removed from the disc slot within10 seconds of being ejected, the disc will bere-inserted automatically.NOTE: To prevent a disc from accidentallybeing damaged, always remove the disc fromthe unit when disc play is finished.CD Play/Pause SelectorPress the 1 >/|| button to freeze disc playback.Press 1 >/|| again to resume disc playback.Seek Up/Next TrackPress the next track >>| button during discplay to select the beginning of the next track.Seek Down/Previous TrackPress the previous track |>|button to advance rapidly in the forwarddirection or the previous track |
TUNER OPERATIONFM/AM BandDuring radio play, press the BAND button tochoose between three FM and two AM bands.The indication “AM” or “FM” appears on thedisplay panel according to your selection.Up TuningPress the seek up >>| button to tune stationsupward step-by-step. The current frequencywill be shown in digital format on the displaypanel.Press and hold the seek >>| button to the nextavailable station.Down TuningPress the seek down |
PLAYING MP3/WMA FILESMP3 OverviewMP3 is short for MPEG <strong>Audio</strong> Layer 3 andrefers to an audio compression technologystandard.This product allows playback of MP3 fileson CD-R or CD-RW discs.The unit can read MP3 files written in theformat compliant with ISO 9660. Howeverit does not support the MP3 data written bythe method of packet write.The unit can not read an MP3 file that hasa file extension other than ".mp3".If you play a non-MP3 file that has the".mp3" extension, you may hear somenoise.In this manual, we refer to what are called"MP3 file" and "folder" in PC terminologyas "Track" and "Album", respectively.Maximum number of directory level is 8,including the root directory. Maximumnumber of files and folders per disc is 256.The unit may not play tracks in the order oftrack numbers.The unit plays only the audio tracks if adisc contains both audio tracks and MP3files.When playing a disc of 8kbps or VBR*, theelapsed playing time in the display windowwill not be correct and also the intro playmay not function properly.*VBR: Variable Bit Rate.Note on creating your own CD-Rs orCD-RWs containing MP3 filesT o e n j o y h i g h q u a l i t y s o u n d , w erecommend converting to MP3 files witha sampling frequency of 44.1 kHz and afixed bit rate of 128 kbps.DO NOT store more than 256 MP3 filesper disc.For ISO 9660-compliant format, themaximum allowable depth of nested foldersis 8, including the root directory(folder).When CD-R disc is used, playback ispossible only for discs which have beenfinalized.Make sure that when MP3 CD-R is burnedthat it is formatted as a data disc and NOTas an audio disc.You should not write non-MP3 files orunneeded folders along with MP3 files onthe CD-R otherwise it takes a long timeuntil the unit startsto play MP3 files.With some CD-R media, data may notbe properly written depending on theirmanufacturing quality. In this case, datamay not be reproduced correctly. Highquality CD-R disc is recommended.Up to 16 characters are displayed for thename of an Album or a Track. ID3 TAGversion 1.x is required.Note that the unit may not play tracks inthe order that you wrote them to the disc.69482CM1231R345A 说 明 书 .indd 6 2010-1-29 10:23:33
MENU FUNCTIONPress SEL/MENU button more than 2 secondsto enter menu mode, then each press changesthe mode, rotate the knob to adjust.DSP modeRotate the control to choose DSP soundeffect: POP - ROCK - CLASSIC - FLAT - OFFEPS modeESP 12s: Selected as CD-ESP time 12seconds, MP3-ESP time >100 seconds.ESP 45s: Selected as CD-ESP time 45seconds, MP3-ESP time >100 seconds.SEEK 1 / 2 modeSEEK 1: Searching station will stop when thenext station is received.SEEK 2: Searching station will stop when || button is released and next station isreceived.VOL LAST/ADJ modeRotate the knob to choose power on volumemode.VOL LAST: The turn on volume level is thevolume level of latest power off.VOL ADJUST: press to enter A-VOL mode,then rotate to set the turn on volume level.MULT ON/OFFMulti Session on/off (Multi session off: mixedCD, ONE session CD; Multi session on:Mixed, Extra, multi session CD)12/24 HOURRotate the knob to choose clock format.BEEP ON/OFFRotate the knob to choose button beep soundon or off.79482CM1231R345A 说 明 书 .indd 7 2010-1-29 10:23:33
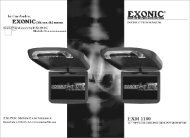
ELECTRICAL CONNECTIONSWiring DiagramAntenna(Black)BATTERY (+)ACC (+)Amp Remote Out(Grey)89482CM1231R345A 说 明 书 .indd 8 2010-1-29 10:23:33
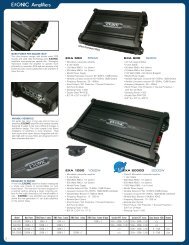
INSTALLATION GUIDEInstallation OpeningThis unit can be installed in any dashboardhaving an opening as shown below. Thedashboard should be 4.75mm - 5.56mm thickin order to be able to support the unit.If the opening is too small, carefully cut or fileas necessary until the sleeve easily slides intothe opening. Do not force the sleeve into theopening or cause it to bend or bow. Check forsufficient space behind the dashboard for theunit chassis.ResetPress the RESET button with a pointed objectto reset the unit to the original status.Note: Press the RESET button will erase theclock setting and stored stations.ResetInstallation Procedures1. If relevant, remove any other audio systemfrom the car.2. Insert the mounting sleeve into thedashboard. Fix it firmly in place by foldingdown the metal tabs.3. P e r f o r m t h e r e q u i r e d e l e c t r i c a lconnections.4. Then check that everything works beforeinstalling the main unit.5. Remove the two screws on the top of theunit, otherwise, the unit will not work.6. Install the car radio in the dashboard usingthe supplied screws (M5x6mm).7. Attach the outer trim frame.If you are not sure how to install this unitcorrectly, contact a qualified technician.Remove thetwo screwsMounting boltRubber cushionTrim plateMain unitMounting sleeveAnti-Theft SystemThis unit is equipped with a detachable panel.Removing this panel makes the radio totallyinoperable.Remove the detachable panel1. Press button.2. Hold the part popped outand pull the panel out.3. Gently press the buttonof the case and open thecover. Place the panelinto the case and take itwith you when you leavethe car.Install detachable panel1. Fix right part of faceplate in the panel slot ofthe unit.2. Press down the left sideof the face plate until itclicks into the panel slot.Remove the unit1. Switch off the power of the unit.22. Remove the panel andthe trim plate.3. Insert both L-Keys intothe hole on the front ofthe set until they lock.4. Pull out the unit.1122122211199482CM1231R345A 说 明 书 .indd 9 2010-1-29 10:23:35
TROUBLESHOOTINGThe following checklist can help you solve some problems which you may encounter when using the unit. Before consulting it, check the connectionsand follow the instructions in the user manual. Do not use the unit in abnormal condition, for example without sound, or with smoke or foul smell cancause fire or electric shock, immediately stop using it and call the store where you purchased it.Problem Possible cause SolutionGeneralThe unit will not switch on.Car ignition is not on.Cable is not properly connected.Fuse is burnt.Turn your car key in the ignition.Check cable connection.Replace fuse with a new fuse of the same capacity.No soundVolume is set at minimum or the muteCheck the volume or switch the mute function off.function is on.The unit or screen does not work normally. The unit system is unstable. Press the RESET button.DISC modeThe appliance will not play discs.The disc is inserted incorrectly.Disc must be inserted with the label side facing up. CleanThe disc is dirty or damaged.the disc and check for damage. Try another disc.Sound skips due to vibration.Mounting angle is over 30˚.Mounting is unstable.Adjust mounting angle to less than 30˚.Mount the unit securely with the supplied parts.TUNER modeUnable to receive stations. The antenna is not connected properly. Connect the antenna properly.Poor quality reception of radio station.The antenna is not fully extended or it is Fully extend the antenna and if broken, replace it with abroken.new one.Preset stations are lost.The battery cable is not properly connected.Connect the permanent live on the unit to the permanentlive on the vehicle.109482CM1231R345A 说 明 书 .indd 10 2010-1-29 10:23:36
SPECIFICATIONGeneralPower supply:12V DC (11V-16V)Test voltage 14.4V, negative groundMaximum power output: 45Wx4 channelsContinuous power output: 20Wx4 channels (4 ,10% T.H.D.)Suitable speaker impedance: 4-8 ohmPre-Amp output voltage: 2.0V (CD play mode: 1KHz, 0 dB, 10 K load)Fuse:15ADimensions(WxHxD):178x50x160mmWeight:1.7kgAux-in:≥300mVFM Stereo RadioFrequency range:87.5-107.9 MHz (USA)87.5-108.0 MHz (EUROPE )Usable sensitivity:8 dBμQuieting sensitivity(S/N=50dB): 12 dBμFrequency response:30Hz-15kHzStereo separation:30dB (1kHz)Image response ratio: 50dBIF response ratio:70dBSignal/noise ratio:55dBDisc PlayerSystem:Frequency response:Signal/noise ratio:Total harmonic distortion:Wow and flutter:Channel separation:ComponentsMounting collar 1Machine screws M5x6mm 4Mounting bolt (50mm) 1Removable face plate case 1Trim plate 1L-key 2Operating instructions 1Rubber cushion 1Disc digital audio system20Hz-20kHz>80 dBLess than 0.20% (1kHz)Below measurable limits>55 dBNote: Specifications and the design are subject to change without noticedue to improvements in technology.MW(AM) RadioFrequency range:Usable sensitivity(S/N=20dB):530-1710 KHz (USA)522-1620 KHz (EUROPE)30 dBμ119482CM1231R345A 说 明 书 .indd 11 2010-1-29 10:23:36
PN.: 1270750123469482CM1231R345A 说 明 书 .indd 1 2010-1-29 10:23:27