AURORA LED SRL/FRL Installation Instructions - Enlightenz
AURORA LED SRL/FRL Installation Instructions - Enlightenz
AURORA LED SRL/FRL Installation Instructions - Enlightenz
- No tags were found...

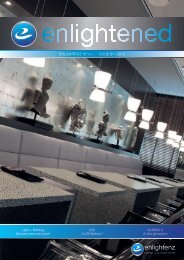
Create successful ePaper yourself
Turn your PDF publications into a flip-book with our unique Google optimized e-Paper software.
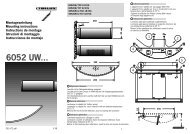
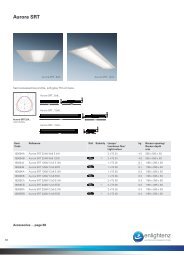
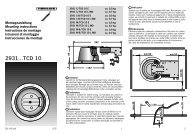
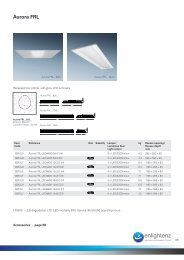
<strong>AURORA</strong> <strong>LED</strong> <strong>SRL</strong>/<strong>FRL</strong> <strong>Installation</strong> <strong>Instructions</strong>Intended Use<strong>AURORA</strong> <strong>LED</strong> is intended as a soft glow, low glare indoor recessed luminaire for office lighting.Safety & <strong>Installation</strong> Information – Please read before beginning installation!• Installing and servicing luminaires can be hazardous due to electrical components and equipmentlocation. Make sure to create a safe working environment to avoid hazards and to ensure correct &safe installation and operation.• Luminaire is to be installed by a qualified electrician only.• Work on the luminaire must be carried out in a tension free state.• Do not cover the luminaire with insulating material.• Do not place any cables on the top surface of the luminaire.• Luminaire is to be installed and maintained to be electrically safe, prevent the risk of fire, not causeadverse effects to property and avoid causing excessive heat.• Luminaire is to be installed so it has adequate clearance from structural members and buildingelements such as thermal insulation.• Luminaire is rated IP20 and must be installed indoors.• Store these installation instructions for future maintenance or demounting. Make these installationinstructions available to the appropriate personnel.WARNING: Do not use this luminaire if the external flexible power cord is damaged. Ensure that areplacement power cord is supplied and installed by a suitably qualified person to avoid a hazard.Scope of SupplyThe <strong>AURORA</strong> <strong>LED</strong> range is available as a semi-recessed (<strong>SRL</strong>) and a fully recessed (<strong>FRL</strong>) fitting. Thefollowing fitting types are available:• Standard• DALI (on request) for use in DALI controlled and other lamp installations• Emergency (on request)All fittings are available in the following sizes:• 600mm x 600mm with 2 x 2200lm <strong>LED</strong> modules• 1200mm x 600mm with 2 x 2200lm <strong>LED</strong> modules• 1200mm x 600mm with 4 x 2200lm <strong>LED</strong> modules• 1200mm x 300mm with 2 x 2200lm <strong>LED</strong> modules• 1200mm x 300mm with 4 x 2200lm <strong>LED</strong> modulesAll fittings are supplied with:• Pre-wired 3 metre power cord with plug & play connector or DALI plug (DALI fittings)• 2200lm <strong>LED</strong> modules• Batwing reflectors• Seismic restraint kit (optional): x1 (<strong>AURORA</strong> 6X6), x2 (<strong>AURORA</strong> 12X6 & 12X3)1How to Install <strong>AURORA</strong> <strong>LED</strong> …ABCD1 LineN NeutralProtective Eartha+ DALIb- DALI1. Preparation• Remove fitting and power cord from the packaging.Ensure the fitting is handled with care, always grip onthe outside of the frame.• Remove the ceiling tile where the light fitting is to beplaced.NOTE: <strong>AURORA</strong> <strong>LED</strong> requires an adequate verticalclearance of at least 100mm in the ceiling cavity.2. Mount to Ceiling and Connect• Hold the underside of the fitting.• Insert the fitting into the ceiling cavity by placing oneend of the fitting into the ceiling on a 45° angle (A).• Slide the fitting diagonally up and over the T-rail so thatthe whole fitting can be placed in the ceiling cavity.• Once the whole fitting is up in the ceiling cavity, turnthe fitting horizontally so that the fitting lies within theT-rail framing.• Lower fitting to sit neatly inside T-rails (B).• To ensure compliance with AS/NZS 4219:2009 Section5.14, <strong>Enlightenz</strong> recommends the use of seismicrestraint kit(s) (C) each consisting of two wire loops,nuts, bolts and washers to secure fitting to T-railsaccording to the following instructions:<strong>AURORA</strong> <strong>LED</strong> 6X6:Fasten wire loops to holes provided in opposite cornersof the fitting and secure to T-rail framing. Additionalythe remaining two holes in the other two corners of thefitting can be used to secure the fitting to the ceilingabove T-rail framing.<strong>AURORA</strong> <strong>LED</strong> 12X6 and 12X3:Fasten wire loops to holes provided in all four cornersof the fitting and secure to T-rail framing. Alternativelyuse holes provided to secure fitting to ceiling above T-rail framing.NOTE: For safe installation and operation of <strong>AURORA</strong><strong>LED</strong> do not cover the luminaire with insulation material.• Insert the power inlet plug and connect the powercable to 230VAC power supply.• When installing a DALI fitting, plug DALI connector intothe fitting and connect with control unit. Ensure theDALI connector (D) is wired as shown in the tablebeside.2
How to Clean <strong>AURORA</strong> <strong>LED</strong> …Specifications• Clean the outside of the fitting with a damp soft cloth if required.• Use a mild cleaning product suitable for use on acrylic if required. Test on a small inconspicuousarea first.• Do not remove diffuser.<strong>AURORA</strong><strong>SRL</strong>/<strong>FRL</strong>2x2200lm6X6<strong>AURORA</strong><strong>SRL</strong>/<strong>FRL</strong>2x2200lm12X6<strong>AURORA</strong><strong>SRL</strong>/<strong>FRL</strong>4x2200lm12X6<strong>AURORA</strong><strong>SRL</strong>/<strong>FRL</strong>2x2200lm12X3<strong>AURORA</strong><strong>SRL</strong>/<strong>FRL</strong>4x2200lm12X3CAUTION: <strong>AURORA</strong> <strong>LED</strong> is a Class II high voltage luminaire. Always ensure to disconnectpower supply before working on <strong>AURORA</strong> <strong>LED</strong>!NOTE: Remove fitting from ceiling and carry out tasks on the ground if possible. If work needs to becarried out on the mounted fitting, make sure to create a safe working environment to avoid risks dueto equipment location and electrical components.NOTE: Do not leave fingerprints or dents on reflectors or <strong>LED</strong>s. Wear soft gloves if required.OperatingAmbientTemperature *OperatingEnvironmentSupply Voltage 220VAC–240VAC25°C 25°C 25°C 25°C 25°CIndoor Indoor Indoor Indoor Indoor220VAC–240VAC220VAC–240VAC220VAC–240VAC220VAC–240VACHow to Service <strong>AURORA</strong> <strong>LED</strong> …Due to the long life span of <strong>LED</strong> modules and luminaire design <strong>AURORA</strong> <strong>LED</strong> does not require regularservicing. Any maintenance required is to be carried out by qualified personnel only!Fuse 240VAC 3.1Afast blow20mm length240VAC 3.1Afast blow20mm length240VAC 3.1Afast blow20mm lengthPower Factor 0.95 0.95 0.95240VAC 3.1Afast blow20mm length240VAC 3.1Afast blow20mm lengthDALI ConfigurationFor assistance with managing lighting control systems based on DALI installations get in touch with theteam at <strong>Enlightenz</strong> or ask for a copy of the <strong>Enlightenz</strong> Design Guide.Current 0.280A 0.280A 0.280APower 40.4W 40.4W 40.4W<strong>LED</strong> Modules 2 x 2200lm/840 2 x 2200lm/840 4 x 2200lm/840 2 x 2200lm/840 4 x 2200lm/840Weight 4.1kg 7.7kg 7.7kg 6.0kg 6.0kgIP Rating IP20 IP20 IP20 IP20 IP20Dimensions inmmSeismicRestraint Kit **595 x 595 595 x 1195 595 x 1195 295 x 1195 295 x 1195x1 x2 x2 x2 x2* For optimal light output and product life** To ensure compliance with AS/NZS 4219:2009 Section 5.14. Each kit consists of 2 x 160mm wireloop, 2 x M4x10 nut, 2 x M4 bolt & washer.<strong>AURORA</strong>DOCC. Version 1.0. 11/2012Phone + 64 9 414 4950 PO Box 302 302Fax +64 9 414 4951info@enlightenz.co.nzwww.enlightenz.co.nz0800 ENLIGHTNorth HarbourAucklandNew Zealand© 2012 <strong>Enlightenz</strong>. All rights reserved. Specifications are subject to change without notice. Standardconditions of sale apply. 5 year electronic ballast warranty for projects registered with <strong>Enlightenz</strong>.1 year lamp warranty (supply only).34