313 Curtain Wall - Ali Systems Limited
313 Curtain Wall - Ali Systems Limited
313 Curtain Wall - Ali Systems Limited

Create successful ePaper yourself
Turn your PDF publications into a flip-book with our unique Google optimized e-Paper software.
Assembly & Installation<br />
Fitting of mullions<br />
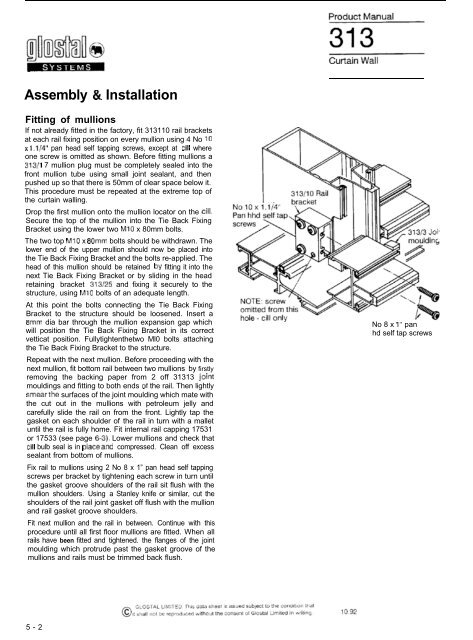
If not already fitted in the factory, fit <strong>313</strong>110 rail brackets<br />
at each rail fixing position on every mullion using 4 No 10<br />
x 1.1/4” pan head self tapping screws, except at till where<br />
one screw is omitted as shown. Before fitting mullions a<br />
<strong>313</strong>/l 7 mullion plug must be completely sealed into the<br />
front mullion tube using small joint sealant, and then<br />
pushed up so that there is 50mm of clear space below it.<br />
This procedure must be repeated at the extreme top of<br />
the curtain walling.<br />
Drop the first mullion onto the mullion locator on the till.<br />
Secure the top of the mullion into the Tie Back Fixing<br />
Bracket using the lower two Ml0 x 80mm bolts.<br />
The two top Ml0 x 80mm bolts should be withdrawn. The<br />
lower end of the upper mullion should now be placed into<br />
the Tie Back Fixing Bracket and the bolts re-applied. The<br />
head of this mullion should be retained by fitting it into the<br />
next Tie Back Fixing Bracket or by sliding in the head<br />
retaining bracket <strong>313</strong>/25 and fixing it securely to the<br />
structure, using Ml0 bolts of an adequate length.<br />
At this point the bolts connecting the Tie Back Fixing<br />
Bracket to the structure should be loosened. Insert a<br />
Smm dia bar through the mullion expansion gap which<br />
will position the Tie Back Fixing Bracket in its correct<br />
vetticat position. Fullytightenthetwo Ml0 bolts attaching<br />
the Tie Back Fixing Bracket to the structure.<br />
Repeat with the next mullion. Before proceeding with the<br />
next mullion, fit bottom rail between two mullions by firstly<br />
removing the backing paper from 2 off <strong>313</strong>13 joint<br />
mouldings and fitting to both ends oi the rail. Then lightly<br />
smearthe surfaces of the joint moulding which mate with<br />
the cut out in the mullions with petroleum jelly and<br />
carefully slide the rail on from the front. Lightly tap the<br />
gasket on each shoulder of the rail in turn with a mallet<br />
until the rail is fully home. Fit internal rail capping 17531<br />
or 17533 (see page 6-3). Lower mullions and check that<br />
till bulb seal is in placeand compressed. Clean off excess<br />
sealant from bottom of mullions.<br />
Fix rail to mullions using 2 No 8 x 1” pan head self tapping<br />
screws per bracket by tightening each screw in turn until<br />
the gasket groove shoulders of the rail sit flush with the<br />
mullion shoulders. Using a Stanley knife or similar, cut the<br />
shoulders of the rail joint gasket off flush with the mullion<br />
and rail gasket groove shoulders.<br />
Fit next mullion and the rail in between. Continue with this<br />
procedure until all first floor mullions are fitted. When all<br />
rails have been fitted and tightened. the flanges of the joint<br />
moulding which protrude past the gasket groove of the<br />
mullions and rails must be trimmed back flush.<br />
5-2<br />
No 8 x 1” pan<br />
hd self tap screws