ENLTV-FM3 - Encore Electronics
ENLTV-FM3 - Encore Electronics
ENLTV-FM3 - Encore Electronics

You also want an ePaper? Increase the reach of your titles
YUMPU automatically turns print PDFs into web optimized ePapers that Google loves.
<strong>ENLTV</strong>-<strong>FM3</strong><br />
PCI TV Tuner Adapter with FM Radio<br />
User’s Guide
<strong>ENLTV</strong>-<strong>FM3</strong> User’s Guide<br />
User’s Notice<br />
No part of this manual, including the products and software described in it, may be<br />
reproduced, transmitted, transcribed, stored in a retrieval system, or translated into any language in<br />
any form or by any means, except documentation kept by the purchaser for backup purposes,<br />
without the express written permission of us.<br />
WE PROVIDES THIS MANUAL “AS IS” WITHOUT WARRANTY OF ANY KIND,<br />
EITHER EXPRESS OR IMPLIED, INCLUDING BUT NOT LIMITED TO THE IMPLIED<br />
WARRANTIES OR CONDITIONS OF MERCHANTABILITY OR FITNESS FOR A<br />
PARTICULAR PURPOSE. IN NO EVENT SHALL US, ITS DIRECTORS, OFFICERS,<br />
EMPLOYEES OR AGENTS BE LIABLE FOR ANY INDIRECT, SPECIAL, INCIDENTAL, OR<br />
CONSEQUENTIAL DAMAGES (INCLUDING DAMAGES FOR LOSS OF PROFITS, LOSS<br />
OF BUSINESS, LOSS OF USE OR DATA, INTERRUPTION OF BUSINESS), EVEN IF WE<br />
HAS BEEN ADVISED OF THE POSSIBILITY OF SUCH DAMAGES ARISING FROM ANY<br />
DEFECT OR ERROR IN THIS MANUAL OR PRODUCT.<br />
Product warranty or service will not be extended if: (1) the product is repaired, modified or<br />
altered, unless such repair, modification of alteration is authorized in writing by us; or (2) the serial<br />
number of the product is defaced or missing.<br />
Products and corporate names appearing in this manual may or may not be registered<br />
trademarks or copyrights of their respective companies, and are used only for identification or<br />
explanation and to the owners’ benefit, without intent infringe.<br />
� Windows, MS-DOS, and DirectX are registered trademarks of Microsoft Corporation.<br />
� Adobe and Acrobat are registered trademarks of Adobe Systems Incorporated.<br />
The product name and revision number are both printed on the product itself. Manual revisions are<br />
released for each product design represented by the digit before and after the period of the manual<br />
revision number. Manual updates are represented by the third digit in the manual revision number.<br />
SPECIFICATIONS AND INFORMATION CONTAINED IN THIS MANUAL ARE<br />
FURNISHED FOR INFORMATION USE ONLY, AND ARE SUBJECT TO CHANGE AT ANY<br />
TIME WITHOUT NOTICE, AND SHOULD NOT BE CONSTRUED AS A COMMITMENT BY<br />
US. WE ASSUME NO RESPONSIBILITY OR LIABILITY FOR ANY ERRORS OR<br />
INACCURACIES THAT MAY APPEAR IN THIS MANUAL, INCLUDING THE PRODUCTS<br />
AND SOFTWARE DESCRIBED IN IT.<br />
Copyright <strong>Encore</strong> <strong>Electronics</strong> © 2009. All Rights Reserved.<br />
2
<strong>ENLTV</strong>-<strong>FM3</strong> User’s Guide<br />
Contents:<br />
Chapter 1: Introduction...................................................................................................................... 4<br />
1.1 - Package Contents............................................................................................................... 4<br />
1.2 - System Requirements ........................................................................................................ 4<br />
Chapter 2: Getting Started ................................................................................................................. 5<br />
2.1 – <strong>ENLTV</strong>-<strong>FM3</strong> Hardware Installation ................................................................................. 5<br />
2.2 - Device Driver Installation ................................................................................................. 6<br />
2.3 - Install the DirectX® ........................................................................................................ 13<br />
2.4 - Install the <strong>ENLTV</strong>-<strong>FM3</strong> Utility software......................................................................... 14<br />
Chapter 3: Launch the <strong>ENLTV</strong>-<strong>FM3</strong> Program.............................................................................................. 20<br />
3.1 - Running the <strong>ENLTV</strong>-<strong>FM3</strong> for the first time.................................................................... 20<br />
3.2 - Watch TV programs or movies from DVD/VCR/Camcorder ......................................... 22<br />
3.3 - Video Recorder ................................................................................................................ 23<br />
3.4 - Using the Snapshot .......................................................................................................... 24<br />
3.5 - Playback Video ................................................................................................................ 24<br />
3.6 - ImageViewer.................................................................................................................... 26<br />
3.7 – Time-Shifting .................................................................................................................. 27<br />
3.8 - Using and setting up the FM Radio................................................................................. 28<br />
Chapter 4: Using the Remote Control.............................................................................................. 29<br />
Chapter 5: Frequently Asked Questions .......................................................................................... 30<br />
Chapter 6: Technical Support........................................................................................................... 31<br />
3
<strong>ENLTV</strong>-<strong>FM3</strong> User’s Guide<br />
Chapter 1: Introduction<br />
1.1 - Package Contents<br />
The following items are included in the �<strong>ENLTV</strong>-<strong>FM3</strong> package.<br />
� CD setup disc (includes Software Driver and Utility Software)<br />
� <strong>ENLTV</strong>-<strong>FM3</strong> PCI card<br />
� Video cable<br />
� FM antenna<br />
� Remote sensor cable<br />
� Remote controller<br />
� User’s guide<br />
1.2 - System Requirements<br />
� Intel® Pentium® 4 1.7GHz CPU or above<br />
� Minimum 256 MB memory<br />
� Minimum 1GB hard disk space available<br />
� 1024x768 graphic card, DirectX ® 9.0c or above compatible graphic card or higher<br />
� One free PCI slot<br />
� PCI 2.1 or 2.2 compliant interface<br />
� Microsoft Windows® XP/ Windows® Vista<br />
� CD-ROM drive<br />
4
<strong>ENLTV</strong>-<strong>FM3</strong> User’s Guide<br />
Chapter 2: Getting Started<br />
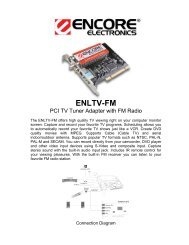
2.1 – <strong>ENLTV</strong>-<strong>FM3</strong> Hardware Installation<br />
Install the <strong>ENLTV</strong>-<strong>FM3</strong> PCI Card to the computer’s<br />
available PCI slot according to your computers<br />
manual and new hardware installation procedures.<br />
Make sure that the computer’s power cord is<br />
unplugged before inserting the <strong>ENLTV</strong>-<strong>FM3</strong> card to<br />
the PCI slot. <strong>ENLTV</strong>-<strong>FM3</strong> supports PCI bus 2.1 and<br />
above.<br />
Refer to the device connection diagram below for<br />
port connections:<br />
Caution:<br />
Take an extra care handling the Remote sensor cable, do not insert or remove the sensor<br />
cable while the computer is powered-on. Otherwise, it can cause the <strong>ENLTV</strong>-<strong>FM3</strong> to<br />
malfunction.<br />
5
<strong>ENLTV</strong>-<strong>FM3</strong> User’s Guide<br />
2.2 - Device Driver Installation<br />
1. Placed the CD software that comes with the <strong>ENLTV</strong>-<strong>FM3</strong> in the CD-ROM drive.<br />
(Assuming that the <strong>ENLTV</strong>-<strong>FM3</strong> Tuner card is properly installed to the computer’s PCI<br />
slot), then follow the on-screen installation guide below.<br />
Device driver installation for Windows® XP Home/Professional Edition/x64 Edition<br />
1. When the computer is powered-on for the<br />
very first time during the setup, a<br />
message “Found New Hardware Wizard”<br />
dialogue box will appear on the screen.<br />
Click “Cancel” button to close “Found New<br />
Hardware Wizard” window.<br />
2. Insert the installation CD into the<br />
CD-ROM drive. The setup screen will<br />
automatically appear.<br />
3. Click the “Setup Driver” button.<br />
4. Select the language then click “Next”.<br />
6
<strong>ENLTV</strong>-<strong>FM3</strong> User’s Guide<br />
5. Click “Next” on driver setup welcome<br />
window to continue.<br />
6. Click “Install” to begin install driver.<br />
7. Click “Next” button.<br />
7
<strong>ENLTV</strong>-<strong>FM3</strong> User’s Guide<br />
8. Click “Continue Anyway” to continue the<br />
installation.<br />
9. Click ”Continue Anyway” button<br />
10. Click “Finish” button<br />
8
<strong>ENLTV</strong>-<strong>FM3</strong> User’s Guide<br />
11. Click “Finish” to reboot PC.<br />
12. To make sure the driver is properly<br />
9<br />
installed and started, open the “Device<br />
Manager”. Please double-click the<br />
“Sound, video and game controller”.
<strong>ENLTV</strong>-<strong>FM3</strong> User’s Guide<br />
Device driver installation for Windows® Vista<br />
1. After <strong>ENLTV</strong>-<strong>FM3</strong> hardware has been<br />
installed, the next time when the computer<br />
is powered-on, a message “Found New<br />
Hardware” dialogue box will appear on the<br />
screen. Click “Cancel” button to close<br />
“Found New Hardware” window.<br />
2. Insert the installation CD into the<br />
CD-ROM drive. The setup screen will<br />
automatically appear.<br />
3. Click the “Setup Driver” button.<br />
4. Select the language then click “Next”.<br />
10
<strong>ENLTV</strong>-<strong>FM3</strong> User’s Guide<br />
2. Click “Next” on driver setup welcome<br />
window to continue.<br />
3. Click “Install” button.<br />
4. Click “Next” button.<br />
11
<strong>ENLTV</strong>-<strong>FM3</strong> User’s Guide<br />
5. Click “Finish” button.<br />
6. Click “Finish” button.<br />
7. To make sure the driver is properly<br />
12<br />
installed and started, open the “Device<br />
Manager”. Please double-click the<br />
“Sound, video and game controller”.
<strong>ENLTV</strong>-<strong>FM3</strong> User’s Guide<br />
2.3 - Install the DirectX®<br />
Microsoft DirectX® allows 3D hardware acceleration support in Windows® 98, 2000,<br />
Windows® XP 32bit/64bit and Windows Vista® 32bit/64bit. For software MPEG support in<br />
Windows® 98, you must first install Microsoft DirectX®, and then an MPEG compliant<br />
video player. Follow the installation steps below to install MS DirectX®.<br />
1. Insert the installation CD into the<br />
CD-ROM drive. The setup screen will<br />
automatically appear.<br />
2. Click the “DirectX” button.<br />
3. Click “Accept the agreement” radio button<br />
then click “Next”<br />
4. Click “Next” to confirm the installation of<br />
DirectX<br />
5. Click “Finish”<br />
NOTE:<br />
The computer will automatically restart.<br />
Please close all programs if any and save<br />
files if needed before hitting the “Finish”<br />
button.<br />
13
<strong>ENLTV</strong>-<strong>FM3</strong> User’s Guide<br />
2.4 - Install the <strong>ENLTV</strong>-<strong>FM3</strong> Utility software.<br />
1. Install TV application on Windows® XP 32bit/64bit<br />
1. Insert the installation CD into the<br />
CD-ROM drive. The setup screen should<br />
automatically appear.<br />
2. Click the “Setup Utility”<br />
3. Select the language then click “Next”.<br />
4. Click “Next” button.<br />
14
<strong>ENLTV</strong>-<strong>FM3</strong> User’s Guide<br />
5. Please read the License Agreement and<br />
click “Yes” button<br />
6. Make sure the “Typical” radio button is<br />
selected then click “Next”.<br />
7. Click “Next” button to accept the default<br />
Note:<br />
location or choose a different folder<br />
(We recommend not to change the default<br />
location)<br />
15
<strong>ENLTV</strong>-<strong>FM3</strong> User’s Guide<br />
8. Click “Next” button.<br />
9. Click “Finish” to restart your computer<br />
NOTE:<br />
We recommend restarting your computer<br />
right after the Installation Wizard.<br />
16
<strong>ENLTV</strong>-<strong>FM3</strong> User’s Guide<br />
2. Install TV application on Windows® Vista 32bit/64bit<br />
1. Insert the installation CD into the<br />
CD-ROM drive. The setup screen should<br />
automatically appear.<br />
2. Click the “Setup Utility”<br />
3. Select the language then click “Next”.<br />
4. Click “Next” button.<br />
17
<strong>ENLTV</strong>-<strong>FM3</strong> User’s Guide<br />
5. Please read the License Agreement and<br />
click “Yes” button<br />
6. Make sure the “Typical” radio button is<br />
selected then click “Next”<br />
7. Click “Next” button to accept the default<br />
Note:<br />
location or choose a different folder<br />
(We recommend not to change the default<br />
location)<br />
18
<strong>ENLTV</strong>-<strong>FM3</strong> User’s Guide<br />
8. Click “Next”<br />
9. Click “Finish” to restart your computer.<br />
NOTE:<br />
We recommend restarting your computer<br />
right after the Installation Wizard.<br />
19
<strong>ENLTV</strong>-<strong>FM3</strong> User’s Guide<br />
Chapter 3: Launch the <strong>ENLTV</strong>-<strong>FM3</strong> Program<br />
3.1 - Running the <strong>ENLTV</strong>-<strong>FM3</strong> for the first time<br />
Click “Start”, move your mouse to “Programs\<strong>ENLTV</strong>-<strong>FM3</strong>” then click <strong>ENLTV</strong>-<strong>FM3</strong><br />
NOTE:<br />
When the <strong>ENLTV</strong>-<strong>FM3</strong> Program is first started, it will prompt you to configure the Device<br />
Setting.<br />
20
<strong>ENLTV</strong>-<strong>FM3</strong> User’s Guide<br />
1. Select the video signal format in your area (NTSC<br />
or PAL) from the “TV Tuner Standard” drop-down<br />
menu.<br />
2. Click “Next”<br />
3. This step will give you an option to scan for TV<br />
channels. Select which signal source you are<br />
connected to in the “TV Scan Type” line then click<br />
“Search”. There are two types of scans.<br />
i. One is scan by TV channel table “Cable”,<br />
“Antenna” and “Extend”<br />
ii. One is scan by frequency that scans low<br />
frequency to high frequency. The “Auto”<br />
scan mode is not for the TV table order.<br />
21
<strong>ENLTV</strong>-<strong>FM3</strong> User’s Guide<br />
3.2 - Watch TV programs or movies from DVD/VCR/Camcorder<br />
7.TV wall<br />
6.Channel List<br />
1. Source Switch: click it to select TV, Audio/Video or S-Video<br />
2. Search TV channel: click to search available TV channel.<br />
3. Volume control: Adjust the Volume or mute.<br />
4. Channel control: Set channel up or down’<br />
5. Double click to full screen display or right click for the program menu<br />
6. Channel List: This is listing all available TV channel.<br />
7. TV wall display: show 4x4 TV wall on screen.<br />
22<br />
5.Double click to full screen<br />
4.Channel Control<br />
3.Volume Control<br />
2.Search TV Channel<br />
1.Source Switch
<strong>ENLTV</strong>-<strong>FM3</strong> User’s Guide<br />
When you do a full screen display, you can use the panel bar to set up your TV box.<br />
1. Fix Panel: To fix the display panel. Show / Hide as mouse drags.<br />
2. Hide Panel: To hide the sub-panel.<br />
3. Snapshot: Same as "Snapshot" button of main panel.<br />
4. TV Wall: To launch TV Wall function, same as "TV Wall" button,<br />
5. Start / Stop Record: Record the current playing audio/video, same as "Start/Stop<br />
Record" of main panel.<br />
6. Switch Next Channel: Switch to next channel, same as "Switch Next Channel" button<br />
of main panel.<br />
7. Switch Previous Channel: Switch to previous channel, same as "Switch Previous<br />
Channel" button of main panel.<br />
8. Volume Adjustment: To adjust the output volume, same as "Volume Adjust" scroll bar<br />
of the main panel.<br />
9. Mute: Audio Mute<br />
3.3 - Video Recorder<br />
1. Click the “Setting” button to setup the record<br />
format.<br />
2. Setup the video format then click “OK”.<br />
3. Click “Record” button to start to capturing<br />
23<br />
video.
<strong>ENLTV</strong>-<strong>FM3</strong> User’s Guide<br />
3.4 - Using the Snapshot<br />
3.5 - Playback Video<br />
Movie Player function List:<br />
1. Click the “Setting” button to setup the image<br />
format.<br />
About: To show the current version info<br />
2. The <strong>ENLTV</strong>-<strong>FM3</strong> support BMP and JPEG<br />
image format. The default is JPEG. Please<br />
choose your desired format.<br />
3. Click “Snapshot” button to capture image.<br />
1. Click “Playback” button to select video file.<br />
2. Choose the video then click “open” button<br />
24
<strong>ENLTV</strong>-<strong>FM3</strong> User’s Guide<br />
Exit: To exit the video playback window, [Esc] or [ALT]+[F4] on keyboard equalized<br />
Minimize: To minimize the video playback window, click "MoviePlayer" in desktop<br />
taskbar to restore display<br />
Hide Control Panel: To hide video control panel, right click video window and select<br />
"Control Panel" to restore display<br />
Setting: Click to open “Options” dialog and adjust settings for video windows,<br />
snapshots and playlist.<br />
ImageViewer: To open image folder (refer to “3.6 ImageViewer” on page26.)<br />
Step Backward: Step by step rewind recorded video<br />
Step Forward: Step by step forward recorded video<br />
Slow Backward: To slow-rewind play recorded video<br />
Slow Forward: To slow-forward the video<br />
Fast Backward: To fast rewind play recorded video<br />
Fast Forward: To fast forward play recorded video<br />
Mute: To turn off audio, click again to restore<br />
Volume Adjust: Drag the slider with the mouse or use Left and Right arrow<br />
on keyboard to adjust volume.<br />
Play/Pause: Click to play the current video file, click again to pause, click one<br />
more to continue.<br />
Stop Play: Stop.<br />
Snapshot: Save current video frame as .BMP or .JPG image file.<br />
Default save file name is “snapshot time” and saved under “My Pictures”<br />
folder. You also can open “snapshots settings” option in “Options” to set<br />
snapshot saving directory, image format and select rename file.<br />
Play List: Show/Hide the Play List window. By default, video files shown are from<br />
the record directory, C:\VIdeo\<br />
25
<strong>ENLTV</strong>-<strong>FM3</strong> User’s Guide<br />
3.6 - ImageViewer<br />
1. Click the “ImageViewer” to retrieve the<br />
saved pictures.<br />
2. You can use the “ImageViewer” software to<br />
control pictures zoom in/out, or rename.<br />
The menu bar contains many function buttons for easy operations, these are:<br />
Refresh: To refresh the display snapshot image in current folder.<br />
DirBar: Show/Hide the Direct Panel on the left window Pane, through which you<br />
can browse and select folder.<br />
ImageBar: Show/Hide the Image Bar on the left of window, through which you<br />
can preview snapshot image.<br />
Set Wallpaper: Set the current image as wallpaper of the Windows desktop, click<br />
the right dropped arrow you can select wallpaper display mode.<br />
Skin: To set the skin of the image browser window<br />
Zoom out: To shrink display current image<br />
Zoom in: To magnify current image<br />
Match Zoom: You can select the matched display mode in the drop-down arrow<br />
Full Size: Shows image at 100% magnification<br />
Fit Image: Magnifies image to fit screen or window<br />
Fit Width: Magnifies image to fit width of screen or window<br />
Fit Height: Magnifies image to fit height of screen or window<br />
Lock: Locks the viewer at the current zoom level.<br />
26
<strong>ENLTV</strong>-<strong>FM3</strong> User’s Guide<br />
3.7 – Time-Shifting<br />
TimeShift<br />
1. Right click inside the <strong>ENLTV</strong>-<strong>FM3</strong> video<br />
window and select the “Timeshift”<br />
function<br />
2. Video is now being recorded to your<br />
hard disk while showing live on screen.<br />
You can click “pause” button or slide the<br />
“timer” to control the current TV show.<br />
3. Click “Stop” button on the control panel<br />
or right click inside the <strong>ENLTV</strong>-<strong>FM3</strong><br />
video window and select “Stop” from the<br />
context menu to stop the time-shift<br />
function.<br />
27
<strong>ENLTV</strong>-<strong>FM3</strong> User’s Guide<br />
3.8 - Using and setting up the FM Radio<br />
NOTE:<br />
<strong>ENLTV</strong>-<strong>FM3</strong> is equipped with FM Radio receiver only. There is no AM Radio receiver included.<br />
1. Click the “Switch Video Source” button then<br />
select “Radio Mode”.<br />
2. Click the “Setup” button<br />
3. If the list of radio channel is empty, click<br />
“Search” button to scan available radio<br />
program.<br />
4. At the channel list, you can select radio<br />
programs then click “Use Favorite Channel list”<br />
button to set the favorite channel.<br />
Note:<br />
(You can select multiple channels at one time<br />
by pressing and holding the “CTRL” key on<br />
your keyboard while selecting radio channels)<br />
28
<strong>ENLTV</strong>-<strong>FM3</strong> User’s Guide<br />
Chapter 4: Using the Remote Control<br />
The Remote control allows you to operate the <strong>ENLTV</strong>-<strong>FM3</strong> program, such as turning the<br />
TV on or off, changing channel and volume, etc. Aim the upper front side of the Remote<br />
Control to the Remote Control Receiver as you would do on other infrared remote control.<br />
For default button assignments, please refer to the list below:<br />
Remote Control Default Settings:<br />
1. Open or Close TV Program.<br />
2. Mute<br />
3. Number keys.<br />
4. Single or Double digits channel.<br />
5. Return to the previous channel last viewed<br />
6. Switch TV signals, S-Video and A/V signal<br />
7. Snapshot<br />
8. Channel Up<br />
9. Channel Low<br />
10. Volume High<br />
11. Volume Low<br />
12. Full screen<br />
13. Record<br />
14. Record Pause<br />
15. Video Settings:Click to respectively adjust<br />
video brightness, contrast, hue and saturation<br />
(use together with the right two direction key).<br />
16. Decrease video setting.<br />
17. Increase video setting.<br />
18. Click to set video brightness, contrast, hue<br />
and saturation to default value.<br />
19. Hide / Display Control Panel.<br />
20. Set time to shutdown Windows system.<br />
29
<strong>ENLTV</strong>-<strong>FM3</strong> User’s Guide<br />
Chapter 5: Frequently Asked Questions<br />
Q: I can’t use <strong>ENLTV</strong>-<strong>FM3</strong> when I run the software and it shows an error message.<br />
A: This problem is because of incorrect sound card device driver, or the driver and software did<br />
not mach.<br />
1. Incorrect sound card device driver<br />
• Check the Device Manager for any yellow or red markings under “Sound, Video and Game<br />
Controller”. If you see yellow or red markings your sound card may be bad or not working<br />
correctly.<br />
• Check the sound card settings in Control Panel to make sure the correct sound card is<br />
selected (This happens to PC with more than one sound card and Bluetooth device)<br />
• Check the Device Manager > Sound, Video and Game Controller. After the driver<br />
installation you should see a line that says “TV Tuner Card”. If you don’t see it that means<br />
the driver for <strong>ENLTV</strong>-<strong>FM3</strong> is not installed.<br />
2. The <strong>ENLTV</strong>-<strong>FM3</strong> driver and software does not match<br />
The <strong>ENLTV</strong>-<strong>FM3</strong> driver and software should match. If step 1 did not work to fix the problem,<br />
uninstall the driver and the software, and then reinstalling then from the product CD again. If<br />
your product CD is not available with you, you can check our web site at<br />
http://www.encore-usa.com for download.<br />
30
<strong>ENLTV</strong>-<strong>FM3</strong> User’s Guide<br />
Q: How do I uninstall the <strong>ENLTV</strong>-<strong>FM3</strong> software?<br />
A: For Windows® Vista, there are two way to uninstall the <strong>ENLTV</strong>-<strong>FM3</strong> Utility software<br />
1. Go to Start > All Program > <strong>ENLTV</strong>-<strong>FM3</strong> > Uninstall <strong>ENLTV</strong>-<strong>FM3</strong>.<br />
2. Go to Windows “Control Panel” > “Add or Remove programs” Select <strong>ENLTV</strong>-<strong>FM3</strong> then<br />
click “Remove” button<br />
Q: Why doesn’t the “Record” function work? I can watch a TV programs fine, but when I<br />
hit the “Record” button, nothing is saved to my hard disk drive.<br />
A:This can be a Windows account or user rights issue.<br />
1. In Windows® Vista system, use “Administrator” account type to login and try to record<br />
again.<br />
2. Recording function use a video CODEC to encode a movie. To make sure video CODEC<br />
resource is not being occupied, we suggest reinstalling the <strong>ENLTV</strong>-<strong>FM3</strong> utility software,<br />
this way the CODEC link will also be reset.<br />
3. Make sure that you meet the minimum system requirements.<br />
Chapter 6: Technical Support<br />
For Technical Support or Installation Hotline contacts please visit our web site at<br />
http://www.encore-usa.com<br />
31
<strong>ENLTV</strong>-<strong>FM3</strong> User’s Guide<br />
32
2009/08/01<br />
Version: 4.0