Mapelastic 315 Mapelastic 315 - BuildSite.com
Mapelastic 315 Mapelastic 315 - BuildSite.com
Mapelastic 315 Mapelastic 315 - BuildSite.com
- No tags were found...

You also want an ePaper? Increase the reach of your titles
YUMPU automatically turns print PDFs into web optimized ePapers that Google loves.
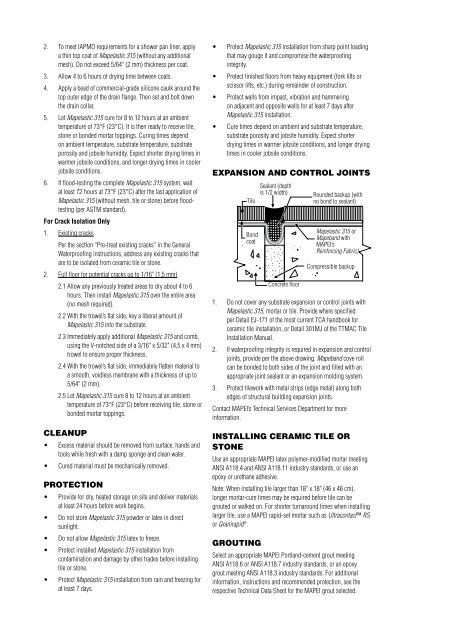
2. To meet IAPMO requirements for a shower pan liner, applya thin top coat of <strong>Mapelastic</strong> <strong>315</strong> (without any additionalmesh). Do not exceed 5/64" (2 mm) thickness per coat.3. Allow 4 to 6 hours of drying time between coats.4. Apply a bead of <strong>com</strong>mercial-grade silicone caulk around thetop outer edge of the drain flange. Then set and bolt downthe drain collar.5. Let <strong>Mapelastic</strong> <strong>315</strong> cure for 8 to 12 hours at an ambienttemperature of 73°F (23°C). It is then ready to receive tile,stone or bonded mortar toppings. Curing times dependon ambient temperature, substrate temperature, substrateporosity and jobsite humidity. Expect shorter drying times inwarmer jobsite conditions, and longer drying times in coolerjobsite conditions.6. If flood-testing the <strong>com</strong>plete <strong>Mapelastic</strong> <strong>315</strong> system, waitat least 72 hours at 73°F (23°C) after the last application of<strong>Mapelastic</strong> <strong>315</strong> (without mesh, tile or stone) before floodtesting(per ASTM standard).For Crack Isolation Only1. Existing cracksPer the section “Pre-treat existing cracks” in the GeneralWaterproofing instructions, address any existing cracks thatare to be isolated from ceramic tile or stone.2. Full floor for potential cracks up to 1/16" (1,5 mm)2.1 Allow any previously treated areas to dry about 4 to 6hours. Then install <strong>Mapelastic</strong> <strong>315</strong> over the entire area(no mesh required).2.2 With the trowel’s flat side, key a liberal amount of<strong>Mapelastic</strong> <strong>315</strong> into the substrate.2.3 Immediately apply additional <strong>Mapelastic</strong> <strong>315</strong> and <strong>com</strong>b,using the V-notched side of a 3/16" x 5/32" (4,5 x 4 mm)trowel to ensure proper thickness.2.4 With the trowel’s flat side, immediately flatten material toa smooth, voidless membrane with a thickness of up to5/64" (2 mm).2.5 Let <strong>Mapelastic</strong> <strong>315</strong> cure 8 to 12 hours at an ambienttemperature of 73°F (23°C) before receiving tile, stone orbonded mortar toppings.CLEANUP• Excess material should be removed from surface, hands andtools while fresh with a damp sponge and clean water.• Cured material must be mechanically removed.PROTECTION• Provide for dry, heated storage on site and deliver materialsat least 24 hours before work begins.• Do not store <strong>Mapelastic</strong> <strong>315</strong> powder or latex in directsunlight.• Do not allow <strong>Mapelastic</strong> <strong>315</strong> latex to freeze.• Protect installed <strong>Mapelastic</strong> <strong>315</strong> installation fromcontamination and damage by other trades before installingtile or stone.• Protect <strong>Mapelastic</strong> <strong>315</strong> installation from rain and freezing forat least 7 days.• Protect <strong>Mapelastic</strong> <strong>315</strong> installation from sharp point loadingthat may gouge it and <strong>com</strong>promise the waterproofingintegrity.• Protect finished floors from heavy equipment (fork lifts orscissor lifts, etc.) during remainder of construction.• Protect walls from impact, vibration and hammeringon adjacent and opposite walls for at least 7 days after<strong>Mapelastic</strong> <strong>315</strong> installation.• Cure times depend on ambient and substrate temperature,substrate porosity and jobsite humidity. Expect shorterdrying times in warmer jobsite conditions, and longer dryingtimes in cooler jobsite conditions.EXPANSION AND CONTROL JOINTSTileBondcoatSealant (depthis 1/2 width)Concrete floorRounded backup (withno bond to sealant)<strong>Mapelastic</strong> <strong>315</strong> orMapeband withMAPEI’sReinforcing Fabric)Compressible backup1. Do not cover any substrate expansion or control joints with<strong>Mapelastic</strong> <strong>315</strong>, mortar or tile. Provide where specifiedper Detail EJ-171 of the most current TCA handbook forceramic tile installation, or Detail 301MJ of the TTMAC TileInstallation Manual.2. If waterproofing integrity is required in expansion and controljoints, provide per the above drawing. Mapeband cove rollcan be bonded to both sides of the joint and filled with anappropriate joint sealant or an expansion molding system.3. Protect tilework with metal strips (edge metal) along bothedges of structural building expansion joints.Contact MAPEI’s Technical Services Department for moreinformation.INSTALLING CERAMIC TILE ORSTONEUse an appropriate MAPEI latex polymer-modified mortar meetingANSI A118.4 and ANSI A118.11 industry standards, or use anepoxy or urethane adhesive.Note: When installing tile larger than 18" x 18" (46 x 46 cm),longer mortar-cure times may be required before tile can begrouted or walked on. For shorter turnaround times when installinglarger tile, use a MAPEI rapid-set mortar such as Ultracontact RSor Granirapid ® .GROUTINGSelect an appropriate MAPEI Portland-cement grout meetingANSI A118.6 or ANSI A118.7 industry standards, or an epoxygrout meeting ANSI A118.3 industry standards. For additionalinformation, instructions and re<strong>com</strong>mended protection, see therespective Technical Data Sheet for the MAPEI grout selected.