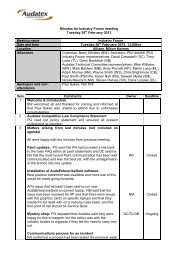
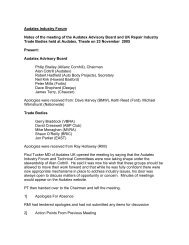
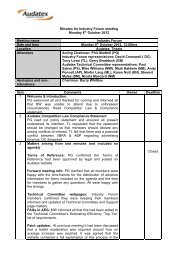
Quick Start A/W - Audatex
Quick Start A/W - Audatex
Quick Start A/W - Audatex

Create successful ePaper yourself
Turn your PDF publications into a flip-book with our unique Google optimized e-Paper software.
AudaEnterpriseGoldNew Features Guide
AudaEnterpriseGoldNew Features GuideIntroductionIn order to enable Vehicle Damage Assessors (VDAs) and engineers tocomplete and authorise body repair estimates more thoroughly andefficiently, we have launched AudaEnterpriseGold 3.6, a ground-breakingdevelopment which introduces new core graphics and calculationfunctionality.This first edition of our New Features Guide provides a step-by-stepoverview of the new and enhanced features for AudaEnterpriseGold 3.6.We will update this Guide as and when further developments are made.1
Model SelectionThere have been a number of enhancements to model selection.It is still possible to use AudaVIN to obtain vehicle details or use theModel Selection wizard to select the manufacturer, model, bodystyle, sub-model, build dates and paint types. The model optionssuch as door mirrors and wheels, which were previously listed withinModel Selection are now available instead within AudaGraphics:Where the model options were previously listed within the ModelSelection, the following message is displayed (where the optionsused to be), informing you how to access the Model Options dialogwithin AudaGraphics:2
On clicking on the toolbar within AudaGraphics, the ModelOptions dialog is displayed:The Model Options dialog contains a summary of the selectedinformation on the ‘Selected’ tab.The options are logically grouped within the appropriate tab, forexample ‘windscreens’ are found on the ‘Exterior’ tab:A ‘red circle’ on the tab heading indicates that there are optionsselected within the tab. A ‘grey circle’ indicates that there are notcurrently any options selected.Select the required tab and then select the required options. It ispossible to change the options within this dialog that have alreadybeen selected via the traditional Model Selection dialog.3
To change Model Selection:To change the model options, we recommend that you access theModel Options dialog within AudaGraphics (by clicking on theAudaGraphics toolbar). However, it is also possible to change themodel selection from within the Job Log.From the left-hand panel of the Job Log,select Model Selection.A dialog is displayedenabling you to changethe vehicle or edit themodel options.To change the model:If you wish to change the model, for example, from a BMW to anAudi, in the Change Existing Model Selection, click Change Vehicle.The Model Selection wizard is displayed.Note – once an assessment has been sent, the person receiving theassessment is prevented from changing the model sheet.(Note – the recipient is still able to change the sub-model and othermodel options)If the recipient tries to change the model sheet, a message isdisplayed informing them that they are not allowed to change themodel sheet:To edit the Model Options:1. If you wish to keep the same vehicle but just edit some of theoptions for example, changing the model from a BMW 318i to a325i, build dates, engine or trim level, click Edit Model Options.The Model Options dialog is displayed.Notes –• This only applies if the recipient is online and is usingAudaEnterpriseGold 3.6.• There is no change to the existing behaviour for MACE andTTS assessments.2. Select the required Model Options and click OK.4
To search within the Model Options dialog:Rather than having to search through the various tabs of the ModelOptions dialog to locate a particular model option, it is possible tosearch for an option.1. Within the Model Options dialog, click Search.2. Enter the name of the option e.g. Fog (for fog lights)The search will take you to the appropriate tab and bold theappropriate option(s).The Model Options searchdialog is displayed.5
AudaGraphics – Legend for coloursIn addition to the standard colours shown in AudaGraphics, there arenow colours for material types Aluminium and HSS/UHSS > 600MPa(high strength steel/ultra high strength steel). Clicking on the toolbarbutton within AudaGraphics displays a legend informing youwhat the colours mean.Colour coded material typesAluminium and HSS/UHSS >600MPa are also available inAudaGraphics in earlier versionsof AudaEnterpriseGold butthe Legend (shown opposite)is only available inAudaEnterpriseGold 3.6.Note – The July 2010 datarelease or later is also requiredto enable colour coded materialtypes for all users.Parts Price PreviewParts price preview provides a quick sense check on the cost ofparts without having to re-calculate and view reports.Parts price preview has been enabled in v3.6. In order to view partsprices, offline (local) data for the selected vehicle must be installed.(Offline data will be available in data releases from August 2010.The data must be installed after AudaEnterpriseGold 3.6 has beeninstalled)Additionally, parts price preview is not available within an assessmentuntil a calculation has been performed.Once a calculation has been performed, parts price preview will beavailable for anyone viewing the assessment (i.e. it is not Companyor user specific).If you change model selection after calculation, parts price previewwill not be available until you have performed a calculation using thenew model.6
To access parts price preview:1. Within AudaGraphics, right-click on the part whose price youwish to view.2. From the menu, select Search.The parts price is displayed.Running TotalRunning total provides a quick sense check on the total cost of parts,labour, paint, additional costs, and the overall total cost withouthaving to re-calculate and view reports.Running total has been enabled in v3.6. In order to view the costs,offline data (i.e. data installed directly on your PC) for the selectedvehicle must be installed.(Offline data will be available in data releases from August 2010.The data must be installed after AudaEnterpriseGold 3.6 has beeninstalled)Additionally, running total is not available within an assessment untila calculation has been performed.The running total values are displayed at the bottom of theAudaGraphics screen:The offline parts prices are only based on Manufacturer’s prices.It is possible that the offline parts price will differ from the onlineprice obtained on calculation as the online prices may be more upto date. It is important that you keep your data up to date tominimise these differences.The offline prices are only based on Manufacturer’s prices.It is possible that the offline parts price will differ from the onlineprice obtained on calculation as the online prices may be more upto date. This will affect the running total. It is important that youkeep your data up to date to minimise these differences.7
Add CommentsWithin AudaEnterpriseGold v3.6, it is possible to attach a commentagainst a part (guide number). This enables you to associate acomment with a part. Note that comments will not appear inany reports.To add a comment to a part:4. Enter a comment and click OK.Each comment entry can have a maximum length ofapproximately 350 characters.5. The comment can be viewed by right-clicking on the part andselecting Comment Entry from the menu, or by selecting theChecklist tab, right-clicking on the part and selecting CommentEntry from the menu:1. Within AudaGraphics select thepart and the required operation(e.g. repair).2. Right-click on the part andselect the left or right part(where applicable).3. From the sub-menu selectComment Entry:The Comment Entry dialogis displayed:Note – adding a comment will require you to recalculate even if theselected parts are unaffected in any other way.8
To view a comment:Comments are viewable in the APS checklist view:To delete a comment:1. Display the Comment Entry dialog (by either right-clicking on thecomment in the Checklist tab and selecting Edit Comment, or byright-clicking on the part and selecting Comment Entry).2. Click Delete.Comments can also be viewed via the menu on the part(by right-clicking on the part).Comments are currently local to the user who added them, but weare looking to ensure they will also be available to the recipient in afuture release.9
Dynamic DisplayDynamic Display is a new feature within AudaGraphics. DynamicDisplay graphics make damage capture easier as the graphicsexactly match the specific model you are working on. Additionally,partial repairs are now marked in colour, making it easier forcapturing and reviewing.Dynamic Display files are the next generation graphics files and willbe released gradually via data updates. They do not require the userto do anything in order to use them.Dynamic Display will not be enabled on any version ofAudaEnterpriseGold earlier than 3.6.Dynamic Display makes the distinction between ‘plausible’ and‘non-plausible parts’.• Plausible parts are those parts defined by the model/model optionsyou have selected, and shown in the graphics as normal.• Non-plausible parts are parts that are also potentially available,but not shown by default as they are not applicable to themodel/model options you have selected.AudaGraphics colours – material typesNote – When you open AudaGraphics where Dynamic Display isavailable, one of four messages may be displayed relating to thematerial type information, an example of which is:The message displayed depends on what material type informationthe manufacturer has supplied.Ticking the ‘Do not show this dialog in the future’ only applies to themodel sheet within the current assessment, whilst the assessmentis open. If you re-open AudaGraphics within the assessment, themessage will be re-displayed. This is to ensure that the messagealso reflects the latest information from the manufacturer.Where appropriate the message is displayed for other assessments.10
Graphic AccessTo access the zones, click on the area of the vehicle required.<strong>Quick</strong> access to special zones is available via shortcut buttons.Areas containing selected operations are highlighted in grey.Search Tree AccessThe search tree is situated to the left of the main tree and can beused to navigate to the required areas. On selecting a grey box, adropdown will appear displaying applicable zones within that zone:Pre selected options describingthe vehicles.Zones are selectable from thegrey bars.Clicking on a zone (grey bar) displays a drop-down list:In the picture opposite, the body isselected. The pink bars show theplausible areas that can be selected.(Only plausible areas are shown forselection)<strong>Quick</strong> access to special zones11The example above is for a four doorvehicle, and so there are zones forthe front and rear doors. If a threedoor version had been selected thenthe rear doors would not be shownin this list.
In the picture below the front outer section is selected:Headlamp Washers added:(De-selecting thecheckbox will removethe item from thegraphical display andfrom the vehiclespecification)Each of the blue bars lists a model option that is relevant to the areaof the vehicle currently displayed (to the right of the search tree).In the example above there is an option for Headlamp Washers.However, there is not an image representing them in the graphics tothe right. By moving the mouse cursor over each of the blue bars therelevant images will be shown temporarily on the screen.To add the option to the graphical display you must select (tick) therequired checkbox in the blue bar. When the option is selected, it isadded to the vehicle specification for calculation.Note – Where an option does not have a graphical representation,it MUST be selected from the Model Options dialog (accessed byclicking on the AudaGraphics toolbar).For example – Windscreens have the possibility to be heated andtinted, but these would look the same in the graphic so these optionsmust be selected from the Model Options dialog. The same appliesto options such as door mirrors.Right-clicking on any of the headers (for example Bodywork FrontOuter) will toggle the display of the model option codes on and off:12
Alt PartsA list of parts not shown can also befound by selecting the Alt parts tab atthe bottom of the search tree:Zone TreeThis method is very much like the previous version of the zone tree.By clicking the ‘eye’ toolbar button you can toggle betweenviewing all sections or only plausible sections.The plausible view is shown below:This will include non-plausible parts forwhich options have not been selected.For example –R/F Fog lamps are shown at the top of the list but not in the graphicsscreen. Once the option for fog lamps has been selected these willappear in the graphics.13
Navigation ArrowsZone navigation is also available by using the navigation arrowswithin the graphics screen as shown below. Clicking an arrow willtake you to the next adjacent zone.Zone Navigation buttonsPartial Panel RepairsSelecting the correct partial repair is now clearer. On clicking anyof the selection circles, the corresponding parts of the partial arehighlighted in colour.Selection circlePartial repairs colouredIf an assessment (which uses Dynamic Display) is sent to a user whodoes not have AudaEnterpriseGold 3.6 and Dynamic Display, therecipient will be able to view and process the assessment as normal.Additional item in Zone 99 Possible Damagefor AudaInvoiceA new storage and recovery item for AudaInvoice is available withinZone 99 of AudaEnterpriseGold. Within ‘Possible Damage’ it is nowpossible to select ‘AI_repatriate_veh’; this will then appear on theinvoice within AudaInvoice.14
For further assistance, please contact the <strong>Audatex</strong> Service Desk:Tel: 0118 923 5666 Fax: 0118 930 4175Email: servicedesk@audatex.co.uk<strong>Audatex</strong> (UK) Limited, The Forum, Station Road, Theale, Reading RG7 4RATel: 0118 932 3535 Fax: 0118 930 4175 Email: salesdesk@audatex.co.ukwww.audatex.co.uk www.solerainc.comCopyright ©2010 Solera, Inc./All rights reserved 09/10