FreeWheel Rack Installation Guide - Seating Dynamics
FreeWheel Rack Installation Guide - Seating Dynamics
FreeWheel Rack Installation Guide - Seating Dynamics

You also want an ePaper? Increase the reach of your titles
YUMPU automatically turns print PDFs into web optimized ePapers that Google loves.
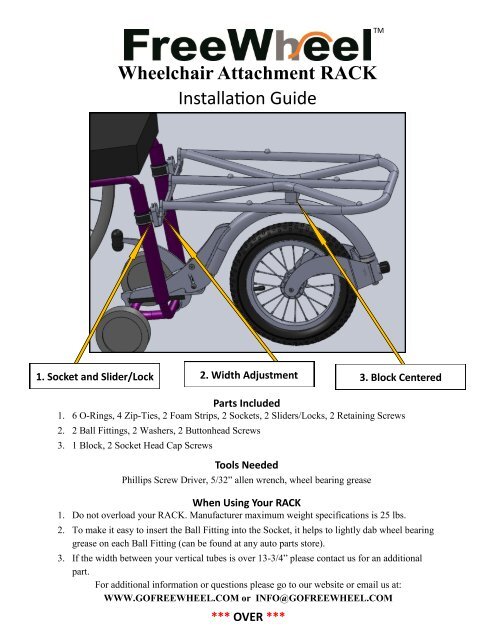
TMWheelchair Attachment RACK<strong>Installation</strong> <strong>Guide</strong>1. Socket and Slider/Lock 2. Width Adjustment3. Block CenteredParts Included1. 6 O-Rings, 4 Zip-Ties, 2 Foam Strips, 2 Sockets, 2 Sliders/Locks, 2 Retaining Screws2. 2 Ball Fittings, 2 Washers, 2 Buttonhead Screws3. 1 Block, 2 Socket Head Cap ScrewsTools NeededPhillips Screw Driver, 5/32” allen wrench, wheel bearing greaseWhen Using Your RACK1. Do not overload your RACK. Manufacturer maximum weight specifications is 25 lbs.2. To make it easy to insert the Ball Fitting into the Socket, it helps to lightly dab wheel bearinggrease on each Ball Fitting (can be found at any auto parts store).3. If the width between your vertical tubes is over 13-3/4” please contact us for an additionalpart.For additional information or questions please go to our website or email us at:WWW.GOFREEWHEEL.COM or INFO@GOFREEWHEEL.COM*** OVER ***
STEP 1Slider/LockZip-Ties andFoam BackingRetaining Screw10”Bottom of foam strip 10” fromfloor withOUT <strong>FreeWheel</strong> on3 - O-RingsSTEP 2 STEP 3WasherButtonhead ScrewBall FittingCenter Block at top of<strong>FreeWheel</strong>