Mustang Sheet Fabrication Guide - Curbellplastics.com
Mustang Sheet Fabrication Guide - Curbellplastics.com
Mustang Sheet Fabrication Guide - Curbellplastics.com
- No tags were found...

Create successful ePaper yourself
Turn your PDF publications into a flip-book with our unique Google optimized e-Paper software.
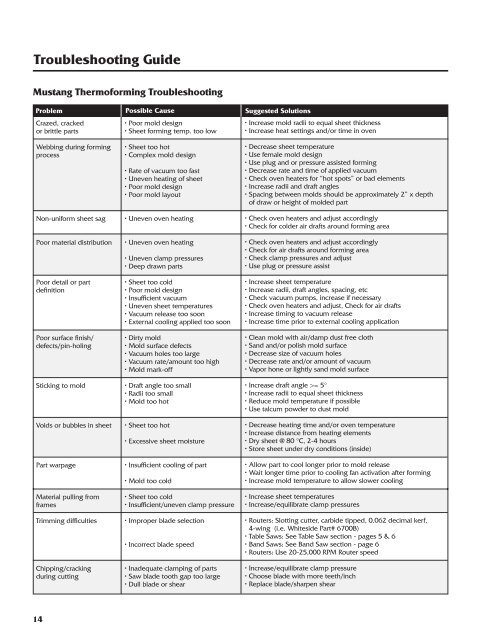
Troubleshooting <strong>Guide</strong><strong>Mustang</strong> Thermoforming TroubleshootingProblemCrazed, crackedor brittle partsWebbing during formingprocessNon-uniform sheet sagPoor material distributionPoor detail or partdefinitionPoor surface finish/defects/pin-holingSticking to moldVoids or bubbles in sheetPart warpageMaterial pulling fromframesTrimming difficultiesChipping/crackingduring cuttingPossible Cause• Poor mold design• <strong>Sheet</strong> forming temp. too low• <strong>Sheet</strong> too hot• Complex mold design• Rate of vacuum too fast• Uneven heating of sheet• Poor mold design• Poor mold layout• Uneven oven heating• Uneven oven heating• Uneven clamp pressures• Deep drawn parts• <strong>Sheet</strong> too cold• Poor mold design• Insufficient vacuum• Uneven sheet temperatures• Vacuum release too soon• External cooling applied too soon• Dirty mold• Mold surface defects• Vacuum holes too large• Vacuum rate/amount too high• Mold mark-off• Draft angle too small• Radii too small• Mold too hot• <strong>Sheet</strong> too hot• Excessive sheet moisture• Insufficient cooling of part• Mold too cold• <strong>Sheet</strong> too cold• Insufficient/uneven clamp pressure• Improper blade selection• Incorrect blade speed• Inadequate clamping of parts• Saw blade tooth gap too large• Dull blade or shearSuggested Solutions• Increase mold radii to equal sheet thickness• Increase heat settings and/or time in oven• Decrease sheet temperature• Use female mold design• Use plug and or pressure assisted forming• Decrease rate and time of applied vacuum• Check oven heaters for “hot spots” or bad elements• Increase radii and draft angles• Spacing between molds should be approximately 2” x depthof draw or height of molded part• Check oven heaters and adjust accordingly• Check for colder air drafts around forming area• Check oven heaters and adjust accordingly• Check for air drafts around forming area• Check clamp pressures and adjust• Use plug or pressure assist• Increase sheet temperature• Increase radii, draft angles, spacing, etc• Check vacuum pumps, increase if necessary• Check oven heaters and adjust, Check for air drafts• Increase timing to vacuum release• Increase time prior to external cooling application• Clean mold with air/damp dust free cloth• Sand and/or polish mold surface• Decrease size of vacuum holes• Decrease rate and/or amount of vacuum• Vapor hone or lightly sand mold surface• Increase draft angle >= 5°• Increase radii to equal sheet thickness• Reduce mold temperature if possible• Use talcum powder to dust mold• Decrease heating time and/or oven temperature• Increase distance from heating elements• Dry sheet @ 80 °C, 2-4 hours• Store sheet under dry conditions (inside)• Allow part to cool longer prior to mold release• Wait longer time prior to cooling fan activation after forming• Increase mold temperature to allow slower cooling• Increase sheet temperatures• Increase/equilibrate clamp pressures• Routers: Slotting cutter, carbide tipped, 0.062 decimal kerf,4-wing (i.e. Whiteside Part# 6700B)• Table Saws: See Table Saw section - pages 5 & 6• Band Saws: See Band Saw section - page 6• Routers: Use 20-25,000 RPM Router speed• Increase/equilibrate clamp pressure• Choose blade with more teeth/inch• Replace blade/sharpen shear14