Setting up your new iPad 2
Setting up your new iPad 2
Setting up your new iPad 2

Create successful ePaper yourself
Turn your PDF publications into a flip-book with our unique Google optimized e-Paper software.
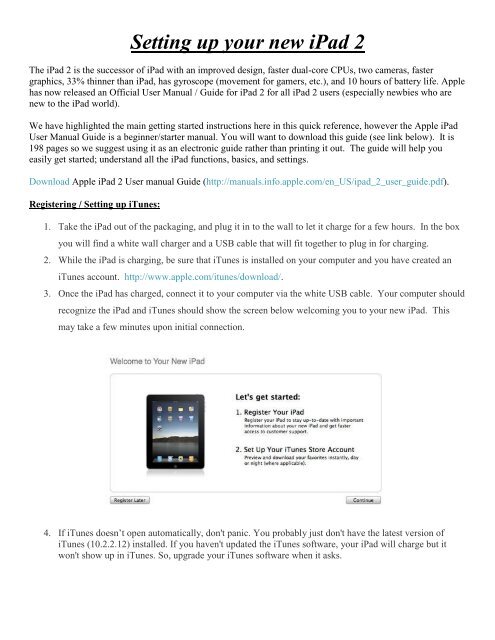
<strong>Setting</strong> <strong>up</strong> <strong>your</strong> <strong>new</strong> <strong>iPad</strong> 2The <strong>iPad</strong> 2 is the successor of <strong>iPad</strong> with an improved design, faster dual-core CPUs, two cameras, fastergraphics, 33% thinner than <strong>iPad</strong>, has gyroscope (movement for gamers, etc.), and 10 hours of battery life. Applehas now released an Official User Manual / Guide for <strong>iPad</strong> 2 for all <strong>iPad</strong> 2 users (especially <strong>new</strong>bies who are<strong>new</strong> to the <strong>iPad</strong> world).We have highlighted the main getting started instructions here in this quick reference, however the Apple <strong>iPad</strong>User Manual Guide is a beginner/starter manual. You will want to download this guide (see link below). It is198 pages so we suggest using it as an electronic guide rather than printing it out. The guide will help youeasily get started; understand all the <strong>iPad</strong> functions, basics, and settings.Download Apple <strong>iPad</strong> 2 User manual Guide (http://manuals.info.apple.com/en_US/ipad_2_user_guide.pdf).Registering / <strong>Setting</strong> <strong>up</strong> iTunes:1. Take the <strong>iPad</strong> out of the packaging, and plug it in to the wall to let it charge for a few hours. In the boxyou will find a white wall charger and a USB cable that will fit together to plug in for charging.2. While the <strong>iPad</strong> is charging, be sure that iTunes is installed on <strong>your</strong> computer and you have created aniTunes account. http://www.apple.com/itunes/download/.3. Once the <strong>iPad</strong> has charged, connect it to <strong>your</strong> computer via the white USB cable. Your computer shouldrecognize the <strong>iPad</strong> and iTunes should show the screen below welcoming you to <strong>your</strong> <strong>new</strong> <strong>iPad</strong>. Thismay take a few minutes <strong>up</strong>on initial connection.4. If iTunes doesn’t open automatically, don't panic. You probably just don't have the latest version ofiTunes (10.2.2.12) installed. If you haven't <strong>up</strong>dated the iTunes software, <strong>your</strong> <strong>iPad</strong> will charge but itwon't show <strong>up</strong> in iTunes. So, <strong>up</strong>grade <strong>your</strong> iTunes software when it asks.
5. Check the box at the bottom of the agreement policy and press continue to click through the licenseagreement. Sign in to <strong>your</strong> iTunes account, or set one <strong>up</strong> if you don't have one already. You might get amessage that says an <strong>iPad</strong> has previously been synced with <strong>your</strong> computer.6. You will need to login with <strong>your</strong> iTunes / Apple ID and password. If you do not have an Apple ID, youwill need to choose the “I do not have an Apple ID option. Click Continue.Enter <strong>your</strong> Apple ID andpassword here. Be sure to clickon the circle next to “Use myApple ID to register my <strong>iPad</strong>.”If you do not have a previously createdApple ID select the circle next to “I donot have an Apple ID”, choose UnitedStates, and click continue. You willfollow the prompts to create <strong>your</strong> Apple/ iTunes user account. Press Continue after making choice**Existing <strong>iPad</strong> users, please skip to Step 8.**
7. If you are a NEW IPAD USER you will choose, “Set <strong>up</strong> as a <strong>new</strong> <strong>iPad</strong>” and click Continue.**At this point <strong>your</strong> <strong>iPad</strong> is ready for use. Take a look at the App Store to purchase useful apps.**8. Get In Sync (For Users who have had an <strong>iPad</strong> Previously)If you have previously synced an <strong>iPad</strong> and would like to transfer everything over to this <strong>iPad</strong>, choose “Restorefrom the back<strong>up</strong> of: (choose <strong>your</strong> <strong>iPad</strong>)” and click Continue.
Click on the Apps Tab. If you are a previous <strong>iPad</strong> user or an iPhone user, you may already have some appslisted when you go to sync <strong>your</strong> iTunes account. Pick and choose the apps you want to sync by checking orunchecking the boxes. If you are a <strong>new</strong> <strong>iPad</strong> & iTunes user, you will most likely not see any apps listed hereThe other thing you will, most likely, want to sync is music. To do this, follow the same process as with theApps by clicking the Music tab and check and uncheck boxes next to the songs you want to sync to <strong>your</strong> <strong>iPad</strong>.