Cisco Unity Voice Messaging User Guide - Administration
Cisco Unity Voice Messaging User Guide - Administration
Cisco Unity Voice Messaging User Guide - Administration

You also want an ePaper? Increase the reach of your titles
YUMPU automatically turns print PDFs into web optimized ePapers that Google loves.
<strong>Cisco</strong> <strong>Unity</strong> <strong>Voice</strong> <strong>Messaging</strong> <strong>User</strong> <strong>Guide</strong>Release 4.0(5)Published April 14, 2005Corporate Headquarters<strong>Cisco</strong> Systems, Inc.170 West Tasman DriveSan Jose, CA 95134-1706USAhttp://www.cisco.comTel: 408 526-4000800 553-NETS (6387)Fax: 408 526-4100Text Part Number: OL-7374-01This book is intended for use with <strong>Cisco</strong> <strong>Unity</strong> with Microsoft Exchange.
THE SPECIFICATIONS AND INFORMATION REGARDING THE PRODUCTS IN THIS MANUAL ARE SUBJECT TO CHANGE WITHOUT NOTICE. ALLSTATEMENTS, INFORMATION, AND RECOMMENDATIONS IN THIS MANUAL ARE BELIEVED TO BE ACCURATE BUT ARE PRESENTED WITHOUTWARRANTY OF ANY KIND, EXPRESS OR IMPLIED. USERS MUST TAKE FULL RESPONSIBILITY FOR THEIR APPLICATION OF ANY PRODUCTS.THE SOFTWARE LICENSE AND LIMITED WARRANTY FOR THE ACCOMPANYING PRODUCT ARE SET FORTH IN THE INFORMATION PACKET THATSHIPPED WITH THE PRODUCT AND ARE INCORPORATED HEREIN BY THIS REFERENCE. IF YOU ARE UNABLE TO LOCATE THE SOFTWARE LICENSEOR LIMITED WARRANTY, CONTACT YOUR CISCO REPRESENTATIVE FOR A COPY.The <strong>Cisco</strong> implementation of TCP header compression is an adaptation of a program developed by the University of California, Berkeley (UCB) as part of UCB’s publicdomain version of the UNIX operating system. All rights reserved. Copyright © 1981, Regents of the University of California.NOTWITHSTANDING ANY OTHER WARRANTY HEREIN, ALL DOCUMENT FILES AND SOFTWARE OF THESE SUPPLIERS ARE PROVIDED “AS IS” WITHALL FAULTS. CISCO AND THE ABOVE-NAMED SUPPLIERS DISCLAIM ALL WARRANTIES, EXPRESSED OR IMPLIED, INCLUDING, WITHOUTLIMITATION, THOSE OF MERCHANTABILITY, FITNESS FOR A PARTICULAR PURPOSE AND NONINFRINGEMENT OR ARISING FROM A COURSE OFDEALING, USAGE, OR TRADE PRACTICE.IN NO EVENT SHALL CISCO OR ITS SUPPLIERS BE LIABLE FOR ANY INDIRECT, SPECIAL, CONSEQUENTIAL, OR INCIDENTAL DAMAGES, INCLUDING,WITHOUT LIMITATION, LOST PROFITS OR LOSS OR DAMAGE TO DATA ARISING OUT OF THE USE OR INABILITY TO USE THIS MANUAL, EVEN IF CISCOOR ITS SUPPLIERS HAVE BEEN ADVISED OF THE POSSIBILITY OF SUCH DAMAGES.CCSP, CCVP, the <strong>Cisco</strong> Square Bridge logo, Follow Me Browsing, and StackWise are trademarks of <strong>Cisco</strong> Systems, Inc.; Changing the Way We Work, Live, Play, and Learn, andiQuick Study are service marks of <strong>Cisco</strong> Systems, Inc.; and Access Registrar, Aironet, BPX, Catalyst, CCDA, CCDP, CCIE, CCIP, CCNA, CCNP, <strong>Cisco</strong>, the <strong>Cisco</strong> CertifiedInternetwork Expert logo, <strong>Cisco</strong> IOS, <strong>Cisco</strong> Press, <strong>Cisco</strong> Systems, <strong>Cisco</strong> Systems Capital, the <strong>Cisco</strong> Systems logo, <strong>Cisco</strong> <strong>Unity</strong>, Enterprise/Solver, EtherChannel, EtherFast,EtherSwitch, Fast Step, FormShare, GigaDrive, GigaStack, HomeLink, Internet Quotient, IOS, IP/TV, iQ Expertise, the iQ logo, iQ Net Readiness Scorecard, LightStream,Linksys, MeetingPlace, MGX, the Networkers logo, Networking Academy, Network Registrar, Packet, PIX, Post-Routing, Pre-Routing, ProConnect, RateMUX, ScriptShare,SlideCast, SMARTnet, The Fastest Way to Increase Your Internet Quotient, and TransPath are registered trademarks of <strong>Cisco</strong> Systems, Inc. and/or its affiliates in the United Statesand certain other countries.All other trademarks mentioned in this document or Website are the property of their respective owners. The use of the word partner does not imply a partnership relationshipbetween <strong>Cisco</strong> and any other company. (0601R)Any Internet Protocol (IP) addresses used in this document are not intended to be actual addresses. Any examples, command display output, and figures included in thedocument are shown for illustrative purposes only. Any use of actual IP addresses in illustrative content is unintentional and coincidental.<strong>Cisco</strong> <strong>Unity</strong> 4.0(5) and Later <strong>Voice</strong> <strong>Messaging</strong> <strong>User</strong> <strong>Guide</strong> (With Microsoft Exchange)© 2005-2006 <strong>Cisco</strong> Systems, Inc. All rights reserved.
CONTENTSPrefaceviiAdditional <strong>Cisco</strong> <strong>Unity</strong> DocumentationviiiCHAPTER 1 Introduction to <strong>Cisco</strong> <strong>Unity</strong> 1-1CHAPTER 2 Getting Started: Enrolling on <strong>Cisco</strong> <strong>Unity</strong> 2-1CHAPTER 3 The Tools You Use 3-1Working With <strong>Cisco</strong> <strong>Unity</strong> by Phone 3-1About <strong>Cisco</strong> <strong>Unity</strong> Conversation Styles 3-1Customizing the <strong>Cisco</strong> <strong>Unity</strong> Conversation 3-2Using the <strong>Cisco</strong> Personal Communications Assistant 3-2Setting Up Your Browser to Access the <strong>Cisco</strong> PCA 3-2Working With the <strong>Cisco</strong> <strong>Unity</strong> Assistant 3-3Working With the <strong>Cisco</strong> <strong>Unity</strong> Inbox 3-3Working With the Media Master Control Bar 3-4CHAPTER 4 Accessing <strong>Cisco</strong> <strong>Unity</strong> by Phone and from Your Computer 4-1Accessing <strong>Cisco</strong> <strong>Unity</strong> by Phone 4-1Accessing the <strong>Cisco</strong> <strong>Unity</strong> Assistant and <strong>Cisco</strong> <strong>Unity</strong> Inbox 4-2CHAPTER 5 Securing and Changing Your <strong>Cisco</strong> <strong>Unity</strong> Passwords 5-1Securing Your <strong>Cisco</strong> <strong>Unity</strong> Passwords 5-1Changing Your Phone Password 5-1Changing Your <strong>Cisco</strong> PCA Password 5-2CHAPTER 6 Managing Your Mailbox Size 6-1Tips for Managing Your Mailbox Size 6-1Reasons Why Your Mailbox May Fill Up Quickly 6-1OL-7374-01<strong>Cisco</strong> <strong>Unity</strong> 4.0(5) and Later <strong>Voice</strong> <strong>Messaging</strong> <strong>User</strong> <strong>Guide</strong> (With Microsoft Exchange)iii
ContentsChanging the Speed of the <strong>Cisco</strong> <strong>Unity</strong> Conversation 14-3Changing the Time Format Used for Message Time Stamps 14-3Changing Your Message Addressing Setting 14-4Changing What <strong>Cisco</strong> <strong>Unity</strong> Plays When You Log On 14-4CHAPTER 15 Changing Recording and Playback Settings 15-1Choosing Recording and Playback Devices 15-1Changing Playback Volume for Messages 15-2Changing Playback Speed for Messages 15-4CHAPTER 16 Changing Greeting Settings 16-1<strong>Cisco</strong> <strong>Unity</strong> Personal Greetings 16-1Enabling, Recording, and Disabling a Greeting 16-2CHAPTER 17 Changing Call Transfer and Screening Options 17-1Changing Call Transfer Options 17-2Changing Caller Message Options 17-3Changing Your Call Screening Options 17-4CHAPTER 18 Changing Message Playback Settings 18-1What You Hear When You Check Messages 18-1Enabling the Message Type Menu 18-2Changing Message Playback Order 18-3Changing What <strong>Cisco</strong> <strong>Unity</strong> Plays Before and After a Message 18-5CHAPTER 19 Changing Message Notification Settings 19-1Using the <strong>Cisco</strong> <strong>Unity</strong> Assistant to Set Up a Notification Device 19-1Cascading and Chaining Message Notifications 19-8SMS (SMPP) Text Message Notification Considerations 19-9Enabling or Disabling a Notification Device by Phone 19-9Changing a Notification Phone Number by Phone 19-10CHAPTER 20 Changing Private List Settings 20-1Creating New Private Lists 20-1Changing the Name of a Private List 20-2Changing the Members of a Private List 20-3OL-7374-01<strong>Cisco</strong> <strong>Unity</strong> 4.0(5) and Later <strong>Voice</strong> <strong>Messaging</strong> <strong>User</strong> <strong>Guide</strong> (With Microsoft Exchange)v
ContentsDeleting Private Lists 20-5CHAPTER 21 <strong>Cisco</strong> <strong>Unity</strong> Phone Menus and Shortcuts 21-1Phone Menus for the Standard Conversation 21-1Main Menu and Shortcuts (Standard Conversation) 21-1Send a Message Menu and Shortcuts (Standard Conversation Style) 21-2During Message Menu and Shortcuts (Standard Conversation Style) 21-2After Message Menu and Shortcuts (Standard Conversation Style) 21-3Phone Menus for Optional Conversation 1 21-4Main Menu and Shortcuts (Optional Conversation 1 Style) 21-4Send a Message Menu and Shortcuts (Optional Conversation 1 Style) 21-5During Message Menu and Shortcuts (Optional Conversation 1 Style) 21-5After Message Menu and Shortcuts (Optional Conversation 1 Style) 21-6Phone Menus for Alternate Keypad Mapping N 21-7Main Menu and Shortcuts (Alternate Keypad Mapping N) 21-7During Message Menu and Shortcuts (Alternate Keypad Mapping N) 21-7After Message Menu and Shortcuts (Alternate Keypad Mapping N) 21-8Phone Menus for Alternate Keypad Mapping X 21-8Main Menu and Shortcuts (Alternate Keypad Mapping X) 21-9During Message Menu and Shortcuts (Alternate Keypad Mapping X) 21-9After Message Menu and Shortcuts (Alternate Keypad Mapping X) 21-10Phone Menus for Alternate Keypad Mapping S 21-10Main Menu and Shortcuts (Alternate Keypad Mapping S) 21-10During Message Menu and Shortcuts (Alternate Keypad Mapping S) 21-11After Message Menu and Shortcuts (Alternate Keypad Mapping S) 21-11CHAPTER 22 Media Master Control Bar Keyboard Shortcuts 22-1CHAPTER 23 Reference Information 23-1G LOSSARYI NDEXvi<strong>Cisco</strong> <strong>Unity</strong> 4.0(5) and Later <strong>Voice</strong> <strong>Messaging</strong> <strong>User</strong> <strong>Guide</strong> (With Microsoft Exchange)OL-7374-01
PrefaceThe <strong>Cisco</strong> <strong>Unity</strong> <strong>User</strong> <strong>Guide</strong> shows you, the <strong>Cisco</strong> <strong>Unity</strong> user, how to manage your messages, and howto change the settings that define how you work with <strong>Cisco</strong> <strong>Unity</strong>.Information in the <strong>Cisco</strong> <strong>Unity</strong> <strong>User</strong> <strong>Guide</strong> is presented by task. Each task includes procedures for doingthe task. Some procedures may work differently for you, depending on how <strong>Cisco</strong> <strong>Unity</strong> is set up at yourorganization.Some procedures contain figures that include a step number within a circle pointing to an item on thescreen that the step applies to. For example, the following sample figure indicates that Step 4 applies tothe OK button.3554434The “<strong>Cisco</strong> <strong>Unity</strong> Phone Menus and Shortcuts” chapter lists the most frequently used <strong>Cisco</strong> <strong>Unity</strong> menusand shortcut key sequences for managing messages and personal options by phone.The “Reference Information” chapter provides space for reference information, where you can write:• The phone numbers for calling <strong>Cisco</strong> <strong>Unity</strong> from your desk phone, from another phone within yourorganization, or from outside your organization.• Your <strong>Cisco</strong> <strong>Unity</strong> ID (usually your desk phone extension).• The URL for the <strong>Cisco</strong> Personal Communications Assistant (PCA) website.• The <strong>Cisco</strong> <strong>Unity</strong> server name and domain. (You need this information to log on to the <strong>Cisco</strong> PCAwebsite.)• Contact information for your <strong>Cisco</strong> <strong>Unity</strong> administrator or other support staff in your organization.OL-7374-01<strong>Cisco</strong> <strong>Unity</strong> 4.0(5) and Later <strong>Voice</strong> <strong>Messaging</strong> <strong>User</strong> <strong>Guide</strong> (With Microsoft Exchange)vii
PrefaceAdditional <strong>Cisco</strong> <strong>Unity</strong> DocumentationIn addition to the <strong>Cisco</strong> <strong>Unity</strong> <strong>User</strong> <strong>Guide</strong>, you may also find the following documentation useful:• <strong>Cisco</strong> <strong>Unity</strong> at a Glance—A quick-reference card that provides instructions for accessing<strong>Cisco</strong> <strong>Unity</strong> by phone and accessing the <strong>Cisco</strong> Personal Communications Assistant (PCA). It alsocontains a map of the prerecorded instructions and menus collectively known as the <strong>Cisco</strong> <strong>Unity</strong>phone conversation.• <strong>Cisco</strong> <strong>Unity</strong> Phone Menus and Shortcuts—A wallet-sized card that lists the most frequently used<strong>Cisco</strong> <strong>Unity</strong> menus and shortcut key sequences for managing your messages and personal optionsby phone.All <strong>Cisco</strong> <strong>Unity</strong> subscriber documentation is available athttp://www.cisco.com/en/US/products/sw/voicesw/ps2237/products_user_guide_list.html.viii<strong>Cisco</strong> <strong>Unity</strong> 4.0(5) and Later <strong>Voice</strong> <strong>Messaging</strong> <strong>User</strong> <strong>Guide</strong> (With Microsoft Exchange)OL-7374-01
CHAPTER1Introduction to <strong>Cisco</strong> <strong>Unity</strong>Welcome to <strong>Cisco</strong> <strong>Unity</strong>. On <strong>Cisco</strong> <strong>Unity</strong>, you and the other users in your organization are known assubscribers. As a subscriber, you can manage voice and fax messages from a touchtone phone or fromyour computer.With a full-featured system, <strong>Cisco</strong> <strong>Unity</strong> provides the following options:FaxText to Speech<strong>Cisco</strong> <strong>Unity</strong> Assistant<strong>Cisco</strong> <strong>Unity</strong> InboxTTYThe fax option lets you hear new fax-message properties (for example, thesender, date, and time) over the phone, and receive notification of new faxmessages by phone or pager.When you also have the fax option, you can send your fax messages to a faxmachine by phone.The <strong>Cisco</strong> <strong>Unity</strong> Assistant is a website that lets you customize how you andyour callers interact with <strong>Cisco</strong> <strong>Unity</strong> by phone. You can also use it topersonalize your <strong>Cisco</strong> <strong>Unity</strong> settings—including your recorded greetings andmessage delivery options—or to set up message notification devices and tocreate private lists.The <strong>Cisco</strong> <strong>Unity</strong> Inbox is a website that lets you listen to, compose, reply to,forward, and delete voice messages.When you also have the fax option, you can use the <strong>Cisco</strong> <strong>Unity</strong> Inbox tomanage faxes as well.Subscribers and unidentified callers who use TTY can call <strong>Cisco</strong> <strong>Unity</strong> anduse the same features that a hearing caller can use with few exceptions.Typically, a dedicated phone number is set up for use by an outside caller withTTY. Ask your <strong>Cisco</strong> <strong>Unity</strong> administrator for details.Your <strong>Cisco</strong> <strong>Unity</strong> administrator can tell you whether these options are available to you.OL-7374-01<strong>Cisco</strong> <strong>Unity</strong> 4.0(5) and Later <strong>Voice</strong> <strong>Messaging</strong> <strong>User</strong> <strong>Guide</strong> (With Microsoft Exchange)1-1
Chapter 1Introduction to <strong>Cisco</strong> <strong>Unity</strong>1-2<strong>Cisco</strong> <strong>Unity</strong> 4.0(5) and Later <strong>Voice</strong> <strong>Messaging</strong> <strong>User</strong> <strong>Guide</strong> (With Microsoft Exchange)OL-7374-01
CHAPTER2Getting Started: Enrolling on <strong>Cisco</strong> <strong>Unity</strong>Your first step in using <strong>Cisco</strong> <strong>Unity</strong> is to enroll as a subscriber, which you do by phone. Typically,<strong>Cisco</strong> <strong>Unity</strong> is set up so that you hear the first-time enrollment conversation when you call <strong>Cisco</strong> <strong>Unity</strong>for the first time. The first-time enrollment conversation is a set of prerecorded instructions that guideyou as you do the following tasks:• Record your name.• Record a greeting that outside callers hear when you do not answer your phone.• Change your phone password. (Longer passwords are more secure. See the “Securing and ChangingYour <strong>Cisco</strong> <strong>Unity</strong> Passwords” chapter for more information.)• Choose whether to be listed in the directory. (When you are listed in the directory, callers who donot know your extension can reach you by finding your name in directory assistance. You must havea recorded name to be listed in the directory.)NoteWhile the first-time enrollment conversation prompts you to change your initial phone password, it doesnot let you to change the password that you use to log on to the <strong>Cisco</strong> PCA website. Your phone and<strong>Cisco</strong> PCA passwords are not synchronized.Do the following procedure to enroll as a <strong>Cisco</strong> <strong>Unity</strong> subscriber. Typically, your <strong>Cisco</strong> <strong>Unity</strong>administrator gives you an ID (usually your desk phone extension) and a temporary phone password.To Enroll as a <strong>Cisco</strong> <strong>Unity</strong> SubscriberStep 1Step 2Step 3Dial the applicable number to call <strong>Cisco</strong> <strong>Unity</strong> from your desk phone, from another phone within yourorganization, or from outside your organization.If you are calling from another phone within your organization or from outside your organization,press * when <strong>Cisco</strong> <strong>Unity</strong> answers.Listen carefully, and respond as prompted. You do not need to refer to any <strong>Cisco</strong> <strong>Unity</strong> documentationduring enrollment. The system will tell you when the enrollment process is complete.If you hang up before you have completely enrolled, none of your changes are saved and the first-timeenrollment conversation plays again the next time you log on to <strong>Cisco</strong> <strong>Unity</strong>.After enrollment, see the “The Tools You Use” chapter to learn about the <strong>Cisco</strong> <strong>Unity</strong> tools that you canuse to check and send messages, record additional greetings, and set up notification devices.OL-7374-01<strong>Cisco</strong> <strong>Unity</strong> 4.0(5) and Later <strong>Voice</strong> <strong>Messaging</strong> <strong>User</strong> <strong>Guide</strong> (With Microsoft Exchange)2-1
Chapter 2Getting Started: Enrolling on <strong>Cisco</strong> <strong>Unity</strong>At any time after enrollment, you can rerecord your name and greeting, or change your phone passwordand directory listing status.2-2<strong>Cisco</strong> <strong>Unity</strong> 4.0(5) and Later <strong>Voice</strong> <strong>Messaging</strong> <strong>User</strong> <strong>Guide</strong> (With Microsoft Exchange)OL-7374-01
Using the <strong>Cisco</strong> Personal Communications AssistantChapter 3The Tools You UseThe procedures in this guide indicate the keypad mapping used with the standard and Optionalconversation 1 styles. Keypad mappings for other conversation styles are indicated in the “<strong>Cisco</strong> <strong>Unity</strong>Phone Menus and Shortcuts” chapter. The features described in this guide are available with allconversation styles however.Maps of the standard and Optional Conversation 1 styles are available athttp://www.cisco.com/en/US/products/sw/voicesw/ps2237/products_user_guide_list.html.Customizing the <strong>Cisco</strong> <strong>Unity</strong> ConversationAlthough you cannot control which conversation style that you hear when you access <strong>Cisco</strong> <strong>Unity</strong> byphone, you can customize it in many ways. For example, there are two styles of menus—full andbrief—available for you to use with each conversation style. You can also choose which language youhear, and specify the order in which <strong>Cisco</strong> <strong>Unity</strong> plays your messages to you.Information on customizing the <strong>Cisco</strong> <strong>Unity</strong> conversation is provided in the “Changing Phone MenuPreferences” and the “Changing Message Playback Settings” chapters. For a summary of what you hearwhen you check messages by phone, see the “What You Hear When You Check Messages” section onpage 18-1.Using the <strong>Cisco</strong> Personal Communications AssistantThe <strong>Cisco</strong> Personal Communications Assistant (PCA) lets you access the following <strong>Cisco</strong> web tool(s):<strong>Cisco</strong> <strong>Unity</strong> Assistant<strong>Cisco</strong> <strong>Unity</strong> InboxThe <strong>Cisco</strong> <strong>Unity</strong> Assistant lets you customize how you and your callersinteract with <strong>Cisco</strong> <strong>Unity</strong> by phone. You can also use it to personalize your<strong>Cisco</strong> <strong>Unity</strong> settings—including your recorded greetings and messagedelivery options—or to set up message notification devices and create privatelists.The <strong>Cisco</strong> <strong>Unity</strong> Inbox lets you listen to, compose, reply to, forward, anddelete voice messages. When you have the fax option, you can also use the<strong>Cisco</strong> <strong>Unity</strong> Inbox to manage faxes.Setting Up Your Browser to Access the <strong>Cisco</strong> PCAAlthough it is likely that your <strong>Cisco</strong> <strong>Unity</strong> administrator has already done so for the computer that youuse at the office, note that in order to use the <strong>Cisco</strong> PCA and its web tools, your browser must beconfigured to:• Enable Active scripting.• Download and run ActiveX controls.• Enable Java scripting.• Accept all cookies.• Automatically check for newer versions of temporary Internet files.• Enable Medium-High privacy.3-2<strong>Cisco</strong> <strong>Unity</strong> 4.0(5) and Later <strong>Voice</strong> <strong>Messaging</strong> <strong>User</strong> <strong>Guide</strong> (With Microsoft Exchange)OL-7374-01
Chapter 3The Tools You UseUsing the <strong>Cisco</strong> Personal Communications AssistantKeep this in mind if your organization offers remote access to the <strong>Cisco</strong> PCA, and you want to set up acomputer at home to access the <strong>Cisco</strong> PCA. (Talk to your <strong>Cisco</strong> <strong>Unity</strong> administrator about using the<strong>Cisco</strong> PCA across a firewall.)Working With the <strong>Cisco</strong> <strong>Unity</strong> AssistantYou can use the <strong>Cisco</strong> <strong>Unity</strong> Assistant to personalize the <strong>Cisco</strong> <strong>Unity</strong> phone settings that control howyou and your callers interact with <strong>Cisco</strong> <strong>Unity</strong> by phone. For example, you can manage your greetings,call transfer, and message notification settings.Some <strong>Cisco</strong> <strong>Unity</strong> Assistant pages may include a Media Master control bar, which you use to record andplay greetings and names.Information on using the <strong>Cisco</strong> <strong>Unity</strong> Assistant to do specific tasks is provided throughout this guide andin Help.To Access <strong>Cisco</strong> <strong>Unity</strong> Assistant HelpStep 1Step 2On any <strong>Cisco</strong> <strong>Unity</strong> Assistant page, click Help.Click a topic link on the menu.Related TopicWorking With the Media Master Control Bar, page 3-4Working With the <strong>Cisco</strong> <strong>Unity</strong> Inbox<strong>Voice</strong> messages are presented in the <strong>Cisco</strong> <strong>Unity</strong> Inbox, along with receipts. When you have the faxoption, you can also use the <strong>Cisco</strong> <strong>Unity</strong> Inbox to manage faxes. (E-mail messages are not presented inthe <strong>Cisco</strong> <strong>Unity</strong> Inbox.)NoteThe <strong>Cisco</strong> <strong>Unity</strong> Inbox does not refresh the display automatically; you must click the Refresh MessageList icon periodicals to check for new messages.By default, ten messages are presented at a time, though you can change the number for each session byclicking a different value in the Messages Per Page list. When the number of messages in your<strong>Cisco</strong> <strong>Unity</strong> Inbox exceeds the value specified in the Messages Per Page list, click the arrows or the pagenumber at the bottom of the page to navigate to additional <strong>Cisco</strong> <strong>Unity</strong> Inbox pages.By clicking the applicable icon on each <strong>Cisco</strong> <strong>Unity</strong> Inbox page, you can sort and delete the messageson the page, and compose and listen to a voice message. You use the Media Master control bar to playand record messages.TipTalk to your <strong>Cisco</strong> <strong>Unity</strong> administrator if you experience performance or sound quality issues whenplaying messages through multimedia speakers in a low-bandwidth environment.Information on using the <strong>Cisco</strong> <strong>Unity</strong> Inbox to do specific tasks is provided throughout this guide and inHelp.OL-7374-01<strong>Cisco</strong> <strong>Unity</strong> 4.0(5) and Later <strong>Voice</strong> <strong>Messaging</strong> <strong>User</strong> <strong>Guide</strong> (With Microsoft Exchange)3-3
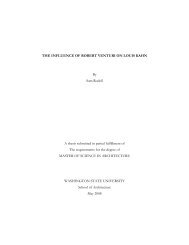
Working With the Media Master Control BarChapter 3The Tools You UseTo Access <strong>Cisco</strong> <strong>Unity</strong> Inbox HelpStep 1Step 2On any <strong>Cisco</strong> <strong>Unity</strong> Inbox page, click Help for information about a page or procedures on using afeature.Click a topic link on the menu.For help on an icon, hover the mouse over the icon until a tooltip is displayed.Related TopicWorking With the Media Master Control Bar, page 3-4Working With the Media Master Control BarThe Media Master control bar appears in the <strong>Cisco</strong> <strong>Unity</strong> Inbox, and depending on how <strong>Cisco</strong> <strong>Unity</strong> isset up, it may also appear on some <strong>Cisco</strong> <strong>Unity</strong> Assistant pages. By clicking the VCR-style controls, youcan use the Media Master to make and play recordings with either your phone or your computermicrophone and speakers.RecordStopPlayRecordinglengthVolumecontrolSpeedcontrol*OptionsmenuSound fileoptions55466NoteThe Media Master control bar does not work through a firewall. It also requires that your browser is ableto download and run ActiveX controls.The Options menu on the Media Master control bar allows you to work with other sound (WAV) files inyour recordings. The following sound file options are available:NewPastePaste from FileErase a recording to rerecord.Paste a sound recording the same way you paste text in a text file.Paste another sound file to a recording.3-4<strong>Cisco</strong> <strong>Unity</strong> 4.0(5) and Later <strong>Voice</strong> <strong>Messaging</strong> <strong>User</strong> <strong>Guide</strong> (With Microsoft Exchange)OL-7374-01
Chapter 3The Tools You UseWorking With the Media Master Control BarCopyCopy to FileCopy a sound recording the same way you copy text in a text file.Copy the recording to a sound file that you name.Depending on how <strong>Cisco</strong> <strong>Unity</strong> is set up at your organization, this option may beunavailable.Related Topics• Changing Recording and Playback Settings, page 15-1• Media Master Control Bar Keyboard Shortcuts, page 22-1OL-7374-01<strong>Cisco</strong> <strong>Unity</strong> 4.0(5) and Later <strong>Voice</strong> <strong>Messaging</strong> <strong>User</strong> <strong>Guide</strong> (With Microsoft Exchange)3-5
Working With the Media Master Control BarChapter 3The Tools You Use3-6<strong>Cisco</strong> <strong>Unity</strong> 4.0(5) and Later <strong>Voice</strong> <strong>Messaging</strong> <strong>User</strong> <strong>Guide</strong> (With Microsoft Exchange)OL-7374-01
CHAPTER4Accessing <strong>Cisco</strong> <strong>Unity</strong> by Phone and from YourComputerThis chapter contains two sections:• Accessing <strong>Cisco</strong> <strong>Unity</strong> by Phone, page 4-1• Accessing the <strong>Cisco</strong> <strong>Unity</strong> Assistant and <strong>Cisco</strong> <strong>Unity</strong> Inbox, page 4-2Accessing <strong>Cisco</strong> <strong>Unity</strong> by PhoneDo the procedure in this section to access <strong>Cisco</strong> <strong>Unity</strong> by phone. If you are logging on for the first time,see the “Getting Started: Enrolling on <strong>Cisco</strong> <strong>Unity</strong>” chapter instead.To Access <strong>Cisco</strong> <strong>Unity</strong> by PhoneStep 1Step 2Dial the applicable number to call <strong>Cisco</strong> <strong>Unity</strong> from your desk phone, from another phone within yourorganization, or from outside your organization.If you are calling from another phone within your organization or from outside your organization,press * when <strong>Cisco</strong> <strong>Unity</strong> answers.Step 3 If prompted, enter your ID (usually your desk phone extension), and press #.Step 4 Enter your <strong>Cisco</strong> <strong>Unity</strong> password, and press #.TipIf you forget your phone password, use the <strong>Cisco</strong> <strong>Unity</strong> Assistant to change it.Related Topics• Changing Your Phone Password, page 13-5• Setting Up Alternate Devices, page 13-3• Changing What <strong>Cisco</strong> <strong>Unity</strong> Plays When You Log On, page 14-4OL-7374-01<strong>Cisco</strong> <strong>Unity</strong> 4.0(5) and Later <strong>Voice</strong> <strong>Messaging</strong> <strong>User</strong> <strong>Guide</strong> (With Microsoft Exchange)4-1
Accessing the <strong>Cisco</strong> <strong>Unity</strong> Assistant and <strong>Cisco</strong> <strong>Unity</strong> InboxChapter 4Accessing <strong>Cisco</strong> <strong>Unity</strong> by Phone and from Your ComputerAccessing the <strong>Cisco</strong> <strong>Unity</strong> Assistant and <strong>Cisco</strong> <strong>Unity</strong> InboxDo the procedure in this section to access the <strong>Cisco</strong> <strong>Unity</strong> Assistant and the <strong>Cisco</strong> <strong>Unity</strong> Inbox usingyour computer browser. If you experience problems viewing pages in the <strong>Cisco</strong> <strong>Unity</strong> Assistant or the<strong>Cisco</strong> <strong>Unity</strong> Inbox, confirm that your browser is configured correctly. See “Setting Up Your Browser toAccess the <strong>Cisco</strong> PCA” section on page 3-2.To Access the <strong>Cisco</strong> <strong>Unity</strong> Assistant and <strong>Cisco</strong> <strong>Unity</strong> InboxStep 1Go to http:///ciscopca. (The URL is case sensitive.)TimesaverStep 2You may want to bookmark the <strong>Cisco</strong> PCA URL, so you do not have to enter the web address each timeyou want to access either the <strong>Cisco</strong> <strong>Unity</strong> Assistant or the <strong>Cisco</strong> <strong>Unity</strong> Inbox. (You cannot bookmarkpages for the <strong>Cisco</strong> <strong>Unity</strong> Assistant or the <strong>Cisco</strong> <strong>Unity</strong> Inbox.)Enter your credentials:<strong>User</strong> NamePasswordDomainEnter the alias for your Windows domain account. (For example, enter tcampbell orenter tcampbell@.)If you enter the full path for your alias (i.e. if you include the domain), you do not needto complete the Domain field.Enter the password for your Windows domain account.If you cannot remember your <strong>Cisco</strong> PCA password, contact your <strong>Cisco</strong> <strong>Unity</strong>administrator for assistance.Enter the name of the domain in which your Windows domain account resides.If you entered a full path for your alias in the <strong>User</strong> Name field, you do not need to enterthe domain name here.Step 3Step 4Under Options, check any or all of the following fields so that you do not have to re-enter yourcredentials the next time you log on to the <strong>Cisco</strong> PCA:• Remember <strong>User</strong> Name• Remember Password• Remember DomainFor security reasons, you may wish to enter some or all of your <strong>Cisco</strong> PCA credentials each time thatyou log on, especially if you share a computer with others. (Depending on how <strong>Cisco</strong> <strong>Unity</strong> is set up, theabove options may not be available to you.)On the <strong>Cisco</strong> PCA Home page, click the <strong>Cisco</strong> <strong>Unity</strong> Assistant or the <strong>Cisco</strong> <strong>Unity</strong> Inbox link.When you are ready, click Log Off in the top right corner of the navigator bar.4-2<strong>Cisco</strong> <strong>Unity</strong> 4.0(5) and Later <strong>Voice</strong> <strong>Messaging</strong> <strong>User</strong> <strong>Guide</strong> (With Microsoft Exchange)OL-7374-01
CHAPTER5Securing and Changing Your <strong>Cisco</strong> <strong>Unity</strong>PasswordsThis chapter contains the following sections:• “Securing Your <strong>Cisco</strong> <strong>Unity</strong> Passwords” section on page 5-1• “Changing Your Phone Password” section on page 5-1• “Changing Your <strong>Cisco</strong> PCA Password” section on page 5-2Securing Your <strong>Cisco</strong> <strong>Unity</strong> PasswordsYou have two <strong>Cisco</strong> <strong>Unity</strong> passwords: your phone password and the password that you use to log on tothe <strong>Cisco</strong> Personal Communications Assistant (PCA) website. Your phone and <strong>Cisco</strong> PCA passwordsare not synchronized.It is a good idea to change your passwords from the initial passwords given to you by your <strong>Cisco</strong> <strong>Unity</strong>administrator. While first-time enrollment prompts you to change your initial phone password, it doesnot let you change the password that you use to log on to the <strong>Cisco</strong> PCA website. Instead, your<strong>Cisco</strong> PCA password is inherited from your Windows password settings. Because you are not requiredto enter an existing phone password to use the <strong>Cisco</strong> <strong>Unity</strong> Assistant to change your phone password,take appropriate measures to keep your <strong>Cisco</strong> PCA password secure.To protect your <strong>Cisco</strong> <strong>Unity</strong> mailbox from unauthorized access, follow the security guidelines providedby your <strong>Cisco</strong> <strong>Unity</strong> administrator when you change both your <strong>Cisco</strong> <strong>Unity</strong> passwords. Consider thatlonger and nontrivial passwords are more secure. A nontrivial password means that:• The password is not the same as previous passwords.• The digits are not all the same (for example, 9999), nor are repeated (for example, 99911).• The digits are not consecutive in either ascending or descending order (for example, 1234 or 4321).• The password is not the same as your extension, nor does it spell your name.Changing Your Phone PasswordYour phone password protects the privacy of your messages and secures your <strong>Cisco</strong> <strong>Unity</strong> account fromunauthorized access. You can change your phone password at any time.OL-7374-01<strong>Cisco</strong> <strong>Unity</strong> 4.0(5) and Later <strong>Voice</strong> <strong>Messaging</strong> <strong>User</strong> <strong>Guide</strong> (With Microsoft Exchange)5-1
Changing Your <strong>Cisco</strong> PCA PasswordChapter 5Securing and Changing Your <strong>Cisco</strong> <strong>Unity</strong> PasswordsThis section contains two procedures. Do the applicable procedure to change your phone password byphone (when using either standard or Optional Conversation 1 style) or from the <strong>Cisco</strong> <strong>Unity</strong> Assistant.Keypad mappings for other conversation styles are documented in the “<strong>Cisco</strong> <strong>Unity</strong> Phone Menus andShortcuts” chapter. Ask your <strong>Cisco</strong> <strong>Unity</strong> administrator which conversation style you are set up to use.TipIf you forget your phone password, use the <strong>Cisco</strong> <strong>Unity</strong> Assistant to change it.To Change Your Phone Password by Phone (Standard and Optional Conversation 1 Styles)Step 1 Log on to <strong>Cisco</strong> <strong>Unity</strong>.Step 2 Press 4 3 1.Step 3 Enter a new password, and press #. Enter digits 0 through 9.Step 4 Enter the new password again to confirm it, and press #.To Change Your Phone Password from the <strong>Cisco</strong> <strong>Unity</strong> AssistantStep 1 In the <strong>Cisco</strong> <strong>Unity</strong> Assistant, on the Preferences menu, click Personal.Step 2 In the New Password box, enter a password. Enter digits 0 through 9.Step 3 In the Confirm New Password box, enter the password again.Step 4 Click Save.Changing Your <strong>Cisco</strong> PCA PasswordYou cannot change your <strong>Cisco</strong> PCA password by phone or from the <strong>Cisco</strong> <strong>Unity</strong> Assistant. To change it,you do so in Windows. You need to know your current <strong>Cisco</strong> PCA password and may also need to knowthe domain name for your <strong>Cisco</strong> <strong>Unity</strong> server. If you have forgotten your password, do not know thedomain name, or if you experience other difficulties when changing your <strong>Cisco</strong> PCA password inWindows, contact your <strong>Cisco</strong> <strong>Unity</strong> administrator for assistance.To Change Your <strong>Cisco</strong> PCA PasswordStep 1Step 2Step 3Step 4Step 5Log off the <strong>Cisco</strong> PCA.Press Ctrl-Alt-Delete, and then click Change Password.Complete the fields in the Change Password dialog box.Specify the domain name for the <strong>Cisco</strong> <strong>Unity</strong> server if the <strong>Cisco</strong> <strong>Unity</strong> server is in a different domainthan the one that you typically access with your Windows password.Click OK.5-2<strong>Cisco</strong> <strong>Unity</strong> 4.0(5) and Later <strong>Voice</strong> <strong>Messaging</strong> <strong>User</strong> <strong>Guide</strong> (With Microsoft Exchange)OL-7374-01
CHAPTER6Managing Your Mailbox SizeA full mailbox can affect the speed at which <strong>Cisco</strong> <strong>Unity</strong> processes your messages. Your <strong>Cisco</strong> <strong>Unity</strong>administrator sets the storage limits for your mailbox, which can prevent you from sending and receivingmessages when you exceed the limits. When you log on by phone or access the <strong>Cisco</strong> <strong>Unity</strong> Inbox,<strong>Cisco</strong> <strong>Unity</strong> notifies you when your mailbox is:• Almost full.• Full and you can no longer send new messages.• Full and you can no longer send or receive new messages.(System broadcast messages are not included in your total mailbox size.)This chapter contains the following sections:• Tips for Managing Your Mailbox Size, page 6-1• Reasons Why Your Mailbox May Fill Up Quickly, page 6-1Tips for Managing Your Mailbox SizeTo make more room in your mailbox, you can delete messages (including messages in the Deleted Itemsfolder in the <strong>Cisco</strong> <strong>Unity</strong> Inbox, if applicable).To archive messages before deleting them, you may be able to save them as WAV files to your hard disk.In the <strong>Cisco</strong> <strong>Unity</strong> Inbox, use the Copy to File option on the Options menu on the Media Master controlbar. (Depending on how <strong>Cisco</strong> <strong>Unity</strong> is set up at your organization, the Copy to File option may not beavailable.)Reasons Why Your Mailbox May Fill Up QuicklyIf you feel that your <strong>Cisco</strong> <strong>Unity</strong> mailbox fills up more quickly than you expect, consider the followingreasons why this may happen. Your <strong>Cisco</strong> <strong>Unity</strong> administrator specifies the size of your mailbox.A Message-Retention Policy May Not Be EnforcedBy default, <strong>Cisco</strong> <strong>Unity</strong> does not automatically delete messages once they reach a certain age. Thismeans that unless your <strong>Cisco</strong> <strong>Unity</strong> administrator set up <strong>Cisco</strong> <strong>Unity</strong> to enforce a message-retentionpolicy, you are responsible for managing your mailbox size by periodically reviewing your savedmessages and either moving, archiving, or deleting them permanently.OL-7374-01<strong>Cisco</strong> <strong>Unity</strong> 4.0(5) and Later <strong>Voice</strong> <strong>Messaging</strong> <strong>User</strong> <strong>Guide</strong> (With Microsoft Exchange)6-1
Reasons Why Your Mailbox May Fill Up QuicklyChapter 6Managing Your Mailbox SizeIf <strong>Cisco</strong> <strong>Unity</strong> is set up to enforce a message-retention policy, ask your <strong>Cisco</strong> <strong>Unity</strong> administrator howlong <strong>Cisco</strong> <strong>Unity</strong> stores your messages before permanently deleting them. This way you can plan toarchive or move important messages ahead of time. <strong>Cisco</strong> <strong>Unity</strong> does not indicate when amessage-retention policy is enforced, nor does it warn you before message are permanently deleted as aresult of such a policy.Total Message Size Includes Original When Messages Are ForwardedYou may receive messages that have been forwarded many times over, which increases message size.The original message plus all recorded and written introductions that were added during forwardingequal the total message size. As a result, your mailbox can exceed its limit, even though you may haverelatively few messages stored in it.6-2<strong>Cisco</strong> <strong>Unity</strong> 4.0(5) and Later <strong>Voice</strong> <strong>Messaging</strong> <strong>User</strong> <strong>Guide</strong> (With Microsoft Exchange)OL-7374-01
CHAPTER7Broadcast MessagesOccasionally, you may receive a special message known as a broadcast message from your <strong>Cisco</strong> <strong>Unity</strong>administrator, network administrator, or management personnel in your organization. Broadcastmessages are recorded announcements that everyone in your organization receives (or perhaps, onlythose at a particular location receives the message, if your organization has multiple locations).For example, your <strong>Cisco</strong> <strong>Unity</strong> administrator may record a broadcast message to ask all <strong>Cisco</strong> <strong>Unity</strong>subscribers to change their phone passwords or a Human Resources manager may send a broadcastmessage to remind you about a deadline for a new benefits package.<strong>Cisco</strong> <strong>Unity</strong> plays your broadcast messages immediately after you log on to <strong>Cisco</strong> <strong>Unity</strong> by phone. Youmust listen to each broadcast message in its entirety before <strong>Cisco</strong> <strong>Unity</strong> will allow you to check yournew and saved messages or change your setup options. Once you have played the broadcast message, itis permanently deleted for you. You cannot respond to or save system broadcast messages.NoteBroadcast messages do not light message waiting indicators on your phone, nor do they cause you tohear a distinctive dial tone when you pick up the receiver—as may occur when you receive other newmessages. In addition, broadcast messages do not trigger message notifications for any alternativedevices—such as a pager or cell phone—that you may have set up in the <strong>Cisco</strong> <strong>Unity</strong> Assistant.You will not receive system broadcast messages in the <strong>Cisco</strong> <strong>Unity</strong> Inbox.OL-7374-01<strong>Cisco</strong> <strong>Unity</strong> 4.0(5) and Later <strong>Voice</strong> <strong>Messaging</strong> <strong>User</strong> <strong>Guide</strong> (With Microsoft Exchange)7-1
Chapter 7Broadcast Messages7-2<strong>Cisco</strong> <strong>Unity</strong> 4.0(5) and Later <strong>Voice</strong> <strong>Messaging</strong> <strong>User</strong> <strong>Guide</strong> (With Microsoft Exchange)OL-7374-01
CHAPTER8Checking MessagesWith a full-featured system, you can check messages by phone and by using the <strong>Cisco</strong> <strong>Unity</strong> Inbox.Once you have listened to or opened a new voice message, it is saved until you delete it. By default,<strong>Cisco</strong> <strong>Unity</strong> does not automatically delete messages once they reach a certain age. Ask your <strong>Cisco</strong> <strong>Unity</strong>administrator if <strong>Cisco</strong> <strong>Unity</strong> is set up to enforce a message-retention policy, and, if so, how long<strong>Cisco</strong> <strong>Unity</strong> stores your messages before permanently deleting them. <strong>Cisco</strong> <strong>Unity</strong> does not indicatewhen a message-retention policy is enforced, nor does it warn you before message are permanentlydeleted as a result of such a policy.This chapter contains the following sections:• Checking Messages by Phone, page 8-1• Checking Messages from Your <strong>Cisco</strong> <strong>Unity</strong> Inbox, page 8-5Checking Messages by PhoneYou can use <strong>Cisco</strong> <strong>Unity</strong> to check new and saved messages by phone. Depending on how <strong>Cisco</strong> <strong>Unity</strong> isset up, you may also be able to play and restore deleted messages by phone.Depending on how <strong>Cisco</strong> <strong>Unity</strong> is set up to work with the phones in your organization, when you receivea new message, a message waiting indicator may light on your phone or you may hear a distinctive dialtone when you pick up the receiver. You can also use the <strong>Cisco</strong> <strong>Unity</strong> Assistant to set up messagenotification for additional devices, such as a pager or cell phone.This section contains two procedures. Do the first procedure, “To Check Messages by Phone (StandardConversation Style),” to check messages when <strong>Cisco</strong> <strong>Unity</strong> is set up to play the standard conversation.Do the second procedure, “To Check Messages by Phone (Optional Conversation 1 Style),” when<strong>Cisco</strong> <strong>Unity</strong> is set up to play Optional Conversation 1.Keypad mappings for other conversation styles are documented in the “<strong>Cisco</strong> <strong>Unity</strong> Phone Menus andShortcuts” chapter. Ask your <strong>Cisco</strong> <strong>Unity</strong> administrator which conversation style you are set up to use.To Check Messages by Phone (Standard Conversation Style)Step 1Step 2Log on to <strong>Cisco</strong> <strong>Unity</strong>. (If <strong>Cisco</strong> <strong>Unity</strong> tells you that your mailbox has exceeded its size quota, see the“Managing Your Mailbox Size” chapter for more information.)Press 1 to hear new messages.OrPress 3 1 to hear saved messages.OL-7374-01<strong>Cisco</strong> <strong>Unity</strong> 4.0(5) and Later <strong>Voice</strong> <strong>Messaging</strong> <strong>User</strong> <strong>Guide</strong> (With Microsoft Exchange)8-1
Checking Messages by PhoneChapter 8Checking MessagesStep 3Use the following keys to select the type of messages that you want to hear. (You will not hear theMessage Type menu if it is disabled in the <strong>Cisco</strong> <strong>Unity</strong> Assistant.)KeyTask1 <strong>Voice</strong> messages2 E-mails 13 Faxes 24 Receipts 3# All messages1. Although the e-mail keys are available in the Message Type menu, <strong>Cisco</strong> <strong>Unity</strong> plays e-mails onlyfor Unified <strong>Messaging</strong> subscribers who also have the text-to-speech option2. Although the fax keys are available in the Message Type menu, <strong>Cisco</strong> <strong>Unity</strong> plays faxes only whenthe system is using the fax option. Note that with fax messages, <strong>Cisco</strong> <strong>Unity</strong> plays only messageproperties, such as the sender, date, and time.3. Depending on how <strong>Cisco</strong> <strong>Unity</strong> is set up at your organization, you may not receive all types ofreceipts.Step 4Use the following keys to control playback as you listen to a message.Key(s) Task Key(s) Task1 Restart message 8 Pause/Resume2 Save 9 Fast-forward3 Delete # Fast-forward to end4 Slow playback ## Skip message, save as is5 Change volume 1* Cancel or back up6 Fast playback 0 Help7 Rewind message1. Not available on some systems.Step 5Use the following keys to manage the message after you have listened to it.8-2<strong>Cisco</strong> <strong>Unity</strong> 4.0(5) and Later <strong>Voice</strong> <strong>Messaging</strong> <strong>User</strong> <strong>Guide</strong> (With Microsoft Exchange)OL-7374-01
Chapter 8Checking MessagesChecking Messages by PhoneKey(s) Task Key(s) Task1 Replay message 6 Save as new(The message waiting indicatoron your phone may light orremain lit.)2 Save 7 Rewind message3 Delete 8 Deliver fax to fax machine 1(Play original message whenmanaging an NDR)4 Reply9 Play message properties(Resend original messagewhen responding to anNDR)42 Reply to all # Save as is44 Call the subscriber 1 * Cancel or back up5 Forward message 0 Help1. Not available on some systems.To Check Messages by Phone (Optional Conversation 1 Style)Step 1Step 2Step 3Log on to <strong>Cisco</strong> <strong>Unity</strong>. (If <strong>Cisco</strong> <strong>Unity</strong> tells you that your mailbox has exceeded its size quota, see the“Managing Your Mailbox Size” chapter for more information.)Press 1 to hear new messages.OrPress 3 1 to hear saved messages.Use the following keys to select the type of messages that you want to hear. (You will not hear theMessage Type menu if it is disabled in the <strong>Cisco</strong> <strong>Unity</strong> Assistant.)Key Task1 <strong>Voice</strong> messages2 E-mails 13 Faxes 24 Receipts 3# All messages1. Although the e-mail keys are available in the Message Type menu, <strong>Cisco</strong> <strong>Unity</strong> plays e-mails onlyfor Unified <strong>Messaging</strong> subscribers who also have the text-to-speech option2. Although the fax keys are available in the Message Type menu, <strong>Cisco</strong> <strong>Unity</strong> plays faxes onlywhen the system is using the fax option. Note that with fax messages, <strong>Cisco</strong> <strong>Unity</strong> plays onlymessage properties, such as the sender, date, and time.3. Depending on how <strong>Cisco</strong> <strong>Unity</strong> is set up at your organization, you may not receive all types ofreceipts.OL-7374-01<strong>Cisco</strong> <strong>Unity</strong> 4.0(5) and Later <strong>Voice</strong> <strong>Messaging</strong> <strong>User</strong> <strong>Guide</strong> (With Microsoft Exchange)8-3
Checking Messages by PhoneChapter 8Checking MessagesStep 4Use the following keys to control playback as you listen to a message.Key(s) Task Key(s) Task1 Rewind message 66 Faster playback2 Pause/Resume 7 Decrease volume 13 Fast-forward 8 Reset volume 133 Fast-forward to end 9 Increase volume 14 Slow playback # Skip message, save as is44 Slower playback ## Skip message, save as new(The message waitingindicator on your phone maylight or remain lit.)5 Play message properties * Cancel or back up6 Fast playback 0 Help1. Not available on some systems.Step 5Use the following keys to manage the message after you have listened to it.Key(s) Task Key(s) Task1 Skip back 82 Reply to all2 Deliver fax to fax machine 1 88 Call the subscriber 1(Play original message whenmanaging an NDR)4 Replay message 9 Save5 Play message properties # Save as is6 Forward message ## Save as new7 Delete * Cancel or back up8 Reply(Resend original messagewhen responding to an NDR)1. Not available on some systems.0 HelpRelated Topics• Sending and Responding to Messages, page 12-1• Deleting Messages, page 11-1• Managing Receipts, page 9-1• Finding Messages by Phone, page 10-1• What You Hear When You Check Messages, page 18-1• Changing Message Notification Settings, page 19-18-4<strong>Cisco</strong> <strong>Unity</strong> 4.0(5) and Later <strong>Voice</strong> <strong>Messaging</strong> <strong>User</strong> <strong>Guide</strong> (With Microsoft Exchange)OL-7374-01
Chapter 8Checking MessagesChecking Messages from Your <strong>Cisco</strong> <strong>Unity</strong> InboxChecking Messages from Your <strong>Cisco</strong> <strong>Unity</strong> InboxYou can check voice and fax (if you have the fax option) messages from your <strong>Cisco</strong> <strong>Unity</strong> Inbox. (E-mailmessages are not available in the <strong>Cisco</strong> <strong>Unity</strong> Inbox.)The <strong>Cisco</strong> <strong>Unity</strong> Inbox does not refresh the display automatically; you must click the Refresh MessageList icon periodicals to check for new messages. You can also use the <strong>Cisco</strong> <strong>Unity</strong> Assistant to set upmessage notification for additional devices. Information in the From field identifies the sender. The fieldwill contain either the name of a <strong>Cisco</strong> <strong>Unity</strong> subscriber or “<strong>Unity</strong> <strong>Messaging</strong> System,” when a messageis left by someone who is not a <strong>Cisco</strong> <strong>Unity</strong> subscriber or by a subscriber who did not log on to<strong>Cisco</strong> <strong>Unity</strong> before leaving the message. The Subject field displays the phone number of the caller, if itis available.Refresh your <strong>Cisco</strong> <strong>Unity</strong> Inbox by clicking the Refresh Message List icon to periodically check for newmessages. After you have listened to or viewed a new message, you may need to refresh again to see theNew Message icon disappear.TipFor information on what to do if your mailbox exceeds its size quota, see the “Managing Your MailboxSize” chapter.To Check <strong>Voice</strong> and Fax Messages from Your <strong>Cisco</strong> <strong>Unity</strong> InboxStep 1To check a voice message from the <strong>Cisco</strong> <strong>Unity</strong> Inbox, click the speaker icon next to the message. (Clickthe icon again to stop playback.)Or you can open a voice message and then play it:a. In the <strong>Cisco</strong> <strong>Unity</strong> Inbox, click the name of the sender to open the message in a new window.b. Click Play on the Media Master control bar.For fax messages, click the link for the attached fax to start the fax viewer program on your computer.OL-7374-01<strong>Cisco</strong> <strong>Unity</strong> 4.0(5) and Later <strong>Voice</strong> <strong>Messaging</strong> <strong>User</strong> <strong>Guide</strong> (With Microsoft Exchange)8-5
Checking Messages from Your <strong>Cisco</strong> <strong>Unity</strong> InboxChapter 8Checking MessagesStep 2Use the following icons or Message menu options to manage voice or fax messages:Previous MessageNext MessageReply(Resend original messagewhen responding to an NDR)Reply to AllForwardDeleteSaveMark Messageas Unheard(Mark Messageas Unread for faxesand NDRs)CloseOpen the previous message.Open the next message.Respond with a voice message to the sender. (Available only for messagesfrom other <strong>Cisco</strong> <strong>Unity</strong> subscribers.)Respond with a voice message to all who received the message and who are<strong>Cisco</strong> <strong>Unity</strong> subscribers.Send the message to another subscriber and/or distribution list. (Note thatyou cannot forward any message that is marked private.)Delete the message.Save the message and any changes, such as marking the message as new orchanging the subject, and return to the <strong>Cisco</strong> <strong>Unity</strong> Inbox.Check this check box to save the message as new. (This may cause the MWIon your phone to light.)Cancel the message without saving changes, and return to the <strong>Cisco</strong> <strong>Unity</strong>Inbox.Related Topics• Sending and Responding to Messages, page 12-1• Deleting Messages, page 11-1• Managing Receipts, page 9-1• Changing Message Notification Settings, page 19-18-6<strong>Cisco</strong> <strong>Unity</strong> 4.0(5) and Later <strong>Voice</strong> <strong>Messaging</strong> <strong>User</strong> <strong>Guide</strong> (With Microsoft Exchange)OL-7374-01
CHAPTER9Managing ReceiptsAs you work with <strong>Cisco</strong> <strong>Unity</strong>, you may manage several different types of receipts, as identified inTable 9-1.Table 9-1 Receipts That You May Receive When Working With <strong>Cisco</strong> <strong>Unity</strong> 1Type of ReceiptReadUnreadHeardUnheardDeliveryDescriptionMessage that informs you when the recipient opens or plays your message.Message that informs you when the recipient deletes your message without everopening or playing it.Term used for a Read receipt in the <strong>Cisco</strong> <strong>Unity</strong> Inbox.Term used for an Unread receipt in the <strong>Cisco</strong> <strong>Unity</strong> Inbox.Message that informs you when your message was delivered to its intendedrecipient.Nondelivery (NDR) Message that informs you when a message that you sent could not be deliveredto its intended recipient.1. Ask your <strong>Cisco</strong> <strong>Unity</strong> administrator which receipts <strong>Cisco</strong> <strong>Unity</strong> is set up to send.This chapter contains the following sections:• Managing Receipts by Phone, page 9-1• Managing Receipts from Your <strong>Cisco</strong> <strong>Unity</strong> Inbox, page 9-4Managing Receipts by PhoneWhen you check your messages by phone, <strong>Cisco</strong> <strong>Unity</strong> plays your receipts along with your othermessages. You play and manage receipts by phone in nearly the same way as other messages, though youcannot reply to or forward delivery receipts or NDRs. Unlike other messages, receipts do not cause amessage waiting indicator on your phone to light.For return receipts, you hear a list of the recipients—including recipients at other locations in yourorganization—who received the message you sent and/or played it. For NDRs, <strong>Cisco</strong> <strong>Unity</strong> identifiesboth local and remote recipients whose mailboxes did not accept your message.OL-7374-01<strong>Cisco</strong> <strong>Unity</strong> 4.0(5) and Later <strong>Voice</strong> <strong>Messaging</strong> <strong>User</strong> <strong>Guide</strong> (With Microsoft Exchange)9-1
Managing Receipts by PhoneChapter 9Managing ReceiptsIf known, <strong>Cisco</strong> <strong>Unity</strong> explains why you received a particular receipt for any message that you send toanother location. Depending on how <strong>Cisco</strong> <strong>Unity</strong> is set up at your organization, you may hear a reasoncode before the prompt which explains why you received the receipt. Include the reason code whenreporting message delivery problems to your <strong>Cisco</strong> <strong>Unity</strong> administrator or support desk.After you play an NDR, <strong>Cisco</strong> <strong>Unity</strong> allows you to play the original message and resend it to therecipient(s) who failed to receive it. You can record an introduction, modify recipient list, and changedelivery options when resending a message. Once you resend the message, <strong>Cisco</strong> <strong>Unity</strong> automaticallydeletes the NDR for you.This section contains two procedures. Do the first procedure, “To Manage Receipts by Phone (StandardConversation Style),” to check messages when <strong>Cisco</strong> <strong>Unity</strong> is set up to play the standard conversation.Do the second procedure, “To Manage Receipts by Phone (Optional Conversation 1 Style),” when<strong>Cisco</strong> <strong>Unity</strong> is set up to play Optional Conversation 1.Keypad mappings for other conversation styles are documented in the “<strong>Cisco</strong> <strong>Unity</strong> Phone Menus andShortcuts” chapter. Ask your <strong>Cisco</strong> <strong>Unity</strong> administrator which conversation style you are set up to use.To Manage Receipts by Phone (Standard Conversation Style)Step 1Step 2Step 3Step 4Log on to <strong>Cisco</strong> <strong>Unity</strong>.Press 1 to hear new messages.On the Message Type menu, press 4 to play receipts. (You will not hear the Message Type menu if it isdisabled in the <strong>Cisco</strong> <strong>Unity</strong> Assistant.)Use the following keys to control playback as you listen to a receipt.Key(s) Task Key(s) Task1 Restart receipt 8 Pause/Resume2 Save 9 Fast-forward3 Delete # Fast-forward to end4 Slow playback ## Skip receipt, save as is5 Change volume 1* Cancel or back up6 Fast playback 0 Help7 Rewind1. Not available on some systems.Step 5Use the following keys to manage the receipt after you have listened to it.9-2<strong>Cisco</strong> <strong>Unity</strong> 4.0(5) and Later <strong>Voice</strong> <strong>Messaging</strong> <strong>User</strong> <strong>Guide</strong> (With Microsoft Exchange)OL-7374-01
Chapter 9Managing ReceiptsManaging Receipts by PhoneKey(s) Task Key(s) Task1 Repeat receipt 7 Rewind receipt2 Save 8 Play original message(NDRs only)3 Delete 9 Play receipt properties4 Resend original message # Save as is(NDRs only)5 Forward* Cancel or back up(Read and unread receiptsonly)6 Save as new 0 HelpTo Manage Receipts by Phone (Optional Conversation 1 Style)Step 1Step 2Step 3Step 4Log on to <strong>Cisco</strong> <strong>Unity</strong>.Press 1 to hear new messages.On the Message Type menu, press 4 to play receipts. (You will not hear the Message Type menu if it isdisabled in the <strong>Cisco</strong> <strong>Unity</strong> Assistant.)Use the following keys to control playback as you listen to a receipt.Key(s) Task Key(s) Task1 Rewind receipt 66 Faster playback2 Pause/Resume 7 Decrease volume 13 Fast-forward 8 Reset volume 133 Fast-forward to end 9 Increase volume 14 Slow playback # Skip receipt, save as is44 Slower playback ## Skip receipt, save as new5 Play message properties * Cancel or back up6 Fast playback 0 Help1. Not available on some systems.Step 5Use the following keys to manage the receipt after you have listened to it.OL-7374-01<strong>Cisco</strong> <strong>Unity</strong> 4.0(5) and Later <strong>Voice</strong> <strong>Messaging</strong> <strong>User</strong> <strong>Guide</strong> (With Microsoft Exchange)9-3
Managing Receipts from Your <strong>Cisco</strong> <strong>Unity</strong> InboxChapter 9Managing ReceiptsKey(s) Task Key(s) Task1 Rewind receipt 9 Save2 Play original message # Save as is(NDRs only)4 Repeat receipt ## Save as new5 Play receipt properties6 Forward (Read and unreadreceipts only)* Cancel or back upOrResend original message(NDRs only)7 Delete 0 HelpRelated TopicChanging What <strong>Cisco</strong> <strong>Unity</strong> Plays Before and After a Message, page 18-5Managing Receipts from Your <strong>Cisco</strong> <strong>Unity</strong> InboxWhen you check your messages in the <strong>Cisco</strong> <strong>Unity</strong> Inbox, <strong>Cisco</strong> <strong>Unity</strong> presents your receipts along withyour other messages. You open and manage receipts from the <strong>Cisco</strong> <strong>Unity</strong> Inbox in nearly the same wayas your other messages, though you cannot reply to or forward return receipts or NDRs.For return receipts, you can review the recipients—including recipients at other locations in yourorganization—whose mailboxes accepted a message you sent and/or played it. For NDRs, the<strong>Cisco</strong> <strong>Unity</strong> Inbox identifies both local and remote recipients whose mailboxes did not accept yourmessage.Information in the From field identifies the sender. Typically for delivery receipt and NDRs, the Fromfield displays “System Administrator.” For read and nonread receipts, the From field displays the nameof the recipient who received your message (and either played it or did not play it, as applicable). TheDate field indicates the time in which the original message was sent.If known, the <strong>Cisco</strong> <strong>Unity</strong> Inbox includes the reason code and the reason why you received a particularreceipt for any message that you send to another location. Include the reason code when reportingmessage delivery problems to your <strong>Cisco</strong> <strong>Unity</strong> administrator or support desk.As you review an NDR, you can use the Media Master control bar to play the original message and youcan resend it to the recipient(s) who failed to receive it. You can record an introduction, modify recipientlist, and change delivery options when resending a message. Once you resend a message, the NDR is notautomatically deleted as it is when you resend a message by phone. Instead, the NDR remains in the<strong>Cisco</strong> <strong>Unity</strong> Inbox until you delete it.To Manage Receipts from Your <strong>Cisco</strong> <strong>Unity</strong> InboxStep 1In the <strong>Cisco</strong> <strong>Unity</strong> Inbox, click the name of the sender to open the receipt.9-4<strong>Cisco</strong> <strong>Unity</strong> 4.0(5) and Later <strong>Voice</strong> <strong>Messaging</strong> <strong>User</strong> <strong>Guide</strong> (With Microsoft Exchange)OL-7374-01
Chapter 9Managing ReceiptsManaging Receipts from Your <strong>Cisco</strong> <strong>Unity</strong> InboxStep 2Use the following icons or Message menu options to manage the receipt:Previous MessageNext MessageResend Original Message(for NDRs only)DeleteSaveMark Messageas UnreadCloseOpen the previous message.Open the next message.Resend original message to recipients who failed to receive it. You can recordan introduction, modify recipient list, and change delivery options.Delete the message.Save the receipt and any changes, such as marking the message as new orchanging the subject, and return to the <strong>Cisco</strong> <strong>Unity</strong> Inbox.Check this check box to save the message as new.Cancel the message without saving changes, and return to the <strong>Cisco</strong> <strong>Unity</strong>Inbox. The receipt is marked read.OL-7374-01<strong>Cisco</strong> <strong>Unity</strong> 4.0(5) and Later <strong>Voice</strong> <strong>Messaging</strong> <strong>User</strong> <strong>Guide</strong> (With Microsoft Exchange)9-5
Managing Receipts from Your <strong>Cisco</strong> <strong>Unity</strong> InboxChapter 9Managing Receipts9-6<strong>Cisco</strong> <strong>Unity</strong> 4.0(5) and Later <strong>Voice</strong> <strong>Messaging</strong> <strong>User</strong> <strong>Guide</strong> (With Microsoft Exchange)OL-7374-01
CHAPTER10Finding Messages by Phone<strong>Cisco</strong> <strong>Unity</strong> offers two ways to find messages by phone:Message LocatorGo-to-MessageAllows you to find new and saved voice messages. When this feature is enabled byyour <strong>Cisco</strong> <strong>Unity</strong> administrator, <strong>Cisco</strong> <strong>Unity</strong> prompts you to “Press 5 to findmessages” from the Main menu.Using the Message Locator menu, you can find voice messages from a particularsubscriber by entering the subscriber name or extension. You can also use it to findvoice messages from all outside callers or messages left by callers who called froma specific number.Based on the criteria that you enter, <strong>Cisco</strong> <strong>Unity</strong> begins playing messages as theyare found. Messages are presented to you in order of oldest to newestmessages—regardless of whether the messages are new or saved. You cannotchange the playback order for Message Locator.Allows you to find a saved message. As you listen to your saved messages, youcan use Go-to-Message to find a message by entering the message number. Youcan also use Go-to-Message to skip back to the previous message and to go to thenext message.This section contains procedures on using Message Locator and Go-to-Message:• There are two procedures on using Message Locator. Do the first procedure, “To Find Messages ByUsing Message Locator (Standard Conversation Style),” to find messages when <strong>Cisco</strong> <strong>Unity</strong> is setup to play the standard conversation. Do the second procedure, “To Find Messages by UsingGo-to-Message (Optional Conversation 1 Style),” when <strong>Cisco</strong> <strong>Unity</strong> is set up to play OptionalConversation 1.• There are two procedures on using Go-to-Message. Do the third procedure in this section, “To FindMessages by Using Go-to-Message (Standard Conversation Style),” to find messages when<strong>Cisco</strong> <strong>Unity</strong> is set up to play the standard conversation. Do the fourth procedure, “To Find Messagesby Using Go-to-Message (Optional Conversation 1 Style),” when <strong>Cisco</strong> <strong>Unity</strong> is set up to playOptional Conversation 1.Keypad mappings for other conversation styles are documented in the “<strong>Cisco</strong> <strong>Unity</strong> Phone Menus andShortcuts” chapter. Ask your <strong>Cisco</strong> <strong>Unity</strong> administrator which conversation style you are set up to use.To Find Messages By Using Message Locator (Standard Conversation Style)Step 1Log on to <strong>Cisco</strong> <strong>Unity</strong>.OL-7374-01<strong>Cisco</strong> <strong>Unity</strong> 4.0(5) and Later <strong>Voice</strong> <strong>Messaging</strong> <strong>User</strong> <strong>Guide</strong> (With Microsoft Exchange)10-1
Chapter 10Finding Messages by PhoneStep 2Step 3Press 5 to access Message Locator.Use the following keys to define your search.KeyTask1 Find voice messages from another subscriber. When prompted, use the phone keypad to eitherspell the subscriber name or to enter the extension of the subscriber. Press ## to switchbetween spelling and number entry.As applicable, you can enter a location ID and an extension to find messages from subscribersat other locations in your organization.2 Find voice messages from all outside callers. <strong>Cisco</strong> <strong>Unity</strong> searches for any messages left byunidentified callers—including outside callers and subscribers who did not log on to<strong>Cisco</strong> <strong>Unity</strong> before calling from an external phone or from a phone that is not associated witha subscriber account (such as a conference room).3 Find voice messages from a specific outside caller. When prompted, use the phone keypad toenter the phone number—or part of the number—of the caller, followed by #.You may have to enter country, area, city, or trunk codes first. Not all callers will have anumber stored in the system. If you have trouble finding messages from a specific caller,contact your <strong>Cisco</strong> <strong>Unity</strong> administrator.Step 4As <strong>Cisco</strong> <strong>Unity</strong> plays a message, use the following keys to control playback as you listen to it.Key(s) Task Key(s) Task1 Restart message 7 Rewind message2 Save 8 Pause/Resume3 Delete 9 Fast-forward4 Slow playback # Fast-forward to end5 Change volume 1## Skip message, save as is6 Fast playback1. Not available on some systems.Step 5Use the following keys to manage the message after you have listened to it.10-2<strong>Cisco</strong> <strong>Unity</strong> 4.0(5) and Later <strong>Voice</strong> <strong>Messaging</strong> <strong>User</strong> <strong>Guide</strong> (With Microsoft Exchange)OL-7374-01
Chapter 10Finding Messages by PhoneKey(s) Task Key(s) Task1 Replay message 5 Forward message2 Save 6 Save as new(The message waiting indicatoron your phone may light orremain lit.)3 Delete 7 Rewind message4 Reply 9 Play message properties42 Reply to all # Save as is44 Call the subscriber 11. Not available on some systems.To Find Messages By Using Message Locator (Optional Conversation 1 Style)Step 1Step 2Step 3Log on to <strong>Cisco</strong> <strong>Unity</strong>.Press 5 to access Message Locator.Use the following keys to define your search.KeyTask1 Find voice messages from another subscriber. When prompted, use the phone keypad to eitherspell the subscriber name or to enter the extension of the subscriber. Press ## to switchbetween spelling and number entry.As applicable, you can enter a location ID and an extension to find messages from subscribersat other locations in your organization.2 Find voice messages from all outside callers. <strong>Cisco</strong> <strong>Unity</strong> searches for any messages left byunidentified callers—including outside callers and subscribers who did not log on to<strong>Cisco</strong> <strong>Unity</strong> before calling from an external phone or from a phone that is not associated witha subscriber account (such as a conference room).3 Find voice messages from a specific outside caller. When prompted, use the phone keypad toenter the phone number—or part of the number—of the caller, followed by #.You may have to enter country, area, city, or trunk codes first. Not all callers will have anumber stored in the system. If you have trouble finding messages from a specific caller,contact your <strong>Cisco</strong> <strong>Unity</strong> administrator.Step 4As <strong>Cisco</strong> <strong>Unity</strong> plays a message, use the following keys to control playback as you listen to it.Key(s) Task Key(s) Task1 Rewind message 6 Fast playback2 Pause/Resume 66 Faster playbackOL-7374-01<strong>Cisco</strong> <strong>Unity</strong> 4.0(5) and Later <strong>Voice</strong> <strong>Messaging</strong> <strong>User</strong> <strong>Guide</strong> (With Microsoft Exchange)10-3
Chapter 10Finding Messages by PhoneKey(s) Task Key(s) Task3 Fast-forward 7 Decrease volume 133 Fast-forward to end 8 Reset volume 14 Slow playback 9 Increase volume 144 Slower playback # Skip message, save as is5 Play message properties ## Skip message, save as new(The message waitingindicator on your phone maylight or remain lit.)1. Not available on some systems.Step 5Use the following keys to manage the message after you have listened to it.Key(s) Task Key(s) Task1 Skip back 82 Reply to all4 Replay message 88 Call the subscriber 15 Play message properties 9 Save6 Forward message # Save as is7 Delete ## Save as new8 Reply1. Not available on some systems.To Find Messages by Using Go-to-Message (Standard Conversation Style)Step 1Step 2Step 3Log on to <strong>Cisco</strong> <strong>Unity</strong>.Press 3 1 to hear saved messages.Use the following keys to select the type of messages that you want to hear. (You will not hear theMessage Type menu if it is disabled in the <strong>Cisco</strong> <strong>Unity</strong> Assistant.)Key Task1 <strong>Voice</strong> messages2 E-mails 13 Faxes 24 Receipts 3# All messages1. Although the e-mail keys are available in the Message Type menu, <strong>Cisco</strong> <strong>Unity</strong> plays e-mailsonly for Unified <strong>Messaging</strong> subscribers who also have the text-to-speech option2. Although the fax keys are available in the Message Type menu, <strong>Cisco</strong> <strong>Unity</strong> plays faxes onlywhen the system is using the fax option. Note that with fax messages, <strong>Cisco</strong> <strong>Unity</strong> plays onlymessage properties, such as the sender, date, and time.10-4<strong>Cisco</strong> <strong>Unity</strong> 4.0(5) and Later <strong>Voice</strong> <strong>Messaging</strong> <strong>User</strong> <strong>Guide</strong> (With Microsoft Exchange)OL-7374-01
Chapter 10Finding Messages by Phone3. Depending on how <strong>Cisco</strong> <strong>Unity</strong> is set up at your organization, you may not receive all types ofreceipts.Step 4Press 12 to find a particular message.Step 5 When prompted, enter the message number followed by #.TipStep 6To more easily use the Go-to-Message feature, turn on message counts in the <strong>Cisco</strong> <strong>Unity</strong> Assistant sothat you know how many saved messages you have and can hear the message number for each message.As <strong>Cisco</strong> <strong>Unity</strong> plays the message, use the following keys to control playback as you listen to it.Key(s) Task Key(s) Task1 Restart message 6 Fast playback14 Play previous saved message 7 Rewind message16 Play next saved message 8 Pause/Resume2 Save 9 Fast-forward3 Delete # Fast-forward to end4 Slow playback ## Skip message, save as is5 Change volume 11. Not available on some systems.Step 7Use the following keys to manage the message after you have listened to it.Key(s) Task Key(s) Task1 Replay message 44 Call the subscriber 114 Play previous saved5 Forward messagemessage16 Play next saved message 6 Save as new(The message waiting indicatoron your phone may light orremain lit.)2 Save 7 Rewind message3 Delete 8 Deliver fax to fax machine 14 Reply 9 Play message properties42 Reply to all # Save as is1. Not available on some systems.To Find Messages by Using Go-to-Message (Optional Conversation 1 Style)Step 1Log on to <strong>Cisco</strong> <strong>Unity</strong>.OL-7374-01<strong>Cisco</strong> <strong>Unity</strong> 4.0(5) and Later <strong>Voice</strong> <strong>Messaging</strong> <strong>User</strong> <strong>Guide</strong> (With Microsoft Exchange)10-5
Chapter 10Finding Messages by PhoneStep 2Press 3 1 to hear saved messages.Use the following keys to select the type of messages that you want to hear. (You will not hear theMessage Type menu if it is disabled in the <strong>Cisco</strong> <strong>Unity</strong> Assistant.)KeyTask1 <strong>Voice</strong> messages2 E-mails 13 Faxes 24 Receipts 3# All messages1. Although the e-mail keys are available in the Message Type menu, <strong>Cisco</strong> <strong>Unity</strong> plays e-mails onlyfor Unified <strong>Messaging</strong> subscribers who also have the text-to-speech option2. Although the fax keys are available in the Message Type menu, <strong>Cisco</strong> <strong>Unity</strong> plays faxes onlywhen the system is using the fax option. Note that with fax messages, <strong>Cisco</strong> <strong>Unity</strong> plays onlymessage properties, such as the sender, date, and time.3. Depending on how <strong>Cisco</strong> <strong>Unity</strong> is set up at your organization, you may not receive all types ofreceipts.Step 3Press 12 to find a particular message.Step 4 When prompted, enter the message number followed by #.TipStep 5To more easily use the Go-to-Message feature, turn on message counts in the <strong>Cisco</strong> <strong>Unity</strong> Assistant sothat you know how many saved messages you have and can hear the message number for each message.As <strong>Cisco</strong> <strong>Unity</strong> plays the message, use the following keys to control playback as you listen to it.Key(s) Task Key(s) Task1 Rewind message 5 Play message properties14 Play previous saved message 6 Fast playback16 Play next saved message 66 Faster playback2 Pause/Resume 7 Decrease volume 13 Fast-forward 8 Reset volume 133 Fast-forward to end 9 Increase volume 14 Slow playback # Skip message, save as is44 Slower playback ## Skip message, save as new(The message waitingindicator on your phone maylight or remain lit.)1. Not available on some systems.Step 6Use the following keys to manage the message after you have listened to it.10-6<strong>Cisco</strong> <strong>Unity</strong> 4.0(5) and Later <strong>Voice</strong> <strong>Messaging</strong> <strong>User</strong> <strong>Guide</strong> (With Microsoft Exchange)OL-7374-01
Chapter 10Finding Messages by PhoneKey(s) Task Key(s) Task1 Skip back 7 Delete14 Play previous saved message 8 Reply16 Play next saved message 82 Reply to all2 Deliver fax to fax machine 1 88 Call the subscriber 14 Replay message 9 Save5 Play message properties # Save as is6 Forward message ## Save as new1. Not available on some systems.Related Topics• Sending and Responding to Messages, page 12-1• Deleting Messages, page 11-1• Managing Receipts, page 9-1• What You Hear When You Check Messages, page 18-1OL-7374-01<strong>Cisco</strong> <strong>Unity</strong> 4.0(5) and Later <strong>Voice</strong> <strong>Messaging</strong> <strong>User</strong> <strong>Guide</strong> (With Microsoft Exchange)10-7
Chapter 10Finding Messages by Phone10-8<strong>Cisco</strong> <strong>Unity</strong> 4.0(5) and Later <strong>Voice</strong> <strong>Messaging</strong> <strong>User</strong> <strong>Guide</strong> (With Microsoft Exchange)OL-7374-01
CHAPTER11Deleting MessagesYou can delete new and saved messages by phone and from the <strong>Cisco</strong> <strong>Unity</strong> Inbox. Depending on how<strong>Cisco</strong> <strong>Unity</strong> is set up, <strong>Cisco</strong> <strong>Unity</strong> may save your deleted messages so that you can use the <strong>Cisco</strong> <strong>Unity</strong>conversation and the <strong>Cisco</strong> <strong>Unity</strong> Inbox to play, restore, and permanently delete them.Deleting messages can be an important way to reduce your mailbox size, especially when <strong>Cisco</strong> <strong>Unity</strong>is not set up to automatically delete messages once they reach a certain age. Ask your <strong>Cisco</strong> <strong>Unity</strong>administrator if <strong>Cisco</strong> <strong>Unity</strong> is set up to enforce a message-retention policy. <strong>Cisco</strong> <strong>Unity</strong> does notindicate when a message-retention policy is enforced, nor does it warn you before message arepermanently deleted as a result of such a policy. If <strong>Cisco</strong> <strong>Unity</strong> is not set up to do so, make sure that youpermanently delete messages periodically. (For information on what to do if your mailbox exceeds itssize limits, see the “Managing Your Mailbox Size” chapter.)TipTo archive messages before deleting them, you may be able to save them as WAV files to your hard disk.(In the <strong>Cisco</strong> <strong>Unity</strong> Inbox, use the Copy to File option on the Options menu on the Media Master controlbar if available.)This chapter contains the following sections:• Deleting Messages by Phone, page 11-1• Checking Deleted Messages by Phone, page 11-2• Managing Deleted Messages from Your <strong>Cisco</strong> <strong>Unity</strong> Inbox, page 11-4Deleting Messages by PhoneYou can delete new and saved messages by phone during message playback or after you listen to theentire message. Depending on how it is set up, <strong>Cisco</strong> <strong>Unity</strong> may save your deleted messages and allowyou to permanently delete them.Do the procedure “To Delete a New or Saved Message (Standard and Optional Conversation 1 Styles)”to delete messages by phone. Keypad mappings for other conversation styles are documented in the“<strong>Cisco</strong> <strong>Unity</strong> Phone Menus and Shortcuts” chapter. Ask your <strong>Cisco</strong> <strong>Unity</strong> administrator whichconversation style you are set up to use.To Delete a New or Saved Message (Standard and Optional Conversation 1 Styles)Step 1Log on to <strong>Cisco</strong> <strong>Unity</strong>.OL-7374-01<strong>Cisco</strong> <strong>Unity</strong> 4.0(5) and Later <strong>Voice</strong> <strong>Messaging</strong> <strong>User</strong> <strong>Guide</strong> (With Microsoft Exchange)11-1
Checking Deleted Messages by PhoneChapter 11Deleting MessagesStep 2Step 3Press 1 to hear new messages, or press 3 to review old messages.During or after message playback, press 3 to delete the message.Table 11-1Use These Keys AnytimeKey Task Key Task* Cancel or back up 0 HelpTo Permanently Delete Deleted MessagesStep 1Step 2Step 3Log on to <strong>Cisco</strong> <strong>Unity</strong>.Press 3 to review old messages. Then press 2 to access deleted messages.Press the applicable key, depending on how you want to delete messages:Key(s) Task Key(s) Task1 Review deleted messages so that you * Cancel or back upcan permanently delete your deletedmessages one by one.2 Permanently delete multiple deletedmessages at once.0 HelpChecking Deleted Messages by PhoneDepending on how <strong>Cisco</strong> <strong>Unity</strong> is set up, you may be able to play your deleted messages by phone, justas you can play new and saved messages. With deleted messages, the <strong>Cisco</strong> <strong>Unity</strong> conversation alsoallows you to “restore” a deleted message as a new or saved message.By default, newest messages are played first. You can specify the message playback order for deletedmessages in the <strong>Cisco</strong> <strong>Unity</strong> Assistant. Note that you cannot enable the Message Type menu or specifya playback order by message type for deleted messages.This section contains two procedures. Do the first procedure, “To Check Deleted Messages by Phone(Standard Conversation Style),” to check messages when <strong>Cisco</strong> <strong>Unity</strong> is set up to play the standardconversation. Do the second procedure, “To Check Deleted Messages by Phone (OptionalConversation 1 Style),” when <strong>Cisco</strong> <strong>Unity</strong> is set up to play Optional Conversation 1.Keypad mappings for other conversation styles are documented in the “<strong>Cisco</strong> <strong>Unity</strong> Phone Menus andShortcuts” chapter. Ask your <strong>Cisco</strong> <strong>Unity</strong> administrator which conversation style you are set up to use.To Check Deleted Messages by Phone (Standard Conversation Style)Step 1Step 2Log on to <strong>Cisco</strong> <strong>Unity</strong>.Press 3 to hear old messages, then press 2 to hear deleted messages.11-2<strong>Cisco</strong> <strong>Unity</strong> 4.0(5) and Later <strong>Voice</strong> <strong>Messaging</strong> <strong>User</strong> <strong>Guide</strong> (With Microsoft Exchange)OL-7374-01
Chapter 11Deleting MessagesChecking Deleted Messages by PhoneStep 3Use the following keys to control playback as you listen to a deleted message.Key(s) Task Key(s) Task1 Restart message 8 Pause/Resume2 Save 9 Fast-forward3 Delete permanently # Fast-forward to end4 Slow playback ## Skip message, save as is5 Change volume 1* Cancel or back up6 Fast playback 0 Help7 Rewind message1. Not available on some systems.Step 4Use the following keys to manage the deleted message after you have listened to it.Key(s) Task Key(s) Task1 Replay message 6 Restore as new(The message waiting indicatoron your phone may light orremain lit.)2 Restore as saved 7 Rewind message3 Delete permanently 8 Deliver fax to fax machine 1(Play original message whenmanaging an NDR)4 Reply9 Play message properties(Resend original messagewhen responding to anNDR)42 Reply to all # Save as is44 Call the subscriber 1* Cancel or back up5 Forward message 0 Help1. Not available on some systems.To Check Deleted Messages by Phone (Optional Conversation 1 Style)Step 1Step 2Step 3Log on to <strong>Cisco</strong> <strong>Unity</strong>.Press 3 to hear old messages, then press 2 to hear deleted messages.Use the following keys to control playback as you listen to a deleted message.OL-7374-01<strong>Cisco</strong> <strong>Unity</strong> 4.0(5) and Later <strong>Voice</strong> <strong>Messaging</strong> <strong>User</strong> <strong>Guide</strong> (With Microsoft Exchange)11-3
Managing Deleted Messages from Your <strong>Cisco</strong> <strong>Unity</strong> InboxChapter 11Deleting MessagesKey(s) Task Key(s) Task1 Rewind message 6 Fast playback2 Pause/Resume 66 Faster playback3 Fast-forward 8 Reset volume 133 Fast-forward to end 9 Increase volume 14 Slow playback # Skip message, save as is44 Slower playback ## Skip message, save as new(The message waitingindicator on your phone maylight or remain lit.)5 Play message properties * Cancel or back up7 Decrease volume 10 Help1. Not available on some systems.Step 4Use the following keys to manage the deleted message after you have listened to it.Key(s) Task Key(s) Task1 Skip back 82 Reply to all2 Deliver fax to fax machine 1 88 Call the subscriber 1(Play original message whenmanaging an NDR)4 Replay message 9 Restore as saved5 Play message properties # Save as is6 Forward message ## Restore as new7 Delete permanently * Cancel or back up8 Reply (Resend originalmessage if responding to anNDR)1. Not available on some systems.0 HelpRelated TopicChanging Message Playback Settings, page 18-1Managing Deleted Messages from Your <strong>Cisco</strong> <strong>Unity</strong> InboxYou can delete a message or group of messages directly from your <strong>Cisco</strong> <strong>Unity</strong> Inbox, or you can deletea message after you have opened it. You also may be able to retrieve deleted messages from a DeletedItems folder in your <strong>Cisco</strong> <strong>Unity</strong> Inbox so that you can listen to voice messages or view faxes, reply toor forward the messages, restore them to the Inbox, or delete them permanently.11-4<strong>Cisco</strong> <strong>Unity</strong> 4.0(5) and Later <strong>Voice</strong> <strong>Messaging</strong> <strong>User</strong> <strong>Guide</strong> (With Microsoft Exchange)OL-7374-01
Chapter 11Deleting MessagesManaging Deleted Messages from Your <strong>Cisco</strong> <strong>Unity</strong> InboxTo Delete MessagesStep 1Step 2Step 3In the <strong>Cisco</strong> <strong>Unity</strong> Inbox, check the box(es) to the left of the message(s) that you want to delete from the<strong>Cisco</strong> <strong>Unity</strong> Inbox.OrClick Select All Rows to mark all the messages on the page for deletion.Click Delete Selected Rows.When prompted, click OK.(Alternatively, you can delete a message from the <strong>Cisco</strong> <strong>Unity</strong> Inbox by opening the message, clickingDelete, and clicking OK.)To Retrieve Deleted MessagesStep 1Step 2In the <strong>Cisco</strong> <strong>Unity</strong> Inbox, click the View Deleted Items icon. (The View Deleted Items icon is the trashcan with the folder.)On the Deleted Items page, do any of the following tasks:To listento a voice messageTo view a faxTo reply to or forwarda messageTo restore a messageto the InboxTo permanentlydelete a messageClick the speaker icon next to the message to play it directly from the<strong>Cisco</strong> <strong>Unity</strong> Inbox.OrOpen the message and play it by using the Media Master control bar.Click the link for the attached fax to start the fax viewer program on yourcomputer.Open the message, and click the applicable icon.Check the check box(es) to the left of the message(s) that you want to restore,and click the Restore icon.Check the check box(es) to the left of the message(s) that you want to delete,click the Delete icon, then click OK.OL-7374-01<strong>Cisco</strong> <strong>Unity</strong> 4.0(5) and Later <strong>Voice</strong> <strong>Messaging</strong> <strong>User</strong> <strong>Guide</strong> (With Microsoft Exchange)11-5
Managing Deleted Messages from Your <strong>Cisco</strong> <strong>Unity</strong> InboxChapter 11Deleting Messages11-6<strong>Cisco</strong> <strong>Unity</strong> 4.0(5) and Later <strong>Voice</strong> <strong>Messaging</strong> <strong>User</strong> <strong>Guide</strong> (With Microsoft Exchange)OL-7374-01
CHAPTER12Sending and Responding to MessagesYou can send voice messages and record a response to messages by phone and from the <strong>Cisco</strong> <strong>Unity</strong>Inbox. Depending on the tool you use, you can send, reply to, and forward messages to subscribers, aswell as to public and private distribution lists, and to e-mail addresses. <strong>Cisco</strong> <strong>Unity</strong> does not save yoursent messages.You cannot reply to voice messages from an unidentified caller. Also, when your mailbox exceeds itssize quota, you may not be able to send messages. (See the “Managing Your Mailbox Size” chapter forinformation.)If your organization has multiple locations, you may be able to send and respond to messages tosubscribers at another location. Ask your <strong>Cisco</strong> <strong>Unity</strong> administrator for details.This chapter contains the following sections:Sending <strong>Voice</strong> Messages• Sending a <strong>Voice</strong> Message by Phone, page 12-1• Sending a <strong>Voice</strong> Message from the <strong>Cisco</strong> <strong>Unity</strong> Inbox, page 12-3Replying to Messages• Replying to a Message by Phone, page 12-4• Replying to a <strong>Voice</strong> Message from Your <strong>Cisco</strong> <strong>Unity</strong> Inbox, page 12-5Forwarding Messages• Forwarding a Message by Phone, page 12-6• Forwarding a <strong>Voice</strong> Message from Your <strong>Cisco</strong> <strong>Unity</strong> Inbox, page 12-8Sending a <strong>Voice</strong> Message by PhoneWhen you send a message, <strong>Cisco</strong> <strong>Unity</strong> sends the message to your intended recipients without ringingtheir extensions. You can send voice messages to <strong>Cisco</strong> <strong>Unity</strong> subscribers, and to public and privatedistribution lists.You can address a message to more than one recipient or type of recipient. You address a message byusing the phone keypad to either spell the subscriber name or to enter the extension of the subscriber.When you address messages to private lists, you must use number entry.OL-7374-01<strong>Cisco</strong> <strong>Unity</strong> 4.0(5) and Later <strong>Voice</strong> <strong>Messaging</strong> <strong>User</strong> <strong>Guide</strong> (With Microsoft Exchange)12-1
Sending a <strong>Voice</strong> Message by PhoneChapter 12Sending and Responding to MessagesWhen you send a message by phone, you can choose from the following special delivery options:UrgentReturn ReceiptPrivateFuture DeliveryMark a message urgent so that <strong>Cisco</strong> <strong>Unity</strong> sends it before regular messages.Request a return receipt so that <strong>Cisco</strong> <strong>Unity</strong> notifies you when the recipient opensthe message.(Note that you may not be able to receive all types of receipts, even though the<strong>Cisco</strong> <strong>Unity</strong> phone menus allow you to request them. Ask your <strong>Cisco</strong> <strong>Unity</strong>administrator whether <strong>Cisco</strong> <strong>Unity</strong> is set up to send receipts to subscribers.)Mark a message private so that the recipient knows to treat it confidentially.Mark a message for future delivery so that <strong>Cisco</strong> <strong>Unity</strong> waits to send the messageon the day and time that you specify.Do the following procedure to send a voice message when using either standard or Optionalconversation 1 styles. Keypad mappings for other conversation styles are documented in the“<strong>Cisco</strong> <strong>Unity</strong> Phone Menus and Shortcuts” chapter. Ask your <strong>Cisco</strong> <strong>Unity</strong> administrator whichconversation style you are set up to use.To Send a <strong>Voice</strong> Message by Phone (Standard and Optional Conversation 1 Styles)Step 1Step 2 Press 2.Step 3Step 4Log on to <strong>Cisco</strong> <strong>Unity</strong>.Follow the <strong>Cisco</strong> <strong>Unity</strong> conversation to address your message. Press ## to switch between spelling andnumber entry. (To address the message to a private list, you must switch to number entry.)Press 1 to add another name or list.OrPress # to record the message, and use the following keys as you record.Key Task Key Task8 Pause or resume # End recordingStep 5Press # to send the message.OrPress 1 for message options. Then use the following keys to select options, and follow the <strong>Cisco</strong> <strong>Unity</strong>conversation to send your message.Key Option Key Option1 Change address 4 Review message2 Change recording # Send message as is3 Set special delivery12-2<strong>Cisco</strong> <strong>Unity</strong> 4.0(5) and Later <strong>Voice</strong> <strong>Messaging</strong> <strong>User</strong> <strong>Guide</strong> (With Microsoft Exchange)OL-7374-01
Chapter 12Sending and Responding to MessagesSending a <strong>Voice</strong> Message from the <strong>Cisco</strong> <strong>Unity</strong> InboxRelated Topics• Changing Your Message Addressing Setting, page 14-4• Changing Private List Settings, page 20-1Sending a <strong>Voice</strong> Message from the <strong>Cisco</strong> <strong>Unity</strong> InboxYou can send voice messages to <strong>Cisco</strong> <strong>Unity</strong> subscribers, e-mail addresses, and public and privatedistribution lists. To address messages to <strong>Cisco</strong> <strong>Unity</strong> subscribers, you enter either their names or theirprimary extensions. (You cannot address messages to subscribers by entering their alternate extensions.)Messages addressed to e-mail addresses are sent as a sound (WAV) file attached to an e-mail message.When you send a message from the <strong>Cisco</strong> <strong>Unity</strong> Inbox, you can choose from the following specialdelivery options:Mark UrgentMark PrivateRequest a HeardMessage Receipt forThis MessageThe message is sent before regular messages.Alerts the recipient to treat the message confidentially. <strong>Cisco</strong> <strong>Unity</strong> subscriberscannot forward private messages by phone or from the <strong>Cisco</strong> <strong>Unity</strong> Inbox.You are notified when the recipient opens the message.(Note that you may not be able to receive all types of receipts, even though the<strong>Cisco</strong> <strong>Unity</strong> Inbox allows you to request them. Ask your <strong>Cisco</strong> <strong>Unity</strong>administrator whether <strong>Cisco</strong> <strong>Unity</strong> is set up to send receipts to subscribers.)Note that even when you have the fax option, you cannot use the <strong>Cisco</strong> <strong>Unity</strong> Inbox to create and senda fax.Do the following procedure to send a voice message.To Send a <strong>Voice</strong> MessageStep 1Step 2Step 3Click the New Message icon.Address the message in one of the following ways:• Enter subscriber names or their primary extensions, and/or e-mail addresses in the To, Cc, and Bccfields. Separate multiple names, extensions, and addresses with semicolons (;). For e-mailaddresses, enter the full e-mail address of the recipient (for example, @.com).• Click To, Cc, or Bcc to select recipients from the Address Book.If needed, click the Check Names icon on the right, then search for and select your recipients to resolvename and extension conflicts. (When names are resolved, they appear as links above the To, Cc, or Bccfields.)TipStep 4Step 5Step 6Click a link to remove an unwanted addressee.In the Subject field, type the subject of the message.Choose one or more special delivery options, if applicable.On the Media Master control bar, click Record and record the message with your chosen recordingdevice:OL-7374-01<strong>Cisco</strong> <strong>Unity</strong> 4.0(5) and Later <strong>Voice</strong> <strong>Messaging</strong> <strong>User</strong> <strong>Guide</strong> (With Microsoft Exchange)12-3
Replying to a Message by PhoneChapter 12Sending and Responding to MessagesPhoneMultimediamicrophonePick up the handset when the phone rings, wait for the tone, then speak into the handset.Speak into the microphone.Step 7Step 8When you finish recording, click Stop.To review your message before you send it, click Play on the Media Master control bar, or click Recordto rerecord the message.Click Send.Related Topics• Changing Recording and Playback Settings, page 15-1• Changing Private List Settings, page 20-1Replying to a Message by PhoneWhen you reply to a message by phone, you can respond to just the sender, and you can add recipients.You can also respond to nondelivery receipts (NDRs) by resending the original message.A message from “<strong>Unity</strong> <strong>Messaging</strong> System” means that the caller was not a <strong>Cisco</strong> <strong>Unity</strong> subscriber orwas not logged on as one when the message was left. You cannot reply to messages from such callers.Do the following procedure to send a voice message when using either standard or Optionalconversation 1 styles. Keypad mappings for other conversation styles are documented in the“<strong>Cisco</strong> <strong>Unity</strong> Phone Menus and Shortcuts” chapter. Ask your <strong>Cisco</strong> <strong>Unity</strong> administrator whichconversation style you are set up to use.To Reply to a Message (Standard and Optional Conversation 1 Styles)Step 1Step 2After listening to the message, press 4 if using the standard conversation style.OrPress 8 if using Optional conversation 1 style.Record the message, and use the following keys as you record.Key Task Key Task8 Pause/Resume # End recordingStep 3Press # to send the message.12-4<strong>Cisco</strong> <strong>Unity</strong> 4.0(5) and Later <strong>Voice</strong> <strong>Messaging</strong> <strong>User</strong> <strong>Guide</strong> (With Microsoft Exchange)OL-7374-01
Chapter 12Sending and Responding to MessagesReplying to a <strong>Voice</strong> Message from Your <strong>Cisco</strong> <strong>Unity</strong> InboxOrPress 1 for message options. Then use the following keys to select options, and follow the <strong>Cisco</strong> <strong>Unity</strong>conversation to send your message.Key Option Key Option1 Change addressing 3 Set special delivery2 Change recording 4 Review message(Resend original message whenresponding to an NDR)Step 4Follow the <strong>Cisco</strong> <strong>Unity</strong> conversation to handle the original message.Related Topics• Changing Your Message Addressing Setting, page 14-4• Managing Receipts, page 9-1Replying to a <strong>Voice</strong> Message from Your <strong>Cisco</strong> <strong>Unity</strong> InboxYou can reply to voice messages from other subscribers. You can respond to just the sender, and you canadd recipients, such as additional <strong>Cisco</strong> <strong>Unity</strong> subscribers, e-mail addresses, and public and privatedistribution lists. You can also respond to nondelivery receipts (NDRs) by resending the originalmessage.A message from “<strong>Unity</strong> <strong>Messaging</strong> System” means that the caller was not a <strong>Cisco</strong> <strong>Unity</strong> subscriber orwas not logged on as one when the message was left. You cannot reply to messages from such callers.When you send a message or respond to an NDR, you can choose from the following special deliveryoptions:Mark UrgentMark Private 1Request a HeardMessage Receipt forThis MessageThe message is sent before regular messages.Alerts the recipient to treat the message confidentially. <strong>Cisco</strong> <strong>Unity</strong> subscriberscannot forward private messages by phone or from the <strong>Cisco</strong> <strong>Unity</strong> Inbox.You are notified when the recipient opens the message.(Note that you may not be able to receive all types of receipts, even though the<strong>Cisco</strong> <strong>Unity</strong> Inbox allows you to request them. Ask your <strong>Cisco</strong> <strong>Unity</strong>administrator whether <strong>Cisco</strong> <strong>Unity</strong> is set up to send receipts to subscribers.)1. Depending on how <strong>Cisco</strong> <strong>Unity</strong> is set up, <strong>Cisco</strong> <strong>Unity</strong> may offer you the private secure delivery option instead. The privatesecure option offers the additional benefit of encrypting the message. Ask your <strong>Cisco</strong> <strong>Unity</strong> administrator for details.OL-7374-01<strong>Cisco</strong> <strong>Unity</strong> 4.0(5) and Later <strong>Voice</strong> <strong>Messaging</strong> <strong>User</strong> <strong>Guide</strong> (With Microsoft Exchange)12-5
Forwarding a Message by PhoneChapter 12Sending and Responding to MessagesDo the following procedure to reply to a voice message.To Reply to a <strong>Voice</strong> MessageStep 1Step 2Step 3Step 4In the <strong>Cisco</strong> <strong>Unity</strong> Inbox, click the name of the sender.In the open message, click Reply, Reply to All, or Resend, as applicable.To address the message to additional recipients, you can either:• Enter subscriber names or their primary extensions, and/or e-mail addresses in the To, Cc, and Bccfields. Separate multiple names, extensions, and addresses with semicolons (;). For e-mailaddresses, enter the full e-mail address of the recipient (for example, @.com).• Click To, Cc, or Bcc to select recipients from the Address Book.If needed, click the Check Names icon on the right, then search for and select your recipients to resolvename and extension conflicts. (When the names are resolved, they appear as links above the To, Cc, orBcc fields.)TipStep 5Step 6Step 7You can click a link to remove an unwanted addressee.Edit the Subject field, if applicable.Select one or more special delivery options, if applicable.On the Media Master control bar, click Record and record the message with your chosen recordingdevice:PhoneMultimediamicrophonePick up the handset when the phone rings, wait for the tone, then speak into the handset.Speak into the microphone.Step 8Step 9When you finish recording, click Stop.To review your message before you send it, click Play on the Media Master control bar, or click Recordto rerecord the message.Click Send.Related Topics• Changing Recording and Playback Settings, page 15-1• Managing Receipts, page 9-1Forwarding a Message by PhoneMessages marked private cannot be forwarded by phone or from the <strong>Cisco</strong> <strong>Unity</strong> Inbox. This includesany voice message that you or another <strong>Cisco</strong> <strong>Unity</strong> subscriber marked private.Do the following procedure to forward a message as is or to record an introduction that plays before theforwarded message when using either the standard or Optional conversation 1 styles.12-6<strong>Cisco</strong> <strong>Unity</strong> 4.0(5) and Later <strong>Voice</strong> <strong>Messaging</strong> <strong>User</strong> <strong>Guide</strong> (With Microsoft Exchange)OL-7374-01
Chapter 12Sending and Responding to MessagesForwarding a Message by PhoneKeypad mappings for other conversation styles are documented in the “<strong>Cisco</strong> <strong>Unity</strong> Phone Menus andShortcuts” chapter. Ask your <strong>Cisco</strong> <strong>Unity</strong> administrator which conversation style you are set up to use.To Forward a Message (Standard and Optional Conversation 1 Styles)Step 1Step 2Step 3Step 4After listening to the message, press 5 when using standard conversation style.After listening to the message, press 6 when using Optional conversation 1 style.Follow the <strong>Cisco</strong> <strong>Unity</strong> conversation to address the forwarded message. Press ## to switch betweenspelling and number entry. (To address the message to a private list, you must switch to number entry.)Once the message is addressed, do one of the following:• Press # to forward the message as is.• Skip to Step 4 to record an introduction.• Skip to Step 6 to change addressing, set special delivery, change recording, or review message.Press 2 to record an introduction. Then use the following keys as you record.Key Task Key Task8 Pause or resume # End recordingStep 5Step 6Press # to forward the message with the introduction.OrSkip to Step 6 to change addressing, set special delivery, change recording, or review message.Press 3 for message options. Then use the following keys to select options, and follow the <strong>Cisco</strong> <strong>Unity</strong>conversation to send your message.Key Option Key Option1 Change addressing 3 Set special delivery2 Change recording 4 Review messageStep 7Step 8Press # to forward the message.Follow the <strong>Cisco</strong> <strong>Unity</strong> conversation to handle the original message.Related Topics• Changing Your Message Addressing Setting, page 14-4• Changing Private List Settings, page 20-1OL-7374-01<strong>Cisco</strong> <strong>Unity</strong> 4.0(5) and Later <strong>Voice</strong> <strong>Messaging</strong> <strong>User</strong> <strong>Guide</strong> (With Microsoft Exchange)12-7
Forwarding a <strong>Voice</strong> Message from Your <strong>Cisco</strong> <strong>Unity</strong> InboxChapter 12Sending and Responding to MessagesForwarding a <strong>Voice</strong> Message from Your <strong>Cisco</strong> <strong>Unity</strong> InboxYou can forward messages to other <strong>Cisco</strong> <strong>Unity</strong> subscribers, e-mail addresses, and public and privatedistribution lists. Messages that you or another <strong>Cisco</strong> <strong>Unity</strong> subscriber mark private cannot be forwardedto anyone from the <strong>Cisco</strong> <strong>Unity</strong> Inbox.You can forward a message as is or record an introduction that plays before the forwarded message. Youcan also choose from the following special delivery options:Mark UrgentMark PrivateRequest a HeardMessage Receipt forThis MessageThe message is sent before regular messages.Alerts the recipient to treat the message confidentially. <strong>Cisco</strong> <strong>Unity</strong> subscriberscannot forward private messages by phone or from the <strong>Cisco</strong> <strong>Unity</strong> Inbox.You are notified when the recipient opens the message.(Note that you may not be able to receive all types of receipts, even though the<strong>Cisco</strong> <strong>Unity</strong> Inbox allows you to request them. Ask your <strong>Cisco</strong> <strong>Unity</strong>administrator whether <strong>Cisco</strong> <strong>Unity</strong> is set up to send receipts to subscribers.)Do the following procedure to forward a voice message.To Forward a <strong>Voice</strong> MessageStep 1Step 2Step 3Step 4In the <strong>Cisco</strong> <strong>Unity</strong> Inbox, click the name of the sender.In the open message, click Forward.To address the message to additional recipients, you can either:• Enter subscriber names or their primary extensions, and/or e-mail addresses in the To, Cc, and Bccfields. Separate multiple names, extensions, and addresses with semicolons (;). For e-mailaddresses, enter the full e-mail address of the recipient (for example, @.com).• Click To, Cc, or Bcc to select recipients from the Address Book.If needed, click the Check Names icon on the right, then search for and select your recipients to resolvename and extension conflicts. (When the names are resolved, they appear as links above the To, Cc, orBcc fields.)TipStep 5Step 6You can click a link to remove an unwanted addressee.Select one or more special delivery options, if applicable.On the Media Master control bar, click Record and record the message with your chosen recordingdevice:PhoneMultimediamicrophonePick up the handset when the phone rings, wait for the tone, then speak into the handset.Speak into the microphone.Step 7When you finish recording, click Stop.12-8<strong>Cisco</strong> <strong>Unity</strong> 4.0(5) and Later <strong>Voice</strong> <strong>Messaging</strong> <strong>User</strong> <strong>Guide</strong> (With Microsoft Exchange)OL-7374-01
Chapter 12Sending and Responding to MessagesForwarding a <strong>Voice</strong> Message from Your <strong>Cisco</strong> <strong>Unity</strong> InboxTo review your message before you send it, click Play on the Media Master control bar, or click Recordto rerecord the message.Step 8Click Send.Related Topics• Changing Recording and Playback Settings, page 15-1• Changing Private List Settings, page 20-1OL-7374-01<strong>Cisco</strong> <strong>Unity</strong> 4.0(5) and Later <strong>Voice</strong> <strong>Messaging</strong> <strong>User</strong> <strong>Guide</strong> (With Microsoft Exchange)12-9
Forwarding a <strong>Voice</strong> Message from Your <strong>Cisco</strong> <strong>Unity</strong> InboxChapter 12Sending and Responding to Messages12-10<strong>Cisco</strong> <strong>Unity</strong> 4.0(5) and Later <strong>Voice</strong> <strong>Messaging</strong> <strong>User</strong> <strong>Guide</strong> (With Microsoft Exchange)OL-7374-01
CHAPTER13Changing Personal SettingsPersonal settings control the information about you as a subscriber on <strong>Cisco</strong> <strong>Unity</strong> and some of thechoices you make for interacting with <strong>Cisco</strong> <strong>Unity</strong>.This chapter contains the following sections:• Changing Your Recorded Name, page 13-1• Changing Your Fax Delivery Phone Number, page 13-2• Setting Up Alternate Devices, page 13-3• Changing Your Directory Listing Status, page 13-4• Changing Your Phone Password, page 13-5Changing Your Recorded NameYour recorded name plays with messages that you leave for other subscribers and identifies you indirectory assistance. It also plays with any of your greetings that use system default recordings insteadof your own recordings.TipOther <strong>Cisco</strong> <strong>Unity</strong> subscribers also do not hear your alternate greeting when they send messages to youby phone. Whenever you enable your alternate greeting, consider re-recording your <strong>Cisco</strong> <strong>Unity</strong> voicename to let more people know when you are out of the office.This section contains two procedures. Do the applicable procedure to change your recorded name byphone (when using either standard or Optional conversation 1 styles) or from the <strong>Cisco</strong> <strong>Unity</strong> Assistant.Keypad mappings for other conversation styles are documented in the “<strong>Cisco</strong> <strong>Unity</strong> Phone Menus andShortcuts” chapter. Ask your <strong>Cisco</strong> <strong>Unity</strong> administrator which conversation style you are set up to use.To Change Your Recorded Name by Phone (Standard and Optional Conversation 1 Styles)Step 1Log on to <strong>Cisco</strong> <strong>Unity</strong>.Step 2 Press 4 3 2.Step 3At the tone, record your name, or press * to keep the current recording. Use the following keys as yourecord.OL-7374-01<strong>Cisco</strong> <strong>Unity</strong> 4.0(5) and Later <strong>Voice</strong> <strong>Messaging</strong> <strong>User</strong> <strong>Guide</strong> (With Microsoft Exchange)13-1
Changing Your Fax Delivery Phone NumberChapter 13Changing Personal SettingsKey Task Key Task8 Pause or resume # End recordingTable 13-1Use These Keys AnytimeKey Task Key Task* Cancel or back up 0 HelpTo Record or Modify Your Recorded Name from the <strong>Cisco</strong> <strong>Unity</strong> AssistantStep 1Step 2In the <strong>Cisco</strong> <strong>Unity</strong> Assistant, on the Preferences menu, click Personal.On the Media Master control bar, click Record and record your name with your chosen recording device:PhoneMultimediamicrophonePick up the handset when the phone rings, wait for the tone, then speak into the handset.Speak into the microphone.Step 3Step 4When you finish recording, click Stop.Click Save.Related Topics• Changing Recording and Playback Settings, page 15-1• <strong>Cisco</strong> <strong>Unity</strong> Personal Greetings, page 16-1Changing Your Fax Delivery Phone NumberIf you are using the text-to-speech option, you can have your fax messages delivered to a fax machinewhen you check messages by phone. You also can change the phone number to which your faxes aredelivered.Depending on how <strong>Cisco</strong> <strong>Unity</strong> is set up, you may not be able to enter certain phone numbers. To specifya fax delivery number, use digits 0 through 9. You can also use:• , (comma) to insert a one-second pause.• # and * to correspond to the # and * keys on the phone.Do not use spaces, dashes, or parentheses between digits. Begin with any access code needed to makean external call (for example, 9). For long-distance numbers, also include 1 and the area code.13-2<strong>Cisco</strong> <strong>Unity</strong> 4.0(5) and Later <strong>Voice</strong> <strong>Messaging</strong> <strong>User</strong> <strong>Guide</strong> (With Microsoft Exchange)OL-7374-01
Chapter 13Changing Personal SettingsSetting Up Alternate DevicesThis section contains two procedures. Do the applicable procedure to change your fax delivery phonenumber by phone (when using either standard or Optional conversation 1 styles) or from the <strong>Cisco</strong> <strong>Unity</strong>Assistant.Keypad mappings for other conversation styles are documented in the “<strong>Cisco</strong> <strong>Unity</strong> Phone Menus andShortcuts” chapter. Ask your <strong>Cisco</strong> <strong>Unity</strong> administrator which conversation style you are set up to use.To Change Your Fax Delivery Phone Number by Phone (Standard and Optional Conversation 1 Styles)Step 1 Log on to <strong>Cisco</strong> <strong>Unity</strong>.Step 2 Press 4 2 2.Step 3 After you hear the current phone number, press the applicable key:Key Task1 Keep the current number.2 Enter a new number.Table 13-2Use These Keys AnytimeKey Task Key Task* Cancel or back up 0 HelpTo Change Your Fax Delivery Phone Number from the <strong>Cisco</strong> <strong>Unity</strong> AssistantStep 1Step 2Step 3In the <strong>Cisco</strong> <strong>Unity</strong> Assistant, on the Preferences menu, click Personal.On the Personal Preferences page, in the Fax Delivery Number field, enter the phone number to whichyou usually want your faxes sent. (The fax ID field is the number which callers use to send you faxes.)Click Save.Setting Up Alternate DevicesIn addition to your primary extension, your <strong>Cisco</strong> <strong>Unity</strong> administrator may set up alternate extensionsfor you, and may also allow you to do so in the <strong>Cisco</strong> <strong>Unity</strong> Assistant. Administrators set up alternateextensions for various reasons, such as handling multiple line appearances on subscriber phones orsimplifying message addressing for subscribers on different <strong>Cisco</strong> <strong>Unity</strong> servers.You may want to use alternate extensions to make calling <strong>Cisco</strong> <strong>Unity</strong> from an alternate device, such asa cell phone, a home phone, or a phone at another work site more convenient. When you specify thephone number for an alternative device in the <strong>Cisco</strong> <strong>Unity</strong> Assistant, <strong>Cisco</strong> <strong>Unity</strong> handles all calls fromthat number in the same way that it handles calls from your primary extension (assuming that thealternate phone number is passed along to <strong>Cisco</strong> <strong>Unity</strong> from the phone system). This means thatOL-7374-01<strong>Cisco</strong> <strong>Unity</strong> 4.0(5) and Later <strong>Voice</strong> <strong>Messaging</strong> <strong>User</strong> <strong>Guide</strong> (With Microsoft Exchange)13-3
Changing Your Directory Listing StatusChapter 13Changing Personal Settings<strong>Cisco</strong> <strong>Unity</strong> associates the alternate phone number with your account, and when such phones are set toforward to <strong>Cisco</strong> <strong>Unity</strong>, callers can listen to your greeting, and leave messages for you, just as they wouldwhen dialing your primary extension.Depending on how <strong>Cisco</strong> <strong>Unity</strong> is set up, you may be able to use the Personal Preferences page in the<strong>Cisco</strong> <strong>Unity</strong> Assistant to:• View the alternate extensions that your <strong>Cisco</strong> <strong>Unity</strong> administrator specified for you.• Specify phone numbers for up to five alternate devices, in addition to those that your <strong>Cisco</strong> <strong>Unity</strong>administrator specified for you.Do the following procedure to set up alternate devices in the <strong>Cisco</strong> <strong>Unity</strong> Assistant.To Set Up Alternate DevicesStep 1Step 2Step 3In the <strong>Cisco</strong> <strong>Unity</strong> Assistant, on the Preferences menu, click Personal.In the Alternate Devices table, enter an extension up to 30 characters in length in the Number field.When entering numbers in the Alternate Devices table, consider the following:• Each alternate extension that you add must be unique; <strong>Cisco</strong> <strong>Unity</strong> will not accept an extension thatis already assigned to another subscriber (either as a primary or alternate extension) or to another<strong>Cisco</strong> <strong>Unity</strong> entity (such as a public distribution list).• Enter digits 0 through 9. Do not use spaces, dashes, or parentheses.• You may also be able to enter a valid alias for a SIP URL. For example, if the URL isSIP:aabade@cisco.com, enter aabade. Talk to your <strong>Cisco</strong> <strong>Unity</strong> administrator to learn more.Optionally, enter a description for the device. For example, you might enter, “Mobile work phone” or“My personal cell phone.”Step 4 To specify another device, click the Add Row button and repeat Step 2 and Step 3.Step 5Click Save. The alternate devices you specified are enabled for all rows in the table.Changing Your Directory Listing StatusYou can choose whether to be listed in the directory. When you are listed in the directory, callers whodo not know your extension can reach you by finding your name in directory assistance.NoteYou must have a recorded name to be listed in the directory.This section contains two procedures. Do the applicable procedure to change your directory listing statusby phone (when using either standard or Optional conversation 1 styles) or from the <strong>Cisco</strong> <strong>Unity</strong>Assistant.Keypad mappings for other conversation styles are documented in the “<strong>Cisco</strong> <strong>Unity</strong> Phone Menus andShortcuts” chapter. Ask your <strong>Cisco</strong> <strong>Unity</strong> administrator which conversation style you are set up to use.To Change Your Directory Listing Status by Phone (Standard and Optional Conversation 1 Styles)Step 1Log on to <strong>Cisco</strong> <strong>Unity</strong>.13-4<strong>Cisco</strong> <strong>Unity</strong> 4.0(5) and Later <strong>Voice</strong> <strong>Messaging</strong> <strong>User</strong> <strong>Guide</strong> (With Microsoft Exchange)OL-7374-01
Chapter 13Changing Personal SettingsChanging Your Phone PasswordStep 2 Press 4 3 1.Step 3Press the applicable key:Key Task1 Change your listing status.2 Keep your current listing status.Table 13-3Use These Keys AnytimeKey Task Key Task* Cancel or back up 0 HelpTo Change Your Directory Listing Status from the <strong>Cisco</strong> <strong>Unity</strong> AssistantStep 1Step 2Step 3In the <strong>Cisco</strong> <strong>Unity</strong> Assistant, on the Preferences menu, click Personal.Check the List In Phone Directory check box to be listed.OrUncheck the List In Phone Directory check box to not be listed.Click Save.Related Topics• Changing Your Recorded Name, page 13-1• Changing Recording and Playback Settings, page 15-1Changing Your Phone PasswordYour phone password protects the privacy of your messages and secures your <strong>Cisco</strong> <strong>Unity</strong> account fromunauthorized access. You can change your phone password at any time.When you change your phone password, follow the security guidelines provided by your <strong>Cisco</strong> <strong>Unity</strong>administrator. In general, shorter passwords are easier to use, but longer passwords are more secure,especially when you specify a nontrivial password.A nontrivial password means that:• The password is not the same as previous passwords.• The digits are not all the same (for example, 9999), nor are repeated (for example, 99911).• The digits are not consecutive in either ascending or descending order (for example, 1234 or 4321).• The password is not the same as your extension, nor does it spell your name.OL-7374-01<strong>Cisco</strong> <strong>Unity</strong> 4.0(5) and Later <strong>Voice</strong> <strong>Messaging</strong> <strong>User</strong> <strong>Guide</strong> (With Microsoft Exchange)13-5
Changing Your Phone PasswordChapter 13Changing Personal SettingsTo Change Your Phone Password from the <strong>Cisco</strong> <strong>Unity</strong> AssistantStep 1 In the <strong>Cisco</strong> <strong>Unity</strong> Assistant, on the Preferences menu, click Personal.Step 2 In the New Password box, enter a password. Enter digits 0 through 9.Step 3 In the Confirm New Password box, enter the password again.Step 4 Click Save.Related TopicSecuring and Changing Your <strong>Cisco</strong> <strong>Unity</strong> Passwords, page 5-113-6<strong>Cisco</strong> <strong>Unity</strong> 4.0(5) and Later <strong>Voice</strong> <strong>Messaging</strong> <strong>User</strong> <strong>Guide</strong> (With Microsoft Exchange)OL-7374-01
CHAPTER14Changing Phone Menu PreferencesPhone menu settings control how you interact with <strong>Cisco</strong> <strong>Unity</strong> by phone. By using them in conjunctionwith message playback settings, you can customize many aspects of the <strong>Cisco</strong> <strong>Unity</strong> conversation.This chapter contains the following sections:• Changing Your <strong>Cisco</strong> <strong>Unity</strong> Conversation Language, page 14-1• Changing Your <strong>Cisco</strong> <strong>Unity</strong> Conversation Menu Style, page 14-2• Changing the Volume of the <strong>Cisco</strong> <strong>Unity</strong> Conversation, page 14-2• Changing the Speed of the <strong>Cisco</strong> <strong>Unity</strong> Conversation, page 14-3• Changing the Time Format Used for Message Time Stamps, page 14-3• Changing Your Message Addressing Setting, page 14-4• Changing What <strong>Cisco</strong> <strong>Unity</strong> Plays When You Log On, page 14-4To learn more about the <strong>Cisco</strong> <strong>Unity</strong> conversation, see the “Working With <strong>Cisco</strong> <strong>Unity</strong> by Phone” sectionon page 3-1.Changing Your <strong>Cisco</strong> <strong>Unity</strong> Conversation LanguageDepending on how <strong>Cisco</strong> <strong>Unity</strong> is set up, you may be able to select the language in which you hear the<strong>Cisco</strong> <strong>Unity</strong> conversation. (Your <strong>Cisco</strong> <strong>Unity</strong> administrator sets the language in which callers hear the<strong>Cisco</strong> <strong>Unity</strong> conversation.)You change your conversation language only from the <strong>Cisco</strong> <strong>Unity</strong> Assistant, not by phone.To Change Your <strong>Cisco</strong> <strong>Unity</strong> Conversation LanguageStep 1Step 2Step 3In the <strong>Cisco</strong> <strong>Unity</strong> Assistant, on the Preferences menu, click Phone Menu.In the Language list, click the language in which you want to hear the <strong>Cisco</strong> <strong>Unity</strong> conversation.Scroll to the bottom of the page, and click Save.OL-7374-01<strong>Cisco</strong> <strong>Unity</strong> 4.0(5) and Later <strong>Voice</strong> <strong>Messaging</strong> <strong>User</strong> <strong>Guide</strong> (With Microsoft Exchange)14-1
Changing Your <strong>Cisco</strong> <strong>Unity</strong> Conversation Menu StyleChapter 14Changing Phone Menu PreferencesChanging Your <strong>Cisco</strong> <strong>Unity</strong> Conversation Menu StyleYou can hear either full or brief menus when you access <strong>Cisco</strong> <strong>Unity</strong> by phone. Full menus providecomprehensive instructions, and brief menus provide abbreviated versions of full menus.This section contains two procedures. Do the applicable procedure to change the conversation menustyle by phone (when using either standard or Optional conversation 1 styles) or from the <strong>Cisco</strong> <strong>Unity</strong>Assistant.Keypad mappings for other conversation styles are documented in the “<strong>Cisco</strong> <strong>Unity</strong> Phone Menus andShortcuts” chapter. Ask your <strong>Cisco</strong> <strong>Unity</strong> administrator which conversation style you are set up to use.To Change Your <strong>Cisco</strong> <strong>Unity</strong> Menu Style by Phone (Standard and Optional Conversation 1 Styles)Step 1 Log on to <strong>Cisco</strong> <strong>Unity</strong>.Step 2 Press 4 2 3.Step 3 Press 1 to switch between full and brief menus.Table 14-1Use These Keys AnytimeKey Task Key Task* Cancel or back up 0 HelpTo Change Your <strong>Cisco</strong> <strong>Unity</strong> Menu Style from the <strong>Cisco</strong> <strong>Unity</strong> AssistantStep 1Step 2In the <strong>Cisco</strong> <strong>Unity</strong> Assistant, on the Preferences menu, click Phone Menu.On the Phone Menu Preferences page, in the Menu Style list, choose the menu style that you want tohear:FullBrief<strong>Cisco</strong> <strong>Unity</strong> plays comprehensive instructions; click if you are a new <strong>Cisco</strong> <strong>Unity</strong> user.<strong>Cisco</strong> <strong>Unity</strong> plays abbreviated versions of the full menus; click if you are a more experienceduser.Step 3Scroll to the bottom of the page, and click Save.Changing the Volume of the <strong>Cisco</strong> <strong>Unity</strong> ConversationDepending on how <strong>Cisco</strong> <strong>Unity</strong> is set up, you may be able to use the <strong>Cisco</strong> <strong>Unity</strong> Assistant to set thevolume level at which you hear the <strong>Cisco</strong> <strong>Unity</strong> conversation. You can also adjust the volumetemporarily from most phones.14-2<strong>Cisco</strong> <strong>Unity</strong> 4.0(5) and Later <strong>Voice</strong> <strong>Messaging</strong> <strong>User</strong> <strong>Guide</strong> (With Microsoft Exchange)OL-7374-01
Chapter 14Changing Phone Menu PreferencesChanging the Speed of the <strong>Cisco</strong> <strong>Unity</strong> ConversationNoteThe volume that you specify here does not affect the volume of recorded voice names, messages, orsubscriber greetings.To Change the Volume for the <strong>Cisco</strong> <strong>Unity</strong> ConversationStep 1Step 2Step 3In the <strong>Cisco</strong> <strong>Unity</strong> Assistant, on the Preferences menu, click Phone Menu.In the Volume list, click the level at which you want to hear the <strong>Cisco</strong> <strong>Unity</strong> conversation.Scroll to the bottom of the page, and click Save.Related TopicChanging Playback Volume for Messages, page 15-2Changing the Speed of the <strong>Cisco</strong> <strong>Unity</strong> ConversationDepending on how <strong>Cisco</strong> <strong>Unity</strong> is set up, you may be able to use the <strong>Cisco</strong> <strong>Unity</strong> Assistant to set thespeed at which you hear the <strong>Cisco</strong> <strong>Unity</strong> conversation.NoteThe speed that you specify here does not affect the speed of recorded voice names, messages, orsubscriber greetings.To Change the <strong>Cisco</strong> <strong>Unity</strong> Conversation SpeedStep 1Step 2Step 3In the <strong>Cisco</strong> <strong>Unity</strong> Assistant, on the Preferences menu, click Phone Menu.In the Speed list, click the level at which you want to hear the <strong>Cisco</strong> <strong>Unity</strong> conversation.Scroll to the bottom of the page, and click Save.Related TopicChanging Playback Speed for Messages, page 15-4Changing the Time Format Used for Message Time StampsYou can select the time format used for the message time stamps that you hear when you listen to yourmessages by phone. The following time formats are available:12-Hour Clock24-Hour ClockYou hear “1:00 p.m.” when listening to the time stamp for a message left at 1:00 p.m.You hear “1300” when listening to the time stamp for a message left at 1:00 p.m.OL-7374-01<strong>Cisco</strong> <strong>Unity</strong> 4.0(5) and Later <strong>Voice</strong> <strong>Messaging</strong> <strong>User</strong> <strong>Guide</strong> (With Microsoft Exchange)14-3
Changing Your Message Addressing SettingChapter 14Changing Phone Menu PreferencesYou change your time-stamp preference only from the <strong>Cisco</strong> <strong>Unity</strong> Assistant, not by phone.To Change the Time Format Used for Message Time StampsStep 1Step 2Step 3In the <strong>Cisco</strong> <strong>Unity</strong> Assistant, on the Preferences menu, click Phone Menu.On the Phone Menu Preferences page, in the Time Format list, choose the time format that you want touse.Scroll to the bottom of the page, and click Save.Related Topics• What You Hear When You Check Messages, page 18-1• Changing What <strong>Cisco</strong> <strong>Unity</strong> Plays Before and After a Message, page 18-5Changing Your Message Addressing Setting<strong>Cisco</strong> <strong>Unity</strong> provides two ways to address messages to other subscribers by using your phone keypad:• Spell a subscriber name.• Enter a subscriber extension.You change the message addressing setting that <strong>Cisco</strong> <strong>Unity</strong> uses by default only from the <strong>Cisco</strong> <strong>Unity</strong>Assistant, not by phone. Depending on how <strong>Cisco</strong> <strong>Unity</strong> is set up, you may be able to switch betweenspelling and number entry by pressing ## when you are prompted to address a message over thephone—regardless of the message addressing setting that you choose in the <strong>Cisco</strong> <strong>Unity</strong> Assistant.To Change Your Message Addressing SettingStep 1Step 2Step 3In the <strong>Cisco</strong> <strong>Unity</strong> Assistant, on the Preferences menu, click Phone Menu.On the Phone Menu Preferences page, in the When Addressing a Message Let Me Identify a SubscriberBy section, click the option that you want to use as the default for messages that you send.Scroll to the bottom of the page, and click Save.Changing What <strong>Cisco</strong> <strong>Unity</strong> Plays When You Log OnYou can control what <strong>Cisco</strong> <strong>Unity</strong> plays when you log on by phone:• You can choose whether or not <strong>Cisco</strong> <strong>Unity</strong> plays your recorded name.• You can choose the types of messages for which <strong>Cisco</strong> <strong>Unity</strong> announces count totals when you checkmessages by phone.14-4<strong>Cisco</strong> <strong>Unity</strong> 4.0(5) and Later <strong>Voice</strong> <strong>Messaging</strong> <strong>User</strong> <strong>Guide</strong> (With Microsoft Exchange)OL-7374-01
Chapter 14Changing Phone Menu PreferencesChanging What <strong>Cisco</strong> <strong>Unity</strong> Plays When You Log OnYou change your logon conversation only from the <strong>Cisco</strong> <strong>Unity</strong> Assistant, not by phone.To Change Your Logon ConversationStep 1Step 2Step 3In the <strong>Cisco</strong> <strong>Unity</strong> Assistant, on the Preferences menu, click Phone Menu.On the Phone Menu Preferences page, in the After Logging On Play section, check the My RecordedName check box to hear your recorded name when you call <strong>Cisco</strong> <strong>Unity</strong> and log on.Uncheck the My Recorded Name check box to have <strong>Cisco</strong> <strong>Unity</strong> proceed directly to your message countwhen you call <strong>Cisco</strong> <strong>Unity</strong> and log on.In the For New Messages Play section, check any of the following check boxes, depending on themessage counts you want to hear and whether you have the text-to-speech and fax options:Message Count Totals<strong>Voice</strong> Message CountsE-mail Message Counts 1Fax Counts 2Check this check box to have <strong>Cisco</strong> <strong>Unity</strong> announce the total number of allmessages (voice, fax, and receipts).Check this check box to have <strong>Cisco</strong> <strong>Unity</strong> announce the number of voicemessages.Check this check box to have <strong>Cisco</strong> <strong>Unity</strong> announce the number of e-mailmessages.Check this check box to have <strong>Cisco</strong> <strong>Unity</strong> announce the number of faxmessages.1. Although e-mail counts are offered on the Phone Menu Preferences page, <strong>Cisco</strong> <strong>Unity</strong> plays e-mails only for Unified<strong>Messaging</strong> subscribers who also have the text-to-speech option.2. Although fax counts are offered on the Phone Menu Preferences page, <strong>Cisco</strong> <strong>Unity</strong> plays faxes only when the system is usingthe fax option. Note that with fax messages, <strong>Cisco</strong> <strong>Unity</strong> plays only message properties, such as the sender, date, and time.Step 4Step 5In the For Saved Messages Play section, check the Message Count Totals check box to have <strong>Cisco</strong> <strong>Unity</strong>announce the total number of all saved messages (voice, fax, and receipt messages).Click Save.Related Topics• What You Hear When You Check Messages, page 18-1• Changing Your Recorded Name, page 13-1OL-7374-01<strong>Cisco</strong> <strong>Unity</strong> 4.0(5) and Later <strong>Voice</strong> <strong>Messaging</strong> <strong>User</strong> <strong>Guide</strong> (With Microsoft Exchange)14-5
Changing What <strong>Cisco</strong> <strong>Unity</strong> Plays When You Log OnChapter 14Changing Phone Menu Preferences14-6<strong>Cisco</strong> <strong>Unity</strong> 4.0(5) and Later <strong>Voice</strong> <strong>Messaging</strong> <strong>User</strong> <strong>Guide</strong> (With Microsoft Exchange)OL-7374-01
CHAPTER15Changing Recording and Playback SettingsRecording and playback settings allow you to control which devices you use to record and playmessages, and to change playback volume and adjust playback speed.This chapter contains the following sections:• Choosing Recording and Playback Devices, page 15-1• Changing Playback Volume for Messages, page 15-2• Changing Playback Speed for Messages, page 15-4Choosing Recording and Playback DevicesYou can choose the devices you use for recording and playback in <strong>Cisco</strong> <strong>Unity</strong>:RecordingPlaybackYou speak into your phone or into a multimedia microphone (if your computer has one).You hear recordings through your phone or through multimedia speakers (if yourcomputer has them).NoteIf you play messages through multimedia speakers while working in alow-bandwidth environment, sound quality may suffer. To improve sound qualitywhen using the <strong>Cisco</strong> <strong>Unity</strong> Inbox, ask your <strong>Cisco</strong> <strong>Unity</strong> administrator forassistance.The phone offers the best sound quality for recordings. By default, the Media Master control bar usesthe phone as the recording and playback device.Do the following procedure to choose recording and playback devices from any Media Master controlbar.Note that updates to the Media Master are saved per user, per computer. If you also use another computerto access the Media Master (for example, a computer at home), you need to update the Media Mastersettings on the second computer as well.To Choose Recording and Playback Devices from a Media Master Control BarStep 1Step 2Access the <strong>Cisco</strong> <strong>Unity</strong> Assistant.In the <strong>Cisco</strong> <strong>Unity</strong> Assistant, go to a page that contains a Media Master control bar. (For example, on thePreferences menu, click Personal to use the one in the Recorded Name field.)OL-7374-01<strong>Cisco</strong> <strong>Unity</strong> 4.0(5) and Later <strong>Voice</strong> <strong>Messaging</strong> <strong>User</strong> <strong>Guide</strong> (With Microsoft Exchange)15-1
Changing Playback Volume for MessagesChapter 15Changing Recording and Playback SettingsStep 3On the Options menu, click either Playback Devices or Recording Devices, and choose the device thatyou want to use in the list.The option refers to the recording and playback devices that are set for yourcomputer (on the Windows Start menu, click Settings > Control Panel > Sounds and Multimedia). Referto Windows Help for more information on preferred devices.3455467Step 4If you chose Phone for your playback or recording device, confirm that the phone information is correct:a. On the Options menu, click Options.b. In the dialog box, confirm that your extension and the name of your <strong>Cisco</strong> <strong>Unity</strong> server is correct.(If you do not know the server name, contact your <strong>Cisco</strong> <strong>Unity</strong> administrator.)c. Click OK.Changing Playback Volume for MessagesYou can adjust the playback volume of your messages in several ways. As you listen to a message byphone, you can adjust the volume by using the phone keypad (the change does not affect the playbackvolume of other messages). To adjust the playback volume for all messages that you listen to by usingthe phone, you use the Volume setting in the <strong>Cisco</strong> <strong>Unity</strong> Assistant.To adjust the volume of the messages that you listen to through your computer speakers, you use a MediaMaster control bar.Do the applicable procedure to change playback volume by phone, from the <strong>Cisco</strong> <strong>Unity</strong> Assistant, orfrom any Media Master control bar.This section contains two procedures to change playback volume by phone. Do the first procedure, “ToChange Playback Volume by Phone (Standard Conversation Style),” to check messages when<strong>Cisco</strong> <strong>Unity</strong> is set up to play the standard conversation. Do the second procedure, “To Change PlaybackVolume by Phone (Optional Conversation 1 Style),” when <strong>Cisco</strong> <strong>Unity</strong> is set up to play OptionalConversation 1.Keypad mappings for other conversation styles are documented in the “<strong>Cisco</strong> <strong>Unity</strong> Phone Menus andShortcuts” chapter. Ask your <strong>Cisco</strong> <strong>Unity</strong> administrator which conversation style you are set up to use.NoteThe volume that you specify here does not affect the volume of the <strong>Cisco</strong> <strong>Unity</strong> conversation, recordedvoice names, or subscriber greetings.15-2<strong>Cisco</strong> <strong>Unity</strong> 4.0(5) and Later <strong>Voice</strong> <strong>Messaging</strong> <strong>User</strong> <strong>Guide</strong> (With Microsoft Exchange)OL-7374-01
Chapter 15Changing Recording and Playback SettingsChanging Playback Volume for MessagesTo Change Playback Volume by Phone (Standard Conversation Style)While listening to a message, toggle among these volume settings to adjust the volume of the message:Press 5 oncePress 5 againPress 5 againIncreases the volume.Decreases the volume.Returns the volume to normal.To Change Playback Volume by Phone (Optional Conversation 1 Style)While listening to a message, toggle among these volume settings to adjust the volume of the message:Press 9Press 7Press 8Increase the volume.Decrease the volume.Return the volume to normal.To Change Playback Volume from the <strong>Cisco</strong> <strong>Unity</strong> AssistantStep 1Step 2Step 3In the <strong>Cisco</strong> <strong>Unity</strong> Assistant, on the Preferences menu, click Phone Menu.In the Volume list, click Low, Medium, or High to select the playback volume for all messages that youlisten to by phone.Scroll to the bottom of the page, and click Save.To Change Playback Volume from a Media Master Control BarStep 1Step 2Step 3Step 4Access the <strong>Cisco</strong> <strong>Unity</strong> Assistant.In the <strong>Cisco</strong> <strong>Unity</strong> Assistant, go to a page that contains a Media Master control bar. (For example, on thePreferences menu, click Personal to use the one in the Recorded Name field.)On the Media Master control bar, click and drag the Volume Control slider to decrease or increaseplayback volume, as desired.Play the recording to save the volume setting for all messages that you listen to through your computerspeakers.Related TopicChanging the Volume of the <strong>Cisco</strong> <strong>Unity</strong> Conversation, page 14-2OL-7374-01<strong>Cisco</strong> <strong>Unity</strong> 4.0(5) and Later <strong>Voice</strong> <strong>Messaging</strong> <strong>User</strong> <strong>Guide</strong> (With Microsoft Exchange)15-3
Changing Playback Speed for MessagesChapter 15Changing Recording and Playback SettingsChanging Playback Speed for MessagesYou can adjust the playback speed of your messages by phone or from a Media Master control bar. Asyou listen to a message by phone, you can adjust the playback speed by using the phone keypad (thechange does not affect the playback speed of other messages).To adjust the playback speed of all messages that you listen to through your computer speakers, you usea Media Master control bar in the <strong>Cisco</strong> <strong>Unity</strong> Inbox. Note that you cannot adjust playback speed fromthe <strong>Cisco</strong> <strong>Unity</strong> Assistant.This section contains two procedures. Do the applicable procedure to change your playback speed byphone (when using either standard or Optional conversation 1 styles) or from a Media Master control bar.Keypad mappings for other conversation styles are documented in the “<strong>Cisco</strong> <strong>Unity</strong> Phone Menus andShortcuts” chapter. Ask your <strong>Cisco</strong> <strong>Unity</strong> administrator which conversation style you are set up to use.NoteThe speed that you specify here does not affect the speed of the <strong>Cisco</strong> <strong>Unity</strong> conversation, recorded voicenames, or subscriber greetings.To Change Playback Speed by Phone (Standard and Optional Conversation 1 Styles)While listening to a message, toggle among the following speed settings:Press 4 oncePress 4 againPress 6 oncePress 6 againSlow playback.Slower playback.Fast playback.Faster playback.To Change Playback Speed from a Media Master Control BarStep 1Step 2Step 3Step 4Access your <strong>Cisco</strong> <strong>Unity</strong> Inbox.In your <strong>Cisco</strong> <strong>Unity</strong> Inbox, click the name of a message sender to open the message in a new window.On the Media Master control bar, click and drag the Speed Control slider for slower or faster playback,as desired.Play the recording to save the speed setting for all messages that you listen to with your computerspeakers.Related TopicChanging the Speed of the <strong>Cisco</strong> <strong>Unity</strong> Conversation, page 14-315-4<strong>Cisco</strong> <strong>Unity</strong> 4.0(5) and Later <strong>Voice</strong> <strong>Messaging</strong> <strong>User</strong> <strong>Guide</strong> (With Microsoft Exchange)OL-7374-01
CHAPTER16Changing Greeting Settings<strong>Cisco</strong> <strong>Unity</strong> allows you to record up to five personal greetings. You can enable as many greetings as youwant, and you can specify how long you want a greeting enabled.This chapter contains the following sections:• <strong>Cisco</strong> <strong>Unity</strong> Personal Greetings, page 16-1• Enabling, Recording, and Disabling a Greeting, page 16-2<strong>Cisco</strong> <strong>Unity</strong> Personal GreetingsTable 16-1 describes the available greetings. Note that <strong>Cisco</strong> <strong>Unity</strong> plays the greetings that you enablefor the applicable situation, while some greetings override other greetings when they are enabled.Table 16-1Alternate Greeting<strong>Cisco</strong> <strong>Unity</strong> GreetingsEnable this greeting to play during a specific time period when you want to indicate specialcircumstances, such as when you are on vacation. (For example, “I will be out of the office until....”)As long as it is enabled, the alternate greeting overrides all other greetings.Your <strong>Cisco</strong> <strong>Unity</strong> administrator specifies whether <strong>Cisco</strong> <strong>Unity</strong> transfers callers to your greeting withoutringing your phone, whether callers are able to skip your greeting, and whether callers can leave you amessage when your alternate greeting is enabled. The Alternate Greeting page in the <strong>Cisco</strong> PCAindicates the caller options that your administrator has enabled for you. It is important to note that calleroptions do not apply when an outsider caller or another subscriber dials your extension directly.TipOther <strong>Cisco</strong> <strong>Unity</strong> subscribers also do not hear your alternate greeting when they send messagesto you by phone. In addition to enabling your alternate greeting, consider re-recording your<strong>Cisco</strong> <strong>Unity</strong> voice name to let more people know when you are out of the office. Your recordedname plays when subscribers address messages to you and when callers look you up in directoryassistance. See the “Changing Your Recorded Name” section on page 13-1.The <strong>Cisco</strong> PCA displays a reminder when you have your alternate greeting turned on. Depending onhow <strong>Cisco</strong> <strong>Unity</strong> is set up, <strong>Cisco</strong> <strong>Unity</strong> may also play a prompt to remind you when your alternategreeting is enabled after you log on by phone.OL-7374-01<strong>Cisco</strong> <strong>Unity</strong> 4.0(5) and Later <strong>Voice</strong> <strong>Messaging</strong> <strong>User</strong> <strong>Guide</strong> (With Microsoft Exchange)16-1
Enabling, Recording, and Disabling a GreetingChapter 16Changing Greeting SettingsTable 16-1Busy GreetingInternal GreetingClosed (Off Hours)GreetingStandard Greeting<strong>Cisco</strong> <strong>Unity</strong> Greetings (continued)Enable this greeting to indicate when you are on the phone. (For example, “I am currently on anotherline, please leave a message....”)As long as it is enabled, the busy greeting overrides the standard, closed, and internal greetings whenyour phone is busy.Note that not all phone systems provide the support necessary for the <strong>Cisco</strong> <strong>Unity</strong> busy greeting to work.For assistance, talk to your <strong>Cisco</strong> <strong>Unity</strong> administrator.Enable this greeting to provide information that coworkers need to know. (For example, “I will be inconference room B until noon today....”)As long as it is enabled, the internal greeting overrides the standard and off-hours greetings, and playsonly to callers within your organization when you do not answer your phone.Note that not all phone systems provide the support necessary for the <strong>Cisco</strong> <strong>Unity</strong> internal greeting towork. For assistance, talk to your <strong>Cisco</strong> <strong>Unity</strong> administrator.Enable this greeting if you want <strong>Cisco</strong> <strong>Unity</strong> to play a special greeting during the nonwork hours thatyour <strong>Cisco</strong> <strong>Unity</strong> administrator specified for your organization. (For example, “Sorry, I am not availableto answer your call. Company office hours are...”)As long as it is enabled, the closed greeting overrides the standard greeting during nonbusiness hours.This greeting plays during the work hours that your <strong>Cisco</strong> <strong>Unity</strong> administrator specified for yourorganization, or in other situations when no other greeting is enabled.By design, the standard greeting cannot be disabled.<strong>Cisco</strong> <strong>Unity</strong> prompts you to record the standard greeting when you enroll as a subscriber. (For example,“I am away from my desk right now...”)Enabling, Recording, and Disabling a GreetingYou can manage all five of your greetings by phone or from the <strong>Cisco</strong> <strong>Unity</strong> Assistant. When you enablea greeting, you specify how long you want it enabled. <strong>Cisco</strong> <strong>Unity</strong> will play the greeting in the applicablesituation until the date and time that you specified arrives, and then the greeting is automaticallydisabled. For example, you can set your alternate greeting to stop playing on the day that you return froma vacation. You can also enable a greeting to play indefinitely, which is useful when you enable a busyor a closed greeting.You choose from one of the following sources to specify what callers hear when a greeting is enabled:My Personal GreetingSystem Greeting<strong>Cisco</strong> <strong>Unity</strong> plays a greeting that you record.<strong>Cisco</strong> <strong>Unity</strong> plays a prerecorded greeting along with your recorded name (forexample, “Sorry, is not available”). If you do not have arecorded name, <strong>Cisco</strong> <strong>Unity</strong> plays your extension instead.When a greeting is enabled but not recorded, <strong>Cisco</strong> <strong>Unity</strong> plays a prerecordedsystem greeting.NoteRecording a greeting does not enable it.16-2<strong>Cisco</strong> <strong>Unity</strong> 4.0(5) and Later <strong>Voice</strong> <strong>Messaging</strong> <strong>User</strong> <strong>Guide</strong> (With Microsoft Exchange)OL-7374-01
Chapter 16Changing Greeting SettingsEnabling, Recording, and Disabling a GreetingYou can disable a greeting at any time. When a greeting is disabled, <strong>Cisco</strong> <strong>Unity</strong> no longer plays it,though the recording is not erased. (However, note that if you enable the system greeting when youalready recorded a personal greeting, your personal greeting is no longer available by phone. Use the<strong>Cisco</strong> <strong>Unity</strong> Assistant to listen to and re-enable the last personal greeting that you recorded, or use eitherthe phone or the <strong>Cisco</strong> <strong>Unity</strong> Assistant to record and enable a new personal greeting.)This section contains several procedures. Do the applicable procedure to change your greetings by phone(when using standard or Optional conversation 1 styles) or from the <strong>Cisco</strong> <strong>Unity</strong> Assistant.Keypad mappings for other conversation styles are documented in the “<strong>Cisco</strong> <strong>Unity</strong> Phone Menus andShortcuts” chapter. Ask your <strong>Cisco</strong> <strong>Unity</strong> administrator which conversation style you are set up to use.To Rerecord Your Current Greeting by Phone (Standard and Optional Conversation 1 Styles)Step 1Log on to <strong>Cisco</strong> <strong>Unity</strong>.Step 2 Press 4 1.Step 3After <strong>Cisco</strong> <strong>Unity</strong> plays your current greeting, press 1 to rerecord it. Then use the following keys as yourecord.Key Task Key Task8 Pause or resume # End recordingTable 16-2Use These Keys AnytimeKey Task Key Task* Cancel or back up 0 HelpTo Enable and Disable Your Alternate Greeting by Phone (Standard and Optional Conversation 1 Styles)Step 1Log on to <strong>Cisco</strong> <strong>Unity</strong>.Step 2 Press 4 1.Step 3Step 4Step 5Press # to skip hearing your current greeting.Press 2 to enable or disable your alternate greeting. (When your alternate greeting is enabled, pressing2 disables it; when it is disabled, pressing 2 enables it.)If you enabled your alternate greeting, either:Press 1 to specify the day and time when you want <strong>Cisco</strong> <strong>Unity</strong> to disable it. When <strong>Cisco</strong> <strong>Unity</strong> promptsyou to enter a time of day, enter it by using either the 12- or 24-hour clock format.OrPress 2 to enable it indefinitely.OL-7374-01<strong>Cisco</strong> <strong>Unity</strong> 4.0(5) and Later <strong>Voice</strong> <strong>Messaging</strong> <strong>User</strong> <strong>Guide</strong> (With Microsoft Exchange)16-3
Enabling, Recording, and Disabling a GreetingChapter 16Changing Greeting SettingsTo Change Your Other Greetings by Phone (Standard and Optional Conversation 1 Styles)Step 1Log on to <strong>Cisco</strong> <strong>Unity</strong>.Step 2 Press 4 1.Step 3Step 4Press # to skip hearing your current greeting.Press 3 to edit settings for your other greetings. Then use the following keys to select the greeting thatyou want to change.Key Task1 Standard greeting2 Closed greeting3 Alternate greeting4 Busy greeting5 Internal greetingStep 5After <strong>Cisco</strong> <strong>Unity</strong> plays the greeting, use the following keys to change it.Key Task Key Task1 (Re)record * Cancel or back up2 Use system greeting 0 Help3 Enable/Disable greetingIf you rerecord your greeting, use the following keys as you record.Key Task Key Task8 Pause or resume # End recordingTo Change Your Greetings from the <strong>Cisco</strong> <strong>Unity</strong> AssistantStep 1 In the <strong>Cisco</strong> <strong>Unity</strong> Assistant, on the menu bar, click Greetings.Step 2 Click the greeting you want to change.Step 3 To enable the greeting, skip to Step 4.OrClick Disabled to disable it. Then skip to Step 6.Step 4 Choose one of the following options:• To enable the greeting to play indefinitely, click Enabled With No End Date and Time.16-4<strong>Cisco</strong> <strong>Unity</strong> 4.0(5) and Later <strong>Voice</strong> <strong>Messaging</strong> <strong>User</strong> <strong>Guide</strong> (With Microsoft Exchange)OL-7374-01
Chapter 16Changing Greeting SettingsEnabling, Recording, and Disabling a Greeting• To enable the greeting to play for a specified time, click Enabled Until, then enter the greetingexpiration date. <strong>Cisco</strong> <strong>Unity</strong> will automatically disable the greeting on the day and at the time youspecify.Step 5Choose what callers hear when the greeting is enabled:• To record your own greeting, click My Personal Greeting. Then, on the Media Master control bar,click Record and record your personal greeting with your chosen recording device:PhoneMultimediamicrophonePick up the handset when the phone rings, wait for the tone, then speak into the handset.Speak into the microphone.When you finish recording, click Stop.• To use the prerecorded system greeting, click System Default Greeting.• To use a blank recording, click Nothing.Step 6Click Save.Related TopicChanging Recording and Playback Settings, page 15-1OL-7374-01<strong>Cisco</strong> <strong>Unity</strong> 4.0(5) and Later <strong>Voice</strong> <strong>Messaging</strong> <strong>User</strong> <strong>Guide</strong> (With Microsoft Exchange)16-5
Enabling, Recording, and Disabling a GreetingChapter 16Changing Greeting Settings16-6<strong>Cisco</strong> <strong>Unity</strong> 4.0(5) and Later <strong>Voice</strong> <strong>Messaging</strong> <strong>User</strong> <strong>Guide</strong> (With Microsoft Exchange)OL-7374-01
CHAPTER17Changing Call Transfer and Screening OptionsCall transfer and screening settings control how <strong>Cisco</strong> <strong>Unity</strong> handles your incoming calls from callerswho did not dial you directly.Transfer and screening settings apply only when calls are routed to you from the main greeting recordedfor your organization, directory assistance, or a similar automated call handler that your <strong>Cisco</strong> <strong>Unity</strong>administrator set up to assist callers who dial the main phone number for your organization. This meansthat when an outside caller or another subscriber dials your extension to reach you by phone, your<strong>Cisco</strong> <strong>Unity</strong> transfer and screening settings do not apply.Table 17-1 describes the different types of settings.Table 17-1<strong>Cisco</strong> <strong>Unity</strong> Call Transfer and Screening SettingsCall Transfer SettingsCaller Message SettingsCall Screening Settings 1You can choose to answer calls from callers who do not dial you directly, oryou can have indirect calls routed to your greeting. When you choose toanswer indirect calls at your extension or at another extension you specify,you may also be able to indicate how you want <strong>Cisco</strong> <strong>Unity</strong> to handle thecalls when your phone is busy 1 .You can choose whether callers who do not dial you directly can edittheir messages and mark them urgent.You can choose to have <strong>Cisco</strong> <strong>Unity</strong> screen calls from callers who do notdial you directly. You can specify that <strong>Cisco</strong> <strong>Unity</strong> ask for the name of thecaller and play the name for you before connecting the call. <strong>Cisco</strong> <strong>Unity</strong> canalso tell you when it connects the call, or give you the option of taking anindirect call or routing it to your greeting for the caller to leave a message.1. Busy and screening settings are unavailable when <strong>Cisco</strong> <strong>Unity</strong> is not set up to handle indirect calls; for some organizations,the phone system handles both calls from callers who did not dial you directly and calls from callers who do.This chapter contains the following sections:• Changing Call Transfer Options, page 17-2• Changing Caller Message Options, page 17-3• Changing Your Call Screening Options, page 17-4TipTo set up call transfers for direct calls to your extension, talk to your <strong>Cisco</strong> <strong>Unity</strong> administrator. Yourdesk phone or even the phone system that your organization uses may offer transfer features that you canuse to manage direct calls.OL-7374-01<strong>Cisco</strong> <strong>Unity</strong> 4.0(5) and Later <strong>Voice</strong> <strong>Messaging</strong> <strong>User</strong> <strong>Guide</strong> (With Microsoft Exchange)17-1
Changing Call Transfer OptionsChapter 17Changing Call Transfer and Screening OptionsChanging Call Transfer OptionsCall transfer options allow you to choose to have indirect calls ring your extension, ring anotherextension or phone number that you specify, or you can have calls from callers who do not dial youtransferred directly to voice mail, so your phone does not ring at all. (When you send calls to voice mail,callers do not have to wait while your phone rings unanswered; your greeting plays immediately.)When you choose to answer indirect calls at your extension, you can indicate what you want <strong>Cisco</strong> <strong>Unity</strong>to do when your phone is busy. <strong>Cisco</strong> <strong>Unity</strong> provides the following options:Send Callers to <strong>Voice</strong> MailPut Callers on HoldWithout AskingAsk Callers to HoldWithout offering the option to hold, <strong>Cisco</strong> <strong>Unity</strong> plays your greeting, thenprompts the caller to leave a message.<strong>Cisco</strong> <strong>Unity</strong> puts the caller on hold and does not offer the option ofleaving a message.<strong>Cisco</strong> <strong>Unity</strong> gives the caller the options of holding or leaving a message.TipTo set up call transfers for direct calls to your extension, talk to your <strong>Cisco</strong> <strong>Unity</strong> administrator. Yourdesk phone or even the phone system that your organization uses may offer transfer features that you canuse to manage direct calls.This section contains two procedures. Do the applicable procedure to change your call transfer settingsby phone (when using standard or Optional conversation 1 styles) or from the <strong>Cisco</strong> <strong>Unity</strong> Assistant.Keypad mappings for other conversation styles are documented in the “<strong>Cisco</strong> <strong>Unity</strong> Phone Menus andShortcuts” chapter. Ask your <strong>Cisco</strong> <strong>Unity</strong> administrator which conversation style you are set up to use.To Change Call Transfer Settings by Phone (Standard and Optional Conversation 1 Styles)Step 1 Log on to <strong>Cisco</strong> <strong>Unity</strong>.Step 2 Press 4 4.Step 3 After <strong>Cisco</strong> <strong>Unity</strong> announces your current call transfer settings, use the following keys to change them.KeyTask1 Switch between transferring calls to a phone and to voice mail.2 Change your transfer phone number. To transfer calls to an external phone number, contactyour <strong>Cisco</strong> <strong>Unity</strong> administrator.NoteSimply changing your transfer number does not change whether calls are transferredto a phone or sent to voice mail. <strong>Cisco</strong> <strong>Unity</strong> transfers calls to your transfer numberonly if you also specify that <strong>Cisco</strong> <strong>Unity</strong> transfers your calls to a phone.17-2<strong>Cisco</strong> <strong>Unity</strong> 4.0(5) and Later <strong>Voice</strong> <strong>Messaging</strong> <strong>User</strong> <strong>Guide</strong> (With Microsoft Exchange)OL-7374-01
Chapter 17Changing Call Transfer and Screening OptionsChanging Caller Message OptionsTable 17-2Use These Keys AnytimeKey Task Key Task* Cancel or back up 0 HelpTo Change Call Transfer Settings from the <strong>Cisco</strong> <strong>Unity</strong> AssistantStep 1Step 2In the <strong>Cisco</strong> <strong>Unity</strong> Assistant, on the Preferences menu, click Transfer and Screening.In the Transfer Calls To field, choose whether to transfer calls to your extension, or another number, ortransfer calls directly to voice mail:• To transfer calls to your extension, click Extension .• To transfer calls to another number, click the radio button for the unlabeled box, then enter a transfernumber. (To transfer calls to an external phone number, such as a home or cell phone, contact your<strong>Cisco</strong> <strong>Unity</strong> administrator.)• To transfer calls directly to voice mail, click My Personal Greeting.NoteStep 3Step 4As a convenience, you can edit the transfer number in the unlabeled box even when you have specifiedthat <strong>Cisco</strong> <strong>Unity</strong> transfers calls to your extension or sent to voice mail. <strong>Cisco</strong> <strong>Unity</strong> will transfer calls tothe number in the box only if you also click the radio button adjacent to it.If you choose to transfer calls to your extension, in the If My Extension Is Busy list, choose how youwant <strong>Cisco</strong> <strong>Unity</strong> to handle calls when your phone is busy.Click Save.Changing Caller Message OptionsCaller message options allow you to choose what callers can do when they leave messages for you.<strong>Cisco</strong> <strong>Unity</strong> provides the following options:Callers Can Editthe MessageCallers Can Markthe Message as Urgent<strong>Cisco</strong> <strong>Unity</strong> gives callers the options of listening to, adding to, rerecording,or deleting their messages.<strong>Cisco</strong> <strong>Unity</strong> asks callers if they want to mark their messages urgent.You can change your caller message options only from the <strong>Cisco</strong> <strong>Unity</strong> Assistant, not by phone.To Change Caller Message OptionsStep 1In the <strong>Cisco</strong> <strong>Unity</strong> Assistant, on the Preferences menu, click Transfer and Screening.OL-7374-01<strong>Cisco</strong> <strong>Unity</strong> 4.0(5) and Later <strong>Voice</strong> <strong>Messaging</strong> <strong>User</strong> <strong>Guide</strong> (With Microsoft Exchange)17-3
Changing Your Call Screening OptionsChapter 17Changing Call Transfer and Screening OptionsStep 2Step 3Check or uncheck one or both of the Listen To And Re-Record The Message and Mark The MessageAs Urgent check boxes.Click Save.Changing Your Call Screening Options<strong>Cisco</strong> <strong>Unity</strong> provides the following call screening options:Tell You When the CallIs ConnectedTell You Who The CallIs ForAsk You If You WantTo Take the CallAsk for Caller’s NameCheck this box so that <strong>Cisco</strong> <strong>Unity</strong> tells you when it connects the call.<strong>Cisco</strong> <strong>Unity</strong> plays the recorded name attached to the dialed extension. Usethis setting when two or more people share a phone.<strong>Cisco</strong> <strong>Unity</strong> asks if you want to take the call or have the caller leavea message.<strong>Cisco</strong> <strong>Unity</strong> records the name of the caller and plays it for you beforeconnecting the call.TipTo set up call screening for direct calls to your extension, talk to your <strong>Cisco</strong> <strong>Unity</strong> administrator. Yourdesk phone or even the phone system that your organization uses may offer screening features that youcan use to manage direct calls.You can change your call screening options only from the <strong>Cisco</strong> <strong>Unity</strong> Assistant, not by phone.To Change Your Call Screening OptionsStep 1Step 2Step 3In the <strong>Cisco</strong> <strong>Unity</strong> Assistant, on the Preferences menu, click Transfer and Screening.In the Screen Calls section, check one or more boxes to change your screening options. When you do,consider the following:• If you want the option to decline a call for someone you share a phone with, check both the Tell MeWho the Call Is For and the Ask Me If I Want To Take The Call check boxes.• If you want the option to accept or decline calls based on the identity of the caller, check both theAsk Me If I Want To Take The Call and the Ask For Caller’s Name check boxes.• If you want the option of declining a call and routing it to your greeting after hearing the name ofthe caller, check both the Ask Me If I Want To Take The Call and the Ask For Caller’s Namecheck boxes.Click Save.17-4<strong>Cisco</strong> <strong>Unity</strong> 4.0(5) and Later <strong>Voice</strong> <strong>Messaging</strong> <strong>User</strong> <strong>Guide</strong> (With Microsoft Exchange)OL-7374-01
CHAPTER18Changing Message Playback SettingsYou use the <strong>Cisco</strong> <strong>Unity</strong> Assistant to specify your message playback preferences when you checkmessages by phone. You can use the message playback settings in conjunction with the phone menusettings in the <strong>Cisco</strong> <strong>Unity</strong> Assistant to customize many aspects of the <strong>Cisco</strong> <strong>Unity</strong> conversation.This chapter contains the following sections:• What You Hear When You Check Messages, page 18-1• Enabling the Message Type Menu, page 18-2• Changing Message Playback Order, page 18-3• Changing What <strong>Cisco</strong> <strong>Unity</strong> Plays Before and After a Message, page 18-5To learn more about the <strong>Cisco</strong> <strong>Unity</strong> conversation, see the “Working With <strong>Cisco</strong> <strong>Unity</strong> by Phone” sectionon page 3-1.Note<strong>Cisco</strong> <strong>Unity</strong> does not allow you to dictate what messages you do not want to hear over the phone. So,you cannot use the message playback preferences to cause <strong>Cisco</strong> <strong>Unity</strong> to play one type of message andnot play another type.What You Hear When You Check MessagesWhen you log on to <strong>Cisco</strong> <strong>Unity</strong> by phone, <strong>Cisco</strong> <strong>Unity</strong> plays your recorded name and then tells you howmany new and saved messages you have. After your message counts, <strong>Cisco</strong> <strong>Unity</strong> plays the Main menu:Key(s)Task1 Hear new messages2 Send a message3 Review saved messages4 Change setup options5 Find a message 11. Depending on how <strong>Cisco</strong> <strong>Unity</strong> is set up at your organization, Message Locator may not beavailable to you.OL-7374-01<strong>Cisco</strong> <strong>Unity</strong> 4.0(5) and Later <strong>Voice</strong> <strong>Messaging</strong> <strong>User</strong> <strong>Guide</strong> (With Microsoft Exchange)18-1
Enabling the Message Type MenuChapter 18Changing Message Playback SettingsOnce you choose to play either your new or old messages, <strong>Cisco</strong> <strong>Unity</strong> plays your messages in the orderyou specify in the <strong>Cisco</strong> <strong>Unity</strong> Assistant (first ordered by your choice of message type and urgency andthen ordered by the time that a message was sent). Alternatively, you can enable the Message Type menu,which <strong>Cisco</strong> <strong>Unity</strong> plays after you choose whether to play your new or old messages. The Message Typemenu allows you to choose which messages you want to hear by type.By default, <strong>Cisco</strong> <strong>Unity</strong> plays information about a message and the message sender before and afterplaying the message. What you hear about a message and the message sender depends on whether themessage was left by another subscriber or an unidentified caller, as indicated in Table 18-1.Table 18-1Message Information You HearWhen the Message Is From<strong>Cisco</strong> <strong>Unity</strong> subscriberUnidentified caller<strong>Cisco</strong> <strong>Unity</strong> PlaysMessage number, time stamp, and recorded name and/or extension of thesubscriber who left the message.Message number and time stamp.<strong>Cisco</strong> <strong>Unity</strong> may also play the phone number of the caller, if the numberis available and <strong>Cisco</strong> <strong>Unity</strong> is set up to do so by your administrator.You use the <strong>Cisco</strong> <strong>Unity</strong> Assistant to specify what information <strong>Cisco</strong> <strong>Unity</strong> plays about a message andthe message sender before and after playing messages.Related Topics• Changing What <strong>Cisco</strong> <strong>Unity</strong> Plays When You Log On, page 14-4• Changing the Time Format Used for Message Time Stamps, page 14-3• Enabling the Message Type Menu, page 18-2• Changing Message Playback Order, page 18-3• Changing What <strong>Cisco</strong> <strong>Unity</strong> Plays Before and After a Message, page 18-5Enabling the Message Type MenuWhen it is enabled, <strong>Cisco</strong> <strong>Unity</strong> plays the Message Type menu before it plays your new and savedmessages so that you can choose which messages you want to hear by type:KeyTask1 <strong>Voice</strong> messages2 E-mails 13 Faxes 24 Receipts 3# All messages1. Although the e-mail keys are available in the Message Type menu, <strong>Cisco</strong> <strong>Unity</strong> plays e-mailsonly for Unified <strong>Messaging</strong> subscribers who also have the text-to-speech option.2. Although the fax keys are available in the Message Type menu, <strong>Cisco</strong> <strong>Unity</strong> plays faxes onlywhen the system is using the fax option. Note that with fax messages, <strong>Cisco</strong> <strong>Unity</strong> plays onlymessage properties, such as the sender, date, and time.18-2<strong>Cisco</strong> <strong>Unity</strong> 4.0(5) and Later <strong>Voice</strong> <strong>Messaging</strong> <strong>User</strong> <strong>Guide</strong> (With Microsoft Exchange)OL-7374-01
Chapter 18Changing Message Playback SettingsChanging Message Playback Order3. Depending on how <strong>Cisco</strong> <strong>Unity</strong> is set up at your organization, you may not receive all types ofreceipts.For each type of message that you chose to hear, <strong>Cisco</strong> <strong>Unity</strong> plays the messages in the order that youspecify in the <strong>Cisco</strong> <strong>Unity</strong> Assistant.The Message Type menu is particularly handy when you want to check for a certain message type byphone, and not check any others. When the Message Type menu is disabled, you will not hear it. (Youwill also not hear the Message Type menu when you check deleted messages.) Instead, <strong>Cisco</strong> <strong>Unity</strong>simply plays your messages according to the order that you specify.To Enable the Message Type MenuStep 1Step 2Step 3In the <strong>Cisco</strong> <strong>Unity</strong> Assistant, on the Preferences menu, click Message Playback.Check the Message Type Menu check box.Scroll to the bottom of the page, and click Save.Changing Message Playback OrderYou can customize the message playback order for your new, saved, and deleted messages in the<strong>Cisco</strong> <strong>Unity</strong> Assistant. For new and saved messages, you can use the playback settings to sort messagesin order by message type (for example, voice, fax, or e-mail) and by message urgency. In this way, youcan specify that <strong>Cisco</strong> <strong>Unity</strong> plays your urgent voice messages first, then your urgent faxes, followed byyour normal voice messages, and so on.By default, new and saved messages are sorted by type in the following order:1. Urgent voice messages2. Normal voice messages3. Urgent faxes4. Normal faxes5. Urgent e-mails6. Normal e-mails7. Receipts and noticesExcept for receipts, note that the messages are sorted so that <strong>Cisco</strong> <strong>Unity</strong> plays the urgent messages foreach message type first. (Receipts are sorted only by the time that they were sent.)According to the order you specify for new and saved messages, <strong>Cisco</strong> <strong>Unity</strong> then plays the messagesfor each type according to the time that a message was sent, so that either the newest or oldest messagesare presented first for each message type. For deleted messages, you can indicate only whether<strong>Cisco</strong> <strong>Unity</strong> plays the newest or oldest message first, as <strong>Cisco</strong> <strong>Unity</strong> does not sort deleted messages bytype.NoteYou cannot change the playback order for Message Locator. When <strong>Cisco</strong> <strong>Unity</strong> finds messages based onthe criteria that you enter, they are presented to you in order of oldest to newest messages.OL-7374-01<strong>Cisco</strong> <strong>Unity</strong> 4.0(5) and Later <strong>Voice</strong> <strong>Messaging</strong> <strong>User</strong> <strong>Guide</strong> (With Microsoft Exchange)18-3
Changing Message Playback OrderChapter 18Changing Message Playback SettingsTable 18-2 lists the default order for new, saved, and deleted messages, regardless of type.Table 18-2Message StateNewSavedDeletedMessage Playback OrderDefault OrderOldest message firstNewest message firstNewest message firstTo illustrate how message playback order works, Table 18-3 shows the order in which <strong>Cisco</strong> <strong>Unity</strong> playsmessages when you listen to messages on a Thursday afternoon (based on the default order settings).Table 18-3Example of How Message Playback Order WorksNew Messages Saved Messages Deleted Messages 11. Urgent voice message sentTuesday at 10:30 a.m.2. Urgent voice message sentTuesday at 2:13 p.m.3. Normal voice message sentWednesday at noon.4. Normal voice message sentThursday at 8:30 a.m.5. Urgent e-mail message sentWednesday at 4:10 p.m.1. Urgent voice message sentTuesday at 2:13 p.m.2. Urgent voice message sentTuesday at 10:30 a.m.3. Normal voice message sentThursday 8:30 a.m.4. Normal voice message sentWednesday at noon.5. Urgent e-mail message sentWednesday at 4:10 p.m.1. Normal voice message sentThursday 8:30 a.m.2. Urgent e-mail message sentWednesday at 4:10 p.m.3. Normal voice message sentWednesday at noon.4. Urgent voice message sentTuesday at 2:13 p.m.5. Urgent voice message sentTuesday at 10:30 a.m.1. Depending on how <strong>Cisco</strong> <strong>Unity</strong> is set up, you may not be able to play deleted messages over the phone.You can set the order in which <strong>Cisco</strong> <strong>Unity</strong> plays your messages only from the <strong>Cisco</strong> <strong>Unity</strong> Assistant,not by phone.To Change Message Playback OrderStep 1Step 2Step 3Step 4Step 5Step 6In the <strong>Cisco</strong> <strong>Unity</strong> Assistant, on the Preferences menu, click Message Playback.In the New Message Play Order section, use the Move Up and Move Down buttons to put the list ofmessage types in the order that you want them played.On the Then By menu, click Newest First or Oldest First to specify the message order for all newmessages. (Note that this does not allow you to have a particular message type played.)In the Saved Message Play Order section, use the Move Up and Move Down buttons to put the list ofmessage types in the order that you want them played.On the Then By menu, click Newest First or Oldest First to specify the message order for all savedmessages.Scroll to the bottom of the page, and click Save.18-4<strong>Cisco</strong> <strong>Unity</strong> 4.0(5) and Later <strong>Voice</strong> <strong>Messaging</strong> <strong>User</strong> <strong>Guide</strong> (With Microsoft Exchange)OL-7374-01
Chapter 18Changing Message Playback SettingsChanging What <strong>Cisco</strong> <strong>Unity</strong> Plays Before and After a MessageChanging What <strong>Cisco</strong> <strong>Unity</strong> Plays Before and After a MessageBy default, <strong>Cisco</strong> <strong>Unity</strong> plays information about a message and the message sender before and afterplaying the message. You can change what you hear and when you hear it by using the <strong>Cisco</strong> <strong>Unity</strong>Assistant.You can specify whether you want <strong>Cisco</strong> <strong>Unity</strong> to play all, none, or a combination of the followingoptions before each message:Sender’s InformationMessage NumberTime the MessageWas SentIf available, <strong>Cisco</strong> <strong>Unity</strong> plays the recorded name of the subscriber who sent amessage. Depending on how <strong>Cisco</strong> <strong>Unity</strong> is set up, it may also play either thephone number of an unidentified caller (if available) or the extension of thesubscriber who sent the message.<strong>Cisco</strong> <strong>Unity</strong> announces the sequential number of a message. (For example,“Message 1, a voice message…Message 2, a voice message…”)Although you can turn off message counts in the <strong>Cisco</strong> <strong>Unity</strong> Assistant, it ishandy to know how many messages you have. (This is especially true for savedmessages as you can skip ahead or back to a particular saved message byentering the message number.)<strong>Cisco</strong> <strong>Unity</strong> announces the day, date, and time that a message was sent.The options are a subset of the message properties that <strong>Cisco</strong> <strong>Unity</strong> can play. You can also specifywhether you want <strong>Cisco</strong> <strong>Unity</strong> to play the time that a message was sent after each message.For receipts, the information that <strong>Cisco</strong> <strong>Unity</strong> plays differs slightly. Whether <strong>Cisco</strong> <strong>Unity</strong> plays thetime stamp and reason for a receipt before or after the list of recipient(s), depends on how manyrecipients are associated with the receipt:Table 18-4Receipt Information You HearRecipients Associated with Receipt Time Stamp and Reason Is Played1 After the recipient nameMore than 1Before the recipient listTo Change What <strong>Cisco</strong> <strong>Unity</strong> Plays Before and After a MessageStep 1Step 2Step 3In the <strong>Cisco</strong> <strong>Unity</strong> Assistant, on the Preferences menu, click Message Playback.Scroll down to the Before Playing Each Message Play section, and check or uncheck any or all of thefollowing check boxes to specify what information <strong>Cisco</strong> <strong>Unity</strong> plays before each message:• Sender’s Information• Message Number• Time the Message Was SentIn the After Playing Each Message Play section, check or uncheck the Time the Message Was Sentcheck box to specify whether <strong>Cisco</strong> <strong>Unity</strong> plays the message time stamp before playing each message.OL-7374-01<strong>Cisco</strong> <strong>Unity</strong> 4.0(5) and Later <strong>Voice</strong> <strong>Messaging</strong> <strong>User</strong> <strong>Guide</strong> (With Microsoft Exchange)18-5
Changing What <strong>Cisco</strong> <strong>Unity</strong> Plays Before and After a MessageChapter 18Changing Message Playback SettingsStep 4Click Save.Related Topics• Changing What <strong>Cisco</strong> <strong>Unity</strong> Plays When You Log On, page 14-4• Changing the Time Format Used for Message Time Stamps, page 14-3• Managing Receipts, page 9-118-6<strong>Cisco</strong> <strong>Unity</strong> 4.0(5) and Later <strong>Voice</strong> <strong>Messaging</strong> <strong>User</strong> <strong>Guide</strong> (With Microsoft Exchange)OL-7374-01
CHAPTER19Changing Message Notification Settings<strong>Cisco</strong> <strong>Unity</strong> can call a phone or pager to notify you of new messages. <strong>Cisco</strong> <strong>Unity</strong> can also send messagenotifications in the form of text and SMS messages (for example, “Urgent message for TechnicalSupport” or “You have new voice messages”) to e-mail addresses, text pagers, text-compatible cellphones, and other such devices. If you use the <strong>Cisco</strong> <strong>Unity</strong> Inbox, you can also set up messagenotification so that you receive an e-mail with a link to your <strong>Cisco</strong> <strong>Unity</strong> Inbox whenever a new messagearrives. (Note that you may not be able to access the <strong>Cisco</strong> <strong>Unity</strong> Inbox across a firewall.) Your<strong>Cisco</strong> <strong>Unity</strong> administrator can tell you whether these options are available to you.<strong>Cisco</strong> <strong>Unity</strong> calls a phone or pager or sends a text message based on the notification schedules andcontact options that you set in the <strong>Cisco</strong> <strong>Unity</strong> Assistant. You use the <strong>Cisco</strong> <strong>Unity</strong> Assistant to set up thefollowing notification devices: a home phone, work phone, several alternative phones, pagers (includingtext pagers), an SMS device, and the <strong>Cisco</strong> <strong>Unity</strong> Inbox.TipYou can set up text pager devices in the <strong>Cisco</strong> <strong>Unity</strong> Assistant to e-mail message notifications not onlyto text pagers, but to text-compatible cell phones and other e-mail accounts (such as a home e-mailaddress) as well.Using the phone, you can only turn notification on and off and change notification phone numbers foryour home phone, work phone, a pager, and a spare phone.This chapter contains the following sections:• Using the <strong>Cisco</strong> <strong>Unity</strong> Assistant to Set Up a Notification Device, page 19-1• Cascading and Chaining Message Notifications, page 19-8• SMS (SMPP) Text Message Notification Considerations, page 19-9• Enabling or Disabling a Notification Device by Phone, page 19-9• Changing a Notification Phone Number by Phone, page 19-10Using the <strong>Cisco</strong> <strong>Unity</strong> Assistant to Set Up a Notification DeviceYou can set up all your notification devices in the <strong>Cisco</strong> <strong>Unity</strong> Assistant. For <strong>Cisco</strong> <strong>Unity</strong> to makenotification calls, the phone or pager must be enabled, or turned on. Disabling a notification device doesnot delete its settings. <strong>Cisco</strong> <strong>Unity</strong> considers notification successful if the device answers, even whennew messages remain. (For example, notification is considered successful even when an answeringmachine picks up and records the message.)OL-7374-01<strong>Cisco</strong> <strong>Unity</strong> 4.0(5) and Later <strong>Voice</strong> <strong>Messaging</strong> <strong>User</strong> <strong>Guide</strong> (With Microsoft Exchange)19-1
Using the <strong>Cisco</strong> <strong>Unity</strong> Assistant to Set Up a Notification DeviceChapter 19Changing Message Notification SettingsYou can change the type of messages that <strong>Cisco</strong> <strong>Unity</strong> notifies you of, your notification schedules, andthe contact options for your notification devices only from the <strong>Cisco</strong> <strong>Unity</strong> Assistant, not by phone. Foreach notification device you want to set up, do the applicable procedure in this section.• To Set Up or Change Phone or Pager Notification Devices from the <strong>Cisco</strong> <strong>Unity</strong> Assistant, page 19-2• To Set Up or Change an SMS (SMPP) Notification Devices from the <strong>Cisco</strong> <strong>Unity</strong> Assistant, page19-4• To Set Up or Change Text Pager Notification Devices from the <strong>Cisco</strong> <strong>Unity</strong> Assistant, page 19-5• To Set Up or Change the <strong>Cisco</strong> <strong>Unity</strong> Inbox Notification Device from the <strong>Cisco</strong> <strong>Unity</strong> Assistant,page 19-7To Set Up or Change Phone or Pager Notification Devices from the <strong>Cisco</strong> <strong>Unity</strong> AssistantStep 1Step 2Step 3Step 4Step 5Step 6Step 7Step 8In the <strong>Cisco</strong> <strong>Unity</strong> Assistant, on the Notification Devices menu, click View Notification Devices.Click the notification device that you want to change or set up.Check the Notification Enabled check box to enable the device, or uncheck it to disable the device.In the Phone Number field, enter the phone number of the phone or pager, beginning with any accesscode needed to make an external call (for example, 9).Use digits 0 through 9. Do not use spaces, dashes, or parentheses between digits. For long-distancenumbers, also include 1 and the area code. You can also enter:• , (comma) to insert a one-second pause.• # and * to correspond to the # and * keys on the phone.Depending on how <strong>Cisco</strong> <strong>Unity</strong> is set up, you may not be able to enter certain phone numbers or yourphone system may require additional characters. If you are experiencing difficulties with this setting,contact your <strong>Cisco</strong> <strong>Unity</strong> administrator.Check the Try To Detect Connection check box if you want <strong>Cisco</strong> <strong>Unity</strong> to automatically try to detecta connection to the phone or pager before dialing extra digits.In the Dial Extra Digits field, enter any extra digits that <strong>Cisco</strong> <strong>Unity</strong> will dial after the phone number.The digits could be a password or an access number that you enter to hear messages, or an ID requiredby a pager.In the Dial After field, enter the number of seconds that <strong>Cisco</strong> <strong>Unity</strong> waits after dialing the phoneor pager number before it dials the extra digits. (You may need to experiment with this setting. Try 6seconds, then increase or decrease the time as needed.)To set up your notification schedule, use the Quick Add options to specify a schedule.OrCheck or uncheck the check boxes in the schedule to specify the active and inactive hours for thenotification device. <strong>Cisco</strong> <strong>Unity</strong> makes notification calls during the active hours, if you have newmessages. When a new message arrives during inactive hours, <strong>Cisco</strong> <strong>Unity</strong> sends a message notificationat the start of the next active hour in your schedule.TimesaverThere are several ways to set up your notification schedule quickly. Click Clear Schedule to uncheck allcheck blocks at once. Alternatively, click Invert Schedule to check all the blocks that you currently donot have checked and uncheck the ones that you do have checked. You can use the Copy Day’s Schedulefunction—below the schedule—to copy a schedule for one day to other days.19-2<strong>Cisco</strong> <strong>Unity</strong> 4.0(5) and Later <strong>Voice</strong> <strong>Messaging</strong> <strong>User</strong> <strong>Guide</strong> (With Microsoft Exchange)OL-7374-01
Chapter 19Changing Message Notification SettingsUsing the <strong>Cisco</strong> <strong>Unity</strong> Assistant to Set Up a Notification DeviceStep 9Specify the timing and frequency of the calls that <strong>Cisco</strong> <strong>Unity</strong> makes to notify you of new messages:Attempt First ContactAfter MinutesContact Me Each Timea New Messages ArrivesIf There Are Still New Messages,Try Again Every MinutesIf Does Not AnswerIf Is BusyIf Notification Fails TryEnter the number of minutes that <strong>Cisco</strong> <strong>Unity</strong> waits to makes thefirst notification call once message notification is triggered.If the delay time takes the notification out to a time when the deviceschedule is no longer active, the notification does not take place.You can space notifications on different devices at regular intervals,such as 15 minutes, to achieve a cascading message notificationeffect.Click this option so that <strong>Cisco</strong> <strong>Unity</strong> makes a notification call eachtime that message notification is triggered. When this option isselected and the Attempt First Contact After Minutes field is setto 0, <strong>Cisco</strong> <strong>Unity</strong> triggers message notification immediately.However, if you enter a delay in the Attempt First Contact After Minutes field, <strong>Cisco</strong> <strong>Unity</strong> delays notification that number ofminutes instead of dialing immediately. Messages that arrive duringthe delay period will not trigger separate notifications.Enter the number of minutes that <strong>Cisco</strong> <strong>Unity</strong> makes regularnotification calls, as long as you have new messages. The range forthe redial frequency field is 1 to 100 minutes.For example, if you set the repeat notification interval to 5 minutesat 11:47 a.m., <strong>Cisco</strong> <strong>Unity</strong> will notify you of new messages at11:50 a.m., 11:55 a.m., 12:00 p.m., 12:05 p.m., 12:10 p.m.,12:15 p.m., 12:20 p.m., 12:25 p.m., etc.<strong>Cisco</strong> <strong>Unity</strong> follows your settings for an unanswered device.Indicate settings for:• Hang Up After Rings—Set to a minimum of 3 rings.Choose a higher number to give yourself more time to get to thephone.• Try Again Times—Choose a higher number toaccommodate when you step away from the phone briefly.Choose a lower number to avoid disturbing others.• Try Again After Minutes—Choose a higher number toaccommodate when you step away from the phone for longperiods of time.<strong>Cisco</strong> <strong>Unity</strong> follows your settings for a busy device. Indicatesettings for:• Try Again Times—Choose a higher number if you use thephone frequently.• Try Again After Minutes—Choose a higher number if youhave long phone conversations.Select an option for an additional device to send notification towhen the first device does not answer or is busy. <strong>Cisco</strong> <strong>Unity</strong> callsthe alternate device only if it is enabled and its schedule is current.OL-7374-01<strong>Cisco</strong> <strong>Unity</strong> 4.0(5) and Later <strong>Voice</strong> <strong>Messaging</strong> <strong>User</strong> <strong>Guide</strong> (With Microsoft Exchange)19-3
Using the <strong>Cisco</strong> <strong>Unity</strong> Assistant to Set Up a Notification DeviceChapter 19Changing Message Notification SettingsStep 10Click Save.To Set Up or Change an SMS (SMPP) Notification Devices from the <strong>Cisco</strong> <strong>Unity</strong> AssistantStep 1Step 2Step 3Step 4In the <strong>Cisco</strong> <strong>Unity</strong> Assistant, on the Notification Devices menu, click View Notification Devices.Click SMS (SMPP).In the To field, enter the phone number for your SMS device.The format and the number you enter depends on the SMPP provider. For example, you may need toinclude international country codes, beginning with a plus sign (+) and followed by the country code,area, city, or trunk code, and then the number for your device: +12065551234. Do not start with a zeroor the international dialing prefix. Do not include spaces, dashes, parentheses or other punctuation. Askyour <strong>Cisco</strong> <strong>Unity</strong> administrator for assistance if you experience difficulties.In the From field, what you enter depends on the SMPP provider:• If the SMPP provider requires a “source address” for the server sending the message, enter the IPaddress for the <strong>Cisco</strong> <strong>Unity</strong> server.• If the SMPP provider does not require a “source address,” enter the phone number that you want toappear at the end of the text display. (For example, enter the number you dial to reach <strong>Cisco</strong> <strong>Unity</strong>when you are not dialing from your desk phone.) Like the To field, the format and the number youenter depends on the SMPP provider.Ask your <strong>Cisco</strong> <strong>Unity</strong> administrator to assist you if you are not sure what to enter in this field.TipStep 5Step 6Step 7Step 8For SMS (SMPP) devices, consider that some service providers replace the number that you enter in theFrom field with their own phone number. For an alternative method of including a callback number, tryentering the number within the text of your message. For example, enter: tel:2065551234 in the Textfield (see Step 5).In the Text field, enter any text you want displayed (for example, “You have voice mail”). Every time amessage arrives that matches the criteria selected in the message notification settings, <strong>Cisco</strong> <strong>Unity</strong> sendsthis message.In the SMPP Provider list, select a provider, then check the Notification Enabled check box to enablethe device.If you are uncertain which SMPP provider to choose or if there are no providers in the list, contact your<strong>Cisco</strong> <strong>Unity</strong> administrator.In the <strong>Voice</strong> Messages, E-Mails and Faxes lists, choose the types of messages and message urgency forwhich <strong>Cisco</strong> <strong>Unity</strong> will call the device. When None is selected, <strong>Cisco</strong> <strong>Unity</strong> does not call the devicewhen a new message of that type arrives.To set up your notification schedule, use the Quick Add options to specify a schedule.OrCheck or uncheck the check boxes in the schedule to specify the active and inactive hours for thenotification device. <strong>Cisco</strong> <strong>Unity</strong> makes notification calls during the active hours, if you have newmessages. When a new message arrives during inactive hours, <strong>Cisco</strong> <strong>Unity</strong> sends a message notificationat the start of the next active hour in your schedule.19-4<strong>Cisco</strong> <strong>Unity</strong> 4.0(5) and Later <strong>Voice</strong> <strong>Messaging</strong> <strong>User</strong> <strong>Guide</strong> (With Microsoft Exchange)OL-7374-01
Chapter 19Changing Message Notification SettingsUsing the <strong>Cisco</strong> <strong>Unity</strong> Assistant to Set Up a Notification DeviceTimesaverStep 9There are several ways to set up your notification schedule quickly. Click Clear Schedule to uncheck allcheck blocks at once. Alternatively, click Invert Schedule to check all the blocks that you currently donot have checked and uncheck the ones that you do have checked. You can use the Copy Day’s Schedulefunction—below the schedule—to copy a schedule for one day to other days.Specify the timing and frequency of the calls that <strong>Cisco</strong> <strong>Unity</strong> makes to notify you of new messages:Attempt First ContactAfter MinutesContact Me Each Timea New Messages ArrivesIf There Are Still New Messages,Try Again Every MinutesEnter the number of minutes that <strong>Cisco</strong> <strong>Unity</strong> waits to makes thefirst notification call once message notification is triggered.If the delay time takes the notification out to a time when the deviceschedule is no longer active, the notification does not take place.You can space notifications on different devices at regular intervals,such as 15 minutes, to achieve a cascading message notificationeffect.Click this option so that <strong>Cisco</strong> <strong>Unity</strong> makes a notification call eachtime that message notification is triggered. When this option isselected and the Attempt First Contact After Minutes field is setto 0, <strong>Cisco</strong> <strong>Unity</strong> triggers message notification immediately.However, if you enter a delay in the Attempt First Contact After Minutes field, <strong>Cisco</strong> <strong>Unity</strong> delays notification that number ofminutes instead of dialing immediately. Messages that arrive duringthe delay period will not trigger separate notifications.Enter the number of minutes that <strong>Cisco</strong> <strong>Unity</strong> makes regularnotification calls, as long as you have new messages. The range forthe redial frequency field is 1 to 100 minutes.For example, if you set the repeat notification interval to 5 minutesat 11:47 a.m., <strong>Cisco</strong> <strong>Unity</strong> will notify you of new messages at11:50 a.m., 11:55 a.m., 12:00 p.m., 12:05 p.m., 12:10 p.m.,12:15 p.m., 12:20 p.m., 12:25 p.m., etc.Step 10Click Save.Related TopicSMS (SMPP) Text Message Notification Considerations, page 19-9To Set Up or Change Text Pager Notification Devices from the <strong>Cisco</strong> <strong>Unity</strong> AssistantStep 1Step 2Step 3Step 4In the <strong>Cisco</strong> <strong>Unity</strong> Assistant, on the Notification Devices menu, click View Notification Devices.Click the text pager that you want to change or set up.Check the Notification Enabled check box to enable the device, or uncheck it to disable the device.In the To field, enter the e-mail address of the text pager, text-compatible cell phone, or another e-mailaccount (such as a home e-mail address).OL-7374-01<strong>Cisco</strong> <strong>Unity</strong> 4.0(5) and Later <strong>Voice</strong> <strong>Messaging</strong> <strong>User</strong> <strong>Guide</strong> (With Microsoft Exchange)19-5
Using the <strong>Cisco</strong> <strong>Unity</strong> Assistant to Set Up a Notification DeviceChapter 19Changing Message Notification SettingsStep 5In the From field, enter the phone number that you want to appear at the end of the text display. (Forexample, enter the number you dial to reach <strong>Cisco</strong> <strong>Unity</strong> when you are not dialing from your deskphone.)TipStep 6Step 7Step 8If you have a text-compatible cellular phone that you set up as a text pager, you can activate the automaticcallback function available with your phone when this number is displayed.In the Text field, enter any text you want displayed (for example, “You have voice mail”). Every time amessage arrives that matches the criteria selected in the message notification settings, <strong>Cisco</strong> <strong>Unity</strong> sendsthis message.In the <strong>Voice</strong> Messages, E-Mails and Faxes lists, choose the types of messages and message urgency forwhich <strong>Cisco</strong> <strong>Unity</strong> will call the device. When None is selected, <strong>Cisco</strong> <strong>Unity</strong> does not call the devicewhen a new message of that type arrives.To set up your notification schedule, use the Quick Add options to specify a schedule.OrCheck or uncheck the check boxes in the schedule to specify the active and inactive hours for thenotification device. <strong>Cisco</strong> <strong>Unity</strong> makes notification calls during the active hours, if you have newmessages. When a new message arrives during inactive hours, <strong>Cisco</strong> <strong>Unity</strong> sends a message notificationat the start of the next active hour in your schedule.TimesaverStep 9There are several ways to set up your notification schedule quickly. Click Clear Schedule to uncheck allcheck blocks at once. Alternatively, click Invert Schedule to check all the blocks that you currently donot have checked and uncheck the ones that you do have checked. You can use the Copy Day’s Schedulefunction—below the schedule—to copy a schedule for one day to other days.Specify the timing and frequency of the calls that <strong>Cisco</strong> <strong>Unity</strong> makes to notify you of new messages:Attempt First ContactAfter MinutesEnter the number of minutes that <strong>Cisco</strong> <strong>Unity</strong> waits to makes thefirst notification call once message notification is triggered.If the delay time takes the notification out to a time when the deviceschedule is no longer active, the notification does not take place.You can space notifications on different devices at regular intervals,such as 15 minutes, to achieve a cascading message notificationeffect.19-6<strong>Cisco</strong> <strong>Unity</strong> 4.0(5) and Later <strong>Voice</strong> <strong>Messaging</strong> <strong>User</strong> <strong>Guide</strong> (With Microsoft Exchange)OL-7374-01
Chapter 19Changing Message Notification SettingsUsing the <strong>Cisco</strong> <strong>Unity</strong> Assistant to Set Up a Notification DeviceContact Me Each Timea New Messages ArrivesIf There Are Still New Messages,Try Again Every MinutesClick this option so that <strong>Cisco</strong> <strong>Unity</strong> makes a notification call eachtime that message notification is triggered. When this option isselected and the Attempt First Contact After Minutes field is setto 0, <strong>Cisco</strong> <strong>Unity</strong> triggers message notification immediately.However, if you enter a delay in the Attempt First Contact After Minutes field, <strong>Cisco</strong> <strong>Unity</strong> delays notification that number ofminutes instead of dialing immediately. Messages that arrive duringthe delay period will not trigger separate notifications.Enter the number of minutes that <strong>Cisco</strong> <strong>Unity</strong> makes regularnotification calls, as long as you have new messages. The range forthe redial frequency field is 1 to 100 minutes.For example, if you set the repeat notification interval to 5 minutesat 11:47 a.m., <strong>Cisco</strong> <strong>Unity</strong> will notify you of new messages at11:50 a.m., 11:55 a.m., 12:00 p.m., 12:05 p.m., 12:10 p.m.,12:15 p.m., 12:20 p.m., 12:25 p.m., etc.Step 10Click Save.To Set Up or Change the <strong>Cisco</strong> <strong>Unity</strong> Inbox Notification Device from the <strong>Cisco</strong> <strong>Unity</strong> AssistantStep 1Step 2Step 3Step 4Step 5In the <strong>Cisco</strong> <strong>Unity</strong> Assistant, on the Notification Devices menu, click View Notification Devices.Click Text for <strong>Cisco</strong> <strong>Unity</strong> Inbox.Check the Notification Enabled check box to enable the device, or uncheck it to disable the device.In the To field, enter the e-mail address of the text pager, text-compatible cell phone, or another e-mailaccount (such as a home e-mail address).In the From field, enter the phone number that you want to appear at the end of the text display. (Forexample, enter the number you dial to reach <strong>Cisco</strong> <strong>Unity</strong> when you are not dialing from your deskphone.)TipStep 6Step 7If you have a text-compatible cellular phone that you set up as a text pager, you can activate the automaticcallback function available with your phone when this number is displayed.In the <strong>Voice</strong> Messages, E-Mails and Faxes lists, choose the types of messages and message urgency forwhich <strong>Cisco</strong> <strong>Unity</strong> will call the device. When None is selected, <strong>Cisco</strong> <strong>Unity</strong> does not call the devicewhen a new message of that type arrives.To set up your notification schedule, use the Quick Add options to specify a schedule.OrCheck or uncheck the check boxes in the schedule to specify the active and inactive hours for thenotification device. <strong>Cisco</strong> <strong>Unity</strong> makes notification calls during the active hours, if you have newmessages. When a new message arrives during inactive hours, <strong>Cisco</strong> <strong>Unity</strong> sends a message notificationat the start of the next active hour in your schedule.OL-7374-01<strong>Cisco</strong> <strong>Unity</strong> 4.0(5) and Later <strong>Voice</strong> <strong>Messaging</strong> <strong>User</strong> <strong>Guide</strong> (With Microsoft Exchange)19-7
Cascading and Chaining Message NotificationsChapter 19Changing Message Notification SettingsTimesaverStep 8There are several ways to set up your notification schedule quickly. Click Clear Schedule to uncheck allcheck blocks at once. Alternatively, click Invert Schedule to check all the blocks that you currently donot have checked and uncheck the ones that you do have checked. You can use the Copy Day’s Schedulefunction—below the schedule—to copy a schedule for one day to other days.Specify the timing and frequency of the calls that <strong>Cisco</strong> <strong>Unity</strong> makes to notify you of new messages:Attempt First ContactAfter MinutesContact Me Each Timea New Messages ArrivesIf There Are Still New Messages,Try Again Every MinutesEnter the number of minutes that <strong>Cisco</strong> <strong>Unity</strong> waits to makes thefirst notification call once message notification is triggered.If the delay time takes the notification out to a time when the deviceschedule is no longer active, the notification does not take place.You can space notifications on different devices at regular intervals,such as 15 minutes, to achieve a cascading message notificationeffect.Click this option so that <strong>Cisco</strong> <strong>Unity</strong> makes a notification call eachtime that message notification is triggered. When this option isselected and the Attempt First Contact After Minutes field is setto 0, <strong>Cisco</strong> <strong>Unity</strong> triggers message notification immediately.However, if you enter a delay in the Attempt First Contact After Minutes field, <strong>Cisco</strong> <strong>Unity</strong> delays notification that number ofminutes instead of dialing immediately. Messages that arrive duringthe delay period will not trigger separate notifications.Enter the number of minutes that <strong>Cisco</strong> <strong>Unity</strong> makes regularnotification calls, as long as you have new messages. The range forthe redial frequency field is 1 to 100 minutes.For example, if you set the repeat notification interval to 5 minutesat 11:47 a.m., <strong>Cisco</strong> <strong>Unity</strong> will notify you of new messages at11:50 a.m., 11:55 a.m., 12:00 p.m., 12:05 p.m., 12:10 p.m.,12:15 p.m., 12:20 p.m., 12:25 p.m., etc.Step 9Click Save.Cascading and Chaining Message NotificationsCascading message notification allows you to set up a series of notifications to a widening circle ofrecipients. Alternatively, message notification can be set to “chain” to a series of notification devices ifan attempt to send notification to the first selected device fails. (The definition of failure to a notificationdevice is based on the options you select for retrying a device that is not answered or is busy.)When setting up a chain of message notification devices, select the types of messages and messageurgency for which <strong>Cisco</strong> <strong>Unity</strong> will call only for the first device. If any message types are selected for adevice other than the first, message notification for the device will begin immediately and will not waitfor the notification failure of the previous device. Therefore, your notifications will not occur as a chainbut will all be activated simultaneously.19-8<strong>Cisco</strong> <strong>Unity</strong> 4.0(5) and Later <strong>Voice</strong> <strong>Messaging</strong> <strong>User</strong> <strong>Guide</strong> (With Microsoft Exchange)OL-7374-01
Chapter 19Changing Message Notification SettingsSMS (SMPP) Text Message Notification ConsiderationsNoteTo include text pager and SMS (SMPP) devices in a chaining message notification, you must specify thedevice as last in the chain because notification to these types of devices does not fail.To set up multiple notification devices to function in a cascading or chaining sequence, you may need tocontact your <strong>Cisco</strong> <strong>Unity</strong> administrator for instructions. Without certain settings, cascading or chainingnotification may not work correctly.SMS (SMPP) Text Message Notification ConsiderationsDepending on how <strong>Cisco</strong> <strong>Unity</strong> is set up, SMS (SMPP) notifications may not be available to you. If theyare, consider the following before you set up SMS (SMPP) text message notifications:• SMS (SMPP) notifications are for use with GSM cell phones and other SMS-compatible devices.SMS notifications are generally much faster than (SMTP) text pager notifications, and some SMSservice providers offer the additional benefit of replacing a previous notification with the latest one.• SMS service providers often charge for each SMS message or group of messages that <strong>Cisco</strong> <strong>Unity</strong>sends. To reduce costs to your organization, consider limiting the number of notifications that youreceive by a particular message type or urgency (for example, only voice messages or only voicemessages and urgent e-mail messages).• Some SMS service providers replace the phone number that you enter in the From field on theSMS (SMPP) Notification Device page in the <strong>Cisco</strong> <strong>Unity</strong> Assistant with their own phone number.For an alternative way to include a call back number, try the Tip in the “To Set Up or Change anSMS (SMPP) Notification Devices from the <strong>Cisco</strong> <strong>Unity</strong> Assistant” procedure.• The time stamp for an SMS (SMPP) notification on some phones reflects the time that the SMSmessage was sent by the SMS service provider to your SMS device. For this reason, the time stampmay not reflect your local time zone or preferred time format.Enabling or Disabling a Notification Device by PhoneBy phone, you can only turn notification on and off for your home phone, work phone, a pager, and aspare phone. Additional notification devices can be turned on and off from the <strong>Cisco</strong> <strong>Unity</strong> Assistant.Disabling a notification device does not delete its settings.Do the following procedure to enable or disable a notification device when using standard or Optionalconversation 1 styles. Keypad mappings for other conversation styles are documented in the“<strong>Cisco</strong> <strong>Unity</strong> Phone Menus and Shortcuts” chapter. Ask your <strong>Cisco</strong> <strong>Unity</strong> administrator whichconversation style you are set up to use.To Enable or Disable a Notification Device by Phone (Standard and Optional Conversation 1 Styles)Step 1Log on to <strong>Cisco</strong> <strong>Unity</strong>.Step 2 Press 4 2 1.Step 3After <strong>Cisco</strong> <strong>Unity</strong> announces your notification status, press the corresponding key for the phone or pageryou want to change:OL-7374-01<strong>Cisco</strong> <strong>Unity</strong> 4.0(5) and Later <strong>Voice</strong> <strong>Messaging</strong> <strong>User</strong> <strong>Guide</strong> (With Microsoft Exchange)19-9
Changing a Notification Phone Number by PhoneChapter 19Changing Message Notification SettingsKey Option Key Option1 Pager 3 Work phone2 Home phone 4 Spare phoneStep 4Press 1 to enable or disable notification to the phone or pager.Table 19-1Use These Keys AnytimeKey Task Key Task* Cancel or back up 0 HelpChanging a Notification Phone Number by PhoneBy phone, you can change the notification number for your home phone, work phone, a pager, and aspare phone. Additional notification numbers can be changed from the <strong>Cisco</strong> <strong>Unity</strong> Assistant.When entering phone numbers, do not use spaces, dashes, or parentheses between digits. Begin with anyaccess code needed to make an external call (for example, 9). For long-distance numbers, also include 1and the area code. Depending on how <strong>Cisco</strong> <strong>Unity</strong> is set up, you may not be able to enter certain phonenumbers.Do the following procedure to change a phone number for a notification device when using standard orOptional conversation 1 styles. Keypad mappings for other conversation styles are documented in the“<strong>Cisco</strong> <strong>Unity</strong> Phone Menus and Shortcuts” chapter. Ask your <strong>Cisco</strong> <strong>Unity</strong> administrator whichconversation style you are set up to use.To Change a Notification Phone Number by Phone (Standard and Optional Conversation 1 Styles)Step 1Log on to <strong>Cisco</strong> <strong>Unity</strong>.Step 2 Press 4 2 1.Step 3After <strong>Cisco</strong> <strong>Unity</strong> announces your notification status, press the corresponding key for the phone or pagerwhose number you want to change:Key Option Key Option1 Pager 3 Work phone2 Home phone 4 Spare phoneStep 4Step 5Press 3 to change the notification number.Enter the new number, or press # to keep the current number. (Enter only an extension when you usephone numbers inside your organization for message notification.)19-10<strong>Cisco</strong> <strong>Unity</strong> 4.0(5) and Later <strong>Voice</strong> <strong>Messaging</strong> <strong>User</strong> <strong>Guide</strong> (With Microsoft Exchange)OL-7374-01
Chapter 19Changing Message Notification SettingsChanging a Notification Phone Number by PhoneTable 19-2Use These Keys AnytimeKey Task Key Task* Cancel or back up 0 HelpOL-7374-01<strong>Cisco</strong> <strong>Unity</strong> 4.0(5) and Later <strong>Voice</strong> <strong>Messaging</strong> <strong>User</strong> <strong>Guide</strong> (With Microsoft Exchange)19-11
Changing a Notification Phone Number by PhoneChapter 19Changing Message Notification Settings19-12<strong>Cisco</strong> <strong>Unity</strong> 4.0(5) and Later <strong>Voice</strong> <strong>Messaging</strong> <strong>User</strong> <strong>Guide</strong> (With Microsoft Exchange)OL-7374-01
20CHAPTERChanging Private List SettingsYou can use private distribution lists to create your own groups of voice message recipients. When youaddress a voice message to one of your private lists, all of the recipients on the list receive the message.<strong>Cisco</strong> <strong>Unity</strong> provides several private lists for you to personalize. Only you can send voice messages toyour private lists. You can do so by phone or from your <strong>Cisco</strong> <strong>Unity</strong> Inbox.This chapter contains the following sections:• Creating New Private Lists, page 20-1• Changing the Name of a Private List, page 20-2• Changing the Members of a Private List, page 20-3• Deleting Private Lists, page 20-5Creating New Private ListsYour <strong>Cisco</strong> <strong>Unity</strong> administrator specifies the maximum number of lists that you can manage. Althoughyou can create new private lists by phone, it is easier to do so from the <strong>Cisco</strong> <strong>Unity</strong> Assistant.Do the following procedure to create a private list.To Create a New Private List from the <strong>Cisco</strong> <strong>Unity</strong> AssistantStep 1Step 2Step 3In the <strong>Cisco</strong> <strong>Unity</strong> Assistant, on the Private Lists menu, click New Private List.In the Name field, enter a display name for the list.On the Media Master control bar, click Record and record the name of the list with your chosenrecording device:PhoneMultimediamicrophonePick up the handset when the phone rings, wait for the tone, then speak into the handset.Speak into the microphone.Step 4Step 5Step 6When you finish recording, click Stop.Click Add Members.In the Find Names dialog box, on the Search menu, specify an appropriate search scope. To addsubscribers from other locations in your organization, set the search scope to Global.OL-7374-01<strong>Cisco</strong> <strong>Unity</strong> 4.0(5) and Later <strong>Voice</strong> <strong>Messaging</strong> <strong>User</strong> <strong>Guide</strong> (With Microsoft Exchange)20-1
Changing the Name of a Private ListChapter 20Changing Private List SettingsStep 7In one or more fields, enter the applicable information about the subscriber or public distribution list thatyou want to add to your new list.TipStep 8Step 9Enter an asterisk (*) in a field to list all subscribers or public distribution lists in a directory. For fasterresults, enter one or more characters or values followed by * to narrow your search. If you are searchingfor a common name, make sure that you enter information in more than one field.Click Find.In the list of possible matches, check the box next to the subscriber or public distribution list that youwant to add to your private list, and then click Add Members.OrIf you do not see the subscriber or public distribution list you seek, try entering different search criteria,then click Find to search again. (Remember, you cannot use the <strong>Cisco</strong> <strong>Unity</strong> Assistant to add remoteusers who are not in the directory; instead, use the <strong>Cisco</strong> <strong>Unity</strong> conversation to add them to your list.)TipStep 10When a search returns more matches than expected, increase the value in the Rows Per Page list to viewas many matches as possible. To limit the search, enter more complete search criteria, and/or enter theapplicable information in any additional fields that you left blank. Then click Find to search again.Repeat Step 5 through 9 until you have finished adding members to your list.Related TopicChanging Recording and Playback Settings, page 15-1Changing the Name of a Private ListEach private list has a recorded name and a display name. When you address messages to private listsby phone, <strong>Cisco</strong> <strong>Unity</strong> plays the recorded name so that you can confirm that you have addressed themessage to the correct list. You enter the display name in the <strong>Cisco</strong> <strong>Unity</strong> Assistant. The name that youenter for each private list is then displayed in the <strong>Cisco</strong> <strong>Unity</strong> Inbox Address Book.This section contains two procedures. Do the applicable procedure to change the name of a private listby phone (when using standard or Optional conversation 1 styles) or from the <strong>Cisco</strong> <strong>Unity</strong> Assistant.Keypad mappings for other conversation styles are documented in the “<strong>Cisco</strong> <strong>Unity</strong> Phone Menus andShortcuts” chapter. Ask your <strong>Cisco</strong> <strong>Unity</strong> administrator which conversation style you are set up to use.To Change the Recorded Name of a Private List by Phone (Standard and Optional Conversation 1 Styles)Step 1Log on to <strong>Cisco</strong> <strong>Unity</strong>.Step 2 Press 4 2 4 2.Step 3Step 4Choose the private list whose name you want to change by pressing the number of the list.Press 4 to record the name. (Note that if the list you chose does not already have members, you must addthem before you can record a name for the list.)20-2<strong>Cisco</strong> <strong>Unity</strong> 4.0(5) and Later <strong>Voice</strong> <strong>Messaging</strong> <strong>User</strong> <strong>Guide</strong> (With Microsoft Exchange)OL-7374-01
Chapter 20Changing Private List SettingsChanging the Members of a Private ListTable 20-1Use These Keys AnytimeKey Task Key Task* Cancel or back up 0 HelpTo Change the Recorded and Display Names of the Private List from the <strong>Cisco</strong> <strong>Unity</strong> AssistantStep 1Step 2Step 3Step 4In the <strong>Cisco</strong> <strong>Unity</strong> Assistant, on the Private Lists menu, click View Private Lists.Click the private list whose name you want to change.In the Name field, delete the old name and enter a new one for the list.On the Media Master control bar, click Record and record the new name of the list with your chosenrecording device:PhoneMultimediamicrophonePick up the handset when the phone rings, wait for the tone, then speak into the handset.Speak into the microphone.Step 5Step 6When you finish recording, click Stop.Click Save.Related TopicChanging Recording and Playback Settings, page 15-1Changing the Members of a Private ListThe maximum number of members that you can add to a private list is specified by your <strong>Cisco</strong> <strong>Unity</strong>administrator. Any subscriber or public distribution list that is included in the directory is eligible formembership in your private lists. Depending on how <strong>Cisco</strong> <strong>Unity</strong> is set up at your organization, you maybe able to send and respond to messages from users on remote voice messaging systems who are not inthe directory. If so, you can also include these remote users in your private lists.One private list cannot be included as a member of another private list. In the event that you attempt toadd a subscriber, public distribution list, or remote user who is already a member of your private list,<strong>Cisco</strong> <strong>Unity</strong> does not add the member to your list again.You can add members to your private lists by using either the <strong>Cisco</strong> <strong>Unity</strong> phone menus or the<strong>Cisco</strong> <strong>Unity</strong> Assistant—with the exception of those users on remote voice messaging systems who arenot in the directory. To add remote users to your private lists, you must use the <strong>Cisco</strong> <strong>Unity</strong> phone menus.To review and delete members of your private lists (including remote users, if applicable), you can useeither the <strong>Cisco</strong> <strong>Unity</strong> phone menus or the <strong>Cisco</strong> <strong>Unity</strong> Assistant.OL-7374-01<strong>Cisco</strong> <strong>Unity</strong> 4.0(5) and Later <strong>Voice</strong> <strong>Messaging</strong> <strong>User</strong> <strong>Guide</strong> (With Microsoft Exchange)20-3
Changing the Members of a Private ListChapter 20Changing Private List SettingsNoteAdministrative changes to private list members may cause them to be presented differently when youreview your lists later. Occasionally, administrative changes may even cause some members to beremoved from your lists without notice. Your <strong>Cisco</strong> <strong>Unity</strong> administrator should be able to inform youbefore changes occur, though you will still need to re-add these members to your lists in the event thatthey are inadvertently removed.This section contains three procedures. Do the applicable procedure to change the members of a privatelist by phone (when using standard or Optional conversation 1 styles) or from the <strong>Cisco</strong> <strong>Unity</strong> Assistant.Keypad mappings for other conversation styles are documented in the “<strong>Cisco</strong> <strong>Unity</strong> Phone Menus andShortcuts” chapter. Ask your <strong>Cisco</strong> <strong>Unity</strong> administrator which conversation style you are set up to use.To Change Members of a Private List by Phone (Standard and Optional Conversation 1 Styles)Step 1 Log on to <strong>Cisco</strong> <strong>Unity</strong>.Step 2 Press 4 2 4 2.Step 3 Choose the private list whose members you want to change by pressing the number of the list.Step 4 After <strong>Cisco</strong> <strong>Unity</strong> plays the name of the list, use the following keys to change the members:Key Option Key Option1 Add a name 3 Remove a name2 Hear the list of members whobelong to your private list## Switch between spelling andnumber entryTable 20-2Use These Keys AnytimeKey Task Key Task* Cancel or back up 0 HelpTo Change the Members of a Private List from the <strong>Cisco</strong> <strong>Unity</strong> AssistantStep 1Step 2Step 3Step 4In the <strong>Cisco</strong> <strong>Unity</strong> Assistant, on the Private Lists menu, click View Private Lists.Click the private list whose members you want to change.To remove members, check the box to the left of any member that you want to remove from your list,and click Delete Selected.To add members, click Add Members, and then do the following:a. In the Find Names dialog box, on the Search menu, specify an appropriate search scope. To addsubscribers from other locations in your organization, set the search scope to Global.b. In one or more fields, enter the applicable information about the subscriber or public distribution listthat you want to add to your new list.20-4<strong>Cisco</strong> <strong>Unity</strong> 4.0(5) and Later <strong>Voice</strong> <strong>Messaging</strong> <strong>User</strong> <strong>Guide</strong> (With Microsoft Exchange)OL-7374-01
Chapter 20Changing Private List SettingsDeleting Private ListsTipEnter an asterisk (*) in a field to list all subscribers or public distribution lists in a directory. Forfaster results, enter one or more characters or values followed by * to narrow your search. If youare searching for a common name, make sure that you enter information in more than one field.c. Click Find.d. In the list of possible matches, check the box located to the left of the subscriber or publicdistribution list that you want to add to your private list, and then click Add Members.Ore. If you do not see the subscriber or public distribution list you seek, try entering different searchcriteria, then click Find to search again. (Remember, you cannot use the <strong>Cisco</strong> <strong>Unity</strong> Assistant toadd remote users who are not in the directory; instead, use the <strong>Cisco</strong> <strong>Unity</strong> conversation to add themto your list.)TipWhen a search returns more matches than expected, increase the value in the Rows Per Page listto view as many matches as possible. To limit the search, enter more complete search criteria,and/or enter the applicable information in any additional fields that you left blank. Then clickFind to search again.f. Repeat Step 4 until you have finished adding members to your list.Related TopicChanging Recording and Playback Settings, page 15-1Deleting Private ListsAlthough you can delete individual members of your lists by phone, you cannot delete the list itself. Todelete a list—including its recorded and display name and all of it s members at once, use the<strong>Cisco</strong> <strong>Unity</strong> Assistant.Do the following procedure to delete a private list.To Delete a Private List from the <strong>Cisco</strong> <strong>Unity</strong> AssistantStep 1Step 2Step 3In the <strong>Cisco</strong> <strong>Unity</strong> Assistant, on the Private Lists menu, click View Private Lists.Check the box next to the list that you want to delete.Click Delete Selected Rows icon.Related TopicChanging Recording and Playback Settings, page 15-1OL-7374-01<strong>Cisco</strong> <strong>Unity</strong> 4.0(5) and Later <strong>Voice</strong> <strong>Messaging</strong> <strong>User</strong> <strong>Guide</strong> (With Microsoft Exchange)20-5
Deleting Private ListsChapter 20Changing Private List Settings20-6<strong>Cisco</strong> <strong>Unity</strong> 4.0(5) and Later <strong>Voice</strong> <strong>Messaging</strong> <strong>User</strong> <strong>Guide</strong> (With Microsoft Exchange)OL-7374-01
21CHAPTER<strong>Cisco</strong> <strong>Unity</strong> Phone Menus and ShortcutsThis chapter lists the most frequently used <strong>Cisco</strong> <strong>Unity</strong> menus and shortcut key sequences for managingyour messages and personal options by phone for each conversation style. Ask your <strong>Cisco</strong> <strong>Unity</strong>administrator which conversation style you are set up to use.• Phone Menus for the Standard Conversation, page 21-1• Phone Menus for Optional Conversation 1, page 21-4• Phone Menus for Alternate Keypad Mapping N, page 21-7• Phone Menus for Alternate Keypad Mapping X, page 21-8• Phone Menus for Alternate Keypad Mapping S, page 21-10Phone Menus for the Standard ConversationThis section lists the key sequences for the following menus.• Main Menu and Shortcuts (Standard Conversation), page 21-1• Send a Message Menu and Shortcuts (Standard Conversation Style), page 21-2• During Message Menu and Shortcuts (Standard Conversation Style), page 21-2• After Message Menu and Shortcuts (Standard Conversation Style), page 21-3The information is also available as a wallet card, <strong>Cisco</strong> <strong>Unity</strong> Phone Menus and Shortcuts, athttp://www.cisco.com/univercd/cc/td/doc/product/voice/c_unity/unity40/wlt/wlt405/sw405ve.pdf.Main Menu and Shortcuts (Standard Conversation)While listening to the Main menu, press:Key(s) Task1 Hear new messages2 Send a message31 Review saved messages32 Review deleted messages *4 Change setup optionsOL-7374-01<strong>Cisco</strong> <strong>Unity</strong> 4.0(5) and Later <strong>Voice</strong> <strong>Messaging</strong> <strong>User</strong> <strong>Guide</strong> (With Microsoft Exchange)21-1
Phone Menus for the Standard ConversationChapter 21<strong>Cisco</strong> <strong>Unity</strong> Phone Menus and ShortcutsKey(s) Task41 Change greetings412 Turn on/off alternate greeting421 Change message notification422 Change fax delivery *423 Choose full or brief menus431 Change phone password432 Change recorded name44 Change call transfer51 Find messages from a subscriber *52 Find messages from an outside caller *53 Find messages from all outside callers ** Not available on some systems.Send a Message Menu and Shortcuts (Standard Conversation Style)After addressing and recording a message, press:Key(s) Task# Send message11 Change addressing12 Change recording13 Set delivery options131# Mark urgent and send132# Request return receipt and send133# Mark message private and send13313# Mark urgent and private and send134 Set future delivery14 Review recorded messageDuring Message Menu and Shortcuts (Standard Conversation Style)While listening to a message, press:Key(s) Task1 Restart message12 Play message by number (saved messages only)14 Play previous saved message21-2<strong>Cisco</strong> <strong>Unity</strong> 4.0(5) and Later <strong>Voice</strong> <strong>Messaging</strong> <strong>User</strong> <strong>Guide</strong> (With Microsoft Exchange)OL-7374-01
Chapter 21<strong>Cisco</strong> <strong>Unity</strong> Phone Menus and ShortcutsPhone Menus for the Standard ConversationKey(s) Task16 Play next saved message2 Save3 Delete4 Slow playback5 Change volume *6 Fast playback7 Rewind message8 Pause/Resume9 Fast-forward# Fast-forward to end#2 Restore as saved *#4 Reply#42 Reply to all#5 Forward message#6 Save/Restore as new *#8 Deliver fax to fax machine *#9 Play message properties## Skip message, save as is* Cancel or back up0 Help* Not available on some systems.After Message Menu and Shortcuts (Standard Conversation Style)After listening to a message, press:Key(s) Task1 Replay message12 Play message by number (saved messages only)14 Play previous saved message16 Play next saved message2 Save/Restore as saved *3 Delete4 Reply42 Reply to all44 Call the subscriber *5 Forward messageOL-7374-01<strong>Cisco</strong> <strong>Unity</strong> 4.0(5) and Later <strong>Voice</strong> <strong>Messaging</strong> <strong>User</strong> <strong>Guide</strong> (With Microsoft Exchange)21-3
Phone Menus for Optional Conversation 1Chapter 21<strong>Cisco</strong> <strong>Unity</strong> Phone Menus and ShortcutsKey(s) Task6 Save/Restore as new *7 Rewind8 Deliver fax to fax machine *9 Play message properties# Save as is* Cancel or back up0 Help* Not available on some systems.Phone Menus for Optional Conversation 1This section lists the key sequences for the following menus.• Main Menu and Shortcuts (Optional Conversation 1 Style), page 21-4• Send a Message Menu and Shortcuts (Optional Conversation 1 Style), page 21-5• During Message Menu and Shortcuts (Optional Conversation 1 Style), page 21-5• After Message Menu and Shortcuts (Optional Conversation 1 Style), page 21-6The information is also available as a wallet card, <strong>Cisco</strong> <strong>Unity</strong> Phone Menus and Shortcuts, athttp://www.cisco.com/univercd/cc/td/doc/product/voice/c_unity/unity40/wlt/wlt405/ow405ve.pdf.Main Menu and Shortcuts (Optional Conversation 1 Style)While listening to the Main menu, press:Key(s) Task1 Hear new messages2 Send a message31 Review saved messages32 Review deleted messages *4 Change setup options41 Change greetings412 Turn on/off alternate greeting421 Change message notification422 Change fax delivery *423 Choose full or brief menus431 Change phone password432 Change recorded name44 Change call transfer21-4<strong>Cisco</strong> <strong>Unity</strong> 4.0(5) and Later <strong>Voice</strong> <strong>Messaging</strong> <strong>User</strong> <strong>Guide</strong> (With Microsoft Exchange)OL-7374-01
Chapter 21<strong>Cisco</strong> <strong>Unity</strong> Phone Menus and ShortcutsPhone Menus for Optional Conversation 1Key(s) Task51 Find messages from a subscriber *52 Find messages from an outside caller *53 Find messages from all outside callers ** Not available on some systems.Send a Message Menu and Shortcuts (Optional Conversation 1 Style)After addressing and recording a message, press:Key(s) Task# Send message11 Change addressing12 Change recording13 Set delivery options131# Mark urgent and send132# Request return receipt and send133# Mark message private and send13313# Mark urgent and private and send134 Set future delivery14 Review recorded messageDuring Message Menu and Shortcuts (Optional Conversation 1 Style)While listening to a message, press:Key(s) Task1 Rewind12 Play a saved message by number14 Play previous saved message16 Play next saved message2 Pause/Resume3 Fast-forward33 Fast-forward to end332 Deliver fax to fax machine *336 Forward message337 Delete message338 ReplyOL-7374-01<strong>Cisco</strong> <strong>Unity</strong> 4.0(5) and Later <strong>Voice</strong> <strong>Messaging</strong> <strong>User</strong> <strong>Guide</strong> (With Microsoft Exchange)21-5
Phone Menus for Optional Conversation 1Chapter 21<strong>Cisco</strong> <strong>Unity</strong> Phone Menus and ShortcutsKey(s) Task3382 Reply to all339 Save/Restore as saved *4 Slow playback44 Slower playback5 Play message properties6 Fast playback66 Faster playback7 Decrease volume *8 Reset volume *9 Increase volume *# Skip message, save as is## Skip message, save as new (new and saved messages)* Cancel or back up0 Help* Not available on some systems.After Message Menu and Shortcuts (Optional Conversation 1 Style)After listening to a message, press:Key(s) Task1 Skip back12 Play a saved message by number14 Play previous saved message16 Play next saved message2 Deliver fax to fax machine *4 Replay message5 Play message properties6 Forward message7 Delete8 Reply82 Reply to all88 Call the subscriber *9 Save/Restore as saved *# Save as is## Save/Restore as new ** Cancel or back up21-6<strong>Cisco</strong> <strong>Unity</strong> 4.0(5) and Later <strong>Voice</strong> <strong>Messaging</strong> <strong>User</strong> <strong>Guide</strong> (With Microsoft Exchange)OL-7374-01
Chapter 21<strong>Cisco</strong> <strong>Unity</strong> Phone Menus and ShortcutsPhone Menus for Alternate Keypad Mapping NKey(s) Task0 Help* Not available on some systems.Phone Menus for Alternate Keypad Mapping NThis section lists the key sequences for the following menus.• Main Menu and Shortcuts (Alternate Keypad Mapping N), page 21-7• During Message Menu and Shortcuts (Alternate Keypad Mapping N), page 21-7• After Message Menu and Shortcuts (Alternate Keypad Mapping N), page 21-8Main Menu and Shortcuts (Alternate Keypad Mapping N)While listening to the Main menu, press:Key(s) Task1 Hear new messages2 Send a message3 Review saved and deleted messages *4 Change setup options51 Find messages from a subscriber *52 Find messages from an outside caller *53 Find messages from all outside callers ** Exit# Repeat menu0 Main menu Help* Not available on some systems.During Message Menu and Shortcuts (Alternate Keypad Mapping N)While listening to a message, press:Key(s) Task1 Rewind message3 Fast-forward6 Skip message, save as is71 Reply9 Call the subscriber *OL-7374-01<strong>Cisco</strong> <strong>Unity</strong> 4.0(5) and Later <strong>Voice</strong> <strong>Messaging</strong> <strong>User</strong> <strong>Guide</strong> (With Microsoft Exchange)21-7
Phone Menus for Alternate Keypad Mapping XChapter 21<strong>Cisco</strong> <strong>Unity</strong> Phone Menus and ShortcutsKey(s) Task# Cancel or back up0 Operator* Not available on some systems.After Message Menu and Shortcuts (Alternate Keypad Mapping N)After listening to a message, press:Key(s) Task4 Rewind6 Save as is9 Call the subscriber *70 Play message properties71 Reply72 Replay message73 Forward message74 Reply to all76 Delete77 Save/Restore as saved *78 Save/Restore as new ** Cancel or back up0 Operator* Not available on some systems.Phone Menus for Alternate Keypad Mapping XThis section lists the key sequences for the following menus.• Main Menu and Shortcuts (Alternate Keypad Mapping X), page 21-9• During Message Menu and Shortcuts (Alternate Keypad Mapping X), page 21-9• After Message Menu and Shortcuts (Alternate Keypad Mapping X), page 21-1021-8<strong>Cisco</strong> <strong>Unity</strong> 4.0(5) and Later <strong>Voice</strong> <strong>Messaging</strong> <strong>User</strong> <strong>Guide</strong> (With Microsoft Exchange)OL-7374-01
Chapter 21<strong>Cisco</strong> <strong>Unity</strong> Phone Menus and ShortcutsPhone Menus for Alternate Keypad Mapping XMain Menu and Shortcuts (Alternate Keypad Mapping X)While listening to the Main menu, press:Key(s) Task1 Send a message2 Hear new messages3 Review saved and deleted messages *5 Change setup options81 Find messages from a subscriber *82 Find messages from an outside caller *83 Find messages from all outside callers ** Exit# Repeat menu0 Main menu Help* Not available on some systems.During Message Menu and Shortcuts (Alternate Keypad Mapping X)While listening to a message, press:Key(s) Task2 Skip to message body3 Pause/Resume4 Increase volume *5 Rewind message6 Fast-forward7 Decrease volume *8 Slow playback9 Fast playback# Fast-forward to end of message* Not available on some systems.OL-7374-01<strong>Cisco</strong> <strong>Unity</strong> 4.0(5) and Later <strong>Voice</strong> <strong>Messaging</strong> <strong>User</strong> <strong>Guide</strong> (With Microsoft Exchange)21-9
Phone Menus for Alternate Keypad Mapping SChapter 21<strong>Cisco</strong> <strong>Unity</strong> Phone Menus and ShortcutsAfter Message Menu and Shortcuts (Alternate Keypad Mapping X)After listening to a message, press:Key(s) Task1 Save/Restore as saved *12 Play message by number (saved messages only)14 Play previous saved message16 Play next saved message2 Forward message23 Replay message3 Delete4 Save/Restore as new *5 Rewind6 Save as is7 Reply# Cancel or back up* Not available on some systems.Phone Menus for Alternate Keypad Mapping SThis section lists the key sequences for the following menus.• Main Menu and Shortcuts (Alternate Keypad Mapping S), page 21-10• During Message Menu and Shortcuts (Alternate Keypad Mapping S), page 21-11• After Message Menu and Shortcuts (Alternate Keypad Mapping S), page 21-11Main Menu and Shortcuts (Alternate Keypad Mapping S)While listening to the Main menu, press:Key(s) Task3 Review saved and deleted messages *4 Change setup options5 Hear new messages6 Send a message81 Find messages from a subscriber *82 Find messages from an outside caller *83 Find messages from all outside callers *9 Exit21-10<strong>Cisco</strong> <strong>Unity</strong> 4.0(5) and Later <strong>Voice</strong> <strong>Messaging</strong> <strong>User</strong> <strong>Guide</strong> (With Microsoft Exchange)OL-7374-01
Chapter 21<strong>Cisco</strong> <strong>Unity</strong> Phone Menus and ShortcutsPhone Menus for Alternate Keypad Mapping SKey(s) Task# Repeat menu0 Main menu Help* Not available on some systems.During Message Menu and Shortcuts (Alternate Keypad Mapping S)While listening to a message, press:Key(s) Task13 Forward message14 Call the subscriber *15 Play previous saved message17 Reply2 Rewind message22 Skip message body3 Delete4 Fast-forward5 Skip message, save as is7 Save/Restore as saved *8 Skip to message footer# Fast-forward to end of message* Pause/Resume* Not available on some systems.After Message Menu and Shortcuts (Alternate Keypad Mapping S)After listening to a message, press:Key(s) Task13 Forward message15 Play previous saved message17 Reply2 Rewind message22 Replay message3 Delete42 Reply to all44 Call the subscriber *5 Save as isOL-7374-01<strong>Cisco</strong> <strong>Unity</strong> 4.0(5) and Later <strong>Voice</strong> <strong>Messaging</strong> <strong>User</strong> <strong>Guide</strong> (With Microsoft Exchange)21-11
Phone Menus for Alternate Keypad Mapping SChapter 21<strong>Cisco</strong> <strong>Unity</strong> Phone Menus and ShortcutsKey(s) Task6 Save/Restore as new *7 Save/Restore as saved *8 Deliver e-mail/fax to fax machine *9 Play message properties* Cancel or back up* Not available on some systems.21-12<strong>Cisco</strong> <strong>Unity</strong> 4.0(5) and Later <strong>Voice</strong> <strong>Messaging</strong> <strong>User</strong> <strong>Guide</strong> (With Microsoft Exchange)OL-7374-01
22CHAPTERMedia Master Control Bar Keyboard ShortcutsThis chapter lists the keyboard shortcuts that you can use when working with the Media Master controlbar.Key(s)TaskAlt-Shift-PPlay/PauseAlt-Shift-SStopAlt-Shift-RRecord/PauseAlt-Shift-MOpen Options menuAlt-Shift-F3Skip backAlt-Shift-F4Skip forwardAlt-Shift-F7Decrease volumeAlt-Shift-F8Increase volumeAlt-Shift-F11 Slower playback 1Alt-Shift-F12 Faster playback 11. Speed control is available only in the <strong>Cisco</strong> <strong>Unity</strong> Inbox.You can also use the keyboard to make selections on the Options menu. Press the letter that is underlinedfor the option you want to select on the Options menu.OL-7374-01<strong>Cisco</strong> <strong>Unity</strong> 4.0(5) and Later <strong>Voice</strong> <strong>Messaging</strong> <strong>User</strong> <strong>Guide</strong> (With Microsoft Exchange)22-1
Chapter 22Media Master Control Bar Keyboard Shortcuts22-2<strong>Cisco</strong> <strong>Unity</strong> 4.0(5) and Later <strong>Voice</strong> <strong>Messaging</strong> <strong>User</strong> <strong>Guide</strong> (With Microsoft Exchange)OL-7374-01
23CHAPTERReference Information<strong>Cisco</strong> <strong>Unity</strong> Phone NumbersYour <strong>Cisco</strong> <strong>Unity</strong> ID<strong>Cisco</strong> PCA Website(The URL is case sensitive.)<strong>Cisco</strong> <strong>Unity</strong> Domainand Server Name<strong>Cisco</strong> <strong>Unity</strong> System Administratorand/or Support Desk ContactInformationOL-7374-01<strong>Cisco</strong> <strong>Unity</strong> 4.0(5) and Later <strong>Voice</strong> <strong>Messaging</strong> <strong>User</strong> <strong>Guide</strong> (With Microsoft Exchange)23-1
Chapter 23Reference Information23-2<strong>Cisco</strong> <strong>Unity</strong> 4.0(5) and Later <strong>Voice</strong> <strong>Messaging</strong> <strong>User</strong> <strong>Guide</strong> (With Microsoft Exchange)OL-7374-01
GLOSSARYAalternate extensionalternate greetingANIaudiotextautomated attendantautomatic numberidentificationThe addition number(s) assigned to a subscriber. May be used by <strong>Cisco</strong> <strong>Unity</strong> administrators tohandle multiple line appearances on subscriber phones, or as a convenience for subscribers andcallers who want to communicate by using a cell phone, home phone, or phone at an alternate worksite in addition to a subscriber phone. See also extension and primary extension.A substitute recording that can be turned on and off; it is used for a variety of special situations,such as vacations or a holiday. When enabled, the alternate greeting overrides all other greetings.Automatic number identification.Prerecorded information that an organization makes available to callers.A call handler that is used in place of a human operator to answer and direct calls by playinggreetings and responding to touchtones. See also call handler.See ANI.Bbusy greetingThe recording that plays when a subscriber extension is busy.Ccall handlercall screeningA tool for managing calls in <strong>Cisco</strong> <strong>Unity</strong>; it answers calls and handles them according to the settingsspecified by the <strong>Cisco</strong> <strong>Unity</strong> administrator. See also automated attendant.The <strong>Cisco</strong> <strong>Unity</strong> function of recording the name of a caller and playing it for the subscriber, who canchoose whether to take the call.Call screening options apply only to calls that were routed to the subscriber from the automatedattendant or another call handler, and not on direct calls to subscriber extensions. (Screening optionsdo not apply when an outsider caller or another subscriber dials a subscriber extension directly.)call transferThe <strong>Cisco</strong> <strong>Unity</strong> function of routing calls from the automated attendant or a directory handler to aphone or to the greetings of a subscriber or handler. Call transfer options do not apply when an outsidercaller or another subscriber dials a subscriber extension directly. See also unidentified caller.OL-7374-01<strong>Cisco</strong> <strong>Unity</strong> 4.0(5) and Later <strong>Voice</strong> <strong>Messaging</strong> <strong>User</strong> <strong>Guide</strong> (With Microsoft Exchange)GL-1
Glossary<strong>Cisco</strong> <strong>Unity</strong>Assistant<strong>Cisco</strong> <strong>Unity</strong>conversation<strong>Cisco</strong> <strong>Unity</strong> Inboxclosed greetingclosed hourscodecconversationThe Web interface that gives subscribers the ability to customize personal settings—including recordedgreetings and message delivery options—on their computers.The set of prerecorded instructions and options that <strong>Cisco</strong> <strong>Unity</strong> plays over the phone to subscribersand other callers.A website through which subscribers listen to, compose, reply to, forward, and delete voice messagesfrom a “virtual” Inbox. With the fax option, subscribers can also use the <strong>Cisco</strong> <strong>Unity</strong> Inbox to managefaxes.The recording that plays during the closed hours for the active schedule.The hours and days for an organization that have not been identified as standard hours; these aretypically nonbusiness hours.An analog-to-digital coder/decoder; also referred to as a converter.See <strong>Cisco</strong> <strong>Unity</strong> conversation.Ddirectory assistancedistribution listThe audio listing provided by a directory handler that callers can use to reach subscribers and to leavemessages.See public distribution list or private distribution list.EenrollmentextensionSee subscriber enrollment.The ID that is assigned to each subscriber when their <strong>Cisco</strong> <strong>Unity</strong> accounts are created; typically, thisID is the internal phone number that rings a subscriber phone. Also called the primary extension. Seealso alternate extension and primary extension.GgreetingA recording that welcomes callers and may offer them the opportunity to leave a message. Greetingscan be recorded by subscribers or system administrators.IIDinternal greetingA numeric identifier that <strong>Cisco</strong> <strong>Unity</strong> uses to recognize a subscriber. A subscriber ID usually is theextension assigned to a subscriber.The recording that a subscriber can set up to play only to other subscribers in place of the standard oralternate greeting.GL-2<strong>Cisco</strong> <strong>Unity</strong> 4.0(5) and Later <strong>Voice</strong> <strong>Messaging</strong> <strong>User</strong> <strong>Guide</strong> (With Microsoft Exchange)OL-7374-01
GlossaryKkeypadkeypad mapThe portion of a phone that contains touchtone keys.The key sequences that are assigned to the options offered by the <strong>Cisco</strong> <strong>Unity</strong> conversation formanaging your messages and personal options by phone.MMedia Mastercontrol barmessagenotificationmessage propertiesMWIThe VCR-style recording and playback device that appears on several pages of the <strong>Cisco</strong> <strong>Unity</strong>Assistant and the <strong>Cisco</strong> <strong>Unity</strong> Inbox. It can be used to record and play names, messages, and greetings,either with a phone or with a computer microphone and speakers.The <strong>Cisco</strong> <strong>Unity</strong> function of notifying a subscriber when new messages arrive.Information about a message, including sender, special delivery status, message number, time and datesent. Subscribers can use the <strong>Cisco</strong> <strong>Unity</strong> Assistant to specify whether they want to hear a portion ofthe message properties before or after the message plays, or not at all.Message waiting indicator. A phone system device (lamp, distinctive dial tone, or LCD display) thatalerts a subscriber to the arrival of new messages.NNDRNondelivery receipts. An NDR message informs the sender when a voice message could not bedelivered to its intended recipient.OOpening Greetingcall handleroutside callerA predefined call handler that acts as an automated attendant, playing the greeting that callers first hearwhen they call the organization, and performing specified actions.Anyone who is not enrolled on <strong>Cisco</strong> <strong>Unity</strong>. See also unidentified caller.Pprimary extensionprivate distributionlistThe ID that is assigned to each subscriber when their <strong>Cisco</strong> <strong>Unity</strong> accounts are created; typically, thisID is the internal phone number that rings a subscriber phone. See also alternate extension andextension.A list of message recipients (subscribers, remote users, and/or public distribution lists) used to sendvoice messages to more than one subscriber at a time. The individual subscriber who owns the list isthe only person who can send messages to the list.OL-7374-01<strong>Cisco</strong> <strong>Unity</strong> 4.0(5) and Later <strong>Voice</strong> <strong>Messaging</strong> <strong>User</strong> <strong>Guide</strong> (With Microsoft Exchange)GL-3
Glossarypromptpublic distributionlistA recorded instruction, statement, or question in the <strong>Cisco</strong> <strong>Unity</strong> conversation.A list of message recipients (subscribers and/or public distribution lists) used to send voice messagesto more than one subscriber at a time. Anyone can send messages to public distribution lists, which arecreated and maintained by an administrator.Rrecorded nameA recording of the name of a subscriber; also called voice name.SSMTPstandard greetingstandard hourssubscribersubscriberconversationsubscriberenrollmentSimple Mail Transfer Protocol. A format used to send e-mail messages between servers.A recording that plays during the standard hours specified for the active schedule.The hours and days in a schedule that are designated as business hours.Anyone enrolled on <strong>Cisco</strong> <strong>Unity</strong>.The set of prerecorded instructions and options that <strong>Cisco</strong> <strong>Unity</strong> plays over the phone to subscribers,enabling them to send messages, hear messages, and change settings.The process of preparing a subscriber account for use: recording a name and greeting, setting apassword, and choosing whether the subscriber is listed in the directory.TTRAPtouchtone keysTelephone Recording and Playback. The feature that allows subscribers to use the phone as therecording and playback device for the Media Master control bar, as an alternative to using a computermicrophone and speakers. See also Media Master control bar.The 12 buttons with letters, numbers, and/or characters on a phone keypad; callers press keys to dialextensions, spell names, and select options in the <strong>Cisco</strong> <strong>Unity</strong> conversation.Uunidentified callerAn outside caller, or a subscriber who did not log on to <strong>Cisco</strong> <strong>Unity</strong> before calling from an externalphone or from a phone that is not associated with a subscriber account (such as a conference room).Subscribers who call from an extension inside the organization on a phone system that does not supportidentified subscriber messaging are also considered unidentified callers.GL-4<strong>Cisco</strong> <strong>Unity</strong> 4.0(5) and Later <strong>Voice</strong> <strong>Messaging</strong> <strong>User</strong> <strong>Guide</strong> (With Microsoft Exchange)OL-7374-01
INDEXAaccessMedia Master 22-1accessibilityTTY 3-1using Media Master 22-1addressing messageschanging settings 14-4alternate devices, about 13-3alternate greeting 16-1Bbrief menus, changing to 14-2broadcast message 7-1browsersettings for <strong>Cisco</strong> PCA 3-2busy greeting 16-2Ccaller message options 17-3call screeningabout 17-1announcing call before connecting 17-4asking callers for a name 17-4sending calls to voice mail 17-4sharing a phone 17-4call transferabout 17-1message options for callers 17-3putting callers on hold 17-2sending calls to an extension 17-2sending calls to voice mail 17-2specifying how calls are handled when phone isbusy 17-2cell phone, using as an alternate device 13-3changing<strong>Cisco</strong> PCA passwords 5-2directory listing status 13-4fax delivery number 13-3menu types 14-2message addressing settings 14-4personal settings 13-1phone menu settings 14-1phone passwords 5-1private list members 20-3recorded name 13-1checkingdeleted messages by phone 11-2messages from <strong>Cisco</strong> <strong>Unity</strong> Inbox 8-5new and saved messages by phone 8-1<strong>Cisco</strong> PCAbrowser settings 3-2<strong>Cisco</strong> Personal Communications Assistanthow to log on 4-2<strong>Cisco</strong> <strong>Unity</strong>optional features 1-1subscriber, defined 1-1<strong>Cisco</strong> <strong>Unity</strong> Assistantbrowser settings 3-2Help 3-3Media Master control bar 3-4OL-7374-01<strong>Cisco</strong> <strong>Unity</strong> 4.0(5) and Later <strong>Voice</strong> <strong>Messaging</strong> <strong>User</strong> <strong>Guide</strong> (With Microsoft Exchange)IN-1
Index<strong>Cisco</strong> <strong>Unity</strong> Inboxbrowser settings 3-2Help 3-3Media Master control bar 3-4closed greeting 16-2conversationchanging menu types 14-2<strong>Cisco</strong> <strong>Unity</strong> 3-1customizing 3-2customizing logon 14-4language, about 14-1language, changing 14-1menu styles, about 14-2speed, changing 14-3style, about 3-1volume, changing 14-2copying sound recordings 3-4Ddeleted messages 11-1delivering faxesabout 13-2changing number 13-3delivery optionssending messages by phone 12-2sending messages from <strong>Cisco</strong> <strong>Unity</strong> Inbox 12-3delivery receipt 9-1directory listing statusabout 13-4changing 13-4distribution lists. See also private lists, public distributionlistsEFfax messageschanging delivery number 13-3delivering 13-2fax option 1-1findingfinding a deleted message 11-2messages by phone 10-1forwarding messagesby phone 12-6from the <strong>Cisco</strong> <strong>Unity</strong> Inbox 12-8full mailbox 6-1full menus, changing to 14-2Ggreetingsabout 16-1enabling or disabling 16-2overriding other greetings 16-2recording 16-2Hheard receipt 9-1Help<strong>Cisco</strong> <strong>Unity</strong> Assistant 3-3<strong>Cisco</strong> <strong>Unity</strong> Inbox 3-3hotkeys for Media Master 22-1IID 2-1internal greeting 16-2e-mail messageshearing over the phone 1-1enrolling on <strong>Cisco</strong> <strong>Unity</strong> 2-1IN-2<strong>Cisco</strong> <strong>Unity</strong> 4.0(5) and Later <strong>Voice</strong> <strong>Messaging</strong> <strong>User</strong> <strong>Guide</strong> (With Microsoft Exchange)OL-7374-01
IndexKkeyboard shortcuts for Media Master 22-1Llanguagechanging 14-1<strong>Cisco</strong> <strong>Unity</strong> conversation 14-1logging in<strong>Cisco</strong> Personal Communications Assistant 4-2logging onto <strong>Cisco</strong> <strong>Unity</strong> by phone 4-1logonconversation 14-4playing message counts 14-4playing recorded name 14-4Mmailbox sizefactors that affect size 6-1managing 6-1storage limits 6-1Media Masterkeyboard shortcuts 22-1Media Master control barabout 3-4Options menu 3-4menus 3-1styles 14-2menu typeschanging 14-2message notification. See notificationmessage numberusing to find a message 10-1message playback settings 18-1messagesadjusting playback speed 15-4adjusting playback volume 15-2allowing callers to edit messages 17-3allowing callers to mark urgent 17-3changing addressing settings 14-4changing options for callers 17-3checking by phone 8-1, 11-2checking from <strong>Cisco</strong> <strong>Unity</strong> Inbox 8-5choosing what callers can do 17-3deleted 11-1enabling the Message Type menu 18-2fax delivery 13-2finding by phone 10-1forwarding by phone 12-6forwarding from the <strong>Cisco</strong> <strong>Unity</strong> Inbox 12-8message number, playing 18-5message number, using to find a message 10-1options for callers, about 17-1playback order 18-3properties 18-5replying to by phone 12-4replying to from <strong>Cisco</strong> <strong>Unity</strong> Inbox 12-5saved 8-1sender name, playing 18-5sending by phone 12-1time stamp, playing 18-5types 18-3types for notification 19-1Message Type menu 18-2Nname. See recorded nameNDR 3-3, 9-1nondelivery receipt 9-1notificationabout 19-1changing options 19-1changing phone number by phone 19-10changing schedule 19-1OL-7374-01<strong>Cisco</strong> <strong>Unity</strong> 4.0(5) and Later <strong>Voice</strong> <strong>Messaging</strong> <strong>User</strong> <strong>Guide</strong> (With Microsoft Exchange)IN-3
Indexchanging types of messages 19-1device, enabling or disabling by phone 19-9device, enabling or disabling from the <strong>Cisco</strong> <strong>Unity</strong>Assistant 19-1devices 19-1procedureTo access <strong>Cisco</strong> <strong>Unity</strong> Assistant online help 3-3to access <strong>Cisco</strong> <strong>Unity</strong> by phone 4-1To access the <strong>Cisco</strong> <strong>Unity</strong> Inbox online help 3-4public distribution lists 12-1Ooff hours greeting 16-2Options menu, Media Master control bar 3-4Ppasswordsabout 5-1changing <strong>Cisco</strong> PCA 5-2changing phone 5-1initial 2-1securing and protecting them 5-1performance issues 6-1personal settings, changing 13-1phone menus 3-1language, changing 14-1speed, changing 14-3volume, changing 14-2phone menu settings, changing 14-1PIN. See passwords 5-1playback speed, changing 15-4playback volume, changing 15-2playingdeleted messages 11-2new and saved messages 8-1private listsabout 12-1, 20-1changing members 20-3ProcedureTo enroll on <strong>Cisco</strong> <strong>Unity</strong> 2-1Rread receipt 9-1receiptsabout 9-1delivery 3-3managing from the <strong>Cisco</strong> <strong>Unity</strong> Inbox 9-4nondelivery (NDRs) 3-3read (heard) 3-3requesting return receipts by phone 12-2requesting return receipts from <strong>Cisco</strong> <strong>Unity</strong> Inbox 12-3responding to NDRs by phone 12-4responding to NDRs from <strong>Cisco</strong> <strong>Unity</strong> Inbox 9-5, 12-5types defined 9-1recorded nameabout 13-1changing 13-1recordinggreetings 16-2recording and playback settings 15-1recording devicesabout 15-1replying tomessages by phone 12-4messages from <strong>Cisco</strong> <strong>Unity</strong> Inbox 12-5restoring deleted messages 11-2return receipt 9-1Ssaved messages 8-1schedule for notification 19-1IN-4<strong>Cisco</strong> <strong>Unity</strong> 4.0(5) and Later <strong>Voice</strong> <strong>Messaging</strong> <strong>User</strong> <strong>Guide</strong> (With Microsoft Exchange)OL-7374-01
Indexscreening calls 17-4sendingvoice messages by phone 12-1sending messagesselecting delivery options by phone 12-2selecting delivery options from <strong>Cisco</strong> <strong>Unity</strong> Inbox 12-3SMS message notification 19-1SMTP message notification 19-1speedchanging 14-3speed, changing for message playback 15-4standard greeting 16-2subscriber 1-1system broadcast message 7-1system greeting 16-2Ttext-to-speech option 1-1transfer. See call transferTTYabout 1-1using TTY phones 3-1Uunidentified caller 12-1unread receipt 9-1Vvolumechanging 14-2volume, changing for message playback 15-2OL-7374-01<strong>Cisco</strong> <strong>Unity</strong> 4.0(5) and Later <strong>Voice</strong> <strong>Messaging</strong> <strong>User</strong> <strong>Guide</strong> (With Microsoft Exchange)IN-5
IndexIN-6<strong>Cisco</strong> <strong>Unity</strong> 4.0(5) and Later <strong>Voice</strong> <strong>Messaging</strong> <strong>User</strong> <strong>Guide</strong> (With Microsoft Exchange)OL-7374-01