


You also want an ePaper? Increase the reach of your titles
YUMPU automatically turns print PDFs into web optimized ePapers that Google loves.
The <strong>Paper</strong> <strong>Enigma</strong> Machine<br />
http://mckoss.com/crypto/enigma.htm<br />
Introduction<br />
<strong>Mike</strong> <strong>Koss</strong><br />
mike04@mckoss.com<br />
Wednesday, April 28, 2004<br />
Having been fascinated with codes and secret writing<br />
since I was young, I had a special fascination for the<br />
mechanical cryptographic machines I read about in<br />
Martin Gardner’s Codes, Ciphers, and Secret Writing,<br />
and in David Kahn’s The Code Breakers. While there<br />
are several museums where you can see some of these<br />
devices they are usually placed behind a glass case<br />
where you cannot see for yourself how they work.<br />
With the advent of the Internet, it became possible for<br />
people with obscure hobbies like collecting<br />
cryptographic machines to find others with similar<br />
interests and a market was born on sites like eBay. I<br />
first realized that I could own an <strong>Enigma</strong> of my own via<br />
a Bletchley Park email mailing list. A collector in Washington D.C. emailed the list<br />
indicating he had an <strong>Enigma</strong> to sell. We agreed on a price and I flew to<br />
Washington (from Seattle) to inspect the machine. We also took it to the National<br />
Cryptological Museum (http://www.nsa.gov/museum/) to check it for authenticity.<br />
Satisfied, I returned home to Seattle with my first historical cryptographic<br />
machine. I found replacement bulbs and wired up a battery so I could put the<br />
machine though its paces. Over the years, I’ve enjoyed demonstrating the<br />
workings of the <strong>Enigma</strong> to friends, and I have taken it to local area schools to<br />
lecture on the workings and historical significance of the <strong>Enigma</strong>.<br />
In 2003, I had the pleasure of lecturing to the MIT Alumni Club of Puget Sound.<br />
Knowing my audience would be very technical, I wanted to do more than have a<br />
simple show and tell. These folks would want to get their hands “dirty” and<br />
actually learn the inner workings of the machine. There are several <strong>Enigma</strong><br />
simulators available on the Web, but I wanted to be able to create a tangible “kit”<br />
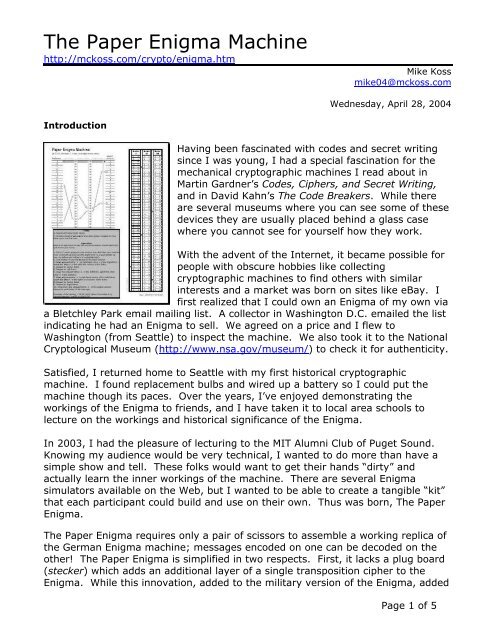
that each participant could build and use on their own. Thus was born, The <strong>Paper</strong><br />
<strong>Enigma</strong>.<br />
The <strong>Paper</strong> <strong>Enigma</strong> requires only a pair of scissors to assemble a working replica of<br />
the German <strong>Enigma</strong> machine; messages encoded on one can be decoded on the<br />
other! The <strong>Paper</strong> <strong>Enigma</strong> is simplified in two respects. First, it lacks a plug board<br />
(stecker) which adds an additional layer of a single transposition cipher to the<br />
<strong>Enigma</strong>. While this innovation, added to the military version of the <strong>Enigma</strong>, added<br />
Page 1 of 5
an extra layer of complexity to the original <strong>Enigma</strong>, it does not change the<br />
fundamental operation of the machine.<br />
Second, there are no “ring settings”. These merely allow the inner wiring of each<br />
rotor to be rotated with respect to the outer indicator settings. The only<br />
cryptographic effect is that the rotors will “roll-over” at a different position. I’ve<br />
left this off for simplicity as it does not change the basic workings of the machine.<br />
The fundamental operation of the <strong>Enigma</strong> is quite simple. When a keyboard letter<br />
is pressed, an electrical contact is made on one of 26 wires entering on the right<br />
hand side of the rotor system. That signal is then carried through the three rotors<br />
from right to left. The internal wiring of a rotor simply permutes each of the 26<br />
input contacts on the right to one of the 26 output contacts on the left.<br />
After traveling from right to left through all three rotors, the signal is then<br />
“reflected” by a fixed permutation (via a “reflecting rotor”) and then travels in<br />
reverse through all three wheels again (this time from left to right). The 26<br />
contacts are connected to light bulbs so that the ultimate code letter is illuminated<br />
on a lamp for as long as the keyboard key is held down.<br />
The right hand rotor rotates to the next letter position when each key is pressed,<br />
thus changing the final alphabet permutation for every letter of the message. The<br />
other rotors can also rotate as explained below.<br />
An excellent technical description of the workings of the <strong>Enigma</strong> can be found at<br />
Tony Sale’s web site: http://www.codesandciphers.org.uk/enigma/.<br />
How to use the <strong>Paper</strong> <strong>Enigma</strong><br />
Each part of the <strong>Enigma</strong> machine is modeled by a corresponding component of the<br />
<strong>Paper</strong> <strong>Enigma</strong>:<br />
Page 2 of 5
Real <strong>Enigma</strong> <strong>Paper</strong> <strong>Enigma</strong><br />
Electrical Rotor <strong>Paper</strong> Strip: Each connection made in a<br />
physical rotor is indicated by matching<br />
letters in the left and right hand column<br />
of a rotor strip.<br />
Note that each paper rotor has two<br />
copies of the alphabet printed on it. The<br />
reason being that we can always<br />
position the strip so that a particular<br />
letter can be at the top row of the<br />
machine and we still have 25 letters<br />
below it to line up with all the<br />
input/output rows.<br />
Reflecting Rotor Connections of the reflector are<br />
indicated by matching letters in the left<br />
hand column (marked “Reflector”).<br />
Rotor position indicator (windows) The top row (printed with gray<br />
background) aligns with the left-hand<br />
column letters of each rotor to indicate<br />
rotor positions.<br />
Keyboard and Lamps Right hand column of letters (marked<br />
“Input/Output”).<br />
To assemble the <strong>Paper</strong> <strong>Enigma</strong>, simply cut out the three rotor strips and place<br />
each one over the columns marked “Left Rotor”, “Center Rotor”, and “Right Rotor”.<br />
Operation<br />
To use the <strong>Paper</strong> <strong>Enigma</strong>, one need know only how to emulate the motion of the<br />
rotors after each letter, and be able to trace the path of the letter permutations<br />
through the rotor strips. It’s probably easiest to follow a specific example (this<br />
example is printed on the <strong>Paper</strong> <strong>Enigma</strong> in light gray).<br />
1. First position the rotors into their selected columns and starting positions.<br />
In our example, we’ll use rotors I, II, and III in order, and start at positions<br />
“M”, “C”, and “K”. In a real <strong>Enigma</strong>, the rotor wheels would be inserted into<br />
the machine, and then rotated until “M”, “C” and “K” were visible on the<br />
indicator windows above each rotor. In the paper <strong>Enigma</strong>, we position the<br />
strips so that the indicated left-hand letter of each rotor is over the first row<br />
(next to input/output letter “A”).<br />
Page 3 of 5
2. The first step of encoding any letter is to Advance the Rotors. This is done<br />
before encoding each letter – even the first one. The right-most rotor is<br />
always shifted up one letter. So, in our example, rotor III is shifted up to<br />
the “L” position.<br />
The rotors on the <strong>Enigma</strong> move something like an odometer – but not quite!<br />
In an odometer, we would expect the sequence 189 -> 190 -> 191. On an<br />
<strong>Enigma</strong>, we would have the corresponding sequence 189 -> 190 -> 201(!)<br />
The reason being that an <strong>Enigma</strong> machine does not contain a true “carry”<br />
mechanism. Rather, each rotor has a notch on its left hand side. When the<br />
notch rotates into the “roll-over” position, both the notched wheel AND the<br />
wheel to the left are moved one letter ahead.<br />
In the <strong>Paper</strong> <strong>Enigma</strong>, the notches are indicated with small upward pointing<br />
arrows along the left edge. When the starting position for a letter has an<br />
arrow in the first row, move that rotor and the one to its left up one position.<br />
Note that in no circumstance should any rotor advance more than one<br />
position between two successive letter encodings; either the right wheel will<br />
move by itself, or the right wheel and the middle wheel will move together,<br />
or all three wheels will advance one letter.<br />
Page 4 of 5
3. Now it is a simple matter to trace the path of the permutations through the<br />
machine. Starting at the input letter on the right (in this case, “E”), note the<br />
letter on the right-most rotor III (another “E”). Find the matching “E” in the<br />
left hand column of rotor III.<br />
4. That “E” lines up with the letter “Y” on the right hand column of the center<br />
rotor II. Find “Y” in the left hand column.<br />
5. “Y” lines up with “V” in left-most rotor I. Locate “V” in the left hand column.<br />
6. “V” lines up with “J” in the reflector. Find the other letter “J” in the reflector.<br />
7. Now we trace the signal path back through the rotors form left to right. “J”<br />
in the reflector lines up with a “J” in rotor I.<br />
8. “J” lines up with “P” in rotor II.<br />
9. “P” lines up with “D” in rotor III.<br />
10. Finally “D” lines up with “Q” in the Input/Output column. Our output<br />
letter is “Q”.<br />
To encode (or decode) a whole message, repeat the above steps for each letter.<br />
Note that the <strong>Enigma</strong> can be used to decode any message by simply starting the<br />
machine in the same configuration as the encoding. <strong>Enigma</strong> encodings are<br />
symmetrical; if “A” encodes to “X”, then “X” will encode to “A” by following the<br />
reverse path through the rotors.<br />
Starting from the position above (rotors I-II-III starting at positions M-C-K) try<br />
decoding this sample message: QMJIDO MZWZJFJR.<br />
Availability<br />
The <strong>Paper</strong> <strong>Enigma</strong> is available as a free download from<br />
http://mckoss.com/crypto/enigma.htm. All you need are a pair of scissors and<br />
you too can have a working model of the famous World War II German <strong>Enigma</strong><br />
machine.<br />
Biographical Sketch<br />
<strong>Mike</strong> <strong>Koss</strong> is a software engineer living in the Seattle area. He received his MS in<br />
computer science from MIT in 1983, including a study of cryptology under<br />
Professor Ron Rivest. Besides feeding his eBay addiction with antique<br />
cryptographic machines, Mr. <strong>Koss</strong>’s interests include programming instruction and<br />
web-based application development. He is currently president of the MIT Alumni<br />
Club of Puget Sound.<br />
Page 5 of 5