Convertible "Alwaysâ¢" - Baby's Dream Furniture
Convertible "Alwaysâ¢" - Baby's Dream Furniture
Convertible "Alwaysâ¢" - Baby's Dream Furniture
- No tags were found...

You also want an ePaper? Increase the reach of your titles
YUMPU automatically turns print PDFs into web optimized ePapers that Google loves.
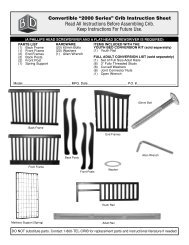
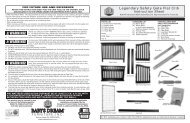
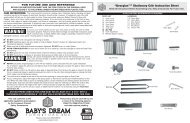
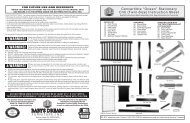
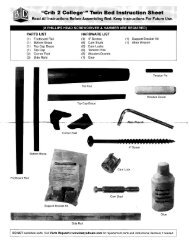
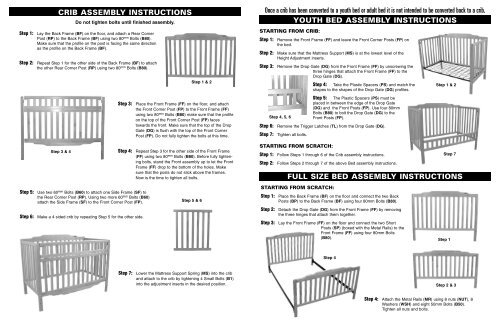
CRIB ASSEMBLY INSTRUCTIONSDo not tighten bolts until finished assembly.Step 1: Lay the Back Frame (BF) on the floor, and attach a Rear CornerPost (RP) to the Back Frame (BF) using two 80 mm Bolts (B80).Make sure that the profile on the post is facing the same directionas the profile on the Back Frame (BF).Step 2: Repeat Step 1 for the other side of the Back Frame (BF) to attachthe other Rear Corner Post (RP) using two 80 mm Bolts (B80).Step 1 & 2Step 3: Place the Front Frame (FF) on the floor, and attachthe Front Corner Post (FP) to the Front Frame (FF)using two 80 mm Bolts (B80) make sure that the profileon the top of the Front Corner Post (FP) facestowards the front. Make sure that the top of the DropGate (DG) is flush with the top of the Front CornerPost (FP). Do not fully tighten the bolts at this time.Once a crib has been converted to a youth bed or adult bed it is not intended to be converted back to a crib.YOUTH BED ASSEMBLY INSTRUCTIONSSTARTING FROM CRIB:Step 1: Remove the Front Frame (FF) and leave the Front Corner Posts (FP) onthe bed.Step 2: Make sure that the Mattress Support (MS) is at the lowest level of theHeight Adjustment inserts.Step 3: Remove the Drop Gate (DG) from the Front Frame (FF) by unscrewing thethree hinges that attach the Front Frame (FF) to theDrop Gate (DG).Step 4, 5, 6Step 4: Take the Plastic Spacers (PS) and match theshapes to the shapes of the Drop Gate (DG) profiles.Step 5: The Plastic Spacers (PS) must beplaced in between the edge of the Drop Gate(DG) and the Front Posts (FP). Use four 80mmBolts (B80) to bolt the Drop Gate (DG) to theFront Posts (FP).Step 6: Remove the Trigger Latches (TL) from the Drop Gate (DG).Step 7: Tighten all bolts.Step 1 & 2Step 3 & 4Step 4: Repeat Step 3 for the other side of the Front Frame(FF) using two 80 mm Bolts (B80). Before fully tighteningbolts, stand the Front assembly up to let the FrontFrame (FF) drop to the bottom of the holes. Makesure that the posts do not stick above the frames.Now is the time to tighten all bolts.STARTING FROM SCRATCH:Step 1: Follow Steps 1 through 6 of the Crib assembly instructions.Step 7Step 2: Follow Steps 2 through 7 of the above Bed assembly instructions.FULL SIZE BED ASSEMBLY INSTRUCTIONSStep 5: Use two 60 mm Bolts (B60) to attach one Side Frame (SF) tothe Rear Corner Post (RP). Using two more 60 mm Bolts (B60)attach the Side Frame (SF) to the Front Corner Post (FP).Step 6: Make a 4 sided crib by repeating Step 5 for the other side.Step 5 & 6STARTING FROM SCRATCH:Step 1: Place the Back Frame (BF) on the floor and connect the two BackPosts (BP) to the Back Frame (BF) using four 80mm Bolts (B80).Step 2: Detach the Drop Gate (DG) from the Front Frame (FF) by removingthe three hinges that attach them together.Step 3: Lay the Front Frame (FF) on the floor and connect the two ShortPosts (SP) (boxed with the Metal Rails) to theFront Frame (FF) using four 80mm Bolts(B80).Step 1Step 4Step 7: Lower the Mattress Support Spring (MS) into the criband attach to the crib by tightening 4 Small Bolts (B1)into the adjustment inserts in the desired position.Step 2 & 3Step 4: Attach the Metal Rails (MR) using 8 nuts (NUT), 8Washers (WSH) and eight 50mm Bolts (B50).Tighten all nuts and bolts.