Convertible "Alwaysâ¢" - Baby's Dream Furniture
Convertible "Alwaysâ¢" - Baby's Dream Furniture
Convertible "Alwaysâ¢" - Baby's Dream Furniture
- No tags were found...

Create successful ePaper yourself
Turn your PDF publications into a flip-book with our unique Google optimized e-Paper software.
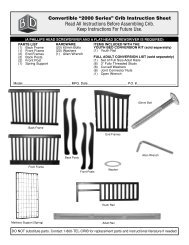
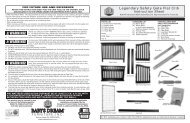
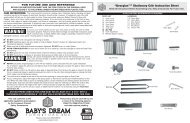
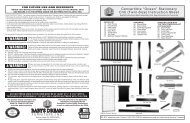
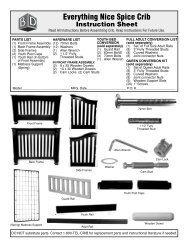
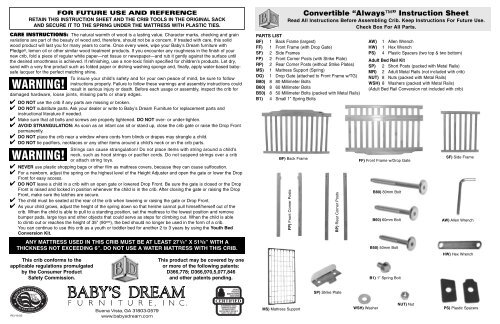
FOR FUTURE USE AND REFERENCERETAIN THIS INSTRUCTION SHEET AND THE CRIB TOOLS IN THE ORIGINAL SACKAND SECURE IT TO THE SPRING UNDER THE MATTRESS WITH PLASTIC TIES.CARE INSTRUCTIONS: The natural warmth of wood is a lasting value. Character marks, checking and grainvariations are part of the beauty of wood and, therefore, should not be a concern. If treated with care, this solidwood product will last you for many years to come. Once every week, wipe your Baby’s <strong>Dream</strong> furniture withPledge ® , lemon oil or other similar wood treatment products. If you encounter any roughness in the finish of yournew crib, fold a piece of regular white paper—not tissue or newspaper—and rub it gently against the surface untilthe desired smoothness is achieved. If refinishing, use a non-toxic finish specified for children’s products. Let dry,sand with a very fine product such as folded paper or dishing washing sponge and, finally, apply water-based babysafelacquer for the perfect matching shine.WARNING!To insure your child’s safety and for your own peace of mind, be sure to followinstructions properly. Failure to follow these warnings and assembly instructions couldresult in serious injury or death. Before each usage or assembly, inspect the crib fordamaged hardware, loose joints, missing parts or sharp edges.✔ DO NOT use the crib if any parts are missing or broken.✔ DO NOT substitute parts. Ask your dealer or write to Baby’s <strong>Dream</strong> <strong>Furniture</strong> for replacement parts andinstructional literature if needed.✔ Make sure that all bolts and screws are properly tightened. DO NOT over- or under-tighten.✔ AVOID STRANGULATION: As soon as an infant can sit or stand up, close the crib gate or raise the Drop Frontpermanently.✔ DO NOT place the crib near a window where cords from blinds or drapes may strangle a child.✔ DO NOT tie pacifiers, necklaces or any other items around a child’s neck or on the crib parts.WARNING!Strings can cause strangulation! Do not place items with string around a child’sneck, such as hood strings or pacifier cords. Do not suspend strings over a cribor attach string toys.✔ NEVER use plastic shopping bags or other film as mattress covers, because they can cause suffocation.✔ For a newborn, adjust the spring on the highest level of the Height Adjuster and open the gate or lower the DropFront for easy access.✔ DO NOT leave a child in a crib with an open gate or lowered Drop Front. Be sure the gate is closed or the DropFront is raised and locked in position whenever the child is in the crib. After closing the gate or raising the DropFront, make sure the latches are secure.✔ The child must be seated at the rear of the crib when lowering or raising the gate or Drop Front.✔ As your child grows, adjust the height of the spring down so that he/she cannot pull himself/herself out of thecrib. When the child is able to pull to a standing position, set the mattress to the lowest position and removebumper pads, large toys and other objects that could serve as steps for climbing out. When the child is ableto climb out or reaches the height of 35” (90 cm ), the bed should no longer be used in the form of a crib.You can continue to use this crib as a youth or toddler bed for another 2 to 3 years by using the Youth BedConversion Kit.ANY MATTRESS USED IN THIS CRIB MUST BE AT LEAST 27 1 /4” X 51 5 /8” WITH ATHICKNESS NOT EXCEEDING 6”. DO NOT USE A WATER MATTRESS WITH THIS CRIB.This crib conforms to theapplicable regulations promulgatedby the Consumer ProductSafety Commission.This product may be covered by oneor more of the following patents:D366,778; D366,970,5,077,846and other patents pending.<strong>Convertible</strong> “Always” Instruction SheetRead All Instructions Before Assembling Crib. Keep Instructions For Future Use.Check Box For All Parts.PARTS LISTBF) 1 Back Frame (largest)FF) 1 Front Frame (with Drop Gate)SF) 2 Side FramesFP) 2 Front Corner Posts (with Strike Plate)RP) 2 Rear Corner Posts (without Strike Plates)MS) 1 Mattress Support (Spring)DG) 1 Drop Gate (attached to Front Frame w/TG)B80) 8 80 Millimeter BoltsB60) 8 60 Millimeter BoltsB50) 8 50 Millimeter Bolts (packed with Metal Rails)B1) 4 Small 1” Spring BoltsBF) Back FrameFP) Front Corner PostsRP) Rear Corner PostsAW) 1 Allen WrenchHW) 1 Hex WrenchPS) 4 Plastic Spacers (two top & two bottom)Adult Bed Rail KitSP) 2 Short Posts (packed with Metal Rails)MR) 2 Adult Metal Rails (not included with crib)NUT) 8 Nuts (packed with Metal Rails)WSH) 8 Washers (packed with Metal Rails)(Adult Bed Rail Conversion not included with crib)FF) Front Frame w/Drop GateB80) 80mm BoltB60) 60mm BoltB50) 50mm BoltB1) 1” Spring BoltSF) Side FrameAW) Allen WrenchHW) Hex WrenchSP) Strike PlateREV 6/03Buena Vista, GA 31803-0579www.babysdream.comMS) Mattress SupportWSH) WasherNUT) NutPS) Plastic Spacers
CRIB ASSEMBLY INSTRUCTIONSDo not tighten bolts until finished assembly.Step 1: Lay the Back Frame (BF) on the floor, and attach a Rear CornerPost (RP) to the Back Frame (BF) using two 80 mm Bolts (B80).Make sure that the profile on the post is facing the same directionas the profile on the Back Frame (BF).Step 2: Repeat Step 1 for the other side of the Back Frame (BF) to attachthe other Rear Corner Post (RP) using two 80 mm Bolts (B80).Step 1 & 2Step 3: Place the Front Frame (FF) on the floor, and attachthe Front Corner Post (FP) to the Front Frame (FF)using two 80 mm Bolts (B80) make sure that the profileon the top of the Front Corner Post (FP) facestowards the front. Make sure that the top of the DropGate (DG) is flush with the top of the Front CornerPost (FP). Do not fully tighten the bolts at this time.Once a crib has been converted to a youth bed or adult bed it is not intended to be converted back to a crib.YOUTH BED ASSEMBLY INSTRUCTIONSSTARTING FROM CRIB:Step 1: Remove the Front Frame (FF) and leave the Front Corner Posts (FP) onthe bed.Step 2: Make sure that the Mattress Support (MS) is at the lowest level of theHeight Adjustment inserts.Step 3: Remove the Drop Gate (DG) from the Front Frame (FF) by unscrewing thethree hinges that attach the Front Frame (FF) to theDrop Gate (DG).Step 4, 5, 6Step 4: Take the Plastic Spacers (PS) and match theshapes to the shapes of the Drop Gate (DG) profiles.Step 5: The Plastic Spacers (PS) must beplaced in between the edge of the Drop Gate(DG) and the Front Posts (FP). Use four 80mmBolts (B80) to bolt the Drop Gate (DG) to theFront Posts (FP).Step 6: Remove the Trigger Latches (TL) from the Drop Gate (DG).Step 7: Tighten all bolts.Step 1 & 2Step 3 & 4Step 4: Repeat Step 3 for the other side of the Front Frame(FF) using two 80 mm Bolts (B80). Before fully tighteningbolts, stand the Front assembly up to let the FrontFrame (FF) drop to the bottom of the holes. Makesure that the posts do not stick above the frames.Now is the time to tighten all bolts.STARTING FROM SCRATCH:Step 1: Follow Steps 1 through 6 of the Crib assembly instructions.Step 7Step 2: Follow Steps 2 through 7 of the above Bed assembly instructions.FULL SIZE BED ASSEMBLY INSTRUCTIONSStep 5: Use two 60 mm Bolts (B60) to attach one Side Frame (SF) tothe Rear Corner Post (RP). Using two more 60 mm Bolts (B60)attach the Side Frame (SF) to the Front Corner Post (FP).Step 6: Make a 4 sided crib by repeating Step 5 for the other side.Step 5 & 6STARTING FROM SCRATCH:Step 1: Place the Back Frame (BF) on the floor and connect the two BackPosts (BP) to the Back Frame (BF) using four 80mm Bolts (B80).Step 2: Detach the Drop Gate (DG) from the Front Frame (FF) by removingthe three hinges that attach them together.Step 3: Lay the Front Frame (FF) on the floor and connect the two ShortPosts (SP) (boxed with the Metal Rails) to theFront Frame (FF) using four 80mm Bolts(B80).Step 1Step 4Step 7: Lower the Mattress Support Spring (MS) into the criband attach to the crib by tightening 4 Small Bolts (B1)into the adjustment inserts in the desired position.Step 2 & 3Step 4: Attach the Metal Rails (MR) using 8 nuts (NUT), 8Washers (WSH) and eight 50mm Bolts (B50).Tighten all nuts and bolts.