DIY dressing table - kitchen trends - Home-Dzine
DIY dressing table - kitchen trends - Home-Dzine
DIY dressing table - kitchen trends - Home-Dzine

You also want an ePaper? Increase the reach of your titles
YUMPU automatically turns print PDFs into web optimized ePapers that Google loves.
<strong>Home</strong>-<strong>Dzine</strong><br />
online<br />
IDEAS AND INSPIRATION FOR YOUR HOME<br />
July 2012<br />
DESIGN<br />
DECORATING<br />
<strong>DIY</strong><br />
RECLAIMED RECLAIMED STYLE<br />
STYLE
a word or two 5 KITCHEN<br />
TRENDS FROM<br />
MILAN TRADE<br />
FAIR<br />
It’s so nice to be able to concentrate on the<br />
magazine again, and I enjoyed doing quite<br />
a few projects for this issue, which features<br />
not only <strong>DIY</strong> projects but quite a bit on<br />
design as well.<br />
I know I have asked for your input before<br />
but if you have any ideas or suggestions<br />
for content for the <strong>Home</strong>-<strong>Dzine</strong> Online<br />
magazine, or any specific features you<br />
would like to see in the magazine - or on the<br />
website - please drop us a line at homedzine@iburst.co.za.<br />
Enjoy!<br />
Janice<br />
<strong>Home</strong>-<strong>Dzine</strong> Online is written and compiled by Janice Anderssen.<br />
All projects in this issue, or any other issue, remain the property<br />
of <strong>Home</strong>-<strong>Dzine</strong> and Janice Anderssen, or the respective<br />
copyright holders, and may not be copied or reproduced in any<br />
manner whatsoever without written permission.<br />
13<br />
DESIGN<br />
SECRETS<br />
19 <strong>DIY</strong><br />
DRESSING<br />
TABLE<br />
11<br />
SHUTTERS &<br />
BLINDS
29<br />
35<br />
DESIGN FOR<br />
PROFIT<br />
36<br />
RECLAIMED<br />
STYLE<br />
DESIGN WITHOUT LIMITS<br />
45<br />
TAGINES<br />
24<br />
MAKE AN<br />
ADJUSTABLE<br />
MIRROR<br />
36<br />
DESIGNERS<br />
WITH SAVVY<br />
54<br />
GLITTER<br />
PLAY DOUGH<br />
49<br />
COURTYARD<br />
GARDENS
4<br />
Eurolux delivers ondemand<br />
lighting<br />
Cost and energy savings are major design<br />
considerations for modern lighting systems. An<br />
estimated 29% of a typical office’selectricityusage<br />
is spent on lighting, but occupancy sensors can<br />
reduce this usage by half. The recently released<br />
Eurolux range of lighting motion detectors offers<br />
an effective occupancy sensor solution for most<br />
commercial, industrial and residential buildings.<br />
“Occupancy sensors have become a standard<br />
requirement in modern lighting design,” says Shaun<br />
Bouchier, director at Eurolux. “Besides providing a<br />
means of minimizing energy consumption, it enhances<br />
safety and also reduces light pollution.”<br />
“Wall sensors work well in small rooms, like individual<br />
offices, bathrooms etc., while ceiling sensors are better<br />
suited to large spaces or wherever the lighting load is<br />
higher,” explains Bouchier.<br />
The detection distance of the<br />
Eurolux products range from 12<br />
meters on the CO98 to 2-16 meters<br />
on the CO95.<br />
The new Eurolux range consists<br />
of recessed and surface mounted<br />
models with LUX levels ranging<br />
from 3 – 2000 LUX (adjus<strong>table</strong>).<br />
The Eurolux CO96<br />
[shown bottom left] is<br />
a surface mounted infrared<br />
sensor most suited to use in<br />
offices, boardrooms and residential<br />
homes, with a 380 degree detection range. With such<br />
sensors, motion is detected when an infrared source;<br />
such as a human; passes in front of another infrared<br />
source with a different temperature. The sensors react<br />
to the changes in heat patterns created by the moving<br />
person and turn lights on accordingly. This product is<br />
also available as a recessed unit.<br />
According to Bouchier, the advantages of passive<br />
infrared are that they are highly resistant to false<br />
triggering, relatively inexpensive, and do not radiate<br />
any energy. However, because they operate on a lineof-sight<br />
mechanism, they don’t work well over long<br />
distances (+ 12 meters) or in rooms with obstructions.<br />
Proper placement and orientation of occupancy<br />
sensors is crucial, says Bouchier. “They must be able<br />
to sense all occupants to avoid inadvertently turning<br />
off lights while the space is occupied.” In addition, the<br />
sensor must not be too sensitive as to cause “false<br />
positive” triggering such as the detection of passerby’s<br />
in adjoining hallways.<br />
Lighting motion sensors are most effective in<br />
spaces that are intermittently occupied, meaning it<br />
is unoccupied for two or more hours per day, and<br />
where the lights are typically left on when the space<br />
is unoccupied.<br />
For more information on this range<br />
and the effective use of lighting motion<br />
sensors contact Eurolux on 021 528 8400<br />
or admin@eurolux.co.za
The annual Milan<br />
Trade Fair places<br />
emphasis on HOME.<br />
As the largest furniture show in the<br />
world, the Milan Trade Fair - iSaloni<br />
- draws in excess of 2,000 exhibitors<br />
to show case future design <strong>trends</strong> for<br />
all areas of a home.<br />
It may be the 21st century, but<br />
designers are reinterpreting the<br />
past in design that is modern and<br />
more personal.<br />
decor and design<br />
5
When Marchi designed this <strong>kitchen</strong>, the<br />
picture in my mind was to create the ideal<br />
interior for a young couple who wanted<br />
an interior with good taste, but practical<br />
at the same time. A versatile <strong>kitchen</strong> to<br />
form a comfor<strong>table</strong> background for a range<br />
of activities and a changing life-style: an<br />
environment that would give a warm and<br />
welcoming feel to the whole apartment<br />
which had recently been restored.<br />
They wanted a style that was congenial but<br />
still original, with plenty of room to invite<br />
friends for entertaining, and therefore it had<br />
to be functional, but also stylish enough to<br />
be incorporated into the living room area.<br />
A combination of comfort and elegance,<br />
providing upscale contemporary elements<br />
for a very<br />
practical<br />
modern<br />
<strong>kitchen</strong>,<br />
ideal for<br />
everyday<br />
living and<br />
conceived as the<br />
focal point of the<br />
home.<br />
The attention given to<br />
details such as the old<br />
silver handles and the<br />
total modular flexibility<br />
highlighted by top-quality<br />
electrical appliances<br />
embellish and enhance<br />
the vintage style of this<br />
artisanal <strong>kitchen</strong>.<br />
This is a <strong>DIY</strong> dream <strong>kitchen</strong>, with simple<br />
cabinet design, with painted finish in your<br />
personal choice of colours, precut stone<br />
tops, silver handles and the total modular<br />
flexibility highlighted by top-quality<br />
electrical appliances to embellish and<br />
enhance the vintage style of this artisanal<br />
<strong>kitchen</strong>.<br />
7
8<br />
If the iSaloni Milan Trade Fair is anything to go<br />
by, and it usually is, <strong>kitchen</strong> design is about to<br />
change. Gone are the wrapped and foil doors<br />
and cabinets, the high lacquer glossy finish is<br />
tossed aside and <strong>kitchen</strong>s are morphing into<br />
how the heart of a home should look... warm,<br />
comfor<strong>table</strong> and more natural.<br />
What I love about this new trend is the fact<br />
that it is totally <strong>DIY</strong>-able. Painted finishes are<br />
combined with metallic elements to add a<br />
touch of glam without the expensive price tag.<br />
Your local Metals Centre offer a wide range of<br />
stainless steel, aluminium and tin sheeting in<br />
varying thicknesses that is easy to cut and use.<br />
paint<br />
perfect
warm<br />
wood<br />
If you prefer natural finishes for your <strong>kitchen</strong><br />
- a more rustic look - then you can easily<br />
incorporate wood cabinets and fittings into<br />
this causal and homey style. Using pine,<br />
meranti or saligna is an affordable way to<br />
design and assemble a new <strong>kitchen</strong> and be<br />
sustainable too.<br />
Sealed natural stone is a wonderful finish for<br />
<strong>kitchen</strong> countertops, offering both practicality<br />
and durability, plus it’s an easy <strong>DIY</strong> option.<br />
You will find a wide selection of natural stone<br />
tiles at your local Builders Warehouse.<br />
9
10<br />
A feature wall in energising<br />
red brings some rouge to a<br />
minimalist <strong>kitchen</strong>, and helps<br />
to define the dining area of this<br />
open-plan space, too.<br />
You will need:<br />
Plascon Cashmere Rickshaw Red (R4-B1-1)<br />
Plascon Cashmere Smoke Screen (B6-E2-1)<br />
Plascon Velvaglo White (VLO 1)<br />
Drop sheets<br />
Masking tape<br />
Paintbrush, 10 cm<br />
Paint roller<br />
Sandpaper, 180-grit<br />
Here’s how:<br />
1. Make sure the wall is clean and dry.<br />
If you’re painting over a coloured<br />
wall – especially one with a yellow or<br />
yellow-toned base – first neutralise it<br />
with two coats of a mid-tone grey, such<br />
as Plascon Cashmere Smoke Screen.<br />
This will help prevent show-through so<br />
you will need fewer coats of your chosen<br />
colour.<br />
On the other hand, if your base wall<br />
is white, apply two coats of Plascon<br />
Cashmere White.<br />
<strong>DIY</strong> TIP:<br />
Work on a drop sheet and allow the<br />
paint to dry between coats.<br />
2. Mask off any skirtings, doorframes and<br />
cornices. Using a 10cm paintbrush, paint<br />
two coats of Plascon Cashmere Rickshaw<br />
Red along the borders of the wall,<br />
working in the direction of the line you’re<br />
following. Next, use a roller to paint the<br />
rest of the wall in vertical strokes.<br />
Apply two coats, allowing the first coat to<br />
dry before you apply the second.<br />
<strong>DIY</strong> TIP:<br />
If necessary, when the wall is dry, use<br />
180-grit sandpaper to lightly sand any<br />
wooden skirtings, doorframes and<br />
cornices, mask off the adjacent wall<br />
and paint with Plascon Velvaglo White<br />
using a paintbrush. Allow to dry and<br />
finish with a second coat.
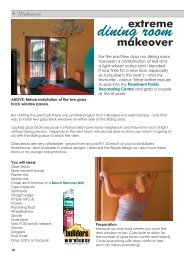
There is nothing more pleasurable than basking in winter sunshine slivering<br />
through a glass window or door on a cold day. These magic moments have<br />
us following the lazy sun with lizard-like devotion and curling our toes in<br />
woolly socks with delight. But as soon as the sun is cloaked, the cold grips<br />
us and we look for ways to replicate that natural warmth.<br />
It is the same windows and doors that invite the<br />
winter sun into our homes that are responsible<br />
for losing our homes’ warmth. Glass windows<br />
and doors lose and gain heat in four ways:<br />
Thermal radiation is the emission of electromagnetic<br />
waves from all matter that has a<br />
temperature greater than zero. It is due to this<br />
process that a clear glass window or door absorbs<br />
the warmth inside your home and then re-radiates<br />
it to the exterior.<br />
Heat conduction is the flow of thermal energy<br />
from a higher temperature to a lower temperature.<br />
A clear glass window or door allows the flow of<br />
thermal energy through the glass to the exterior.<br />
a comfor<strong>table</strong> home -<br />
all year round<br />
There are<br />
many ways<br />
to create a<br />
comfor<strong>table</strong><br />
home, without<br />
switching on.<br />
This month we<br />
take a look at<br />
shutters and<br />
blinds.<br />
Heat convection is the natural process by which<br />
cool air moves downwards and warm air takes<br />
its place. Due to thermal radiation and heat<br />
conduction the air near a clear glass window or<br />
door is cooled and due to convection is moves<br />
towards the floor hereby drawing more warm air<br />
from the room to take its place.<br />
Air leakage is relatively self explainable;<br />
openings due to damaged or poor fitted windows<br />
and doors allow warm air to be lost to the<br />
exterior.<br />
“South Africans love the outdoors and we are<br />
spoilt with so much natural beauty, therefore<br />
we design and build homes with fantastic glass<br />
11
12<br />
windows and doors, often stretching the expanse<br />
of a wall, allowing for maximum views and<br />
natural outdoor – indoor flow,’ says Stephen<br />
Palmer, managing director of American shutters.<br />
“However the same focus placed on the aesthetic<br />
and lifestyle value of these openings should be<br />
placed on the ways in which they are insulated to<br />
ensure comfort and health.”<br />
Once a home is built, we tend to prioritise<br />
decorating styles and standards on how we treat<br />
windows and doors. Traditional window <strong>dressing</strong>s<br />
such as fabric curtains and security measures<br />
such as security gates do not always consider<br />
the massive heat loss that is facilitated by glass<br />
windows and doors.<br />
Most thermal insulation materials are hidden and<br />
not considered in the interior design process<br />
such as ceiling insulation and under floor heating.<br />
Others are not designed with decorating in mind<br />
such as bulky gas heaters and awkward electric<br />
heaters that require mobility to match the indoor<br />
movement of the home’s occupants and they are<br />
an ongoing cost.<br />
It makes perfect design, cost, thermal insulation<br />
and energy efficient sense to address the areas<br />
of a home that are responsible for the most heat<br />
loss, i.e. the windows and doors.<br />
“Shutters and blinds are the design choices of<br />
award winning architects and interior designers<br />
because of a number of factors. They can be<br />
customised to suit and enhance any opening<br />
regardless of how unusual it may be: arched,<br />
triangular or domed. They translate well in all<br />
decorating styles, from classic to contemporary.<br />
They facilitate outdoor-indoor living, allowing for<br />
uninterrupted views, maximum ventilation and<br />
light,” says Karina Palmer of American shutters.<br />
Shutters and blinds add to a home, they also add<br />
value to a property. Due to the very décor specific<br />
nature and transience of fabric window <strong>dressing</strong>s<br />
they are not considered fixtures, as are shutters<br />
and blinds. The investment made in opting for<br />
shutters and blinds is one that is rewarded when<br />
a property is valued and or sold.<br />
In the cooler months, perhaps the most<br />
appreciated value of shutters and blinds is their<br />
thermal insulation and energy efficiency. When<br />
opened shutters and blinds allow us to capture<br />
as much of the winter sunshine during the day<br />
and when closed they work to keep that warmth<br />
locked inside.<br />
So savour and save the winter sunshine with<br />
shutters and blinds – the most stylish prevention<br />
of heat loss due to thermal radiation, heat<br />
conduction and convection.
design<br />
secrets<br />
13
14<br />
I love to browse furniture<br />
catalogues, especially those<br />
of international furniture<br />
manufactures. It gives me ideas<br />
and inspiration for the many<br />
furniture projects that I undertake<br />
and also keeps me on track as to<br />
the latest <strong>trends</strong>.<br />
It’s nice to know that I can purchase<br />
timber and board, take out my power<br />
tools and make my own<br />
unique pieces of furniture.<br />
I am sure many of you reading would<br />
love to be able to make some<br />
of the furniture we see on<br />
the Internet, and you probably<br />
could. Let’s take a look at a few tricks<br />
1. See beyond the design<br />
When viewing a piece of<br />
furniture, most people only see<br />
the outside design, but sometimes it<br />
helps to go behind the facade - to see<br />
what’s underneath and behind, and how<br />
the piece is assembled.<br />
More often than not<br />
these days, furniture<br />
is either painted or<br />
veneer. By looking<br />
under you will be<br />
able to tell what<br />
a piece is made<br />
of and how it has<br />
been put together.<br />
The two most<br />
common board<br />
products used<br />
for furniture<br />
manufacture are<br />
MDF and chipboard. Of the two, MDF<br />
(or PG Bison SupaWood) is the stronger<br />
and more durable and<br />
you can buy this board<br />
product and have it<br />
cut to size at your local<br />
Builders Warehouse.<br />
Prices vary, but the<br />
average price for a<br />
sheet of 2700 x 1800mm<br />
of 16mm SupaWood is<br />
around R600, and that’s<br />
affordable when you<br />
think how big the sheet<br />
is and how much cutting<br />
you can get out of it.
2. Scrutinise the detail<br />
Many pieces of furniture are beautiful to<br />
look at and yet quite simple to replicate.<br />
A good example is the cabinet on the<br />
right.<br />
What makes this cabinet unique is the<br />
feet and door detail, both of which are<br />
fairly easy to duplicate if you have the<br />
right tools. Strip away the detail and you<br />
are left with a basic painted cabinet.<br />
The detail you apply to the pieces<br />
you make are what make the<br />
difference.<br />
I am going to share a few of my own<br />
trade secrets with you on how I would<br />
manufacture this particular piece of<br />
furniture.<br />
2. Feet<br />
The feet on the above cabinet have<br />
a wonderful angled square design.<br />
They are also the easiest feet to make<br />
if you have the right power tools. Just<br />
to show you how easy, I made a leg to<br />
show you.<br />
1. Cabinet<br />
This is a fairly a basic design consisting of two<br />
sides, a bottom and top as the frame. There are<br />
three doors, which means you need to have<br />
upright supports on which to mount hinges.<br />
There is also a larger panel that tops off the<br />
basic frame.<br />
15
16<br />
1. By far the simplest and quickest way to<br />
angle the shape of the feet is to use a<br />
mitre saw. The angle is set at around<br />
7-degrees and all four sides are cut at<br />
this same angle.<br />
3. Finish off the foot with 120-grit sanding<br />
to even out any uneven areas and<br />
then 240-grit for a nice smooth finish.<br />
Use sanding paper to sand the curved<br />
area.<br />
2. Using a Dremel MultiTool and large<br />
sanding disc allows you to create the<br />
curved indent at the top of each foot.<br />
Do the side edges first and then the<br />
inside area.<br />
Here is the finished foot and it looks just<br />
as good as the original. It took me about<br />
half an hour to make, which is not bad at<br />
all.
Creating a detailed design<br />
I used my Dremel Trio and one of the new range of router bits to cut out the design. I<br />
didn’t do the full design - just an example to show you how you can do it yourself.<br />
The new router bits are much better than the older bits, it cuts like a hot knife through<br />
butter and glides across the surface as it cuts. This design was actually very easy to<br />
do. If you don’t own a Dremel Trio, you could also do this with a Dremel MultiTool<br />
and engraving bit, but it would take a lot longer.<br />
17
18<br />
Finishing and painting<br />
After assembling your new piece of furniture you<br />
are going to want to take the time to finish properly.<br />
I know that most people hate sanding, but it’s<br />
important to spend time on this step, especially<br />
if you want your project to look good. It’s also<br />
essential to use quality products for staining, sealing<br />
or painting a project. The last thing you want is<br />
chipped paint, warped wood or a finish that it’s<br />
easy to keep clean.<br />
<strong>Home</strong>-<strong>Dzine</strong> trusts the Rust-Oleum range of spray<br />
products and have used these time and time again<br />
on various indoor and outdoor projects.<br />
<strong>Home</strong>-<strong>Dzine</strong> also endorses Woodoc. While it might be slightly more expensive than<br />
other products the proof, as they say, is in the pudding!<br />
At the end of the day it’s not about paying a little more, it’s about using a quality<br />
product that does what it’s supposed to do.<br />
PAINTING TIPS<br />
If, after painting, you find a few problem<br />
spots that need attention, use 1000grit<br />
wet/dry sandpaper. Have a small<br />
container of water handy; dip the<br />
sandpaper into the water and use a soft,<br />
circular motion to rub away defects.<br />
All SupaWood is absorbent on the cut<br />
ends. If you don’t want to waste time<br />
and spray paint, apply a thin layer<br />
of wood filler to the ends to prevent<br />
absorption. Use 240-grit sandpaper to<br />
smooth once the wood filler is dry.<br />
After spraying on first coat.<br />
Thin layer of wood filler<br />
After spraying on second coat.
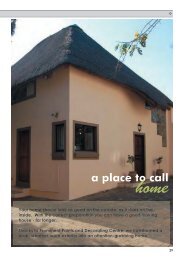
To tie in with our latest <strong>Home</strong>-<strong>Dzine</strong><br />
newsletter, we decided to show you<br />
how easy it is to make a <strong>dressing</strong> <strong>table</strong>.<br />
This simple designs has a few elegant<br />
curves and can easily be glammed up<br />
with mirrored mosaic tiles.<br />
DRESSED<br />
TO IMPRESS<br />
quick and easy<br />
19
20<br />
9<br />
1 - 5<br />
7<br />
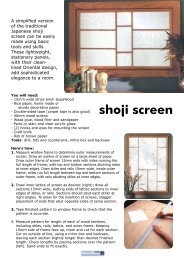
Use a jigsaw and fretsaw (thin)<br />
blade to cut curves in the front and<br />
back aprons.<br />
Cut small blocks to<br />
use for attaching<br />
the legs to the<br />
front/back<br />
and side<br />
aprons.<br />
6<br />
8
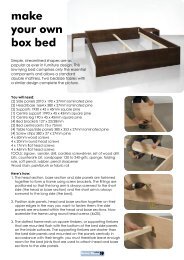
It will only take you 2 hours tops to<br />
assemble our <strong>dressing</strong> <strong>table</strong>, and<br />
then all that’s left to do is to paint<br />
in your choice of finish and colour.<br />
You will need:<br />
1 of 400 x 1200mm - top<br />
2 of 170 x 1080mm - front/back aprons<br />
2 of 170 x 360mm - side aprons<br />
4 of 60 x 800mm - front legs<br />
4 of 40 x 800mm - side legs<br />
10 Plastic corner brackets<br />
Wood glue<br />
Drill/Driver + assorted bits<br />
Jigsaw and fretsaw (thin) blade<br />
25mm cut screws<br />
Wood filler<br />
*For all sections use PG Bison 16mm SupaWood<br />
Here’s how:<br />
Making the legs<br />
1. The legs are slightly angled on one side.<br />
To create the angled edge, measure<br />
down 150mm from the top on all 8 leg<br />
sections and draw a line across.<br />
2. On the bottom end of the 4 front<br />
sections (60mm wide) make a pencil<br />
mark at 40mm. Draw a line from the<br />
150mm mark to the 40mm mark.<br />
3. On the bottom end of the 4 side<br />
sections (40mm wide) make a pencil<br />
mark at 20mm. Draw a line from the<br />
150mm mark to the 40mm mark.<br />
4. Place the front sections on a flat<br />
surface, arranging them as they will be<br />
assembled. EG. The straight edge of<br />
each leg must be on the outside.<br />
5. Run a bead of glue along the top<br />
of the outside edge and place the<br />
straight side section on top. 20mm from<br />
the top and 10mm from the bottom<br />
screw a corner bracket in place.<br />
Making the frame<br />
6. Measure up 20mm from the bottom<br />
edge on both front and back aprons<br />
and draw a line across. Use a template<br />
the draw a curve at both sides - as<br />
shown on the image left. Cut along this<br />
line with a jigsaw.<br />
7. On the front/back aprons measure in<br />
360mm from sides and draw a line. On<br />
the middle section, measure up 20mm<br />
from the bottom edge and draw a line.<br />
Use this line to cut the middle design.<br />
8. On the side aprons measure up 20mm<br />
from the bottom edge and draw a line<br />
across. Use a template the draw a curve<br />
at both sides - as shown on the image<br />
left. Cut along this line with a jigsaw.<br />
21
22<br />
<strong>DIY</strong> Tip:<br />
Use a circular object to help you<br />
to draw the curved shape at either<br />
side of the indent.<br />
9. Attach the legs to the front and side<br />
aprons with wood glue and small<br />
blocks screwed into place with 25mm<br />
wood screws.<br />
10. Attach the top to the frame by<br />
placing corner brackets on the<br />
underside of the top and front/back<br />
and sides. Use 2 brackets on the<br />
front/back apron and a centrally<br />
placed bracket on the sides.<br />
Finishing<br />
Pay particular attention to polishing all<br />
cut edges so that paint is not absorbed<br />
too quickly.<br />
Apply wood filler to gaps for a smooth,<br />
seamless finish. Once dry, sand with 240grit<br />
sandpaper.
Painting<br />
Here’s a good tip for any painting<br />
project. If you paint with a base coat<br />
prior to spraying you use far less paint.<br />
I use leftover paint in white or cream<br />
and apply with a foam roller. Once dry,<br />
the finish is sanded with 360/400-grit<br />
sandpaper.<br />
Do all your spray painting outdoors to<br />
avoid being overwhelmed by fumes.<br />
Don’t spray paint on a windy day or<br />
you will be spraying forever!<br />
For the <strong>dressing</strong> <strong>table</strong> I would<br />
recommend that you use Rust-Oleum<br />
gloss enamel, only because it provides a<br />
tough, durable finish, which is what you<br />
need on a <strong>dressing</strong> <strong>table</strong> where you use<br />
a hair dryer, curling tongues, etc.<br />
Find the complete<br />
Rust-Oleum range<br />
at your local Builders<br />
Warehouse.<br />
23
24<br />
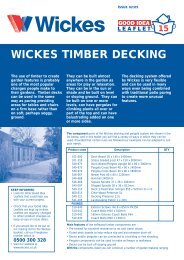
Dress it up<br />
FRAMED MIRROR<br />
Now that you have a <strong>dressing</strong><br />
<strong>table</strong>, you may also need a<br />
framed mirror. For this project I<br />
used tongue and groove (again),<br />
because it fits nicely around the<br />
mirror and I don’t have to fiddle<br />
around the cut the groove.<br />
Most tongue and groove planks<br />
have a 5mm deep groove, but<br />
it’s always better to double check<br />
before cutting the frame.<br />
You will need:<br />
2 of 1200mm lengths of tongue & groove<br />
Mirror cut to 600 x 800mm<br />
Corner braces* and 12mm screws<br />
2 of 8mm dowels<br />
2 of 8mm cable clips<br />
Wood glue<br />
Wood filler<br />
TOOLS<br />
Drill/Driver plus assorted bits<br />
Jigsaw and clean cut blade for wood<br />
Hammer<br />
Wood or rubber mallet<br />
Mitre box and saw or mitre saw<br />
*Builders Warehouse didn’t have stock so<br />
I substituted with T-braces.
Here’s how:<br />
1. When cutting the frame, measure the<br />
width and height of the mirror and then<br />
deduct the groove width from either side.<br />
EG. 600mm - 10mm (5mm groove on both<br />
sides). Do the same for the width and<br />
height.<br />
<strong>DIY</strong> Tip:<br />
Do a test fitting to make sure all the corners fit<br />
nicely together or make any adjustments.<br />
GOOD TO KNOW<br />
Use a wood or rubber mallet to tap the<br />
tongue & groove panel onto the glass.<br />
Starting at one end, a few light taps will do.<br />
2. Once the frame fits nicely around, turn<br />
over and mount the corner or T-braces<br />
onto the back with 12mm screws.<br />
3. Use a mixture and wood glue and wood<br />
filler to fill in any gaps. I prefer to mix the<br />
two together to prevent cracking later on.<br />
25
26<br />
4. Using the framed mirror as a guide, cut<br />
two side sections. These sections should<br />
be as high as the mirror. To secure the<br />
sides you will also need two sections to<br />
attach to the front of the side panels, and<br />
a long section for the back. This will ensure<br />
that your framed mirror stands secure.<br />
<strong>DIY</strong> Tip:<br />
The long back section must be as wide<br />
as the mirror, plus a 5mm allowance on<br />
both sides, plus the width of the base of<br />
each side section.<br />
5. Glue all the frame sections together and<br />
allow the glue to dry before sanding the<br />
edges with 360/400-grit sandpaper to<br />
polish. I also like to apply a very thin layer<br />
of wood filler to all the cut edges. It works<br />
as a block and prevents these edges from<br />
absorbing too much paint.<br />
6. Apply 2 coats of Rust-Oleum Gloss Enamel<br />
in your choice of colour, allowing drying<br />
time between coats.<br />
7. Before attaching mirror,<br />
drill one side of frame for<br />
adjustment holes. Use a<br />
wood drill bit that matches<br />
diameter of your shelf pin.<br />
8. Measure and mark at<br />
both centre of mirror and<br />
side section. At this point,<br />
hammer a cable grip<br />
on both sides of mirror<br />
frame and drill holes on<br />
mirror frame to half the<br />
depth of the dowel. Have<br />
someone help you to hold<br />
frame secure while you<br />
mount mirror in position.<br />
To do this push a dowel<br />
through cable grip and<br />
into drilled hole on both<br />
sides.
ack<br />
To set the right adjustment, insert a shelf pin in the correct hole on the frame.<br />
I made the adjus<strong>table</strong> mirror this way because it’s a battle to try and find adjus<strong>table</strong><br />
fittings, and this way is cheap and easy!<br />
front<br />
27
28<br />
Easy <strong>DIY</strong> magazine<br />
subscribers will see this<br />
project in a future issue,<br />
with additional features.<br />
The centre section will<br />
have a drawer and<br />
the dresser will be<br />
embellished in an easy<br />
way. Keep an eye out for<br />
this issue.
design<br />
without limits<br />
29
30<br />
The Internet offers<br />
unlimited opportunity<br />
for anyone with a small<br />
dose of creativity.<br />
Only last week I was on the radio<br />
chatting about the importance<br />
of recycling, and how you can<br />
so easily repurpose items rather<br />
than toss them out. From this we<br />
got around to talking about the<br />
endless opportunities opening<br />
up for anyone with crafty or <strong>DIY</strong><br />
talents. You only have to take a<br />
look at some of the online craft<br />
sites to see how many are making<br />
a profit, and a huge profit in some<br />
cases, simply by repurposing waste.<br />
While this project doesn’t use waste, it is<br />
a good example of how you can use off<br />
cuts to design and create saleable items.<br />
These bamboo veneer clocks are<br />
designed by DecoyLabs on Etsy and<br />
are for sale at R600 upwards. Definitely<br />
unique but not sure I would pay that<br />
much for a clock.<br />
Additionally, these clocks are made<br />
using a laser cutter, or CNC machine,<br />
and I want to try and make using my<br />
jigsaw. If you have a scroll saw - even<br />
better.<br />
The point behind all this? To show you<br />
that all it takes it creativity to design and<br />
manufacture items that could establish a<br />
home-based business.<br />
The Suitcase<br />
Chair is a<br />
prime<br />
example of how a little<br />
imagination can reap rewarding<br />
benefits.<br />
Local designer, Katie Thompson, has<br />
taken old suitcases and transformed them<br />
into beautiful collector pieces. Selling<br />
from around R4000.00 upwards, these<br />
little travel cases are certainly seeing the<br />
world in style! www.recreate.za.net
Here’s how:<br />
As a first attempt I am not going to add<br />
as much detail as the original design by<br />
DecoyLab.<br />
1. The first step is to draw out my design<br />
and transfer this onto 6mm PG Bison<br />
SupaWood. One of these days I will get<br />
my hands on some carbon paper, but<br />
in the meantime the easiest way is to<br />
rub the back of your printed copy with<br />
pencil and then turn over and press<br />
hard as you draw over the design to<br />
print onto the board.<br />
2. The transferred design will probably be<br />
feint, but you can easily go over again<br />
with a pencil so it’s easier to see.<br />
3. After clamping the board to my<br />
workbench I used a fretsaw blade to<br />
cut out. I call it a fretsaw blade but it’s<br />
actually a thinner blade for a jigsaw.<br />
This blade is ideal for detailed cutting.<br />
Working from the outside in, I rough<br />
cut away sections to make it easier<br />
to make the detailed cuts around the<br />
drawn design.<br />
31
32<br />
As you can see from the cut out on<br />
the left, the jigsaw did a very nice job<br />
indeed. It was tricky, but only took about<br />
15 minutes to do. You have to be very<br />
careful when moving and cutting the<br />
design, as some areas are very thin.<br />
5. I sanded the rough edges with 120-grit<br />
sandpaper and then smoothed with<br />
240-grit sandpaper.<br />
6. There is a front and back design for the<br />
clock, and after cutting and sanding<br />
these need to be painted. I used Rust-<br />
Oleum 2X in blossom white to spray<br />
the front, edges and back of both<br />
sections.<br />
<strong>DIY</strong> TIPS:<br />
• Place the sections on a block of wood<br />
to lift them off the surface, as this allows<br />
you to spray the edges at the same<br />
time.<br />
• Wait for each coat to dry completely<br />
before spraying on the next coat.<br />
• Don’t hold the can closer than 30 cm<br />
from the surface, as any closer and you<br />
will end up with excess paint and runs.<br />
• The edges need quite a few coats<br />
due to the fact that supawood is very<br />
absorbent, hold the can at an angle<br />
when spraying the edges to prevent<br />
spraying too much paint on the top<br />
surface.
7. To mount the clock mechanism,<br />
drill a hole through the front of the<br />
front section. Place a block of wood<br />
behind to prevent the wood chipping<br />
as you drill through. The hole you drill<br />
should be the same diameter as your<br />
clock shaft.<br />
8. Place the shaft through the drilled<br />
hole and use the fastenings that<br />
come with the clock movement to<br />
attach.<br />
9. Since this is a battery-operated clock,<br />
you are going to need to allow for<br />
the back section to be remove for<br />
replacing the battery. Attach velcro<br />
to the back of the battery and front<br />
of the back section, so that this holds<br />
them together firmly but still allows for<br />
pulling apart easily.<br />
On the next page you will see how my<br />
final clock looks.<br />
Although I’m happy with the final result,<br />
I did make a second clock, and this<br />
one came out far better. Obviously the<br />
more you make the better you become!<br />
So many families are struggling<br />
to make ends meet each month<br />
and projects like this are just one<br />
of the ways that you can put<br />
your creative talents to good use.<br />
Who knows... you may design<br />
something that becomes a<br />
collector’s piece or that everyone<br />
loves, but you won’t know until<br />
you try.<br />
33
Uttermost Harrington<br />
Price: $261.80 | R2000.00<br />
Features an antiqued ivory<br />
face with gentle distressing<br />
around the outer rim.<br />
Missing Time Clock by<br />
Cyber Moon<br />
Price: $17.00 | R140.00<br />
I love it when designers<br />
play with our assumed<br />
knowledge and imagination.<br />
This twist on convention<br />
modernizes the classic<br />
clock face design.<br />
design<br />
for profit<br />
I come across hundreds<br />
of designs for home decor<br />
accessories when researching<br />
for projects. Some of these<br />
items cost so little to make and<br />
yet are being sold at exorbitant<br />
prices. Here are just a few<br />
clock designs...<br />
Diamantini & Domeniconi Half Time Clock<br />
Price: $376.00 | R3000.00<br />
An unexpected evolution of the traditional cuckoo<br />
clock. The classic shape is cut in half, and the bird<br />
comes out of the side. Wood frame is lacquered in the<br />
following finishes: black, white, green and red.<br />
35
36<br />
designers<br />
with savvy<br />
Practical. Durable. And the picture of authentic African style. The PPC Cement Laptop<br />
Bag puts a brand that is uniquely South African over your shoulder every time you walk<br />
out the door.<br />
So how do we make them?<br />
An unused Pretoria Portland Cement paper bag is the beginning of each piece.<br />
Production takes a while, but it’s worth it. We separate the layers, remove the top and third<br />
layer of the bag and fuse them together. Bonding them with black cotton means that<br />
durability is never compromised. From there, you can treat it like any other fabric. We draw<br />
the pattern, cut it and stitch the bag together. The strap of the bag is cotton webbing<br />
and is completely adjus<strong>table</strong>.<br />
The PPC Cement Laptop Bag is as practical as you can get, too. There are two sections<br />
and two pockets: carry your laptop cables in one pocket and an iPhone or mouse in the<br />
other. A padded divider separates your laptop from any other papers or notes, and the<br />
entire inside of the bag is also padded to protect everything that you carry inside it. The<br />
bag closes with two magnets discreetly hidden on the flap.<br />
We treat the bag with Scotch Guard so you don’t have to worry about exposing it to the<br />
elements.
The story about how the PPC Cement Laptop<br />
Bag came to be is rather straight forward...<br />
Wendren Setzer was at a shoe factory<br />
ordering shoes (pumps to be specific)<br />
one random day and they were<br />
showing how they made them. Part<br />
of the procedure is to fuse the desired<br />
outer fabric to a cotton to make the<br />
fabric stronger and more sui<strong>table</strong> for<br />
the purpose. Curious as to what else this<br />
technical fabric would be used for she<br />
asked for a sample<br />
Wendren fused it to all sorts of materials,<br />
paper being one of them. Then some<br />
time later was driving along the highway<br />
behind a cement truck and noticed<br />
the packaging, more specifically, the<br />
very graphic elephant logo of Pretoria<br />
Portland Cement. She thought this<br />
would be fantastic to make a bag out<br />
of so got hold of some PPC packaging<br />
and experimented. It really was an<br />
opportunity, experiment and idea that all<br />
came together.<br />
Once she had a prototype she<br />
contacted PPC for their permission to use<br />
their packaging and the rest is history.<br />
“Inspiration is all around<br />
you, you’ve just keep your<br />
eyes and mind open to<br />
possibilities”<br />
http://thewrendesign.com<br />
Reuse - Recycle - Repurpose<br />
37
38<br />
Repurpose empty coffee tins into welcoming candleholders for an entrance or<br />
mantel. All you need is a can of spray adhesive, printed out stencil, a drill/driver<br />
and 3mm HSS bit.
You have to like<br />
furniture<br />
that can be made<br />
from scraps of<br />
wood and still sell<br />
out.<br />
It’s not quite my<br />
style but there is<br />
definitely a place<br />
in the home for<br />
furniture made<br />
from reclaimed<br />
timber, whether<br />
it’s in the den, or<br />
outside on a patio.<br />
We are a generation of waste. We<br />
continuously empty our dustbins and fill<br />
them up again, just to pile more trash on<br />
our dumps.<br />
So much is going to waste and timber is<br />
a valuable commodity, especially if it’s a<br />
hardwood such as saligna, oak, oregon<br />
pine, teak, etc. If you think how many<br />
years it takes a tree to reach maturity,<br />
before we come along and chop it<br />
down to make a piece of furniture, only<br />
to tire of it and throw it out - that’s waste.<br />
Furniture that is made from reclaimed<br />
timber doesn’t have to be rustic in style.<br />
This console <strong>table</strong> [right] features legs<br />
made from reclaimed oak barrel staves<br />
[ via www.vinwood.co.za ]<br />
RECLAIMED TIMBER<br />
rustic furniture<br />
39
40<br />
When you make or<br />
purchase furniture<br />
using reclaimed timber<br />
you not only enjoy its<br />
beauty and uniqueness,<br />
but you also help the<br />
environment.<br />
Sustainable furniture<br />
is not a new idea.<br />
Many countries have<br />
refinished, re-used, and<br />
created furniture from<br />
weathered wood for<br />
centuries.<br />
Reclaimed timber has a<br />
unique coloration and<br />
a natural patina. The<br />
timber usually has widely varying knot<br />
patterns, grain designs, and beautiful<br />
colours, ranging from rich greys to hints of<br />
orange and deep rust depending upon<br />
the timber species used.<br />
Not too long ago I featured a couple of<br />
projects on <strong>Home</strong>-<strong>Dzine</strong> using reclaimed<br />
silver birch branches that had been<br />
trimmed. My projects pale in comparison<br />
to this gorgeous range of rustic furniture<br />
that uses the same materials.<br />
Birch bark furniture traces its roots<br />
to the Adirondack mountains in the<br />
US. Many wealthy early Americans<br />
had “great camps” located in the<br />
pristine Adirondacks.<br />
Local artisans built rustic furniture<br />
with birch bark panels with twigs<br />
and other natural materials.<br />
Example of birch bark furniture can<br />
be found in both museums and<br />
antique shops throughout the US.<br />
ABOVE and BELOW: Silver Birch<br />
furniture from Woodland Creek (USA)
While you can’t walk into a timber<br />
merchant and ask for relcaimed<br />
timber, you can keep an eye on the<br />
classifieds, visit salvage yards and be<br />
on the lookout for pieces that are being<br />
thrown out, perhaps by family or friends.<br />
Even a visit to secondhand shops<br />
might surprise you and you could walk<br />
out with a bargain piece made from<br />
exotic hardwoods that can be reused<br />
and repurposed in a more practical<br />
way, such as making reclaimed timber<br />
furniture for your home - indoor or<br />
outdoor.<br />
41
42<br />
FINISHING RECLAIMED<br />
TIMBER FURNITURE<br />
Finishing and maintaining your new piece<br />
of reclaimed furniture is as easy as ‘5’, or<br />
Woodoc 5.<br />
You want to keep the unique look of<br />
reclaimed timber but enhance the beauty,<br />
and Woodoc 5 is an absolute matt sealer that<br />
will do just that.<br />
How to apply:<br />
1. After you have finished sanding your<br />
piece, be sure to wipe it down with a cloth<br />
lightly dampened with mineral turpentine<br />
to remove all traces of dust, especially in<br />
cupboards, drawers and corners.<br />
2. As this is reclaimed timber, the first coat<br />
will be absorbed very quickly into the<br />
moisture-starved timber. Re-apply the first<br />
coat until the wood no longer absorbs the<br />
sealer and the surface remains wet for 10<br />
minutes.<br />
Woodoc 5 in an interior wood sealer<br />
that is lead- and formaldehyde-free.<br />
3. Once the first coat has dried, wipe down<br />
the surface with Woodoc Steelwool. This is<br />
necessary to ensure maximum penetration<br />
for the second coat of sealer.<br />
4. Allow the second coat to dry completely<br />
before applying a third and final coat.<br />
Note: Woodoc 5 should be stirred until<br />
it becomes milky in appearance. Do not<br />
shake the can, as this causes bubbles<br />
that affect penetration.
44<br />
INAUGURAL ‘TASTE OF DURBAN’ FOOD FEST COMES TO TOWN<br />
Pick n Pay Taste of Durban in association with Orbit sugar-free chewing gum, taking place at Suncoast from<br />
Friday 27 – Sunday 29 July 2012, is destined to be the culinary event of the year.<br />
Over three days, this unique international restaurant festival will bring together the city’s most acclaimed<br />
restaurants, prestigious chefs and carefully selected premium exhibitors to attract Durban’s most dedicated<br />
and sophisticated foodies in an outdoor fine dining celebration. Taking part in the inaugural show are Café<br />
1999, Hartford House, 9th Avenue Bistro, Havana Grill, Little Havana, Jewel of India, Simply Asia, Versailles<br />
and Max’s Lifestyle Tavern. Added to the extraordinary line up of chefs you’ll also have the opportunity to sip<br />
and sample an array of the very best of wine, beer, cocktails and delicious foodie produce Durban has to offer<br />
whilst you shop your way around the festival. If you love eating out this is an opportunity too good to miss.<br />
Sit back and relax at the Pick n Pay Fresh Living Chef’s Theatre where top chefs will showcase their culinary<br />
skills in fun and informative cooking demonstrations, culinary challenges, entertaining tutorials. Or try your<br />
hand at making canapés at the hands on Pick n Pay Wine and Canapé Experience.<br />
www.tasteofdurban.co.za or www.itickets.co.za
food fun<br />
45
46<br />
LAMB TAGINE AND COUSCOUS<br />
Ingredients – serves 6<br />
1/4 cup flour<br />
1 tsp cayenne pepper<br />
2 tsp ground black pepper<br />
2 Tbsp paprika<br />
2 Tbsp ground ginger<br />
2 Tbsp turmeric<br />
2 tsp ground cinnamon<br />
Shoulder of lamb, trimmed and cut into 5cm<br />
chunks (approximately 1.1kg meat)<br />
5 Tbsp olive oil<br />
2 large onions, chopped<br />
2 large carrots, chopped<br />
2 sticks celery, chopped<br />
3 cloves garlic, crushed<br />
2 x 400g tinned chopped tomatoes<br />
200g dried apricots, cut in half<br />
55g dates, cut in half<br />
55g sultanas or raisins<br />
500ml lamb or beef stock<br />
2 Tbsp clear honey<br />
85g flaked almonds, toasted<br />
Coriander and couscous, to serve<br />
Keen to make lamb so tender it melts<br />
off the bone and into your heart? The<br />
tagine is the matriarch of the slowcooker<br />
family and with its distinct<br />
shape, ensures that your meat is<br />
packed with flavour and mouthwateringly<br />
tender.<br />
The sloped, cool walls<br />
of a tagine create<br />
the perfect surface<br />
for converting rising<br />
steam into condensation<br />
which returns to the bottom<br />
of the dish keeping meat moist.<br />
1. Preheat oven to 180 °C.<br />
2. Place flour, seasoning and spices into a<br />
small bowl and mix. Place lamb in a large<br />
bowl and toss together with the spice mix.<br />
3. Heat 2 Tbsp olive oil in tagine base on<br />
stove top. Add carrots, onions and celery<br />
and cook over a gentle heat for 10 minutes<br />
until onions are soft but not coloured. Add<br />
crushed garlic for the final 3 minutes.<br />
4. In a separate frying pan, heat remaining<br />
oil and brown cubes of lamb on all sides,<br />
then add browned meat to tagine. De-glaze<br />
frying pan with tomatoes and add these<br />
juices to the tagine too.<br />
5. Add apricots, dates, sultanas, lamb stock<br />
and honey to tagine.<br />
6. Bring to boil, cover with lid and place in<br />
oven to cook for 2-2.5 hours or until meat<br />
is meltingly tender.<br />
7. Sprinkle on coriander and flaked almonds<br />
and serve with couscous.
A tajine, or tagine is a Berber dish from North Africa, that is named after the<br />
special earthenware pot in which it is cooked. The traditional tagine pot is<br />
formed entirely of a heavy clay, which is sometimes painted or glazed. It<br />
consists of two parts: a base unit that is flat and circular with low sides, and<br />
a large cone or dome-shaped cover that sits on the base during cooking.<br />
The cover is so designed to promote the return of all condensation to<br />
the bottom. With the cover removed, the base can be taken to<br />
the <strong>table</strong> for serving.<br />
Tagines in Moroccan cuisine are slow-cooked stews<br />
braised at low temperatures, resulting in tender meat with<br />
aromatic vege<strong>table</strong>s and sauce. They are traditionally<br />
cooked in the tagine pot, the conical cover which has<br />
a knob-like handle at its top to facilitate removal. While<br />
simmering, the cover can be lifted off without the<br />
aid of a mitten, enabling the cook to inspect the<br />
main ingredients, add vege<strong>table</strong>s, mix the contents,<br />
or add additional braising liquid.<br />
Most tagines involve slow simmering of lessexpensive<br />
meats. For example, the ideal cuts of lamb are<br />
the neck, shoulder or shank cooked until it is falling off the bone.<br />
wikipedia<br />
Make Simmering traditional North African dishes<br />
with meat, poultry, vege<strong>table</strong>s and fish<br />
The combination of meats (lamb, beef,<br />
chicken), sweet vege<strong>table</strong>s (carrots,<br />
tomatoes, aubergines) and fruits (lemon,<br />
dates, oranges) is very typical of North African cookery<br />
and provides a natural sweetness to many dishes. The<br />
sweetness is offset by the use of plenty of spices and<br />
cayenne pepper.<br />
47
48<br />
New Vitrex Tiling Tool range<br />
Completing tiling installations has just become a whole lot<br />
easier with the new Vitrex Tiling Tool range, exclusively<br />
available from Builders Warehouse and Builders Express.<br />
The Vitrex range has everything you need to get that tiling<br />
job done. It has tools for cutting, shaping, fixing and finishing<br />
and ensures a hassle-free tiling installation and professional<br />
workmanship. Plus, Vitrex Tiling Tools are easy to use and<br />
with ergonomically designed grips, you’ll have a comfor<strong>table</strong><br />
hold when using these nifty tools.<br />
For the first time in South Africa, Vitrex is introducing the<br />
Lash Spacer, an easy to use self-levelling spacer that always<br />
stays level so that you can lay tiles evenly.<br />
The high-absorbing grouting sponge with rounded edges<br />
cleans grout perfectly without leaving streaks and uneven<br />
lines. It also assists with not wetting the grout excessively<br />
when cleaning off the surplus grout.<br />
The range also features a handy profile gauge to help you to<br />
cut a tile in a shape that is not easy to measure, such as the<br />
semicircle at the foot of the toilet. The profile gauge assists<br />
you to cut the tile in the exact size you need it to ensure your<br />
tiling job looks perfect.<br />
Vitrex Tiling Tools are distributed by TAL, the tiling<br />
professionals.<br />
vitrex giveaway<br />
We’ve got 5 Vitrex Tiling Starter Kits up<br />
for grabs!<br />
Send us an email and tell us where<br />
you can buy the new Vitrex Tiling Tool<br />
range.<br />
Mail to: home-dzine@iburst.co.za and<br />
remember to include your full name,<br />
daytime contact number and address.
We have passed the<br />
half-way mark for<br />
winter, which means<br />
that spring is only<br />
a couple of months<br />
away. South Africans<br />
are a lucky lot indeed<br />
when it comes to<br />
beautiful weather<br />
and spending time<br />
outdoors.<br />
But spending time<br />
outdoors is sometimes<br />
limited to a small, pocketsized<br />
courtyard that<br />
lacks appeal and is the<br />
last place you feel like<br />
spending time.<br />
In this feature we’re going<br />
to show you a few ways<br />
to transform that small,<br />
unattractive space into<br />
a wonderful oasis where<br />
you want to spend a few<br />
hours soaking up the<br />
fresh air and sunshine.<br />
image: pininterest<br />
gardening delights<br />
49
50<br />
image: pininterest<br />
image: www.home-landscape-plan.com<br />
What’s underfoot<br />
in your courtyard<br />
makes a big<br />
difference.<br />
If the area hasn’t already<br />
been paved or concrete<br />
poured, it’s easy to install<br />
your own informal paving,<br />
and it can make a big<br />
difference to the overall<br />
appearance of the space.<br />
Stone, cement or bricks<br />
cobbles are laid on a level<br />
surface and can also be<br />
laid over concrete that is<br />
still in good condition.<br />
If you can to put down paving bricks or cobbles, remove any grasses and rake until level.<br />
Raking also brings stones to the surface and these need to be removed as well. Put down a 2 to<br />
3mm thick layer of sharp river sand and level this with a straightedge, or long, straight plank of<br />
wood. Now you are ready to start laying the pavers. You will find plenty of instructions on the<br />
website for similar projects.
Add an interesting<br />
feature<br />
When you start designing<br />
your new courtyard,<br />
be sure to include an<br />
interesting feature. It might<br />
be nice to incorporate a<br />
small water feature that not<br />
only looks good, but also<br />
helps to mask any traffic<br />
noise if the courtyard is<br />
close to a road.<br />
If space allows, lush<br />
planting also blocks out<br />
surrounding sound to<br />
create a tranquil haven for<br />
relaxation.<br />
image: www.herbgardendesign.co.uk<br />
image: www.herbgardendesign.co.uk<br />
Plants and hardscape combined<br />
provide interest and texture.<br />
In a small courtyard you can<br />
incorporate a few small beds<br />
and plant these with contrasting<br />
colours and foliage.<br />
Creating privacy is important if you reside in a townhouse complex where units overlook your<br />
garden. A screen of small trees will not only block off nosey neighbours, they will also create a<br />
more lush environment and serve to block off sound.<br />
51
52<br />
image: www.mylandscapes.co.uk
Bright garden designer, Amir Schlezinger, designs and build gardens throughout<br />
London. His main plan is to create beautiful yet highly liveable, social spaces,<br />
which isn’t easy when living in the centre of a large, metropolitan city. We could<br />
take more than a few tips from some of his projects.<br />
Designing or landscaping a courtyard garden<br />
will basically follow the same design rules as<br />
a small garden, with more emphasis placed on<br />
vertical space.<br />
Most courtyards are small and feel cramped<br />
and by adding height around the perimeter, it<br />
creates the illusion of a lofty space that feels<br />
larger than it actually is., making the eye go<br />
upwards.<br />
Keep it green. If your courtyard needs a touch<br />
of green, think about adding artificial turf.<br />
Believe it or not this product is considered<br />
reasonably green; no watering, no fertilising,<br />
no cutting - all of which make artificial turf an<br />
eco choice for small gardens.<br />
53
54<br />
1. Add food colouring to water for<br />
easiest, even distribution. This is<br />
especially helpful if you’re using a<br />
gel or paste food colouring.<br />
2. Place flour, salt, coloured water,<br />
oil, and cream of tartar in a large<br />
saucepan. Cook over medium<br />
high heat, stirring constantly, until it<br />
turns into play dough.<br />
Be creative,<br />
use your<br />
imagination,<br />
have fun!<br />
<strong>Home</strong>made Sparkling<br />
Play Dough Recipe<br />
Summer is still a couple of<br />
months away and when the<br />
days are too cold the play<br />
outside, here’s a fun project<br />
from Celebrations.com to<br />
keep the kids occupied inside!<br />
You will need:<br />
2 cups all-purpose flour<br />
1 cup salt<br />
2 cups water<br />
1 Tablespoon oil<br />
1 teaspoon cream of tartar<br />
food colouring<br />
glitter<br />
3. Turn dough out onto the counter<br />
to let sit until it’s cool enough<br />
to knead. Flatten a bit on the<br />
counter, and sprinkle generously<br />
with glitter. Knead the glitter into<br />
the play dough. If you want more<br />
sparkle, repeat this step.<br />
4. Store in an airtight container. One<br />
batch of this recipe filled four jamjars<br />
perfectly.
If you are planning a<br />
child’s birthday party,<br />
this is a fun way to keep<br />
guests occupied, and<br />
you can make up small<br />
jars of sparkling play<br />
dough to give everyone<br />
as party favours.<br />
Tradewind Tiaras made<br />
up a batch of glittery play<br />
dough for a Star Warsthemed<br />
party.<br />
55
56<br />
IF YOU ARE TACKLING ANY TYPE OF<br />
DECORATING, HOME IMPROVEMENT<br />
OR <strong>DIY</strong> PROJECT - WE WANT TO<br />
KNOW! IN FACT, WE WANT TO<br />
SHARE YOUR PROJECT AND ENTER<br />
YOU INTO THE QUARTERLY DRAW<br />
FOR BOSCH, SKILL AND DREMEL<br />
TOOL HAMPERS.<br />
ALL YOU HAVE TO DO IS USE YOUR BOSCH, SKIL OR DREMEL TOOLS TO MAKE, REPAIR<br />
OR INSTALL AND SEND US A FEW ‘BEFORE’ AND ‘AFTER’ PICS. THEN TELL US HOW YOU<br />
TACKLED THE PROJECT.<br />
SEND IMAGES AND DETAILS TO: home-dzine@iburst.co.za<br />
IMAGE SOURCE: INMAGINE.COM
TAKE A LOOK AT OUR SCHEDULE FOR 2012<br />
More great projects for you to make and take home<br />
Beginners & Advanced Workshops<br />
Basic Electrical and Plumbing Workshops<br />
Soul Sisters for our Cape Town <strong>DIY</strong> Divas<br />
Basic Welding<br />
Career Workshops<br />
Every Saturday morning from 09:00 to 12:00<br />
at a venue near you.<br />
www.<strong>DIY</strong>-DIVAS.co.za<br />
57