Download Wohlenberg Here - Technifold USA
Download Wohlenberg Here - Technifold USA
Download Wohlenberg Here - Technifold USA
- No tags were found...

Create successful ePaper yourself
Turn your PDF publications into a flip-book with our unique Google optimized e-Paper software.
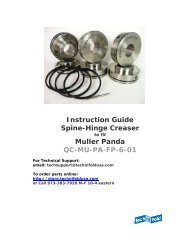
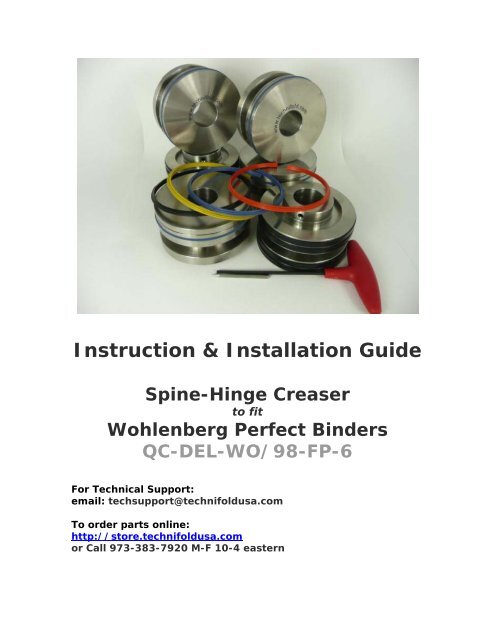
Instruction & Installation GuideSpine-Hinge Creaserto fit<strong>Wohlenberg</strong> Perfect BindersQC-DEL-WO/98-FP-6For Technical Support:email: techsupport@technifoldusa.comTo order parts online:http://store.technifoldusa.comor Call 973-383-7920 M-F 10-4 eastern
*** IMPORTANT ***Handle With Care When Installing!Yes, these precision tools are heavy duty but it IS possible to ding theedges of the device and ruin the female creasing channel/rib holder.Take your time when doing the installation.Be sure the cover feeder shafts are clean and free of burrs, and never,ever force anything! Everything should be moved with a finger touch—if not, there is something wrong!If you have any questions or are not getting the results youexpect email techsupport@technifoldusa.comor take a look at the FAQ and Tech Support page:http://www.technifoldusa.com/faqs-support/Our products do not work like conventional tools, so what you may beaccustomed to doing may not be right for this product. So please, askaway! We provide unlimited free tech support and will work toovercome any obstacle or problem.Tech Support: email techsupport@technifoldusa.com and we’ll getback to you as soon as possible, usually the same business day.
Installation instructions<strong>Wohlenberg</strong> binder30mm shaft & 98mm outer diameterwith a fixed 6mm hingeUnscrewing the 2 x6mm screws will allowthe parts to beseparated
Tighten the 2x6mm screwsfirmly to the shaftWith the 2 x 6mm insidescrews loosened unscrewthe 2 crease rib holders untilthe gap is large enough toremove the crease rib.Hand screw the holderstogether.Place the small bar in any of thesmall 6mm holes and tightenthe holders firmly together.Tighten the 2 x 6mm screws tohold the clamped devices firmlytogether.Crease RibsOrange light creaseBlue medium creaseYellow heavyNylon Crease RibsBlack heavy
The 4 TOP Gripper rollers we supply have2 different outside diameters.(Same gripper band, different recesses.)Use these with your OEM, all steel bottom support collars.Heavy stocks will need the larger OD to maintain a proper grip on the sheet.Medium to light stocks will use the small diameter.Simply position the appropriate diameter gripper on top of the lower steel collar.The metal collars here arefor supporting the sheet andshould not be used to gripthe cover stock.(Use your OEM lower gripperrollers as described above.)
Photo showing the assembly of the crease units before installationTop shafts use the gripper support collarsTo stop damage please remove crease ribs before installationInstalling the bottom shaft partsSelect the correct colour coded split crease ribs and attach them on to theholder.Align a bottom crease unit with the edge of the book clamp and tighten thefixing screws. Align the remaining bottom crease unit into the desired positionand tighten the fixing screw.Installing the top shaft partsIt is important to use the <strong>Technifold</strong> top gripper support collars and the originalplain metal bottom support collars.Once the crease units are on the shafts insert the split crease ribs into theunits.To achieve the correct grip between the support collars, align the top andbottom collars together. Equal gentle pressure should be achieved on eachcollar.As the top shaft is being lowered, slide the male rib protrusions into thecorresponding female channels.Slowly run a sheet of cover stock between the crease units. As the coverstock rotates through the crease units the loose top crease units automatically
centralise to the optimum crease position. Tighten down the fixings screwswhen the crease unit fixing screws come into view.To achieve the optimum crease position the crease ribs mustlocate into the centre of the female channels.Insert paper undercalliper blocksTo finely set the calliper pressure for the first time, it may beadvantageous to insert 80gsm paper between the blocks as shownabove. When setting for different weights of stock simply insert thecorrect stock into the 4 calliper blocks and the setting willautomatically be set to the correct pressure.
Tips on Selecting the Right Creasing RibThink of your new Spine & Hinge Creaser as a device that gives you theultimate in control over how your perfect bound book covers will look andperform. There are 4 crease ribs to work with so with a little experimentationearly on, you will find crease settings that are perfect for each of the jobsyou run. <strong>Here</strong> are some brief suggestions.If fiber cracking is not a problem with the stock you are running, andit’s 250gsm (about .010) or heavier, start with the black nylon creasing ribs.(You’ll have to experiment!) The nylon ribs will last longer than the rubberribs. Always be sure to center the devices as explained in another part of thismanual. An off-center tool will wear out the ribs prematurely. For lighterstocks, you’ll probably need to use one of the 3 colored creasing ribs.If you expect fiber cracking to be a problem, then start with one of the3 types of rubber creasing ribs included with your new kit. Always be sure tore-center the devices whenever you re-position any tool. This applies to bothrubber and nylon ribs.Always be sure to crease with the male creasing rib hitting the face (outside)of the piece to produce a crease that will eliminate fiber cracking. Therecould be exceptions to this ‘rule’ but in most cases this will give the bestresult.What Does a Good Crease Look Like?The inside bead of the crease should be smoothlyrounded as shown in photo at right. If visible tearsstart to appear, you probably have too much pressure.The outside of the crease should also be smooth andfree of cracking or tearing.Experiment with Various CreasesUse the enclosed Crease Setting Log as an operatorreference. Try various creasing ribs and then make anote of the creasing rib that works best for each job orfor a particular stock.If you run a wide range of paper stocks, initially this will take a little work butit’s well worth it the long run.Refer to your Crease Setting Log when you return to that job or thatparticular stock. This will save you LOTS of setup time!For Technical Supportemail: TechSupport@technifoldusa.comor visit http://www.technifoldusa.com/faqs-support/
Frequently Asked Questionsfor the Spine-Hinge Creaser to fit KolbusWhich side of the sheet do I crease?Technically, the correct way to score the sheet inorder to eliminate fiber cracking is the same as witha die score—the male should be hitting the outside(face) of the cover, so that the fold is going awayfrom the male. So the spines should be scored fromone side, the hinges from the other side. (photoright)However, sometimes customer preference dictateshow you crease (score) a particular sheet. A Tip:experiment with various crease settings to find outwhat works best for the jobs that you run. Then usethe enclosed Crease Setting Log to keep a record of what setting works best.What if I still get fiber cracking?Be sure to experiment with different crease settings. For instance, an 80#cover from one mill might require a different setting than an 80# cover fromanother mill. Also check that the female components are centered correctly.How long should the creasing ribs last?The rubber creasing ribs should last 1/2 million to 1.5 million sheets ormore, depending on the weight of paper. Use the minimum pressurenecessary to get a good crease. A deeper crease is not necessarily better foreliminating fiber cracking. It might be better to go to a different creasing ribrather than apply excessive pressure. The nylon creasing rib will last evenlonger.When do I have to re-center the female components?Whenever you move any component to a new position you need to recenterthat male/female pair.What range of papers can I crease?In general, the Spine-Hinge Creaser should work on stocks from about 60#cover up through 16pt. Paper varies substantially so feel free to experimentno matter what type of paper stock you are running.For Technical Supportemail: TechSupport@technifoldusa.comor visit http://www.technifoldusa.com/faqs-support/To Order Replacement Parts:Call the Sales Office 973-383-7920 M-F 10-4 easternor online http://store.technifoldusa.com/
Quad Creaser<strong>Wohlenberg</strong>To fit <strong>Wohlenberg</strong> Perfect Binder with 6mm Fixed HingeStock Code: QC-DEL-WO/98-FP-6SETTINGSShaft Size: 30mm Exit ShaftOuter Diameter: 98mm<strong>Wohlenberg</strong>4 crease shaftsChampionCity EGolfPhoenixContents of Package4x Male/ Female Components:contains both the split creasing rib and thefixed 6mm female channel hinge4x Orange Gripper Crease (M-169):split creasing ribs will crease 100- 150gsm4x Blue Gripper Crease (M-167):split creasing ribs will crease 150- 280gsm4x Yellow Gripper Crease (M-170):split creasing ribs will crease 280- 350gsm4x Black Nylon Crease RibsQC-DEL-WO-98/PCsplit creasing ribs will crease 250-350gsmOptional Nylon RibsOrange Dot Black Nylon Crease RibsQC-DEL-WO-98/PC-Osplit creasing ribs will crease 100- 170gsmEach black gripper gives a separate pressure setting4x Top Support Collars:With 2 x grip pressure settingshelps support the sheet duringcreasing8 x M-88 Gripper bandslocated in support collars1 x 3mm T handle hexagon key1 x removal tool / tension barBlack Blanking Spacersallows quick adjustment when setting upbooks with2 x spine creases only (no hinge)QC-WO-SPPhone 973-383-7920 • http://store.technifoldusa.com