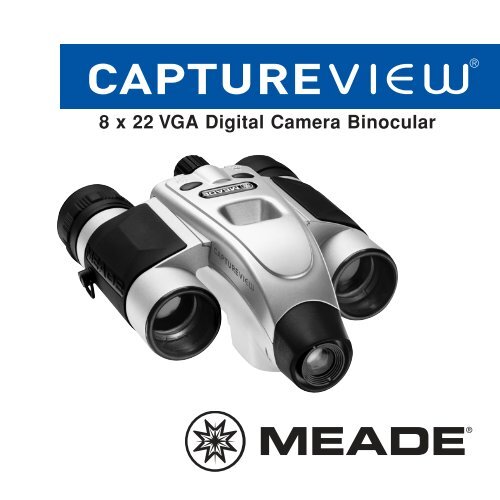
8 x 22 VGA Digital Camera Binocular - Meade
8 x 22 VGA Digital Camera Binocular - Meade
8 x 22 VGA Digital Camera Binocular - Meade
- No tags were found...

You also want an ePaper? Increase the reach of your titles
YUMPU automatically turns print PDFs into web optimized ePapers that Google loves.
8x<strong>22</strong> <strong>Meade</strong> 3.07 5/10/07 9:21 AM Page 1®8 x <strong>22</strong> <strong>VGA</strong> <strong>Digital</strong> <strong>Camera</strong> <strong>Binocular</strong>
8x<strong>22</strong> <strong>Meade</strong> 3.07 5/10/07 9:21 AM Page 2
8x<strong>22</strong> <strong>Meade</strong> 3.07 5/10/07 9:21 AM Page 3ContentsQuick Start ................................................................................ 4Features.................................................................................... 6Introduction .............................................................................. 8How to Use Your <strong>Binocular</strong> ...................................................... 9Adjust Eye Relief .................................................................. 9Adjust the Barrels .................................................................. 9Focus the <strong>Binocular</strong> ..............................................................10How to Use Your <strong>Camera</strong> ........................................................11Insert Batteries ......................................................................11Select an Operation ..............................................................11Taking Pictures and Video ........................................................12Take a Still Picture ................................................................12Capture Video........................................................................13Operations ................................................................................14Use the Mode and Shutter Button ........................................14Use the <strong>Camera</strong> Mode ..........................................................15Change the <strong>Camera</strong> Resolution ............................................15Use the Video Mode..............................................................16Erase (Delete) Pictures or Video ..........................................16Find Out How Many Pictures You’ve Taken ..........................17Use the Self-Timer ................................................................17Find Out How Much Power is Left in the Battery ..................18Find Out Why CaptureView is Beeping ................................19Download Pictures ................................................................19Install Image Editing Software ..............................................20Download Images to Your PC ..............................................21Capture Live (Webcam) Video/Take a Snapshot ................<strong>22</strong>Other Software and System Requirements ..............................24Maintenance and Troubleshooting............................................25Specifications............................................................................26 3
8x<strong>22</strong> <strong>Meade</strong> 3.07 5/10/07 9:21 AM Page 4Quick StartHow to start taking pictures...41(notInstall 2 AAA batteriesincluded).2Turn on camera.Press and hold downMode for 3 seconds.3Point at somethinginteresting.4Press the Shutter.You’ve taken a picture!
8x<strong>22</strong> <strong>Meade</strong> 3.07 5/10/07 9:21 AM Page 5Quick StartHow to download your pictures...USB Cable56Install the drivers.Before you plug in the camera, install the driversfrom the included CD-Rom.Plug in.Connect CaptureView to your PC (not Mac compatible)using the included USB cable.7Install Ulead Photo Explorer.Click on Ulead Photo Explorer and follow the on-screeninstructions.8Enjoy your photos.Open Ulead Photo Explorer to view, edit and printyour pictures.5
8x<strong>22</strong> <strong>Meade</strong> 3.07 5/10/07 9:21 AM Page 6Featuresffgeg6bc d ijbhFig. 1 & 2 (Top andFront Views):1. Eyepieces2. Mode Button3. Shutter Button4. LCD Panel5. Objective Lens6. Barrel7. <strong>Camera</strong> Lens8. Diopter Scale(on righteyepiece)9. Focus knob
8x<strong>22</strong> <strong>Meade</strong> 3.07 5/10/07 9:21 AM Page 7Features1@1# 1#i1!1)jFig. 3 & 4 (Bottomand Rear Views):8. Diopter Scale(on right eyepiece)9. Focus knob10. BatteryCompartment Lid11. USB Port12. Tripod Mountinghole13. Strap clips1)7
8x<strong>22</strong> <strong>Meade</strong> 3.07 5/10/07 9:21 AM Page 8Introduction8Congratulations on purchasing the <strong>Meade</strong> ® CaptureView ® 8 x <strong>22</strong>mm full-featuredbinocular. It is integrated with a digital camera that requires no film to capturepictures or video. This manual is designed to quickly guide you through the operationof your CaptureView. For best results, take a few moments to become familiar withthe operation of your device, and save the manual for future reference.CaptureView has the following features:• Fully functional binocular.• Capture pictures and video, and view them on your PC.• Use CaptureView as an 8x webcam• Transfer pictures and video to your PC for easy printing and editing.• E-mail pictures to your friends and family.• LCD display panel indicates status for ease in performing desired operations.Important Note: Images in the camera will be lost if the batteries are depleted orif the batteries are removed for more than 180 seconds (3 minutes). Accordingly,change the batteries when they run low. Images will be maintained in memory forapproximately 3 minutes when changing batteries. It is recommended that youdownload your images before changing the batteries.To conserve battery life, remove batteries after downloading images to acomputer. There is continual battery drainage even when CaptureView isturned off.Be sure CaptureView is off before changing batteries.WARNING! Never use a <strong>Meade</strong> binocular to look at the Sun! Looking at ornear the Sun will cause instant and irreversible damage to your eye. Eye damageis often painless, so there is no warning to the observer that damage hasoccurred until it is too late. Do not point the binocular at or near the Sun. Childrenshould always have adult supervision while observing.
8x<strong>22</strong> <strong>Meade</strong> 3.07 5/10/07 9:21 AM Page 9How to Use Your <strong>Binocular</strong>If you want to...Do this...Adjust Eye ReliefFold downIf you wear eyeglasses, fold down therubber eyecups and hold theeyepieces up against your glasses.Adjust the BarrelsYou need to adjust the barrels, as thedistance between your eyes is usuallydifferent than the distance betweenanother person’s eyes.1. Hold CaptureView up to your eyes inthe normal viewing position. Useboth hands to hold each barrel firmly.2. Pull the barrels apart or push thebarrels together until you see asingle circular field with both ofyour eyes.BarrelBarrel9
8x<strong>22</strong> <strong>Meade</strong> 3.07 5/10/07 9:21 AM Page 10How to Use Your <strong>Binocular</strong>If you want to...Do this...Focus the <strong>Binocular</strong>Diopter scaleFocus knob1. Set the Diopter Scale on undersideof CaptureView at its center pointbetween “+” and “-.”2. Choose an object (such as atelephone pole) that is at least 50feet (15m.) away.3. Looking with only your left eye,rotate the Focus Knob until theobject you are viewing is focused.4. Looking with only your right eye,rotate the Diopter Scale until theobject you are viewing is focused.5. Now, looking with both eyes, rotatethe Focus Knob to focus on both farand near objects.10
8x<strong>22</strong> <strong>Meade</strong> 3.07 5/10/07 9:21 AM Page 11How to Use Your <strong>Camera</strong>CaptureView performs best under good lighting conditions. Take some time topractice capturing still pictures and video. Depending on the available light and yourdistance from the object, captured images may not appear as bright or centered asviewed through the binoculars. CaptureView has a fixed focus (you cannot focus thecamera manually) and takes focused pictures even if the image in the binoculars isout-of-focus.If you want to...Do this...Insert BatteriesBatterycompartmentSelect an OperationMode Shutter1. Make sure camera is off beforechanging batteries.2. Push the battery compartment lidforward and lift to open.3. Insert 2 AAA 1.5v (user-supplied)batteries into the compartment,noting the correct polarity asillustrated inside the compartment.• Press and hold the Mode buttonfor 3 to 5 seconds to turn onthe camera.• Press the Mode button to display andcycle through the operation icons onthe LCD.• Press the Shutter button when thedesired icon is displayed to selectan operation.11
8x<strong>22</strong> <strong>Meade</strong> 3.07 5/10/07 9:21 AM Page 12Taking Pictures and VideoIf you want to...Do this...Take a Still PictureMode ShutterThe amount of pictures you can take:High Resolution (640 x 480): 80Low Resolution (320 x 240): 300The number of photos you may takewill decrease if you have also takenvideo.1. Press and hold down the Modebutton for 3 to 5 seconds to turn onthe camera. The camera will beepand the camera icon displays on theLCD. The counter, battery life andresolution icons also display.2. Point the binoculars at an object.You may use the focus knob tofocus the image in the binocular, butkeep in mind that the camera has afixed focus and is not affected by thefocus knob.3. Hold CaptureView steady and pressthe Shutter button. Note that thecounter advances. For example, ifthe counter reads “016,” this meansthat this is your sixteenth12
8x<strong>22</strong> <strong>Meade</strong> 3.07 5/10/07 9:21 AM Page 13Taking Pictures and VideoIf you want to...Do this...Take VideoMode ShutterThe maximum length of a video:Up to 30 seconds.The length of video will decrease ifyou have also taken still pictures.1. Press and hold down the Modebutton for 3 to 5 seconds to turn onthe camera.2. Press the Mode button four timesand the Video mode icon displays.Press the shutter button to select thevideo mode.3. Point the binoculars at the scene youwish to capture.4. Press and hold down the Shutterbutton. The camera now captures amovie.5 Release the Shutter button to stoprecording the movie. Note that thenumber of pictures advances by one(a movie counts as one object).Important Note: Video has amaximum length of 30 seconds inthe low-res mode. If you exceed thememory capacity, a "Full" messagewill appear on the display andCaptureView will stop recording.13
8x<strong>22</strong> <strong>Meade</strong> 3.07 5/10/07 9:21 AM Page 14OperationsIf you want to...Do this...Use the Mode and Shutter ButtonsMode ShutterOperation IconsIcons on LCDSelf-Timer Lo Res. Video Frame RateErase Last Erase All• Press and hold the Mode button for 3to 5 seconds to turn the camera onor off.• Use the Mode button to cyclethrough the operation icons.As you press the Mode button, theoperation icons display on-screen inthe following order:<strong>Camera</strong> (default mode, no icon)Self-timerResolution (High is default,)VideoFrame rate (50 or 60 fps)Erase Last ImageErase All ImagesThe next press returns you to the<strong>Camera</strong> icon.• Press the Shutter button when thedesired icon is displayed to activatethe operation.• Use the Shutter button to take apicture, and to begin or end therecording of a movie.14
8x<strong>22</strong> <strong>Meade</strong> 3.07 5/10/07 9:21 AM Page 15OperationsIf you want to...Do this...Use the <strong>Camera</strong> Mode• The camera mode is the defaultsetting. Press the Shutter button totake a still picture.Change the <strong>Camera</strong> ResolutionLo Res.H: High Resolution mode (640 x 480).L: Low Resolution mode (320 x 240).(The default setting is High Resolution;no icon.)• High resolution is the default setting.1. The first time you turn on thecamera, it defaults to HighResolution. This is thedefault setting.2. To change the resolution, keeppressing the Mode button until theLow Resolution (LO) icon displays.Then press the Shutter button toselect Low Resolution. Lowresolution allows you to capturemore images with your camera.15
8x<strong>22</strong> <strong>Meade</strong> 3.07 5/10/07 9:21 AM Page 16OperationsIf you want to...Do this...Use the Video ModeNote: The length of a videodepends on how much memory youhave available. Audio recording isnot available with this camera.Erase (delete) Pictures or VideoErase Last IconErase All IconVideo Icon• Keep pressing the Mode button untilthe Video icon displays. Press theshutter button to select the videomode.Then press and hold down theShutter button to begin recording amovie. Release the Shutter buttonagain to stop recording.• Erase Last. Keep pressing theMode button until the Erase LastImage icon flashes. Press theShutter button twice to erase the lastcaptured image or movie.• Erase All. Keep pressing the Modebutton until the Erase All Imageflashing icon displays and then pressthe Shutter button. The number ofpictures will flash between 0 and thecurrent number on the camera.Press and hold the shutter button toerase the images, You will hear along beep followed by a loud beep.16
8x<strong>22</strong> <strong>Meade</strong> 3.07 5/10/07 9:21 AM Page 17OperationsIf you want to...Do this...Find Out How Many Pictures YouHave Taken• Check out the LCD Counter. Thecounter displays the number ofpictures or videos taken, from0 to 999.Counter DisplayUse the Self-timerSelf-Timer Icon• Keep pressing the Mode button untilthe Self-timer icon displays andpress the Shutter button.The camera then pauses for about10 seconds: It sends out 5 slow andthen several fast warning beepsbefore taking the picture.17
8x<strong>22</strong> <strong>Meade</strong> 3.07 5/10/07 9:21 AM Page 18OperationsIf you want to...Do this...Find Out How Much Power is Leftin the BatteriesFull Power Indicator• Check the battery indicators on thedisplay.Half Power IndicatorLow Power IndicatorFind Out Why CaptureViewis BeepingNote: When the battery is low,CaptureView sends out three shorthigh beeps. It is recommended youdownload the pictures or changethe batteries at this time. If youchange the battery, remember thatyou have 3 minutes to change thebatteries before your imagesare deleted.Listen for the following patterns:Power on: Two short high beeps.Wake up: One long high beep.Sleep: One short high beep.Takes a picture: One short beep.Failed to take picture due toinsufficient memory:Five short high beepsLow battery: Three short highbeeps (beeps only when poweringon).Self-timer: Sends out 5 slow, thenseveral fast beeps before taking apicture.18
8x<strong>22</strong> <strong>Meade</strong> 3.07 5/10/07 9:21 AM Page 19OperationsIf you want to...Do this...Connect CaptureView to a PCUSB PortDrivers must be installed on your PCand can be found on the includedCD-Rom.1) Insert the CD-ROM and install thedriver for downloading your pictures orvideo. (See next page.)Important Note: Do not plug thecamera into your PC until after thedrivers have been installed.2) Just attach one end of the USBcable to the camera's USB port andthe other end to your PC's USB port.Your computer will automaticallyrecognize the device.Use Ulead Photo Explorer to importPhotos to your PC.Note: See “Troubleshooting,”page 25, for more informationabout connecting CaptureView toyour PC.19
8x<strong>22</strong> <strong>Meade</strong> 3.07 5/10/07 9:21 AM Page 20OperationsIf you want to...Do this...Install Image Editing Software(Ulead Photo Explorer)1. Insert supplied CD Rom into yourPC’s drive.2. A splash screen displays. Click on“Ulead Photo Explorer.”3. Follow on-screen instructions.4. After you click “Finish,” the UleadPhoto Explorer icon appears onyour desktop.5. Double-click the icon to launchthe program. You can now view,edit and print your images. PhotoExplorer allows you to import thecamera's photos.20
8x<strong>22</strong> <strong>Meade</strong> 3.07 5/10/07 9:21 AM Page 21OperationsIf you want to...Do this...Download Images to Your PC...Note: Perform thisprocedure after you installdrivers and connect the USBcable from your camera toyour display. See theprevious page for moreinformation.Photo Express Twain Acquire icon.1. Start Photo Explorer.2. Select a folder to which you cantransfer your images. In the lefthand column, first double click on"My Documents," and thendouble-click "My Pictures."3. Go to the File menu and select"Twain Acquire."4. Choose the "Select Source"option.5. Choose "Dual Mode <strong>Camera</strong>8008 <strong>VGA</strong>+" from the Sourcewindow and click the Selectbutton.6. Click "Twain Acquire" icon (imageof a scanner with an arrowpointing a display screen in thebutton bar). The image capturescreen displays. Photos that youdownload will display on the right.The large screen displays a live"web-cam" feed from yourcamera. (Continued...)21
8x<strong>22</strong> <strong>Meade</strong> 3.07 5/10/07 9:21 AM Page <strong>22</strong>OperationsIf you want to...Do this...Download Pictures to your PC..(continued)Photo Express Download icon.Photo Express Arrow icons.Photo Express icons.7. Click on the download icon, theright-most icon on the bottom ofthe image capture screen. Yourimages will download as smallimages on the righthand side ofthe screen.8. Use the Up and Down Arrows toscroll through your images. ClickErase All to erase all the photosfrom the camera. Scroll throughthe images and select an individualphoto to erase.9. Click the Transfer All or Transfericons to transfer your photos to thePhoto Explorer program.Select Exit to leave the imagecapture screen. Thumbnails of theimages you have transferred willdisplay in the Photo Explorerprogram. Double-click on athumbnail to enlarge the image toits original size. Use PhotoExplorer's settings to edit yourimages.<strong>22</strong>
8x<strong>22</strong> <strong>Meade</strong> 3.07 5/10/07 9:21 AM Page 23OperationsIf you want to...To Capture Video Using the LiveFeed (Webcam) Feature :Photo Express Snapshot icon.To Take a Snapshot Using theLive Feed (Webcam) Feature:With a live image displaying on theimage capture screen, click the"Snapshot" icon. The imageimmediately display as the topsmall image on the right side of thescreen. You may now use thetransfer icon to transfer the imageto Explorer or use the Erase iconto delete the image.Do this...With a live image displaying on theimage capture screen, click thevideo capture (movie reel) icon.You will be prompted to name thevideo and to select a folder inwhich to save the video.Click start to begin capturing thevideo and click the video captureicon again to end the capture.You may also enter a time limit forvideo capturing. Enter the timelimit and click start. CaptureViewwill capture video for the length oftime that you set.To download a video you havepreviously captured with theCaptureView, click transfer—youwill be prompted to name andselect a location for your video.Photo Express icons.23
8x<strong>22</strong> <strong>Meade</strong> 3.07 5/10/07 9:21 AM Page 24OperationsSoftwareThe included CD ROM contains Ulead Photo Explorer that will assist you in editingyour images, allow you to transfer images to email, and provide you with other usefulfunctions. Ulead Photo Explorer is a proprietary program and may not be sold,licensed or distributed without the express written consent of Ulead. For moreinformation about Ulead Photo Explorer, visit the Ulead website at www.ulead.com/pex.Click on the "Product Documents" link in the Download section of their homepage to finda link for the Photo Explorer manual.System Requirements• Windows 98SE/Win Me/Win 2000/Win XP• 366MHz (or equivalent) processor or faster.• 128MB of RAM free over System requirements• Video (<strong>VGA</strong>) card with 16MB of RAM minimum, High Color display.• 4x CD-ROM drive.• USB port (1.1).• 600MB of free hard drive space.If you have questions regarding your PC system specifications, please contact yourPC manufacturer.24
8x<strong>22</strong> <strong>Meade</strong> 3.07 5/10/07 9:21 AM Page 25MaintenanceCare of your CaptureView1. Never immerse CaptureView in liquid. Remove dust or stains with a soft clothdampened with water or neutral detergent. Keep in a dry, cool dust-freeenvironment or a container when it is not being used.Do not spray liquid cleaners directly onto LCD. Using only gentle pressure, wipethe LCD with a slightly dampened cleaning cloth.2. Important Note: Images in the camera will be lost if the batteries are depleted orif the batteries are removed for more than 3 minutes. Accordingly, change thebatteries when they run low. Images will be maintained in memory forapproximately 3 minutes when changing batteries.To conserve battery life, remove batteries after downloading images to acomputer. There is continual battery drainage even when CaptureView isturned off.Be sure CaptureView is off before changing batteries.3. Avoid dropping CaptureView. Do not disassemble CaptureView.TroubleshootingIt is very important to use the following connection and disconnectionprocedures to download pictures.1. Only connect CaptureView to your PC when the PC is on and Windows hascompleted loading.2. Your CaptureView camera and PC must be connected before importing photos.3. Avoid physically connecting, disconnecting and reconnecting the camera during adownload session. Instead, disconnect the camera using Windows software:Right-click the USB on-screen icon and select disconnect (or connect toreconnect).4. Always disconnect CaptureView before shutting down the PC.25
8x<strong>22</strong> <strong>Meade</strong> 3.07 5/10/07 9:21 AM Page 26Specifications<strong>Binocular</strong> power8X<strong>Binocular</strong> objective lens diameter <strong>22</strong>mm<strong>Binocular</strong> optical designFolding roof prism<strong>Binocular</strong> close focus16 ft.Field of view (diagonal) 7.0°<strong>Binocular</strong> field of view242 ft. at 1000 yds.Image capture resolution 640 x 480, 320 x 240Maximum length of movieUp to 29 seconds<strong>Camera</strong> aperturef/4.0; fixed lensOptimum camera range32 ft. to infinityMemory8MB SDRAMStorage capacity at each resolution 640 x 480: 80 images320 x 240: 300 imagesOperating system requirementsWindows 98SE/2000/Me/XP(not Mac compatible)Operating environment 41° to 104° F (5° to 40° C). 20%-85%relative humidity, non-condensingInterface typeUSBDisplayIcon LCDWeight9.7 oz. (276g)Product dimensions4.75" W x 1.4" H x 4.25" DBatteries (user supplied)Two x AAA 1.5V alkalineAccessories (included)USB cable, instructions, neck strap,cleaning cloth, carry case, CD ROM withimage editing software26
8x<strong>22</strong> <strong>Meade</strong> 3.07 5/10/07 9:21 AM Page 27BINOCULAR/DIGITAL CAMERA LIMITED WARRANTYEvery <strong>Meade</strong> binocular/digital camera is warranted by <strong>Meade</strong> Instruments (“<strong>Meade</strong>”) to be free of defects inmaterials and workmanship for a period of ONE YEAR from the date of original purchase in the U.S.A. andCanada. At its option, <strong>Meade</strong> will repair or replace the product, or part thereof, found upon inspection by <strong>Meade</strong>to be defective, provided the defective part or product is returned to <strong>Meade</strong>, as explained below. This warrantyapplies to the original purchaser only and is non-transferable. <strong>Meade</strong> products purchased outside North Americaare not included in this warranty, but are covered under separate warranties issued by <strong>Meade</strong> InternationalDistributors.RGA Number Required: Prior to the return of any product or part, a Return Goods Authorization (RGA) numbermust be obtained from <strong>Meade</strong> by writing to the address below, or by calling (800) 626-3233. Each returned partor product must include a written statement detailing the nature of the claimed defect, as well as the owner’sname, address, and phone number.This warranty is not valid in cases where the product has been abused or mishandled, where unauthorizedrepairs have been attempted or performed, or where depreciation of the product is due to normal wear-and tear.<strong>Meade</strong> specifically disclaims special, indirect, or consequential damages or lost profit, which may result from abreach of this warranty. Any implied warranties which cannot be disclaimed are hereby limited to a term of oneyear from the date of original retail purchase.This warranty gives you specific rights. You may have other rights which vary from state to state. <strong>Meade</strong> reservesthe right to change product specifications or to discontinue productions without prior notice. Thiswarranty supersedes all previous <strong>Meade</strong> binocular warranties.Any return made in the U.S.A. under this limited warranty must follow this procedure:Packaging:If possible, ship the product in its original packaging. Please be sure to wrap the package securely and usefilament strapping tape on the outside of the package. Send only the product to be repaired. Please do not sendaccessory items, such as dust caps, carrying case, etc.What to Include with Your Product:• A short note explaining the reasons you are sending the product in for repair.• Your daytime phone number.• The RGA Number• An address for returning your product to you. (No PO boxes, please).• A check or money order in the amount of $10 to cover shipping and handling fees.Shipping:We recommend that you ship your product to us by a traceable parcel service. We also recommend that youinsure your shipment against loss. Many carriers automatically insure packages up to a certain nominal amount,typically $100. Please check to see if the insurance provided by the carrier is adequate to cover the replacementvalue of your product. If you live in the United states, your product should be sent, freight prepaid, to:<strong>Meade</strong> Instruments,Attn: <strong>Binocular</strong>/<strong>Digital</strong> Repair6001 Oak CanyonIrvine, CA 92618® The name “<strong>Meade</strong>,” and the <strong>Meade</strong> logo, are trademarks registered with the U.S. Patent Office and in principalcountries throughout the world. All rights reserved. Specifications subject to change without notice.© 2007 <strong>Meade</strong> Instruments27
8x<strong>22</strong> <strong>Meade</strong> 3.07 5/10/07 9:21 AM Page 28(800) 626-3233 www.meade.com03/07