SOMMERFELD'S TOOLS For Wood - Digital Marketing Services
SOMMERFELD'S TOOLS For Wood - Digital Marketing Services
SOMMERFELD'S TOOLS For Wood - Digital Marketing Services
- No tags were found...

You also want an ePaper? Increase the reach of your titles
YUMPU automatically turns print PDFs into web optimized ePapers that Google loves.
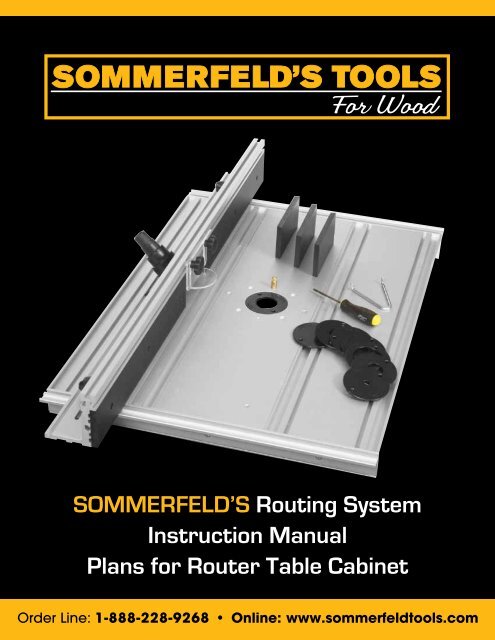
SOMMERFELD’S <strong>TOOLS</strong><strong>For</strong> <strong>Wood</strong>SOMMERFELD’S <strong>TOOLS</strong><strong>For</strong> <strong>Wood</strong>Sommerfeld’s Routing SystemInstruction ManualPlans for Router Table CabinetOrder Line: 1-888-228-9268 • Online: www.sommerfeldtools.com
SOMMERFELD’S <strong>TOOLS</strong><strong>For</strong> <strong>Wood</strong>Order Line: 1-888-228-9268Step #11Cut the strips of adhesive tape to correct lengths for bottom offence. Tape should be placed on 2 outside runners on bottom offence. Peel back off tape and place correctly. (This will preventfence from scratching tabletop and allow it to glide freely.)MAINTENANCE TIP: Keep an eye on tape. If it starts tocome off, we advise using our 2P10 glue or any similar glue tokeep in place.Step #13Slide one 5/16” - 20 x 1½” bolt into opposite fence bracket.Position fence over the bolt and use 5/16” washer and blackknob to hold down. Table is ready for operation in pivot mode.If not using pivot mode, pull pivot pin up and rotate 90° ineither direction to make pivot pin unusable.Slide another 5/16” - 20 x 1½” bolt into opposite fencebracket track and position fence over this bolt and lock downwith 5/16” washer and black knob. Table is now ready to use innon-pivot mode.Cut strips of the adhesive tape and run along the full length of the bottom ofthe fence as seen aboveStep #12Place the fence on the table so pivot pin goes in hole. Makesure your lift handle hole is not under the fence. (If using theTriton router). If it is, turn fence and use other pivot pinhole.Step #14To cut out zero clearance inserts, select router bit and adjustto correct height. Position fence as close to bit as possible andmark outline of bit on zero clearance insert. Cut insert out onband saw to correct opening.To interchange zero clearance inserts, move pivot pin side offence out beyond the table and drop insert out of the bottom offence.We recommend the Tritonrouter for yournew table!Item # TRC001Triton 3-1/4 HP Router6Order online: www.sommerfeldtools.com
Online: www.sommerfeldtools.comSOMMERFELD’S <strong>TOOLS</strong><strong>For</strong> <strong>Wood</strong>Step #15You are now finished and can begin enjoying the benefits ofyour new router table! On pages 9-15 we have plans on how tobuild a quality cabinet to hold your router table.Fence GuardPhoto above shows table with optional table legs and caster wheelsWhy Sommerfeld’sRouter Bit Sets are your best choiceHere’s why you’ll want our Height-Matched Bit SetsEvery routing expert and book offers the same law of router bitinsertion: Insert the bit until it bottoms-out in the collet seat – then retractit 1/16” to 1/8” before tightening. Here’s why. Although the insidesof collets are straight to accept the shanks of your bits, whencollet nuts are tightened, it’s the tapered outside surface thatcauses the collet opening toclose tightly around the bit asit’s drawn down into the seat. Ifthe bit is already in contact withthe collet seat when you tightenthe nut, its shank won’t allowthe collet to be pulled fully into the seat. Not tight. Perhaps notprecisely straight. Certainly not a good thing.Set-up consistency is the key to your successIt stands to reason that if you’re unable to retract every bit thesame, identical distance every time you insert it, you can’t beconfident that every set-up will be identical. This is especially truewith mating bits (i.e. Tongue & Groove – Cope & Stick – etc.)…where you could waste considerable time and scrap on countlesstrial-and-error set-up attempts.Router bit sets solve your problemsStop wasting your valuable time raising and lowering your router,making test cuts to get mating bits in a set to match up.Set the height for one bit in a matched set and theothers are set when you drop them into the colletSince all bits in each set (as well as some others across sets) arematched, just set your bit height once and all other SommerfeldBits that are designed to mate with it will be dead-on aligned theminute you drop them into the collet. Fast. Easy. Foolproof.A simple rubber grommet provides the solutionDrop a small, 1/2” rubber grommet like the one shown here intothe collet before inserting any of the bits in our matched sets.After considerable research and more than 10years’ experience using this method, we havedetermined that the shanks of all our matchedlengthSommerfeld bits will bottom-outidentically in the collet… and allow the collet tobe drawn down into its sleeve the same precisedistance…every time…without multiple routerheight adjustments. That’s why we include one of these grommetswith every Sommerfeld Router Bit Set you purchase from us.First class quality that lastsEvery Sommerfeld Bit is center-ground and CNC machined tostringent standards from premium quality high speed steel foroptimal balance and durability. We then induction braze thecarbide cutting edges (made of top quality micro-grain carbidefrom Ceremetal in Luxembourg) to the bit body, grind it to shapeand hone it to super-sharp perfection before applying a frictionfreeDupont Teflon coating.Toll Free Order Line: 1-888-228-92687
SOMMERFELD’S <strong>TOOLS</strong><strong>For</strong> <strong>Wood</strong>Order Line: 1-888-228-9268Parts List - SOMMERFELD’S FenceItem # Description Pieces87919957 5/16” Flathead Washer 287914966 5/16” x 18 x 1-1/2” Hexhead Bolt 287914925 5/16” x 18 x 3/4” Hexhead Bolt (<strong>For</strong> Guard) 2SOM#9 1-1/2” Fence Knobs 2SOM#8 1” Guard Knob 2CPG Fence Guard 1SFS Infeed/Outfeed Sub Fence (Installed) 2ND/2116 1/4” Weld Nut (Installed) 667661082 1/4” x 20 x 5/8” Cap Screw (Installed) 6SOM#7 Pivot Pin 1WIP-6060 Jam Nut for Pivot Pin 105050109 5/32” Hex Driver 1ZCI30 Zero Clearance Inserts 3DP001 Dust Port 1UHPS-015-R.625 9/16” x 4’ Tape 1UHPS-015-R.75 7/8” x 4’ Tape 1Parts List - SOMMERFELD’S Top OnlyItem # Description Pieces52591294 1/4” x 20 Hex Nylon Lock Nut 687920336 1/4” Split Lock Washer 687914743 1/4” x 20 x 1” Hexhead Bolt 687919957 5/16” Flathead Washer 887914966 5/16” x 18 x 1 1/2” Hexhead Bolt - (Table to Sub-Base) 487915005 5/16” x 18 x 2-1/2” Hexhead Bolt - (Sub-Base to Cabinet) 467661082 1/4” x 20 x 5/8” Cap Screw - (Mounting Triton Router) 4ND/2116 1/4” Weld Nut 1487914701 1/4” x 20 x 1/2” Hexhead Bolt 1467471086 5/16” x 18 Nut 8SPANNER Spanner Wrench 1RINGS Insert Rings 3Starter Pin Starter Pin 18Order online: www.sommerfeldtools.com
Online: www.sommerfeldtools.comSOMMERFELD’S <strong>TOOLS</strong><strong>For</strong> <strong>Wood</strong>Building the 10-drawer, Raised PanelRouter Table System Cabinet• 6” <strong>Digital</strong> Dial Calipers (100-333-1G)• Push Block (PB)• Face Clamp (#81930 or #81932)• 21” Blum TANDEM BluMotion Drawer Slides (56221B)• 1/2” overlay Blum Compact Face Frame Hinges (38N3580.08)• BluMotion Door Silencer (Z971A9700.A1)• Panalign rubber raised panel centering strips (PNL1)About the numbers at the beginning of each stepThese boldface numbers (1:22:45, etc.) at the beginningof each section (and occasionally within a section) representthe time elapsed since the beginning of the program in hours,minutes and seconds. Windows Media Player and mostother players include these counters…use them to help youfind and return to the appropriate sections of the enclosedMarc Sommerfeld DVD.Great tips to ease your work and improve your results• When cutting project components, always cut an extrasame-thickness piece or two for use in making set-ups andpracticing certain procedures.• When working on a router table, remember that for mostoperations, inverted router bits are meant to be used onworkpieces that are fed past the bit with their GOOD SIDESDOWN on the router table surface.• <strong>For</strong> safety’s sake, the larger the diameter of the router bit,the slower the RPM at which it should be run. That’s because thesurface speed at the outer edge of a 3” diameter bit is triple thatof a 1” diameter bit.Getting StartedSOMMERFELD’S products used to build this cabinet:All of the tools listed below can be found by searching for theitem numbers at our on-line catalog (www.sommerfeldtools.com)or our printed catalog. <strong>For</strong> more information about any of theproducts listed below…or to receive a copy of our FREE printedcatalog…contact us TOLL-FREE at 888-228-9268.SOMMERFELD’S PRODUCTS…• Router Table System (SORS)• SOMMERFELD’S version of the Katie Jig DovetailJoint System (SOKJ)• 3-Pc Tongue & Groove Cabinetmaking Bit Set (03004)• 3-Pc Raised Panel Bit Set (03001)• 6-Pc Cabinetmaking Bit Set (06001)• Easy-Set Jig (EZSET)• Easy-Pocket Joinery System (EZP)• Easy-Bore Hinge Boring Jig (SHB)• Easy-Mark Hardware Drilling Jig (EZM-001)OTHER PRODUCTS AVAILABLE FROM SOMMERFELD’S• Triton Plunge Router (MOF001C or TRC001)Here are the recommended speeds:Up to 1” diameter......................... up to 24,000 rpmUp to 2” diameter......................... up to 18,000 rpmUp to 2-1/2” diameter................... up to 16,000 rpmUp to 3-1/2” diameter................... up to 12,000 rpmASSEMBLING THE ROUTER TABLE SYSTEM• (0:00 to 16:12)BUILDING THE ROUTER TABLE CABINET• (16:13 to 17:11 - and - 32:12 to 32:50) Here are two brief,one-minute discussions of the precision, strength and ease ofassembly provided by Marc Sommerfeld’s Tongue-and-Groovejoinery method.• (17:13 - 17:33) Cut all face frame and side/back panelpieces to size (do not cut internal cabinet panel, cabinet door ordrawer pieces at this time. See figure 1, 2 & 3. Use stop blockson your miter gauge to be certain all pieces that are to be anidentical length are so. While you’re at it, cut three 4” spacerblocks to use for equally spacing and marking the positions ofthe drawer rails (D) in the next step, below.Toll Free Order Line: 1-888-228-92689
SOMMERFELD’S <strong>TOOLS</strong><strong>For</strong> <strong>Wood</strong>Order Line: 1-888-228-9268• (17:34 to 20:02) Lay out all of the face frame componentson your benchtop with their GOOD SIDES DOWN and in theirrespective positions. See figure 1. Slide the center stiles (F) tothe left and use a SHARP pencil or scribe to mark the positionsof all the horizontal rails on the left stile (A). Start by aligning thebottom rail (C) with the bottom of the left stile (A). Draw a line onthe stile, at the top of the bottom rail.Figure 1Face Clamp (#81930 or #81932) to hold the parts together andflush while you drive the screws into position (22:03).MARC’S TIPS1: (22:20) <strong>For</strong> improved bonding, apply a thin coat of glue toall end grain and allow to set for a few minutes. Then apply asecond coat and assemble the joint.2: (23:23) When using pocket holes, select fine thread screwsfor hardwoods – coarse thread screws for soft woods.• (24:00 to 33:46) Cut the grooves in the backs of selectedface frame components (A,B,C,E,F) for attaching the sides, floorsand dust panels.Next, slide the center stile (F) to the left and draw another linewhere its top meets the main rail (A). Pull rail (B) into positionagainst top of stile (F) and draw another line on the main stilewhere the top of the rail meets the stile. (18:12)3MARC’S TIPS3: (24:57) SOMMERFELD’S Tongue & Groove CabinetmakingBit Set (03004) makes this task simple because the tongue andgroove bits are matched to automatically align when installed inyour router without time-consuming trial-and-error adjustments.Go to the DVD for a demonstration of how this system worksto save your time and improve your precision…plus tips oninstalling bits, setting bit heights (using our Easy-Set Jig[EZSET]) and setting-up your router table for operation. You justcan’t fail with our Routing Systems & bit sets.4: (29:34) View these tips for cutting stopped grooves in workpieces.• (33:47 to 34.47) Assemble the face frame using glueand pocket screws. Use face clamp to ensure that all matingcomponents are flush before driving pocket screws.Repeat this process, working your way up to the top of thestile, using the 4” spacer blocks you cut earlier to mark thepositions of all the drawer rails (D). Clamp the two opposingstiles (A) together with a couple of spring clamps and use asquare to transfer your markings across both stiles, so the railand opening positions are identical on both mating pieces(18:52).Follow this same procedure to mark the stile positions on eachof the rails – Then number all mating joints 1/1 – 2/2 etc. foreasier assembly.• (34:51 to 35:26) About the side Panels. Use plain 3/4”plywood panels…or raised panels like our example. If youdecide to use plywood, it’s best to use cabinet grade materialwith no voids. See figure 2.Figure 2• (20:30 to 23:57) Use a Pocket Hole Jig (EZP) to drill allof the required pocket holes. Be sure to set your drill stopso the tip of your bit is stopped about 1/8” above the “floor”your workpiece is resting on. DO NOT ASSEMBLE THECOMPONENTS YET. Before assembly, cut the grooves in thebacks of the face frame components that are used for attachingthe sides, floors & other pieces.When it’s time to assemble, it’s important that all componentsremain flush while driving the pocket screws. <strong>For</strong> maximumefficiency during this operation, we offer a special quick-release<strong>For</strong> step-by-step instructions on building raised-panels, see Marc’sraised panel DVD “Arched Raised Panels Made Easy” (DVD1).10Order online: www.sommerfeldtools.com
Online: www.sommerfeldtools.comSOMMERFELD’S <strong>TOOLS</strong><strong>For</strong> <strong>Wood</strong>MARC’S TIPS5: (35:24) If you decide to make raised panel sides and wouldprefer to cut the side panel tongues that will mate with your faceframe rails before you assemble the panels, you’ll need to makefour short scraps withgrooves in them for use ascauls during clamp-down.Slip these cauls overthe tongues on your sidepanels during glue-up tokeep them from gettingsmashed by your clamps.• (37:20 to 40:39) Cut the horizontal grooves near the tops ofthe side panels for the reinforcing corner blocks.MARC’S TIPS6: (38:40) Here’s a great tip about using the climb-cuttechnique to prevent tear-out when cutting across grain –especially on plywood.• (40:45 to 41:30) About the back panel. Again, use plain 3/4”plywood panels…or raised panels like our example. See figure 3.Figure 3measurements. Although these measurements are provided inthe Bill of Materials, it’s always best to double-check everythingto ensue the optimum fit. See figure 7.• (42:59 to 45:50) Cutting tongues on the “front” edges ofall internal cabinet panels (N, P & Q). Since these panels aredesigned to anchor to the face frame…and since our face framecomponents are secured to one another with glue and screwpockets…the ends of the tongues on each panel will have to betrimmed off before they’ll fit.MARC’S TIPS7: (43:57) Here’s how to use a Flush Trim bit to quickly removeends where the grooves on mating pieces stop.• (46:00 to 46:45) In this step, we’ll use our Pocket Hole Jig(EZP) to cut a series of pocket holes in the undersides of ourfloor panels to provide support.MARC’S TIPS8: (45:39) When positioning your pocket holes, be certain NOTto screw these components to the floating panels in the sidesand back. Screw ONLY to the stiles, as the panels must be freeto move, once assembled.• (47:00 to 54:14) In this step, we’ll dry test/clamp the cabinetcomponents together. Use a square to be certain everythingfits properly. Once you’re satisfied with the fit, start by installingthe lower floor. Glue only the tongued edge of the panel, as thescrews will hold the other edges quite nicely without glue.Note that portions of the tongue on the lower center dust panel(Q) will have to be flush-trimmed so the tongue fits properly intothe two center stiles (F).Be sure to cut a groove at the inside top of each of the upperdust panels (P) to accept a 1” x 2” anchoring strip for the RouterTable top.• (54:15 to 57:40) Cut four corner braces (about 1-1/2” wide x5” or so long with 45o angled ends). Once cut, use your Tonguecutter to form a tongue on each end for anchoring into thegrooves at the top of the face frame, sides and back.If you choose raised panels, be sure to cut the vertical groovesin your back panel stiles that will engage the tongues in yourside panels before you assemble the panel. This way, you won’thave to wrestle with the large, cumbersome panel on your routertable.• (42:00 to 42:50) Determining “floor” & dust panelOnce you’re satisfied that everything fits properly, take thecomponents apart, then glue and screw everything togetherand sand.BUILDING THE DRAWERS AND DOOR• (58.07 to 59:50) Begin by cutting all of the drawercomponents to size, according to the Bill of Materials.See figure 4 & 6.Toll Free Order Line: 1-888-228-926811
SOMMERFELD’S <strong>TOOLS</strong><strong>For</strong> <strong>Wood</strong>Order Line: 1-888-228-9268Figure 4Figure 5Figure 6MARC’S TIPS9: (58:21) Here’s Marc’s great tip for determining the size ofyour drawers…based on the size of your drawer openings andthe slides you plan to use. NOTE: You should have your slidesin-hand before making any size determinations.• (59:52 to 1:06:59) Determine the desired spacing for thethrough dovetails and set your dovetail jig accordingly. We usedSOMMERFELD’S version of the famous Katie Jig Dovetail JointSystem. [SOKG].MARC’S TIPS10: (1:00:43) Here’s how to set your router bit height with theKatie Jig. Position a piece of same-thickness stock on top of thejig “comb”. Move the jig up next to your dovetail router bit andset its height just a bit “proud” of the top surface of your scrap.This will cause the dovetail pins to protrude a bit beyond thesurface of the tails. Once assembled, use your belt sander orrandom orbit sander to sand everything flush.• (1:00:40 to 1:01:34) Use your dovetail jig to cut all dovetailpins and tails according to the directions that came with thejig. Once cut, test fit to be certain everything is OK beforeproceeding to the next step.MARC’S TIPS11: (1:04:41) To prevent chip-outs when cutting the tails witha pattern bit, always go to the very outside of each end of yourworkpiece first and clean that out before cutting the insides.• (1:07:00 to 1:07:35) Next, cut the grooves for the drawerbottoms. Use the groove cutter with your Tongue & GrooveCabinetmaking Set (03004) to perform this task. Set yourcutter so the bottom of the 1/4” wide x 1/4” deep grooves arepositioned 1/2” up from drawer bottom.Remove 3/4” from the bottoms of all drawer backs to allow thebottoms to slide in once they’re assembled.• Assemble and glue the drawer boxes together then flushsand the protruding dovetail pins.• (1:08:00 to 1:15:23) Install the drawer slides. As you recall,one side of each drawer opening (the inside) has a dust panelthat’s flush with the drawer stiles (E)…allowing the installation ofthe slides on this side without any modifications. However, theother side of each opening must be built-out so it’s flush as well.Measure this distance, cut these wood “fillers” to the correct sizeand install them as shown in the DVD.• (1:15:39 – 1:29:40) Cut & assemble the cabinet door. Seefigure 5. First, set-up and make the cope cuts on the ends ofboth door rails. Then replace the cope bit with the pattern bitand make the pattern cuts on the inside edges of the door railsand stiles. Finally, change bits again to the Panel Raiser and cutthe edges of your door panel.MARC’S TIPS12: (1:23:20) Since the Panel Raiser is a very large bit, yourresults will be smoother if you cut your door edges in twopasses and slow your router’s speed down. 13: (1:24:03)Make a push block to help prevent tear-outs and providesupport. 14: <strong>For</strong> best results, rotate your stock in a counterclockwisedirection as you make your four cuts…cross-grainfirst, followed by a with-grain cut, followed by another crossgraincut, etc.• (1:25:46 to 1:29:38) Assemble the door. Use small, 1/4” x1/4” x 1” long rubber Panalign strips (PNL1) to hold the panel inposition while allowing it to expand and contract without fear of splitting.MARC’S TIPS13: (1:27:00) When gluing-up raised panel doors, keep theglue well away from any inside edges where the cope andpattern cuts meet, as it’s very difficult to remove excess gluefrom these areas once assembled. If you do get squeeze-out,before the glue dries, try one of these methods for removing it:1): Use a 50/50 solution of white vinegar and water to wipe thejoint…or 2): Pick up a handful of sawdust and rub it across thejoint to soak-up the glue.12Order online: www.sommerfeldtools.com
Online: www.sommerfeldtools.comSOMMERFELD’S <strong>TOOLS</strong><strong>For</strong> <strong>Wood</strong>• (1:29:42 to 1:31:26) To make the drawer fronts, replacethe Panel Raising Bit with a Drawer Front Bit and repeat theprocess you followed when cutting the raised panel for the door.Start with a cross-grain cut and rotate the workpiece counterclockwisethrough all four sides of the drawer front.• (1:31:33 to 1:33:25) Next, change to an Ogee Bit and cutthe door edge detail, following the same rotational plan as withthe raised panel and drawer fronts.• (1:33:26 to 1:38:24) Install the drawer fronts. Start by drillingall of the drawer handle mounting holes.MARC’S TIPS14: (1:33:45) SOMMERFELD’S Easy Mark Hardware DrillingJig (EZM-001) makes easy work of centering handles and otherhardware identically on several matching components.Once the handle holes are drilled, begin the drawer frontinstallation process by determining the overlay of the drawersand door. In our case, this overlay is 1/2”.MARC’S TIPS15: (1:35:14) Tilt the cabinet backwards so it’s leaning ona 5-gallon paint bucket or other object of that approximateheight. This way, gravity will be working WITH you, holding thepieces in place as you work. 16: (1:35:24) Start with lower-mostcomponent and work your way up. In our case, we started withthe lower drawers.Use properly sized spacing strips cut from scrap wood toensure that all components are evenly spaced. Once positioned,temporarily screw the fronts to the drawers through the hardwaremounting holes.When they’re secured, install screws from the inside of thedrawer into the drawer front…then remove the temporary screwsyou installed through the handle holes. Repeat this process forall drawer fronts.• (1:38:25 to 1:41:42) Attach the hinges to the door stile. Wemounted the doors to our cabinet using Blum 35mm, Europeanstyle concealed hinges. These hinges require three holes: a35mm, flat-bottomed hinge cup hole, flanked by two 8mm holesfor the nylon locking inserts.The best way to position these holes properly is to useSommerfeld’s EASY-BORE Hinge Boring Jig (Item: #SHB). Itfeatures an offset-adjustable, clamp-on frame with spring-loadedbits (two 8mm & one 35mm), pre-set for the proper spacing.MARC’S TIPS17: (1:39:45) Use shallow (7/16”)cup concealed hinges on all 3/4”doors with detailed edges to avoidthe possibility of the hinge cup holecoming through your detail cut.Use practice pieces of door stilesto check these hole depths andpositions and avoid ruining a finished door.To attach the Blum hinges to the stile, insert them into theirholes and strike the two small screw heads with a hammer,driving the locking inserts into their 8mm holes.• (1:41:44 to 1:43:06) Attach the door to the face frame. Usea scrap block, clamped to the bottom of the cabinet rail (B) tosupport the door at the proper 1/2” overlay while you install thetwo screws that attach the hinges to the drawer stile (E).• (1:43:20 to 1:44:15) Install the BLUMOTION Door Silencer.• (1:44:18 to 1:49:48) Make the plywood sub-base for theRouter Table System. Drawings and step-by-step directions formaking this sub-base are included with every SOMMERFELD’SRouter Table System.• (1:49:50 to 1:52:16) Attach your Router Table System to thecabinet. Step number 6 on page 4.• (1:52:17 to 1:54:00) Tips on attaching your Router TableSystem to a table saw.Master cabinetmaker Marc Sommerfeld’sDVDs, tips & tools will help you buildprojects just like the Pros!4 Mini Raised Panels Made Easy4 Glass Panel Doors Made Easy4 Cabinetmaking Made Easy4 Mitered Raised Panels Made Easy4 Router Tables Made Easy4 Arched Raised Panels Made Easy4 Shaker Raised Panels Made Easy4 Dovetails Made EasyItem # DVD8PKThe Complete MadeEasy DVD SeriesToll Free Order Line: 1-888-228-926813
SOMMERFELD’S <strong>TOOLS</strong><strong>For</strong> <strong>Wood</strong>Order Line: 1-888-228-9268Large Diagram of SOMMERFELD’S 10-Drawer,Raised Panel Router Table System CabinetFigure 714Order online: www.sommerfeldtools.com
Online: www.sommerfeldtools.comSOMMERFELD’S <strong>TOOLS</strong><strong>For</strong> <strong>Wood</strong>Sommerfeld’s 10-Drawer Router Table Parts ListBill of Materials:NOTE: Hardwood stock is 13/16” thick, except drawercomponents which are made from 5/8” stock . Dimensionsare in inches.In reading dimensions, remember that the width of a boardis always measured across the grain.FACE FRAMEA Main Stiles (2).................................1-1/2 x 35B Rails (3)...........................................1-1/2 x 28-1/2C Bottom Rail......................................4 x 28-1/2D Drawer Rails (4)..............................1-1/2 x 7-1/4E Drawer Stiles (2)..............................1-1/2 x 15F Center Stiles (2)..............................1-1/2 x 5-3/4ENDS (2)G Main Stiles (2)*................................4-1/2 x 35H Rails (2)...........................................4-1/2 x 15J Center Stile (1)**.............................3 x 27L Panels (2)........................................6-1/4 x 26-3/4BACKG Main Stiles (2)* ...............................4-1/2 x 35J Center Stiles (2)**............................3 x 27K Rails (2)...........................................4-1/2 x 23-1/2M Panels.............................................6-1/4 x 26-3/4INTERNAL CABINET PANELS - (3/4” plywood)N Upper & Lower Floors (2)................22-3/4 x 29-7/8(30” if using ¾” hardwood)P Upper Dust Panels (2).................... 22-3/4 x 16-1/2Q Lower Center Dust Panel................22-3/4 x 13-3/4CABINET DOORR Door Stiles (2).................................2-1/2 x 16S Door Rails (2)..................................2-1/2 x 8T Door Panel .....................................7-3/4 x 11-3/4DRAWERS(5/8” thick frames – 1/4” plywood bottoms)Dimensions if using Blumotion slides:Small DrawersU Small Drawer Sides (12).................3 x 21V Small Drawer Fronts/Backs (12).....3 x 6-13/16W Small Drawer Faces (6)...................5 x 8-1/4X Small Drawer Bottoms (6)...............6-1/16 x 20-1/4Large DrawersY Large Drawer Sides (8)...................4-3/4 x 21Z Large Drawer Fronts/Backs (8).......4-3/4 x 13-1/16AA Large Drawer Faces (4)..................6-3/4 x 14-1/2BB Large Drawer Bottoms (4)...............12-5/16 x 20-1/456221B Blum TANDEMDrawer SlidesSommerfeld’s Router TableHardware PackageZ971A9700.A1BluMotion DoorSilencer38N3580.08Face Frame HingesITEM Description Sale56221B (10 pair ) 21” Blum TANDEM BluMotion Drawer Slides $399.0038N3580.08 (1 pair) 1/2” overlay Blum Compact Face Frame Hinges $4.90Z971A9700.A1 BluMotion Door Silencer $5.95TOTAL RETAIL VALUE $409.85SHP$349.00Sommerfeld’sYOU SAVEHardware Package$60.85Toll Free Order Line: 1-888-228-926815
Online: www.sommerfeldtools.comToll Free Order Line: 1-888-228-9268SOMMERFELD’S <strong>TOOLS</strong><strong>For</strong> <strong>Wood</strong>1408 Celebrity RoadRemsen, IA 51050