SOMMERFELD'S TOOLS For Wood - Digital Marketing Services
SOMMERFELD'S TOOLS For Wood - Digital Marketing Services
SOMMERFELD'S TOOLS For Wood - Digital Marketing Services
- No tags were found...

You also want an ePaper? Increase the reach of your titles
YUMPU automatically turns print PDFs into web optimized ePapers that Google loves.
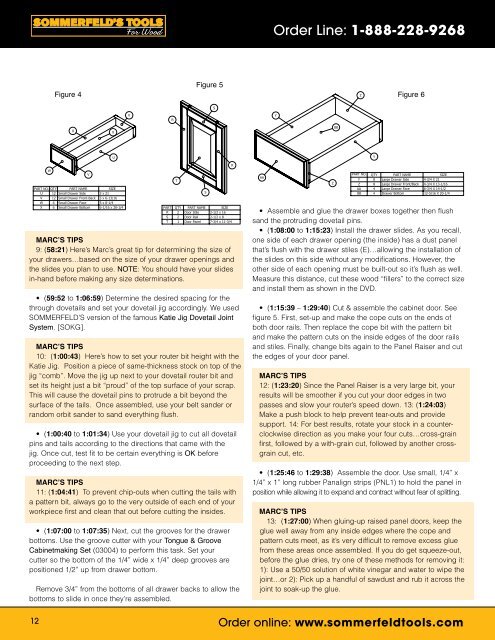
SOMMERFELD’S <strong>TOOLS</strong><strong>For</strong> <strong>Wood</strong>Order Line: 1-888-228-9268Figure 4Figure 5Figure 6MARC’S TIPS9: (58:21) Here’s Marc’s great tip for determining the size ofyour drawers…based on the size of your drawer openings andthe slides you plan to use. NOTE: You should have your slidesin-hand before making any size determinations.• (59:52 to 1:06:59) Determine the desired spacing for thethrough dovetails and set your dovetail jig accordingly. We usedSOMMERFELD’S version of the famous Katie Jig Dovetail JointSystem. [SOKG].MARC’S TIPS10: (1:00:43) Here’s how to set your router bit height with theKatie Jig. Position a piece of same-thickness stock on top of thejig “comb”. Move the jig up next to your dovetail router bit andset its height just a bit “proud” of the top surface of your scrap.This will cause the dovetail pins to protrude a bit beyond thesurface of the tails. Once assembled, use your belt sander orrandom orbit sander to sand everything flush.• (1:00:40 to 1:01:34) Use your dovetail jig to cut all dovetailpins and tails according to the directions that came with thejig. Once cut, test fit to be certain everything is OK beforeproceeding to the next step.MARC’S TIPS11: (1:04:41) To prevent chip-outs when cutting the tails witha pattern bit, always go to the very outside of each end of yourworkpiece first and clean that out before cutting the insides.• (1:07:00 to 1:07:35) Next, cut the grooves for the drawerbottoms. Use the groove cutter with your Tongue & GrooveCabinetmaking Set (03004) to perform this task. Set yourcutter so the bottom of the 1/4” wide x 1/4” deep grooves arepositioned 1/2” up from drawer bottom.Remove 3/4” from the bottoms of all drawer backs to allow thebottoms to slide in once they’re assembled.• Assemble and glue the drawer boxes together then flushsand the protruding dovetail pins.• (1:08:00 to 1:15:23) Install the drawer slides. As you recall,one side of each drawer opening (the inside) has a dust panelthat’s flush with the drawer stiles (E)…allowing the installation ofthe slides on this side without any modifications. However, theother side of each opening must be built-out so it’s flush as well.Measure this distance, cut these wood “fillers” to the correct sizeand install them as shown in the DVD.• (1:15:39 – 1:29:40) Cut & assemble the cabinet door. Seefigure 5. First, set-up and make the cope cuts on the ends ofboth door rails. Then replace the cope bit with the pattern bitand make the pattern cuts on the inside edges of the door railsand stiles. Finally, change bits again to the Panel Raiser and cutthe edges of your door panel.MARC’S TIPS12: (1:23:20) Since the Panel Raiser is a very large bit, yourresults will be smoother if you cut your door edges in twopasses and slow your router’s speed down. 13: (1:24:03)Make a push block to help prevent tear-outs and providesupport. 14: <strong>For</strong> best results, rotate your stock in a counterclockwisedirection as you make your four cuts…cross-grainfirst, followed by a with-grain cut, followed by another crossgraincut, etc.• (1:25:46 to 1:29:38) Assemble the door. Use small, 1/4” x1/4” x 1” long rubber Panalign strips (PNL1) to hold the panel inposition while allowing it to expand and contract without fear of splitting.MARC’S TIPS13: (1:27:00) When gluing-up raised panel doors, keep theglue well away from any inside edges where the cope andpattern cuts meet, as it’s very difficult to remove excess gluefrom these areas once assembled. If you do get squeeze-out,before the glue dries, try one of these methods for removing it:1): Use a 50/50 solution of white vinegar and water to wipe thejoint…or 2): Pick up a handful of sawdust and rub it across thejoint to soak-up the glue.12Order online: www.sommerfeldtools.com