SERVICE MANUAL - Nilfisk-Advance
SERVICE MANUAL - Nilfisk-Advance
SERVICE MANUAL - Nilfisk-Advance
- No tags were found...

You also want an ePaper? Increase the reach of your titles
YUMPU automatically turns print PDFs into web optimized ePapers that Google loves.
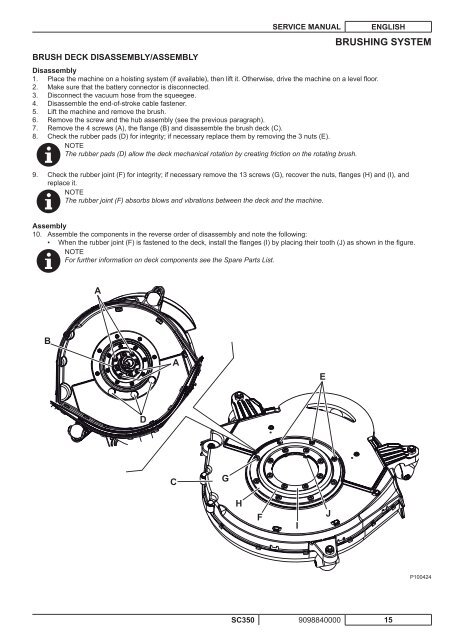
BRUSH DECK DISASSEMBLY/ASSEMBLY<strong>SERVICE</strong> <strong>MANUAL</strong>Disassembly1. Place the machine on a hoisting system (if available), then lift it. Otherwise, drive the machine on a level floor.2. Make sure that the battery connector is disconnected.3. Disconnect the vacuum hose from the squeegee.4. Disassemble the end-of-stroke cable fastener.5. Lift the machine and remove the brush.6. Remove the screw and the hub assembly (see the previous paragraph).7. Remove the 4 screws (A), the flange (B) and disassemble the brush deck (C).8. Check the rubber pads (D) for integrity; if necessary replace them by removing the 3 nuts (E).NOTEThe rubber pads (D) allow the deck mechanical rotation by creating friction on the rotating brush.ENGLISHBRUSHING SYSTEM9.Check the rubber joint (F) for integrity; if necessary remove the 13 screws (G), recover the nuts, flanges (H) and (I), andreplace it.NOTEThe rubber joint (F) absorbs blows and vibrations between the deck and the machine.Assembly10. Assemble the components in the reverse order of disassembly and note the following:• When the rubber joint (F) is fastened to the deck, install the flanges (I) by placing their tooth (J) as shown in the figure.NOTEFor further information on deck components see the Spare Parts List.ABAEDCGHFIJP100424SC350 9098840000 15