Chain Link Fence Installation Tips-Installing Posts and ... - Lowe's
Chain Link Fence Installation Tips-Installing Posts and ... - Lowe's
Chain Link Fence Installation Tips-Installing Posts and ... - Lowe's
- No tags were found...

Create successful ePaper yourself
Turn your PDF publications into a flip-book with our unique Google optimized e-Paper software.
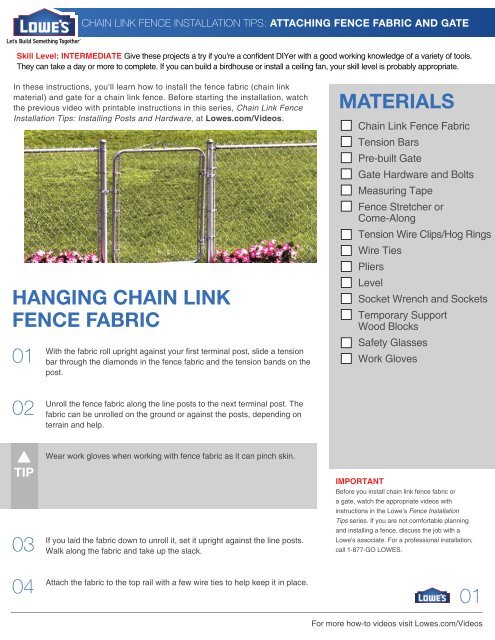
CHAIN LINK FENCE INSTALLATION TIPS: ATTACHING FENCE FABRIC AND GATEHANGING CHAIN LINK FENCE FABRIC (cont.)05At the end, remove excess fence fabric or add more fabric as needed.To remove excess fabric at the end of the run:1. Use pliers to open the top <strong>and</strong> bottom loop on one wire str<strong>and</strong> at thepoint of separation. (fig. 1)2. Unwind the wire str<strong>and</strong> through the links until the fabric comes apart. (fig. 2)To add more fabric:1. Use pliers to open the top <strong>and</strong> bottom loop on the last wire str<strong>and</strong>.2. Unwind one wire str<strong>and</strong>. You’ll use this to connect the two pieces of fabric.3. On the second piece of fabric, use pliers to open the top <strong>and</strong> bottom loopon the first wire str<strong>and</strong>. You may have to remove a second str<strong>and</strong> to makethe two sets of fabric match accordingly.4. Pull the two pieces of fabric together, <strong>and</strong> wind the loose str<strong>and</strong> throughboth pieces.5. Join <strong>and</strong> tighten the loops at the top <strong>and</strong> bottom.(fig. 1)06070809Insert a temporary tension bar into the fabric about 3' from the end. This will be usedto attach the stretcher bar. (fig. 3)Add a temporary tension b<strong>and</strong> on the terminal post. This will be used to attach thecome-along to the post.Hook the stretcher bar to the temporary tension bar.Attach a fence stretcher or come-along to thestretcher bar <strong>and</strong> to the temporary tension b<strong>and</strong>on the post. (fig. 4)(fig. 2)(fig. 3)(fig. 4)02For more how-to videos visit Lowes.com/Videos
CHAIN LINK FENCE INSTALLATION TIPS: ATTACHING FENCE FABRIC AND GATEHANGING CHAIN LINK FENCE FABRIC (cont.)10Use the fence stretcher to slowly <strong>and</strong> evenly tighten the fabric. There should be just enough tension so that you cannotsqueeze the fabric with your fingers. Do not overtighten.1112131415Walk along the fence <strong>and</strong> adjust the fabric as needed to ensure that it is tightly against the posts <strong>and</strong> the bottom is firmlyagainst the ground.Pull slack from the fabric between the fence stretcher <strong>and</strong> end post with your h<strong>and</strong>s.Make sure you’re wearing gloves.Insert a tension bar through the fabric <strong>and</strong> tension b<strong>and</strong>s on the terminal post, <strong>and</strong>secure the bolts. (fig. 5)Carefully loosen <strong>and</strong> remove the stretching tools.Secure the fence fabric to the top rail <strong>and</strong> line posts with wire ties, <strong>and</strong> to the tensionwire with clips.16Continue installing fence fabric between terminal posts until the entire fence, except thegate(s), is completed.(fig. 5)INSTALLING GATE AND HARDWARE01Attach the post hinges about 8" from the top <strong>and</strong> bottom of the post with bolts <strong>and</strong> asocket wrench.Install the top hinge with the pin pointing down. (fig. 6)Install the bottom hinge with the pin pointing up.02Loosely attach the frame hinges to the gate so they stay in place, but can beadjusted later.(fig. 6)03Set the gate in position with about 2" of clearance at the bottom. Use blocks underneath to help hold it in place.03For more how-to videos visit Lowes.com/Videos