WholePacket-Sept2011
WholePacket-Sept2011
WholePacket-Sept2011

You also want an ePaper? Increase the reach of your titles
YUMPU automatically turns print PDFs into web optimized ePapers that Google loves.
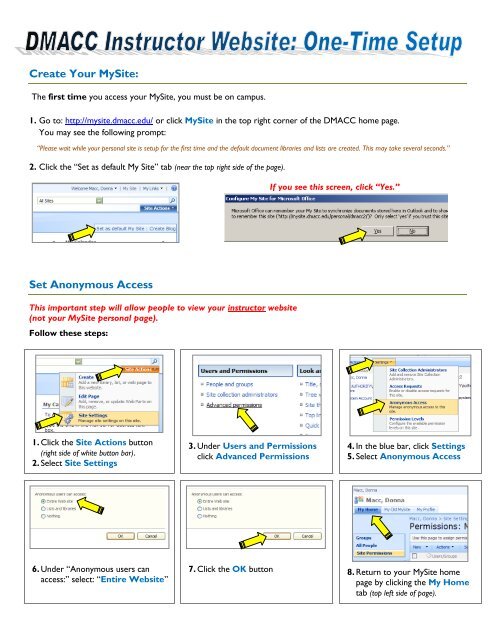
Create Your MySite:<br />
The first time you access your MySite, you must be on campus.<br />
1. Go to: http://mysite.dmacc.edu/ or click MySite in the top right corner of the DMACC home page.<br />
You may see the following prompt:<br />
“Please wait while your personal site is setup for the first time and the default document libraries and lists are created. This may take several seconds.”<br />
2. Click the “Set as default My Site” tab (near the top right side of the page).<br />
Set Anonymous Access<br />
This important step will allow people to view your instructor website<br />
(not your MySite personal page).<br />
Follow these steps:<br />
1. Click the Site Actions button<br />
(right side of white button bar).<br />
2. Select Site Settings<br />
6. Under “Anonymous users can<br />
access:” select: “Entire Website”<br />
3. Under Users and Permissions<br />
click Advanced Permissions<br />
7. Click the OK button<br />
If you see this screen, click “Yes.”<br />
4. In the blue bar, click Settings<br />
5. Select Anonymous Access<br />
8. Return to your MySite home<br />
page by clicking the My Home<br />
tab (top left side of page).
Create Your Instructor Website<br />
1. Start at My Home<br />
2. Click the Site Actions button<br />
(right side of white button bar)<br />
3. Select > Create<br />
5. Complete the form fields on the next page (use your name instead of “Donna Macc”).<br />
Click the OK button when done.<br />
4. Under Web Pages<br />
click Sites and Workspaces
Activate Features<br />
This important step activates a user-friendly editing tool that you will use on your Instructor website.<br />
1. Click the Site Actions button<br />
(right side of white button bar).<br />
2. Select Site Settings<br />
3. Under Site Administration<br />
click Site Features<br />
4. Click the Activate button beside these two features (bottom of the list)<br />
5. Return to your Instructor Site home page: Click the Home tab.<br />
(Top left corner of the page.)
Creating & Developing Your Own<br />
Instructor Website<br />
Updated: September 2011
Creating and Developing Your Own Instructor Website<br />
Table of Contents<br />
Introduction .................................................................................................................................................................................... 2<br />
Overview of Your MySite Personal View ......................................................................................................................... 3<br />
Overview of your MyProfile Page ........................................................................................................................................ 4<br />
Overview of Your Instructor Website .............................................................................................................................. 5<br />
Managing Documents: The Document Library ............................................................................................................ 6<br />
Managing Pictures: The Picture Library .................................................................................................................... 7-11<br />
Main Content Area ............................................................................................................................................................. 12-14<br />
Choose a Theme ........................................................................................................................................................................ 15<br />
Going Live ..................................................................................................................................................................................... 16<br />
Additional Instructions<br />
Modifying the White Link Bar ....................................................................................................................................... 17<br />
Modifying the Quick Launch (Left Navigation) ......................................................................................................... 17<br />
Add Item/Event to Calendar ......................................................................................................................................... 17<br />
Create a New Discussion .............................................................................................................................................. 17<br />
Create/Manage Document Libraries ........................................................................................................................... 18<br />
Create a Class Site or Other Sub-Site ....................................................................................................................... 18<br />
Blogging .................................................................................................................................................................................... 19-21<br />
Online Help / Download this Training Packet ............................................................................................................. 22<br />
Logging in from Off Campus ................................................................................................................................................ 22<br />
Storage Space .............................................................................................................................................................................. 22<br />
Set up Your MySite Personal & Public Pages .............................................................................................................. 23<br />
Creating & Developing Your Own Instructor Website Page 1
Creating and Developing Your Own Instructor Website<br />
Introduction<br />
Instructor websites are built in the public area of your MySite (http://mysite.dmacc.edu)<br />
Everyone at DMACC – faculty, staff & students – has access to create a MySite.<br />
By default, the MySite has two views:<br />
� My Home: Your private view (only you can see this page)<br />
� My Profile: Your public view (everyone can see this page)<br />
We are going to add a new site to your MySite -- your Instructor Site<br />
My Home<br />
Default view<br />
[Personal: visible only to you]<br />
Class Site(s)<br />
The MySite<br />
Instructor Site<br />
NEW SITE<br />
[Public: visible to everyone]<br />
Optional Additional Pages<br />
Blog Calendar<br />
My Profile<br />
Default view<br />
[Public: Only visible to DMACC people]<br />
Creating & Developing Your Own Instructor Website Page 2
Creating and Developing Your Own Instructor Website<br />
Online Help & Instructions: www.dmacc.edu/MySiteHelp<br />
Email Help: MySiteHelp@dmacc.edu<br />
Overview of Your MySite Personal View<br />
Top Tabs: Use to<br />
navigate to different<br />
views of your MySite.<br />
Left Nav<br />
or “Quick<br />
Launch,”<br />
by default,<br />
several links<br />
are present<br />
in the Quick<br />
Launch area.<br />
Instructor Site Link:<br />
Click this link to go<br />
to your new<br />
Instructor Website.<br />
Welcome [Your name] –<br />
Lets you know that you are<br />
logged in to the system.<br />
Center/Content Area<br />
Default is 2 columns, but can be<br />
customized; uses “Web Parts” to<br />
display content on the page.<br />
MySite: Links to your<br />
MySite personal page<br />
(this page).<br />
My Links: Add<br />
favorite links<br />
here and use<br />
them on any<br />
computer<br />
when you are<br />
logged in.<br />
personal page<br />
Site Actions<br />
button – the<br />
starting point for<br />
creating and<br />
updating your<br />
MySite and<br />
Instructor Site<br />
Creating & Developing Your Own Instructor Website Page 3
Creating and Developing Your Own Instructor Website<br />
Overview of My Profile Page<br />
This is the view of your MySite that other people with a DMACC login can view. It is not accessible by the general<br />
public.<br />
This page is also not customizable, so we don’t use it for our instructor website.<br />
If you add shared content to your MySite Personal View, it will show on this page.<br />
Creating & Developing Your Own Instructor Website Page 4
Creating and Developing Your Own Instructor Website<br />
Overview of Your Instructor Site<br />
This new page contains many of the same features as your MySite personal view; however it is accessible by the<br />
general public. In addition, unlike your MySite public view, you can customize this page and let non-DMACC<br />
people access it.<br />
Breadcrumb Trail: Use<br />
to navigate and show your<br />
current location.<br />
Left Nav<br />
or “Quick<br />
Launch,”<br />
by default,<br />
several links<br />
are present<br />
in the Quick<br />
Launch area.<br />
Welcome [Your name] –<br />
Lets you know that you are<br />
logged in to the system.<br />
Center/Content Area<br />
Default is 2 columns, but can be<br />
customized; uses “Web Parts” to<br />
display content on the page.<br />
MySite: Links to your<br />
MySite personal page<br />
(this page).<br />
My Links: Add<br />
favorite links<br />
here and use<br />
them on any<br />
computer<br />
when you are<br />
logged in.<br />
personal page<br />
Site Actions<br />
button – the<br />
starting point for<br />
creating and<br />
updating your<br />
MySite and<br />
Instructor Site<br />
Creating & Developing Your Own Instructor Website Page 5
Creating and Developing Your Own Instructor Website<br />
Managing Documents: The Document Library<br />
Note: Documents added to your instructor site will be visible to everyone. If you would like to store documents that are<br />
only visible to you, go back to your MySite home page (Click MySite in top right corner), before following these instructions.<br />
Upload Documents<br />
� From your Instructor site page, click Documents in the left navigation.<br />
� This view shows your Site Content. By default it has one document library called Shared Documents.<br />
� You can upload files into the Shared Documents library, or create a new one.<br />
� To upload files into the existing library, click Shared Documents in either the left navigation or in the<br />
center area.<br />
� To upload one document<br />
o Click “Upload” in the blue bar<br />
o Click the Browse button and select the file to upload<br />
o Version Comments – these are comments that will only be seen by you<br />
o Click OK<br />
� To upload multiple documents<br />
o Click the down arrow to the right of “Upload” in the blue bar and select “Upload Multiple<br />
Documents”<br />
� Navigate to your documents<br />
� Click the check box next to the documents you wish to upload<br />
� Click OK<br />
� Click YES at the prompt<br />
Creating & Developing Your Own Instructor Website Page 6
Creating and Developing Your Own Instructor Website<br />
Managing Pictures: The Picture Library<br />
Note: Pictures added to your instructor site will be visible to everyone. If you would like to store pictures that are only<br />
visible to you, go back to your MySite home page (Click MySite in top right corner), before following these instructions.<br />
Create a Picture Library<br />
� From your Instructor site page, click View All Site Content in the left navigation.<br />
� This will take you to a screen that shows all of the default features of your instructor website.<br />
� Click the Create button in the blue navigation bar.<br />
Creating & Developing Your Own Instructor Website Page 7
Creating and Developing Your Own Instructor Website<br />
� In the Libraries column, select Picture Library.<br />
� Complete the form (see below) and click the Create button.<br />
Click the<br />
“Create” button<br />
when done.<br />
� Note: After you click the Create button, you will be automatically redirected<br />
to your new Picture Library.<br />
This will be the<br />
name that shows<br />
in the navigation.<br />
Describe what<br />
will be in this<br />
picture library.<br />
Click “Yes” to<br />
put a link in the<br />
left navigation.<br />
Click “No,” the<br />
email option is<br />
not set up.<br />
Click “Yes.” This<br />
creates a backup<br />
copy of your<br />
picture if you<br />
upload a new<br />
version.<br />
Creating & Developing Your Own Instructor Website Page 8
Creating and Developing Your Own Instructor Website<br />
To upload one picture:<br />
� Go to the Pictures library (click on it in the left navigation)<br />
� Click “Upload” in the blue bar.<br />
Note: You can either click on the word “Upload” or click the down arrow to the right and select<br />
“Upload Picture”<br />
� Click the “Browse” button and locate the picture you wish to upload.<br />
� Either double-click the file name or single click and then click the Open button<br />
� If desired, enter “Version Comments” or leave this field blank.<br />
(These comments will only be visible to you.)<br />
� Click the OK button<br />
� If desired, complete the fields on the next screen to set the document properties, or just click the OK<br />
button to complete the upload.<br />
Creating & Developing Your Own Instructor Website Page 9<br />
or
Creating and Developing Your Own Instructor Website<br />
To upload multiple pictures:<br />
� Click the down arrow to the right of “Upload” in the blue bar and select “Upload Multiple Pictures”<br />
� Click Add Picture Shortcut (top left side of window).<br />
� In the next window, navigate to the folder where your picture(s) are located and click the Add button.<br />
Note: You will NOT see any pictures in this window, just file names.<br />
Creating & Developing Your Own Instructor Website Page 10
Creating and Developing Your Own Instructor Website<br />
� This will bring you back to the previous window. Select the photo(s) you wish to upload. To select<br />
multiple photos, hold down the Ctrl key while clicking.<br />
� Select any options from the right side menu, and then click the Upload and Close button.<br />
� Click Go Back to Pictures to view uploaded photos.<br />
� The uploaded photos are now visible in the Pictures Library.<br />
Creating & Developing Your Own Instructor Website Page 11
Creating and Developing Your Own Instructor Website<br />
Main Content Area<br />
Modifying the Main Content Area<br />
� Click the Home tab near the top left side of the screen.<br />
� Click Site Actions (upper right side of page), and then Edit Page.<br />
� This puts the page in edit mode, which shows the Web Parts areas.<br />
� All content added to your page must be in a “Web Part.” You can add, move, edit and delete web parts.<br />
� To edit an existing web part, click the down arrow next to “edit” and select “Modify Shared Web Part”<br />
� To remove an existing web part, click the down arrow next to “edit” and select “Delete”<br />
NOTE: Clicking the “X” hides the web part, it does not delete it from the page<br />
� To move a web part, grab it along the yellow bar and drag to a different location on the page<br />
� To add a new web part, click “Add a Web Part” in either column<br />
Creating & Developing Your Own Instructor Website Page 12
Creating and Developing Your Own Instructor Website<br />
� The Web Parts window will open.<br />
NOTE: You may need<br />
to expand the list of<br />
web parts under each<br />
category by clicking the<br />
“+” button in the blue<br />
bar.<br />
� Commonly used Web Parts:<br />
o Telerik RadEditor for MOSS – Use to put text and images on your web page<br />
o Announcements – Use to post announcements on your web page<br />
o Calendar – Post events to your web page<br />
o Links – Add a list of links to your web page<br />
o RSS Viewer -- Renders RSS feed on your web page<br />
� Select a web part from the list and click the Add button at the bottom of the window.<br />
Adding Text & Photos to the page<br />
� Add the Telerik RadEditor for MOSS web part to your page. It is under the “Miscellaneous” category.<br />
� When the web parts window closes, click Edit > Modify Shared Web Part on the top bar of the new<br />
web part.<br />
Creating & Developing Your Own Instructor Website Page 13
Creating and Developing Your Own Instructor Website<br />
� You will now see a text window in the center column and a new menu on the right side of the page.<br />
� Click inside the large text window to show the editing toolbar.<br />
Type the following text into this box:<br />
Office Location: [your location]<br />
Office Hours: [your office hours]<br />
Phone Number: [your phone number]<br />
Email Address: [your email address]<br />
� Text can be typed directly into this window, or pasted from your computer’s<br />
clipboard.<br />
o Use the formatting buttons on the toolbar, or switch to HTML code view<br />
by clicking the icon.<br />
� To insert a photo or image:<br />
o Click the Image Manager icon , select the photos folder, and the image<br />
to be inserted on the page. Right click the photo to edit its properties<br />
(size, alignment, border, image map, etc.).<br />
� To hide the Web Part frame, Click “Appearance” on the right side of the page, and<br />
under “Chrome Type,” select “None.”<br />
Save & Publish Changes<br />
� Click the OK button at the bottom of the web part menu to save changes.<br />
� Click “Exit Edit Mode” (just below the Site Actions button)<br />
Creating & Developing Your Own Instructor Website Page 14
Creating and Developing Your Own Instructor Website<br />
Choose a Theme<br />
Each site you set up, including your MySite, Instructor Site, blogs, etc, can have a theme applied.<br />
� Click the Site Actions button and select Site Settings.<br />
� Under the Look & Feel column, select Site Theme.<br />
� Select a theme, and click the “Apply” button<br />
� The new theme will be applied to your site.<br />
� Click the Home button near the top left side of the screen.<br />
Creating & Developing Your Own Instructor Website Page 15
Creating and Developing Your Own Instructor Website<br />
Going Live<br />
When your new instructor site is ready to go live:<br />
� Send an email to the DMACC Webmaster – webmaster@dmacc.edu<br />
� A link will be added to your instructor site from the main directory: www.dmacc.edu/instructors<br />
� Once your site is added to the Instructor site directory, it can be accessed from the DMACC home page<br />
(www.dmacc.edu) by clicking on Instructor Websites under Quick Links.<br />
Creating & Developing Your Own Instructor Website Page 16
Creating and Developing Your Own Instructor Website<br />
Additional Instructions<br />
Modifying the White Link Bar (on Instructor site and other sub-sites after a theme is applied)<br />
� Site Actions > Site Settings<br />
� Look and Feel > Top Link Bar<br />
� New Link – Adds a new link (Description is text that will show on navigation bar)<br />
� Change Order – Rearrange the order of current links<br />
� Use Links from Parent – Makes this site (or sub-site) use the same links that are on your instructor site<br />
� Edit a Current Link – Click the icon (left of the link name) to change link URL or text (description)<br />
Modifying the Quick Launch (Left Navigation)<br />
� Site Actions > Site Settings<br />
� Look and Feel > Quick Launch<br />
o New Link – Adds a new link under an existing heading<br />
(Description is text that will show on navigation bar)<br />
o New Heading – Adds a heading (which is also a link), shows up in bold type on the list of<br />
links. Links can be added under the heading. This is a good way to organize multiple links.<br />
o Change Order – Rearrange the order of current links<br />
o Edit a Link – Click the edit icon next to the link you wish to edit and make changes<br />
o Delete a Link – Click the edit icon next to the link you wish to delete, then click delete<br />
� Click the OK button when done to save changes<br />
Add Item/Event to Calendar<br />
� In blue navigation bar, click “New”<br />
� Enter event information<br />
� Click OK<br />
Create a New Discussion<br />
� In blue navigation bar, click “New”<br />
� Enter discussion information<br />
� Click OK<br />
Creating & Developing Your Own Instructor Website Page 17
Creating and Developing Your Own Instructor Website<br />
Additional Instructions (continued)<br />
Create/Manage Document Libraries<br />
� Click “Documents” in the Quick Launch<br />
� Modify settings of an existing document library<br />
o Click the document library name (e.g., “Shared Documents”)<br />
o From the blue bar, click: Settings > Document Library Settings<br />
o General Settings > Title, description and navigation<br />
� Change the name and description, specify if it should be listed in the Quick Launch<br />
o General Settings > Versioning Settings<br />
� Set versioning on documents (save previous versions in history file), etc.<br />
� Create a new document library<br />
o Click “Create” in the blue navigation bar<br />
o Libraries > Document Library<br />
o Enter settings<br />
� Name, description<br />
� Navigation – Do you want it to appear in the Quick Launch?<br />
� Incoming Email – this function DOES NOT WORK (yet)<br />
� Document Versioning History – Create a version each time you edit a file?<br />
� Document Template – Default file type for new files created in this library<br />
o Click Create<br />
Create a Class Site or Other Sub-Site<br />
� From your Instructor website home page (click “Home” in the top white navigation bar)<br />
� Site Actions > Create<br />
� Web Pages > Sites and Workspaces<br />
� Page Settings<br />
o Title: Course Name (e.g., Creative Writing)<br />
o Description: e.g., Creative Writing Class Website<br />
o URL Name: eng221 (for example)<br />
� NOTE: URLs should be all lower case with no spaces and no punctuation other than a dash or<br />
underscore.<br />
o Select a Template: Collaboration > Team Site<br />
o User Permissions: Use same permissions as parent site<br />
o Display this site on the Quick Launch of the parent site? YES<br />
o Display this site on the top link bar of the parent site? YES<br />
o Use the top link bar from the parent site? YES<br />
� Click the Create button<br />
Creating & Developing Your Own Instructor Website Page 18
Creating and Developing Your Own Instructor Website<br />
Blogging<br />
By definition, a blog is a site for a person or team to post ideas, observations, and expertise that site visitors can<br />
comment on.<br />
Create Your Blog<br />
� Start at the Instructor site home page<br />
� Site Actions > Create<br />
� Web Pages > Sites and Workspaces<br />
� Page Settings<br />
o Title: Blog<br />
o Description: e.g., Donna Macc: DMACC Instructor blog<br />
o URL Name: blog<br />
o Select a Template: Collaboration > Blog<br />
o User Permissions: Use same permissions as parent site<br />
o Display this site on the Quick Launch of the parent site? YES<br />
o Display this site on the top link bar of the parent site? YES<br />
o Use the top link bar from the parent site? YES<br />
Activate Features<br />
This important step activates a user-friendly editing tool that you will use on your blog posts.<br />
� Site Actions > Site Settings<br />
� Site Administration > Site Features<br />
� Click the button for these two features (bottom two on the list):<br />
o Use RadEditor to edit HTML fields<br />
o Use RadEditor to edit List Items<br />
Choose a Theme<br />
� Site Actions > Site Settings<br />
� Look & Feel > Site Theme<br />
� Select one and click Apply button<br />
Quick Launch<br />
� Categories – Click to manage Blog categories (add, edit, remove)<br />
� Other Blogs – Click to add links to other blogs (can be removed)<br />
� Links – Click to add links blogs (can be removed)<br />
� RSS Feed – Users click this to subscribe to your RSS feed<br />
Center Column<br />
� Posts are displayed in reverse chronological order (newest entries first)<br />
Right Column – Admin Links<br />
� Create a Post<br />
� Manage Posts<br />
� Etc.<br />
Creating & Developing Your Own Instructor Website Page 19
Creating and Developing Your Own Instructor Website<br />
Create a Blog Post<br />
� Click link in right column under “Admin Links”<br />
� Give the post a title<br />
� Type in body of the post (content). Use editing tools or can update in HTML code (code view)<br />
� Choose a category (must be previously set under Categories on Quick Launch)<br />
� Select a published date, or leave default (current date/time)<br />
� Save as draft – if you don’t want it to show yet on page<br />
� Publish – to allow viewing of the post<br />
Edit Posts<br />
� Click post title<br />
� Click “Edit” button (upper right)<br />
Insert Photo/Image to a Blog Post<br />
� Add a new post or edit a previous post<br />
� Insert cursor where photo should be placed<br />
� Click the Image Manager icon , select the photos folder, and click the image to be inserted on the page.<br />
NOTE: Images must first be uploaded to your Picture Library (See Managing Pictures page 7.)<br />
� Add Image Alt Text (a description of the image)<br />
� Click the Insert button<br />
Set Image Properties<br />
� Right click the photo/image to edit its properties:<br />
o Image size<br />
o Border color and width<br />
o Image alignment<br />
o Horizontal & vertical spacing<br />
o Add/edit an image map (set link(s) on part of the image)<br />
Creating & Developing Your Own Instructor Website Page 20
Creating and Developing Your Own Instructor Website<br />
Create a Blog Post using MS Word 2007<br />
Note: You will need MS Word 2007 and the URL (web address) of your blog<br />
Initial Setup<br />
� Open MS Word 2007<br />
� Click the Office Button at the top left corner of the page<br />
� Click New<br />
� Click the New Blog Post button<br />
� Click the Create button<br />
� Click the Register Now button<br />
� From the drop-down menu select SharePoint blog<br />
� Click Next<br />
� Enter the URL (web address) of your blog in the box<br />
� Click OK<br />
� At the next prompt, put a check in the box "Don't show this message again" and click YES<br />
� Click OK<br />
Create the Post<br />
� Click “Enter Post Title Here” and enter the name of your post<br />
� Click below the line and enter the text for your post<br />
� When done, click Publish in the upper left corner<br />
� Close the MS Word document with our without saving<br />
NOTE: You can insert pictures, clip art, graphs, text art, etc. into your posts and they will automatically be uploaded<br />
to the blog’s photo library when the post is published.<br />
Creating & Developing Your Own Instructor Website Page 21
Creating and Developing Your Own Instructor Website<br />
Online Help / Download this Training Packet<br />
A PDF of this training packet and additional instructions are online at: www.dmacc.edu/mysitehelp<br />
Logging in from Off Campus<br />
Go to this web address to log in to your MySite from off campus:<br />
https://mysite.dmacc.edu/personal/DMACC Username<br />
e.g., https://mysite.dmacc.edu/personal/jdoe<br />
In the Username field, add “dmacc\” just before your dmacc user id (i.e., dmacc\jldoe)<br />
Storage Space<br />
Default Space & How to Increase<br />
By default, each MySite is allocated about 100 MB of storage space. If you run out, just email Tech Support at<br />
techsupport@dmacc.edu, and ask them to increase the file space on your MySite.<br />
Creating & Developing Your Own Instructor Website Page 22
Creating and Developing Your Own Instructor Website<br />
Set Up Your MySite Personal & Public Pages<br />
Getting Started with MySite<br />
Note: Information entered into this section will show on both your personal and public MySite pages.<br />
� Click “Describe Yourself” link in center of page<br />
� Enter info into these fields<br />
� Picture: Click “Choose Picture” button and navigate to your photo<br />
Activate Features<br />
This important step activates a user-friendly editing tool that you will use on your MySite personal (MyHome) web page.<br />
� Site Actions > Site Settings<br />
� Site Administration > Site Features<br />
� Click the button for these two features:<br />
o Use RadEditor to edit HTML fields<br />
o Use RadEditor to edit List Items<br />
� Return to your MySite home page: Click “My Home” in the top white navigation bar.<br />
Adding Content to your MySite Personal (MyHome) Page<br />
� Content can be added to your private MySite home page by adding “web parts” to the page.<br />
(See Modifying the Main Content Area.)<br />
Creating & Developing Your Own Instructor Website Page 23