Apograde review by Ignacio Rodriguez - William Optics
Apograde review by Ignacio Rodriguez - William Optics
Apograde review by Ignacio Rodriguez - William Optics
- No tags were found...

You also want an ePaper? Increase the reach of your titles
YUMPU automatically turns print PDFs into web optimized ePapers that Google loves.
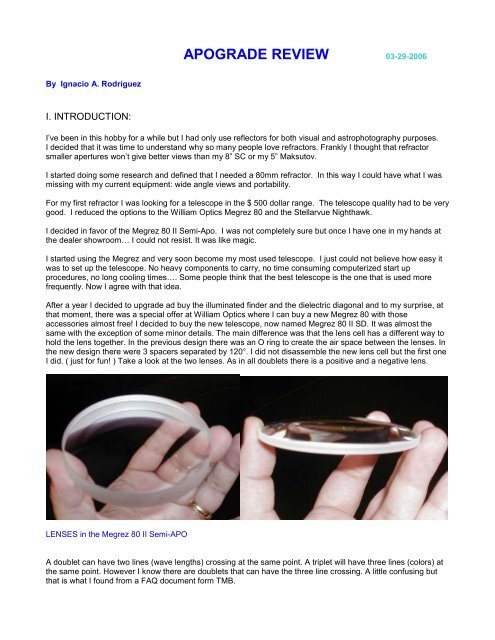
APOGRADE REVIEW 03-29-2006By <strong>Ignacio</strong> A. RodríguezI. INTRODUCTION:I’ve been in this hob<strong>by</strong> for a while but I had only use reflectors for both visual and astrophotography purposes.I decided that it was time to understand why so many people love refractors. Frankly I thought that refractorsmaller apertures won’t give better views than my 8” SC or my 5” Maksutov.I started doing some research and defined that I needed a 80mm refractor. In this way I could have what I wasmissing with my current equipment: wide angle views and portability.For my first refractor I was looking for a telescope in the $ 500 dollar range. The telescope quality had to be verygood. I reduced the options to the <strong>William</strong> <strong>Optics</strong> Megrez 80 and the Stellarvue Nighthawk.I decided in favor of the Megrez 80 II Semi-Apo. I was not completely sure but once I have one in my hands atthe dealer showroom… I could not resist. It was like magic.I started using the Megrez and very soon become my most used telescope. I just could not believe how easy itwas to set up the telescope. No heavy components to carry, no time consuming computerized start upprocedures, no long cooling times…. Some people think that the best telescope is the one that is used morefrequently. Now I agree with that idea.After a year I decided to upgrade ad buy the illuminated finder and the dielectric diagonal and to my surprise, atthat moment, there was a special offer at <strong>William</strong> <strong>Optics</strong> where I can buy a new Megrez 80 with thoseaccessories almost free! I decided to buy the new telescope, now named Megrez 80 II SD. It was almost thesame with the exception of some minor details. The main difference was that the lens cell has a different way tohold the lens together. In the previous design there was an O ring to create the air space between the lenses. Inthe new design there were 3 spacers separated <strong>by</strong> 120°. I did not disassemble the new lens cell but the first oneI did. ( just for fun! ) Take a look at the two lenses. As in all doublets there is a positive and a negative lens.LENSES in the Megrez 80 II Semi-APOA doublet can have two lines (wave lengths) crossing at the same point. A triplet will have three lines (colors) atthe same point. However I know there are doublets that can have the three line crossing. A little confusing butthat is what I found from a FAQ document form TMB.
www.tmboptical.com/documents/tmbFAQ.pdfFrom that document: “All the ED and fluorite doublets have only two color crossings(the only exceptions are the now canceled TMB fluorite doublet, the rare Astro-Physics 130mm and 152mm ZKN-7/FPL-53 ED doublets, and the Aries CAF-2 doublet)”Does anybody know if that TMB fluorite doublet design is similar to the one in the APOGRADE??Almost identical Megrez 80 II Semi-APO and SD version.Comparing the two telescopes I found that the first Megrez (July 2004) had a little better violet free views.However the second Megrez (April 2005) has better contrast.
I had both telescopes for a while and then sold the first one to a friend. I was planning to use the first Megrez toguide the second one in long exposure astrophotography but I can do this easily with the Megrez piggyback my8” SC. By the way, the Losmandy 105mm rings are very good for this purpose.II. APOGRADING:After several months I was thinking on an upgrade again. This time I wanted to move to the Megrez 80 ED ( orperhaps the Super APO! ) This is when I found about the APOGRADE. I have some doubts because I didn’tknow if it was better to sell the Megrez ( for the second time ) and buy a new Megrez 80 FD or 80 ED. I didsome math again and found out that going for the upgrade was not a bad idea and I could keep the old lens cellas a spare o maybe start working in a project using that cell.The cells look identical… but….
Longer cell in the FD design.The new cell is bigger as is shown in the picture. You will have to cut some foam in the carrying case. If youorder the microfocuser more cutting is required.You have to use an extension to be able to focus with the new cell.The new microfocuserthe photo tripod setupThis is not necessarily a downside because I think that will help you to use binoviewers although I have to saythat I have not performed that test. It will also help when adding a focal reducer. I have used a Meade 0.63Xfocal reducer (with the SD) and it works but a lot of in focus travel is required.
OM-1 + 0.63 focal reducerRequired hardwareBefore getting into the imaging tests lets take a look at the physical arrangement inside the Megrez tube. Therehas been a lot of discussion about whether or not the light cone is obstructed <strong>by</strong> the baffles. From mymeasuring there is not a problem. I did not move the baffles back into the tube.Baffle trainHowever you have to verify your own telescope or ask <strong>William</strong> <strong>Optics</strong>. In my case the baffles are located 71mmform the lens side and that is OK. How the same baffle can work with a f/ 6.25 in a f/ 6.94 light cone I don’t know.I guess the effect is not that important if there is not an obstruction.
Megrez 80 II SD + APOGRADE dimensions ( not 100% to scale )III. VISUAL AND IMAGING TESTS:At the beginning I did not see a big improvement. But once I run several test both visual and photographical Iwas surprise (and very happy) to find that there was a significant improvement.We know that resolution is defined <strong>by</strong> aperture but the ability to focus the different length waves closer to thesame point gives a more natural view. The white is whiter and the black is not purple.The typical halo around bright stars and the moon is gone or is almost eliminated. It is a big improvement.I still need to do more imaging testing. The weather has not cooperated to much, however I did some terrestrialphoto comparison. For the first test I used a small metal piece. It is a chromed object with a sphere on the top.
The telescope is about 40 ft from the object. This is not a perfect test but the sun reflections will simulate stars.Visually there was a difference. More light was spread over the area where the sun light was reflected. In animage the typical purple appears on those areas.
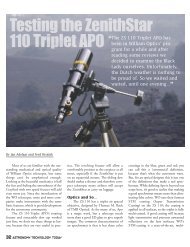
I decided to perform a simple star test defocusing the view (inside an outside focus) to compare the color leveland the diffraction rings. I used a Meade LPI and a Barlow to capture the images. The power was in the 160X –180X range. There was more color in the SD lens. That was very evident. The FD rings were similar inside anoutside focus although they were more difficult to observe outside of focus. The images do not representexactly what you see at the eyepiece. It is better to use a digital camera. I tried to obtain some images placingthe camera lens at the eyepiece. The detail is better than what I obtain using the Meade LPI however aligningthe lens to a short focal length eyepiece is difficult. It is better to use the telescope as the camera lens as I dowith film photography but I have not moved to DSLR yet. My digital camera does not have removablelens.FD star testSD star test
FD inside focus imaged directly at the eyepiece.I need some expert opinions on these images. The minor circles inside the big ones apparently come from theBarlow lenses but I am not sure. The other reason is that the light does not come from a point source. This is notthe best way to create an artificial star.For another test I used an object located 1500 ft form the telescope. This test was imaged using ISO 400 film.Please don’t take into account some dust and particles in the negative. In this test I found that small blackdetails are better imaged in the FD. Also some black is shown purple in the SD.This is difficult to observe at the eyepiece but a photograph easily registers the difference.FD pictureSD picture
FD pictureSD pictureIV. CONCLUSION:There is not a single conclusion from this report. A lot more testing has to be done on long exposureastrophotography and on visual observation with planets. So far I can tell you that there is a difference goingfrom SD to FD and that I am very happy with the upgrade for my own point of view. The SD is not a badtelescope at all… but once you compare results you understand the SD limitations. I guess there is not too muchdifference going from the FD to the Super APO. I hope somebody can give us some light on this comparison orto the Megrez ED which I think would be somewhere in the middle.Each person will have to make his own conclusions from what has been discussed here an also from some otherreports like Timm Bottoni’s excellent <strong>review</strong>, the <strong>William</strong>s <strong>Optics</strong> yahoo group discussions… and of course yourphone calls to <strong>William</strong> <strong>Optics</strong> office.<strong>Ignacio</strong> A. Rodríguezigrodroch@prodigy.net.mx March 2006