Biotechnology Explorer™ ELISA Immuno Explorer™ Kit Instruction ...
Biotechnology Explorer™ ELISA Immuno Explorer™ Kit Instruction ...
Biotechnology Explorer™ ELISA Immuno Explorer™ Kit Instruction ...

You also want an ePaper? Increase the reach of your titles
YUMPU automatically turns print PDFs into web optimized ePapers that Google loves.
<strong>Biotechnology</strong> Explorer <br />
<strong>ELISA</strong> <strong>Immuno</strong> Explorer <strong>Kit</strong><br />
<strong>Instruction</strong> Manual<br />
Catalog #166-2400EDU<br />
explorer.bio-rad.com<br />
Components of this kit ship in separate containers. Store the bag of reagents in the<br />
refrigerator within 1 week of receipt. Note: This kit does not contain any substances of<br />
human or disease origin.<br />
Duplication of any part of this document is permitted for classroom use only.<br />
For Technical Service Call Your Local Bio-Rad Office or in the US Call 1-800-4BIORAD (1-800-424-6723)
To the Instructor<br />
<strong>Immuno</strong>logy is the study of the immune system and how the body protects itself against<br />
foreign, potentially disease-causing microorganisms and molecules. The immune system<br />
has three fundamental functions. They are:<br />
1. To recognize intruders<br />
2. To respond appropriately to intruders in a way that protects the body<br />
3. To respond the next time the intruders are encountered<br />
Mammalian immune systems produce molecules called antibodies that recognize intruder<br />
molecules with incredible specificity. Like magic bullets, antibodies locate and attach<br />
themselves to their targets. By attaching to the invading foreign entities, antibodies make<br />
the invaders recognizable to other cells of the immune system so that they can be<br />
destroyed. Antibodies have become vital high-tech tools, used in biotechnology research<br />
and disease diagnosis and treatment.<br />
This kit facilitates teaching about the immune system, particularly about antigen-antibody<br />
interactions and the unique properties of antibodies that have revolutionized modern<br />
medicine, biotechnology, and research.<br />
What Is <strong>ELISA</strong>?<br />
<strong>ELISA</strong> stands for enzyme-linked immunosorbent assay. This powerful antibody-based test<br />
is used to diagnose diseases such as HIV/AIDS and SARS and to track pathogenic agents<br />
in water, food, and the air, whether these emerge naturally or through acts of aggression.<br />
<strong>ELISA</strong> is also used to identify genetically modified organisms (GMOs) and to trace food<br />
allergens and molecular markers of pregnancy and drug use.<br />
Three approaches to <strong>ELISA</strong> may be taken with this kit (see page 2). Individual curriculum<br />
guides and instructions for each approach are included in the kit, complete with instructor’s<br />
guides and student manuals. The instructor or the students may select the test protocol<br />
most relevant to the concurrent coursework.<br />
Teaching Strategy: Guided, Inquiry-Based Investigation<br />
The intent of this curriculum is to guide students through the thought processes of a<br />
laboratory-based scientific investigation. Students who engage in <strong>Biotechnology</strong> Explorer<br />
activities develop a positive sense of their ability to apply real research tools to relevant<br />
questions. Thought-provoking questions embedded in the student manuals are designed to<br />
maximize students’ engagement in the laboratory. Student involvement in this process<br />
results in an increased understanding of the value of approaching a scientific challenge in<br />
an organized and logical fashion.<br />
You can download this complete instruction manual on the Internet. Visit us on the Web at<br />
explorer.bio-rad.com or call us in the US at 1-800-4BIORAD (1-800-424-6723).<br />
We strive continually to improve our curricula and products and welcome your stories,<br />
ideas, and suggestions!<br />
Respectfully,<br />
Ron Mardigian<br />
Dr. Bryony Wiseman<br />
<strong>Biotechnology</strong> Explorer Program<br />
Bio-Rad Life Science Group<br />
2000 Alfred Nobel Drive<br />
Hercules, California 94547
Table of Contents<br />
<strong>Kit</strong> Inventory Checklist ..................................................................................................1<br />
How This <strong>Kit</strong> Works........................................................................................................2<br />
Step-by-Step Description of <strong>ELISA</strong> ..............................................................................4<br />
General Introduction to This <strong>ELISA</strong> <strong>Kit</strong> ........................................................................5<br />
Biological Warfare and <strong>ELISA</strong> ......................................................................................9<br />
Protocol I: <strong>ELISA</strong> for Tracking Disease Outbreaks ....................................................11<br />
Instructor’s Guide ..................................................................................................12<br />
Page<br />
Instructor’s Laboratory Overview..................................................................................13<br />
Instructor’s Advance Laboratory Preparation................................................................15<br />
Student Workstation Checklist ....................................................................................18<br />
Instructor’s Answer Key and Discussion Points............................................................20<br />
Laboratory Quick Guide ........................................................................................23<br />
Student Manual......................................................................................................26<br />
Introduction ................................................................................................................26<br />
Pre-Lab Focus Questions............................................................................................30<br />
Laboratory Guide ......................................................................................................31<br />
Post-Lab Focus Questions..........................................................................................36<br />
Protocol II: Antigen Detection <strong>ELISA</strong>..........................................................................37<br />
Instructor’s Guide ..................................................................................................38<br />
Instructor’s Laboratory Overview..................................................................................39<br />
Instructor’s Advance Laboratory Preparation................................................................40<br />
Student Workstation Checklist ....................................................................................43<br />
Instructor’s Answer Key and Discussion Points............................................................45<br />
Laboratory Quick Guide ........................................................................................47<br />
Student Manual......................................................................................................50<br />
Introduction..................................................................................................................50<br />
Pre-Lab Focus Questions ............................................................................................54<br />
Laboratory Guide ........................................................................................................55<br />
Post-Lab Focus Questions ..........................................................................................58<br />
Protocol III: <strong>ELISA</strong> Antibody Test ..............................................................................59<br />
Instructor’s Guide ..................................................................................................60<br />
Instructor’s Laboratory Overview..................................................................................61<br />
Instructor’s Advance Laboratory Preparation................................................................62<br />
Student Workstation Checklist ....................................................................................65<br />
Instructor’s Answer Key and Discussion Points............................................................66<br />
Laboratory Quick Guide ........................................................................................69<br />
Student Manual......................................................................................................71<br />
Introduction..................................................................................................................71<br />
Pre-Lab Focus Questions ............................................................................................76<br />
Laboratory Procedure ..................................................................................................77<br />
Post-Lab Focus Questions ..........................................................................................80<br />
Appendix A: <strong>Immuno</strong>logical Concepts ......................................................................81<br />
Appendix B: Glossary..................................................................................................93<br />
Appendix C: Disease Descriptions..............................................................................96<br />
Appendix D: Lesson Extensions ..............................................................................109<br />
Investigations Into Specific Diseases ..................................................................110<br />
Quantitive <strong>ELISA</strong> Laboratory Exercise ................................................................111<br />
Appendix E: Selected References and Useful Web Sites ........................................120
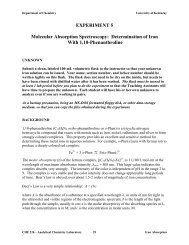
<strong>Kit</strong> Inventory Checklist<br />
This section lists the components provided in this <strong>ELISA</strong> kit. It also lists required and<br />
optional accessories. Each kit contains sufficient materials to outfit 12 student workstations<br />
of up to four students per workstation. Use this checklist to inventory your supplies before<br />
beginning your advanced preparation.<br />
<strong>Kit</strong> Components Quantity (✔)<br />
Antigen, chicken gamma globulin, lyophilized 1 vial ❑<br />
Primary antibody, rabbit anti-chicken polyclonal antibody, lyophilized 1 vial ❑<br />
Secondary antibody, goat anti-rabbit antibody conjugated to<br />
horseradish peroxidase (HRP), lyophilized 1 vial ❑<br />
HRP enzyme substrate 3,3',5,5'-tetramethyl benzidine (TMB) 1 bottle ❑<br />
10x phosphate buffered saline (PBS) 1 bottle ❑<br />
10% Tween 20 1 bottle ❑<br />
Disposable plastic transfer pipets 80 ❑<br />
Bottles and caps, 30 ml 3 ❑<br />
Microplates with 12-well strips 3 plates of ❑<br />
8 strips x 12 wells<br />
Yellow micro test tubes, 2.0 ml 1 bag ❑<br />
Colored micro test tubes, 2.0 ml (15 each of green, blue, 1 bag ❑<br />
orange, violet, and brown)<br />
Required Accessories<br />
micropipets (catalog #166-0515EDU), 50 µl fixed-volume 12 ❑<br />
or 20–200 µl adjustable volume (catalog #166-0507EDU)<br />
Pipet tips (catalog #223-9035EDU) 150 ❑<br />
Paper towels 4 rolls or packs ❑<br />
Beakers, 100–200 ml 12 ❑<br />
Marking pens, black 12 ❑<br />
Graduated cylinder, 100 ml 1 ❑<br />
Graduated cylinder, 1 L 1 ❑<br />
Distilled water 1 L ❑<br />
Optional Accessories<br />
Microplate reader (catalog #168-1002EDU) 1 ❑<br />
Micro test tube racks 12 ❑<br />
Refills Available Separately<br />
Catalog # Description<br />
166-2401EDU <strong>ELISA</strong> kit reagent refill package, includes antigen, primary antibody, secondary<br />
antibody, 10x phosphate buffered saline, 10% Tween 20, and HRP enzyme<br />
substrate<br />
166-2402EDU HRP enzyme substrate<br />
166-2403EDU 10x phosphate buffered saline, 100 ml<br />
166-2404EDU 10% Tween 20, 5 ml<br />
166-2405EDU Microplates with 12-well strips, 3 plates of 8 strips x 12 wells<br />
166-2406 Antigen, chicken gamma globulin, lyophilized<br />
166-2407 Primary antibody, rabbit anti-chicken polyclonal antibody, lyophilized<br />
166-2408 Secondary antibody, goat anti-rabbit antibody conjugated to HRP, lyophilized<br />
1
How This <strong>Kit</strong> Works<br />
This kit gives you the flexibility to perform three different <strong>ELISA</strong>-based protocols with<br />
your students. The <strong>ELISA</strong> tests for the presence of antigen (protocols I and II) or antibody<br />
(protocol III) in unknown samples. The positive control is either antigen or antibody,<br />
depending on the type of test performed.<br />
Type of <strong>ELISA</strong> Real-World Application Positive Control<br />
Protocol I<br />
<strong>ELISA</strong> for Tracking<br />
Disease Outbreaks<br />
Step 1: Classroom exchange HIV, SARS and West Nile Antigen<br />
of simulated bodily fluids viruses, common cold,<br />
Step 2: Antigen detection cholera, smallpox, anthrax,<br />
<strong>ELISA</strong> protocol influenza, and STDs<br />
Step 3: Track disease<br />
transmission<br />
Protocol II<br />
Antigen Detection <strong>ELISA</strong> Pregnancy, drug, GMO, Antigen<br />
<strong>ELISA</strong> for detecting specific and allergen tests<br />
antigens in a sample<br />
Air, food, and water testing<br />
Protocol III<br />
HIV, smallpox, West Nile<br />
and SARS viruses<br />
<strong>ELISA</strong> Antibody Test<br />
<strong>ELISA</strong> for diagnosing HIV, Lyme disease, Antibody<br />
exposure to a disease by trichinosis, West Nile virus,<br />
testing for the presence of and SARS<br />
antibodies to the disease in a<br />
simulated blood sample<br />
Protocol I: <strong>ELISA</strong> for Tracking Disease Outbreaks<br />
Fully engage your students before performing the antigen detection <strong>ELISA</strong> or <strong>ELISA</strong><br />
antibody test. With this interactive approach, students track the spread of a simulated disease<br />
agent through their classroom, exemplifying the spread of a contagious disease through a<br />
population. Beginning with one or two randomly “infected” individuals, students exchange<br />
simulated “body fluids” in vitro. Then they perform an <strong>ELISA</strong> on the resulting shared samples<br />
and use their results to track the progress of the disease through the class. This activity is<br />
designed to generate additional discussion about health issues and epidemiology. Topical<br />
diseases that work well with the tracking protocol include SARS, West Nile virus, HIV/AIDS,<br />
colds, smallpox, anthrax, influenza, and sexually transmitted diseases (STDs). As the instructor,<br />
you can determine the context most appropriate for your lesson and your students.<br />
Protocol II: Antigen Detection <strong>ELISA</strong><br />
Test for the presence of an antigen in a simulated sample. This protocol can be used to<br />
discuss how an <strong>ELISA</strong> can detect disease agents in samples such as body fluids (before<br />
the body has had a chance to mount a detectable immune response). Smallpox is one great<br />
real-world application of this protocol. If detected and treated with vaccine within 2–3 days of<br />
exposure, infected patients do not develop smallpox. Alternatively, the protocol can be<br />
used to discuss how <strong>ELISA</strong> detects for pregnancy, drugs, air or water contamination, or the<br />
presence of pathogens or genetically modified organisms (GMOs) in food.<br />
2
Protocol III: <strong>ELISA</strong> Antibody Test<br />
Test for the presence of antibodies to specific disease antigens in a sample of simulated<br />
patient serum. This type of <strong>ELISA</strong> is used to detect and diagnose infection when the antigen<br />
is undetectable or after the body has mounted an immune response and antibodies are<br />
present in the blood serum. AIDS/HIV testing is a classic real world application. Until<br />
recently, testing for exposure to the HIV virus was limited to <strong>ELISA</strong> detection of antibodies<br />
to the virus, rather than direct detection of the virus itself. The body produces antibodies at<br />
a high enough level to detect by <strong>ELISA</strong>, far earlier than the HIV virus replicates to<br />
detectable levels.<br />
How Do You Choose a Protocol?<br />
We provide a separate manual for each protocol, with a complete instructor's guide and student<br />
manual for each. The instructor or the students may select a diagnostic test of most relevance to<br />
the coursework at hand. The three activities reflect increasing depth of knowledge of the subject<br />
matter from Protocol I, which gives a broad introductory approach to immunology and health<br />
issues, to Protocol III, which gives an opportunity to delve deeply into the biological mechanisms<br />
of the immune system. Please note that in order to provide separate manuals for each protocol,<br />
some information is repeated throughout the manuals.<br />
All three protocols are variations on the same theme, but each approach places real-world<br />
applications of <strong>ELISA</strong> in a different context. To help create relevant and meaningful classroom<br />
contexts for these activities, the introductory pages to this manual (pages 4–9) as well as<br />
appendices A and B provide background vocabulary and factual and conceptual lecture points.<br />
Appendix C (pages 96–109) contains useful information about specific diseases and classroom<br />
presentation scenarios.<br />
Once you have chosen, read pages 4–9 and then go to the relevant manual for the protocol you<br />
have chosen:<br />
Protocol I : <strong>ELISA</strong> for Tracking Disease Outbreaks page 11<br />
Protocol II: Antigen Detection <strong>ELISA</strong> page 37<br />
Protocol III: <strong>ELISA</strong> Antibody Test page 59<br />
Important Note for Instructor’s Advance Laboratory Preparation<br />
Before beginning advance preparation for the activity, select the protocol to be used and a<br />
scenario. Please ensure that the correct advance preparation is followed for the protocol you<br />
wish to perform. The Instructor’s Advance Laboratory Preparation varies subtly for each of the<br />
three protocols.<br />
Safety Issues<br />
Eating, drinking, smoking, and applying cosmetics are not permitted in the work area. Wearing<br />
protective eyewear and gloves is strongly recommended. Students should wash their hands<br />
with soap before and after this exercise. If any of the solutions gets into a student's eyes, flush<br />
with water for 15 minutes.<br />
Storage Temperatures<br />
Open the kit immediately upon receipt and store components at 4°C or room<br />
temperature as indicated.<br />
3
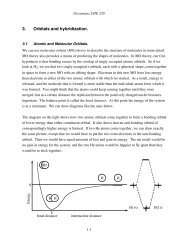
Step-by-Step Description of <strong>ELISA</strong><br />
The protocols in this kit rely on indirect antibody capture <strong>ELISA</strong>. The steps in this assay are:<br />
Step 1: Antigen is added to the wells of the microplate<br />
strip and incubated to allow binding, after which unbound<br />
antigen is washed from the wells with detergent. The<br />
detergent also serves as a blocking agent, binding to all<br />
unused protein binding sites in the wells and preventing<br />
nonspecific binding of antibody.<br />
Step 2: Primary antibody solution is added to the<br />
wells and incubated to allow the antibody to bind to<br />
the antigen. Then unbound primary antibody is washed<br />
from the wells.<br />
Step 3: Enzyme-labeled secondary antibody<br />
solution is added to the wells and incubated to allow<br />
the secondary antibody to bind to the primary<br />
antibody. Then unbound secondary antibody is washed<br />
from the wells.<br />
Step 4: Chromogenic (color-producing) enzyme<br />
substrate is added to the wells and incubated to allow<br />
color to develop. Results of the assay are evaluated. Wells<br />
that remain colorless are negative and wells that turn blue<br />
are positive.<br />
Antigen<br />
Antibody<br />
HRP enzyme<br />
Enzyme<br />
substrate (TMB)<br />
4
General Introduction to This <strong>ELISA</strong> <strong>Kit</strong><br />
To create a relevant and meaningful classroom context for this activity, the in-depth<br />
information in Appendices A and B provides background vocabulary and factual and<br />
conceptual lecture points. In addition, useful reading and web sites are included in<br />
Appendix E. Of course, there is no substitute for a good textbook and the knowledge and<br />
expertise of the instructor.<br />
The following section briefly describes the technical and conceptual points that are directly<br />
related to the laboratory activities in this curriculum. Student understanding of these points<br />
is extremely important to a successful outcome.<br />
Microplate strips: Microplates are made of polystyrene which adsorbs (binds) proteins by<br />
hydrophobic interaction. The plates provided in this kit have 96 wells, arranged in<br />
8 removeable rows of 12-well strips. Two students share one strip. Each well holds<br />
approximately 250 microliters (µl).<br />
Antigen: In this kit, the antigen is chicken gamma-globulin (purified from egg yolks) which<br />
serves as a generic representative of any hypothetical antigen, protein or otherwise.<br />
Incubation times: The rate of binding depends on the incubation temperature and the<br />
concentrations of the reagents. This kit has been optimized so that each incubation can be<br />
performed for 5 minutes at room temperature. Exceeding this time or temperature will<br />
cause an increase in color intensity and possibly some background color in the negative<br />
controls.<br />
Blocking: Blocking agents are added after antigen adsorption to prevent nonspecific<br />
binding of antibodies to the plastic, which would produce false positive results. The blocking<br />
agent may be a protein or a detergent (or both). Common blocking agents include Tween<br />
20 (a nonionic detergent that is used in this kit), nonfat dry milk, gelatin, and bovine serum<br />
albumin (BSA). Although Tween 20 is a sufficient block for this protocol, you may wish to<br />
add the following blocking step for teaching purposes: have the students add 50 µl of 1%<br />
gelatin in wash buffer to their wells for 15 min after the addition of the antigen and then<br />
perform a wash step.<br />
Primary (1°) antibodies: The antibodies that recognize and bind to the antigen in an<br />
immunoassay are primary antibodies. In this kit, the primary antibody is a polyclonal rabbit<br />
antibody raised against chicken gamma-globulin. In the <strong>ELISA</strong> antibody test starting on<br />
page 55, this primary antibody simulates human antibodies in a sample of human serum.<br />
Secondary (2°) antibodies: Secondary antibodies recognize and bind to primary<br />
antibodies. They are made in animals of a different species than that used to make the<br />
primary antibody. For this kit, goats were immunized with rabbit IgG to make the secondary<br />
antibodies.<br />
5
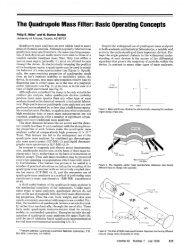
Colorimetric detection: Secondary antibodies for <strong>ELISA</strong> are linked to enzymes. Detection of<br />
secondary antibodies that are bound to primary antibodies occurs by an enzyme-substrate<br />
reaction. In this kit, the secondary antibody is linked to horseradish peroxidase (HRP). In the<br />
presence of hydrogen peroxide (H 2 O 2 ), HRP catalyzes the oxidation of the chromogenic<br />
substrate 3,3’,5,5’-tetramethylbenzidene (TMB). This oxidation of TMB by HRP forms a blue<br />
product. Note: TMB is light sensitive, and the assay results should be determined 5–10 minutes<br />
after the substrate is added to the wells. If the microplate strips sit longer, nonspecific color may<br />
develop. Color that develops after the 5-minute incubation should not be considered in the<br />
assay results. After 20–30 minutes, the blue color may begin to fade as TMB precipitates out<br />
of solution.<br />
3,3’,5,5’-tetramethyl<br />
benzidine (TMB)<br />
(Colorless)<br />
Quinone iminium<br />
double cation radical<br />
of TMB<br />
(Blue color)<br />
2 steps, 1 electron each<br />
Colorimetric Detection: Oxidation of TMB by HRP<br />
Controls: Controls are always run side by side with actual samples to make sure that the<br />
procedure is working correctly. Controls can resolve ambiguous results that occur due to<br />
human error or contaminated reagents; controls must be included in any valid <strong>ELISA</strong>. For<br />
the negative control, the antigen or primary antibody is either omitted (as in this kit) or the<br />
antigen is replaced by a factor that will not bind specifically to the antibody. The positive<br />
control always contains the target antigen or antibody. A negative sample that gives a<br />
positive assay result is called a false positive. A positive sample that gives a negative assay<br />
result is called a false negative.<br />
Many diagnostic assays give a percentage of false positive or false negative results, so<br />
confirmation of diagnosis by a second type of assay is important. For example, immunoassays<br />
for antibodies to human immunodeficiency virus (HIV) can give either false positive or false<br />
negative results. False positives can result from recent vaccinations, and false negatives can<br />
result from immunosuppression (e.g., from drugs given after transplants) or from administering<br />
the test too soon after infection with HIV. (Antibodies against HIV do not appear until some<br />
weeks after HIV infection; the appearance of specific antibodies is called seroconversion.)<br />
Because of this, positive HIV <strong>ELISA</strong> results are always confirmed by western blot (see page 91).<br />
6
In an <strong>ELISA</strong> like those in Protocols I and II (in which antigen concentration is the<br />
experimental variable), an appropriate negative control would be wells with antigen omitted.<br />
Any color product in those wells would be the result of either 1) nonspecific binding of the<br />
antibodies, or 2) experimental error. An appropriate positive control would be a sample<br />
known to contain the antigen. In an <strong>ELISA</strong> antibody test like that in Protocol III (in which<br />
primary antibody concentration is the experimental variable), an appropriate negative control<br />
would be wells with primary antibody omitted. Any color product in those wells would be the<br />
result of either 1) nonspecific binding of the secondary antibody, or 2) experimental error.<br />
An appropriate positive control would be a sample known to contain primary antibody. For<br />
many clinical <strong>ELISA</strong>s, control solutions are provided with the commercial kits.<br />
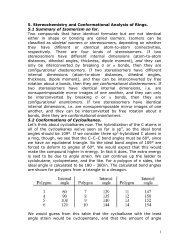
Analysis of Results: An <strong>ELISA</strong> can give qualitative (yes or no) or quantitative (how much?)<br />
information. Qualitative results can be determined visually without the use of<br />
complicated instrumentation. Quantitative results can be estimated visually and scored<br />
symbolically, e.g., (++) for strong signal, (+) for weak signal, (+/–) for an ambiguous signal,<br />
and (–) for no detectable signal. For accurate and precise determination of concentrations, a<br />
microplate reader is required. Microplate readers quantitate the absorbance of light by the<br />
colored substrate in each well of a microplate. They use the negative control wells to set a<br />
baseline and then read the absorbance of each well at a specified wavelength. For example,<br />
the peak absorbance for TMB is at 655 nm. Quantitative <strong>ELISA</strong> controls include a dilution<br />
series of known concentrations that is used to create a standard curve. This standard curve<br />
allows the concentration of antigen in a sample to be quantitated, which in turn may help a<br />
researcher, clinician, or physician determine the infection level of a particular disease. A lesson<br />
extension to perform a quantitative <strong>ELISA</strong> is included<br />
in Appendix D.<br />
<strong>ELISA</strong>s are performed so routinely in both clinical<br />
and research laboratories that assays for many<br />
antigens are available in kit form. <strong>Kit</strong>s normally<br />
include all components and controls needed for<br />
a given test except for the experimental samples.<br />
For example, Bio-Rad’s Clinical Diagnostics Group<br />
produces over 100 kits that are used to detect<br />
autoimmune diseases, blood viruses, genetic<br />
A commercial <strong>ELISA</strong> kit to test for<br />
disorders, microorganisms, toxins, and bovine<br />
antibodies to HIV-2, from Bio-Rad’s<br />
spongiform encephalopathy (BSE or mad cow disease). Clinical Diagnostics Group.<br />
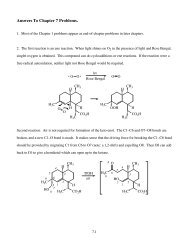
The Bio-Rad <strong>ELISA</strong> <strong>Immuno</strong> Explorer kit demonstrates a method to detect the presence of<br />
specific antigens or antibodies in a variety of samples. A number of different <strong>ELISA</strong> methods<br />
have been developed that differ primarily in the sequence in which antigens and antibodies<br />
are added to the wells. In an antibody capture assay (as used in this kit), antigen is bound<br />
in the plastic wells and the primary antibody binds to (or is captured by) the immobilized<br />
antigen. A secondary antibody is linked to the enzyme horseradish peroxidase (HRP),<br />
which oxidizes its substrate (TMB), turning the assay solution blue.<br />
Antigen<br />
Antibody<br />
HRP enzyme<br />
Enzyme<br />
substrate (TMB)<br />
Antibody capture <strong>ELISA</strong>.<br />
7
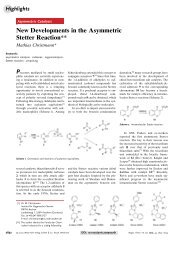
In an antigen capture assay, primary antibody is bound in the plastic wells, antigen is<br />
captured by the immobilized primary antibody, and the captured antigen is detected by a<br />
secondary antibody, also linked to HRP, that turns the assay solution blue upon reaction<br />
with TMB.<br />
Antigen<br />
Antibody<br />
HRP enzyme<br />
Enzyme<br />
substrate (TMB)<br />
Antigen capture <strong>ELISA</strong>.<br />
Real-World Applications of <strong>ELISA</strong><br />
Although <strong>ELISA</strong> is a powerful diagnostic tool in human medicine, the technique is used in a<br />
variety of other fields, including veterinary medicine, food testing, and agriculture. Some<br />
examples include:<br />
Field Use<br />
Human and veterinary medicine • Diagnose a variety of diseases, such as West Nile virus (in<br />
people or animals), HIV, SARS, Lyme disease, trichinosis,<br />
tuberculosis, and many more by detecting serum antibodies<br />
Veterinary • Detect viruses such as feline leukemia virus (FLV) and<br />
feline immunodeficiency virus (FIV) in cats<br />
• Detect parasites such as heartworms in dogs<br />
• Diagnose thyroid problems in dogs and cats by measuring<br />
serum thyroxine (t4) concentrations<br />
• Diagnose equine encephalitis in horses by detecting<br />
arboviruses<br />
Agriculture: crops • Detect viruses such as potato leaf roll virus and cucumber<br />
mosaic virus in food crops<br />
• Detect mycotoxins in crops, such as aflatoxin in cereal<br />
grains and corn<br />
• Detect viruses in decorative plants, such as bean yellow<br />
mosaic virus in gladiolus<br />
• Track adulteration of non-genetically modified (non-GMO)<br />
crops with GMO products<br />
Environmental • Test indoor air quality, such as detecting mold toxins in<br />
buildings<br />
Food safety and quality • Prevent transmission of bovine spongiform encephalitis<br />
(mad cow disease, BSE) by screening for central nervous<br />
system tissues in raw meat, in processed and cooked<br />
meats, and on surfaces<br />
• Determine if food labeling is correct, e.g., by checking for<br />
cow milk proteins in goat milk products or for<br />
non-durum wheat in durum wheat products<br />
• Prevent allergic reactions by detecting ingredients that<br />
aren't listed on food content labels, e.g., detecting peanuts<br />
in products in which peanuts are not listed as an ingredient<br />
Other • Detect restricted or illegal drug use, e.g., performanceenhancing<br />
drugs, marijuana, methamphetamine, cocaine,<br />
etc.<br />
• Confirm pregnancy by detecting human chorionic<br />
gonadotropin (hCG) in urine<br />
8
Chemical Weapons, Biological Warfare, and <strong>ELISA</strong><br />
We feel it is important to include a short treatment of biological warfare since many<br />
educators are finding it necessary to address this subject due to recent concerns over this<br />
phenomenon.<br />
Biological warfare and bioterrorism have been much in the news in recent years; however,<br />
the use of biological agents to cause harm to an enemy is not a recent phenomenon. In the<br />
6th century BC, the Assyrians poisoned the wells of their enemies with rye ergot, and<br />
Athenians poisoned the water supply of their enemies with skunk cabbage (a purgative). In<br />
the 18th century, there were several cases in which Native Americans were given gifts<br />
intentionally contaminated with smallpox. More recently, a Bulgarian defector was killed in<br />
London with ricin (a toxin from castor beans); the toxin was injected into his leg using an<br />
umbrella tip as he waited for a bus. In 2001 in the US, weaponized anthrax spores were<br />
sent through the mail to the news media and government offices.<br />
During a biological attack, detection, diagnosis, and identification of the biological agent<br />
and its related disease(s) are vital to disease containment. Diagnostic tests are needed to<br />
identify the agent and to determine who has been infected so that those exposed can<br />
undergo treatment and/or be quarantined. For example, if smallpox infection is detected<br />
within 2–3 days of exposure, post-exposure vaccination protects against the disease.<br />
Vaccination within 4–5 days of exposure may prevent a fatal outcome. However, the<br />
smallpox vaccine itself is associated with risks, so the question arises as to whether only<br />
infected individuals should be treated.<br />
The CDC prioritizes biological agents based on their danger, primarily their ease of<br />
dissemination/transmission:<br />
• The highest priority agents (category A) are those that are easily transmitted, have<br />
high mortality rates, and may cause public panic. Examples of high priority agents<br />
include anthrax (Bacillus anthracis), botulism (Clostridium botulinum toxin), plague<br />
(Yersinia pestis), smallpox (Variola major), tularemia (Francisella tularensis), and viral<br />
hemorrhagic fevers [filoviruses (e.g., Ebola and Marburg) and arenaviruses (e.g.,<br />
Lassa and Machupo)].<br />
• The second priority agents (category B) are those that are somewhat easy to transmit<br />
and have lower mortality rates, such as brucellosis (Brucella species), epsilon toxin of<br />
Clostridium perfringens, food safety threats (e.g., Salmonella species, Escherichia coli<br />
O157:H7, Shigella), glanders (Burkholderia mallei), melioidosis (Burkholderia<br />
pseudomallei), psittacosis (Chlamydia psittaci), Q fever (Coxiella burnetii), ricin toxin<br />
from castor beans (Ricinus communis), staphylococcal enterotoxin B, typhus fever<br />
(Rickettsia prowazekii), viral encephalitis [alphaviruses (e.g., Venezuelan equine<br />
encephalitis, eastern equine encephalitis, and western equine encephalitis)], and water<br />
safety threats (e.g., Vibrio cholerae and Cryptosporidium parvum).<br />
• Lower priority agents (category C) are emerging pathogens that may become a threat<br />
in the future, such as Nipah virus and hantavirus.<br />
The diagnosis and identification of biological agents are important parts of the response to<br />
biological attack. Also important are plans for prevention of such attacks and preparedness<br />
in case they occur, including using intelligence sources to prevent bioterrorism attacks,<br />
formulating emergency plans, establishing surveillance methods to detect attacks, training<br />
medical and law enforcement professionals, preparing vaccines and treatments, inoculating<br />
populations as needed, and educating the public.<br />
9
Protocol I: <strong>ELISA</strong> for Tracking Disease Outbreaks<br />
Instructor's Guide ........................................................................................................12<br />
Instructor’s Laboratory Overview....................................................................13<br />
Instructor’s Advance Laboratory Preparation..................................................15<br />
Student Workstation Checklist ......................................................................18<br />
Instructor’s Answer Key and Discussion Points..............................................20<br />
Laboratory Quick Guide ..............................................................................................23<br />
Student Manual ............................................................................................................26<br />
Introduction....................................................................................................26<br />
Pre-Lab Focus Questions ..............................................................................30<br />
Laboratory Procedure ..................................................................................31<br />
Post-Lab Focus Questions ............................................................................36<br />
11<br />
PROTOCOL I<br />
TRACKING DISEASE OUTBREAKS
PROTOCOL I<br />
TRACKING DISEASE OUTBREAKS<br />
Protocol I: <strong>ELISA</strong> for Tracking Disease Outbreaks<br />
Instructor’s Guide<br />
This interactive procedure provides a context for introducing a real-world, topical application<br />
of <strong>ELISA</strong>. Students first model the spread of disease in a population by the sharing of<br />
simulated “body fluids”. Each student is given a sample to share, one or two of which are<br />
positive for the “disease agent”. After students share their “body fluids”, they assay their<br />
shared samples using <strong>ELISA</strong>.<br />
Students’ <strong>ELISA</strong> results reveal that a large portion of the class now tests positive for the<br />
disease! This leads to a guided, inquiry-based activity about how the disease has spread<br />
through the population. Because students have a personal connection to the results, this<br />
activity tends to captivate students’ imaginations and is particularly relevant in light of the<br />
recently emerged contagious disease SARS.<br />
Many other diseases also work with this protocol, including West Nile virus, HIV, colds,<br />
influenza, and STDs, to name a few. A review of Appendix C will provide useful information<br />
about appropriate diseases and scenarios for implementation in the classroom. A simple<br />
approach may be to leave the actual disease unspecified for a generic lesson.<br />
Implementation Timeline<br />
Lesson 1 Set the stage Lecture and discussion<br />
Lesson 2 Sharing of simulated body fluids <strong>ELISA</strong> lab<br />
Lesson 3 Analyze <strong>ELISA</strong> results Tracking exercise<br />
12
Instructor’s Laboratory Overview<br />
Step 1: Students share “body fluids” by mixing their sample with those of other students.<br />
Within each pair of students who share, each student takes back half of the combined sample.<br />
Each student repeats the sharing process with a different student either 1 or 2 more times<br />
(depending on class size) and records sharing partners. Note: To ensure dissemination of the<br />
“disease”, the sharing must be performed in two or three separate rounds.<br />
Student A<br />
750 µl<br />
Student B<br />
Students A+B<br />
Student C<br />
Students A+B+C<br />
Step 2: Using a pipet, 50 µl of each student’s sample (unknowns)<br />
along with positive and negative controls are added to the wells of<br />
the microplate strip and incubated for 5 minutes, allowing proteins in<br />
the sample to bind to the wells. The wells are rinsed with wash<br />
buffer (PBST: phosphate buffered saline containing 0.05%<br />
Tween 20) that also blocks the unoccupied protein binding sites in<br />
the wells.<br />
Step 3: Primary antibody (50 µl) is added to each well of the<br />
microplate strip and incubated for 5 minutes at room temperature.<br />
The primary antibody is an antibody that recognizes and binds to<br />
the “disease agent”/antigen. The wells are rinsed with wash buffer<br />
to remove unbound antibody.<br />
Step 4: Horseradish peroxidase (HRP)-labeled secondary antibody<br />
(50 µl) is added to each well and incubated for 5 minutes at room<br />
temperature. The secondary antibody is antibody that recognizes<br />
and binds to the primary antibody. HRP is an enzyme that will<br />
oxidize a color-producing substrate. Wells are rinsed with wash<br />
buffer to remove unbound secondary antibody.<br />
Step 5: The enzyme substrate (50 µl) is added to each well and<br />
students watch color development. If HRP is present (meaning that<br />
the antigen was present in the sample), the solution in the wells will<br />
turn blue within 5 minutes. If the antigen was not present in the<br />
sample, the wells will remain colorless.<br />
13<br />
Student D<br />
PROTOCOL I<br />
TRACKING DISEASE OUTBREAKS
PROTOCOL I<br />
TRACKING DISEASE OUTBREAKS<br />
Typical <strong>ELISA</strong> results.<br />
Using Students’ <strong>ELISA</strong> Results to Track the “Disease”<br />
The number of positive tests in the class results will depend on how many positive<br />
samples you released at the beginning. You can now track the progress of the disease<br />
through your class.<br />
You may want the students to work out a method to track the disease to its source by<br />
themselves. For a more guided inquiry approach, we recommend using the class results<br />
table on page 32 in the student manual. Make a transparency from the page with the<br />
students' names listed and place it on an overhead projector. Ask each student to come up<br />
and write a plus (+) or a minus (-) in the second column to indicate if their <strong>ELISA</strong> tested<br />
positive or negative. Then, depending on whether their <strong>ELISA</strong> tested positive or negative,<br />
they should also write a plus (+) or a minus (-) respectively next to the names of the students<br />
with whom they shared their sample.<br />
For example, if Kiko tested positive and shared with Alexander, Florence, and Mustafa, she<br />
would write a “+” by Alexander, Florence’s, and Mustafa’s names.<br />
The students with all pluses against their names will be revealed as early sources of the<br />
infection.<br />
Question: Why will the class not be able to track the infection to a single student?<br />
Answer: When a single student who is the primary source of infection first shares his or<br />
her sample with a second student, the second student will also have all pluses. This is<br />
representative of the kind of problem that epidemiologists face in the real world. You may<br />
turn this occurrence to your advantage by discussing why epidemiologists investigate many<br />
factors when tracking diseases, such as patients’ locations, histories, and behaviors, in<br />
addition to testing for the infection. You may also have your students perform a more<br />
detailed analysis involving tracking the order in which the samples were shared and deducing<br />
if some of the students can be eliminated from the pool of students suspected as being the<br />
original source.<br />
Epidemiologists rarely have patient samples prior to the outbreak of infection, and rarely<br />
are they able to track an outbreak to a single source. However, you have the advantage of<br />
keeping a record of which students received the infected samples, which for the sake of<br />
this exercise may prove helpful. Alternatively, for a more anonymous approach, you may<br />
sequentially number all the student samples and record the numbers of tubes that are<br />
“infected”. The source can be revealed at the end of the activity to see if it matches your<br />
students’ data analysis.<br />
14
Instructor’s Advance Laboratory Preparation<br />
This section is designed to help you prepare for the laboratory efficiently. We recommend that<br />
you read this section of the manual (Protocol I: Tracking Disease Outbreaks) in its entirety<br />
before beginning your preparation. In addition, if you are choosing to perform a scenario-based<br />
activity (for example, HIV testing), we recommend using the information given in Appendix C<br />
to help plan your lesson.<br />
The most important thing for the students to do is to put the correct components in the<br />
assay wells in the correct order, so having the tubes clearly labeled and properly color-coded<br />
is crucial to a successful outcome.<br />
Objectives<br />
Step 1. Prepare buffers<br />
Step 2. Rehydrate the freeze-dried antigen, primary antibody, and secondary<br />
antibody to make 50x stocks<br />
Step 3. Dilute 50x stock solutions<br />
Step 4. Dispense reagents for student workstations<br />
Step 5. Set out student workstations<br />
Time Required 1–3 hours<br />
Preparation Timeframe<br />
We recommend rehydrating and diluting the antigen and primary antibody no more than<br />
3 days before the lesson, and the secondary antibody less than 24 hours before the lesson.<br />
We also suggest using sterile distilled water to prepare the 1x PBS to avoid contaminating<br />
rehydrated reagents. These reagents must be kept on ice or in the refrigerator if prepared<br />
more than 4 hours before the lesson.<br />
Note: If you are planning to use this kit for multiple lab sessions over a 1- or 2-week<br />
period, we strongly suggest using sterile water to prepare the PBS buffer in order to<br />
avoid contaminating reagents. (Water can be sterilized by boiling it in a microwave oven<br />
for 5 minutes in a loosely capped bottle; after you remove the bottle from the microwave<br />
oven, let it cool, then secure the cap.) Dilute only as much concentrated antibody and antigen<br />
as required for each lab session. The rehydrated antibodies are 50x concentrates. Store<br />
the remaining concentrated antigen and antibodies in the refrigerator at 4°C. We do not<br />
recommend storing the concentrated antibody and antigen for more than 2 weeks, even at<br />
4°C. Do not freeze the solutions.<br />
Volume Measurements<br />
This kit contains graduated disposable plastic transfer pipets (DPTPs) to use for preparing<br />
some of the reagents where volumes between 250 microliters (µl) and 5 milliliters (ml) are<br />
required. In addition, adjustable- or fixed-volume micropipets are needed to measure 50 µl<br />
volumes. The illustration shows the marks on the DPTP corresponding to the volumes to<br />
be measured. Volumes over 1 ml will require multiple additions. For each step of the laboratory<br />
preparation, use a fresh DPTP or a fresh pipet tip.<br />
1 ml<br />
750 µl<br />
500 µl<br />
250 µl<br />
Measuring liquids that contain detergents that foam (e.g., the wash buffer) requires that you<br />
read the volume at the interface of the liquid and the bubbles.<br />
15<br />
100 µl<br />
PROTOCOL I<br />
TRACKING DISEASE OUTBREAKS
PROTOCOL I<br />
TRACKING DISEASE OUTBREAKS<br />
PROTOCOL I: Step-by-Step Instructor’s Advance Preparation Guide<br />
These instructions are for the setup of 12 student workstations of 4 students each.<br />
Supplied Reagents Quantity<br />
Antigen, chicken gamma globulin, freeze-dried 1 vial<br />
Primary antibody, rabbit anti-chicken polyclonal antibody, freeze-dried 1 vial<br />
Secondary antibody, goat anti-rabbit antibody conjugated to (HRP),<br />
freeze-dried 1 vial<br />
HRP enzyme substrate (TMB) 1 bottle<br />
10x phosphate buffered saline (PBS) 1 bottle<br />
10% Tween 20 1 bottle<br />
Required Reagent<br />
Distilled water, sterile is recommended, see note on page 15 1 L<br />
Step 1. Prepare buffers.<br />
We recommend you use a 100 ml and a 1 liter (L) graduated cylinder for preparing the<br />
buffer solutions. You will also need 1 L of distilled water.<br />
Buffer Volume Reagent Used for<br />
1x PBS, 100 ml 90 ml Distilled water • Rehydrating antigen,<br />
10 ml 10x PBS Primary and secondary<br />
antibodies to make 50x<br />
reagent stock solutions<br />
• Diluting 50x antigen to make<br />
positive control and “infected”<br />
student samples<br />
• Negative control<br />
• Negative student samples<br />
Wash Buffer, 900 ml 805 ml Distilled water • Dilution of 50x antibody<br />
stocks<br />
90 ml 10x PBS • Plate washing<br />
4.5 ml 10% Tween 20<br />
Step 2. Rehydrate the freeze-dried antigen, primary antibody, and secondary<br />
antibody.<br />
Carefully remove the stoppers from the three freeze-dried reagents and use a fresh DPTP to<br />
add 0.5 ml 1x PBS to each. Close the stoppers and shake to mix. These solutions are 50x<br />
concentrates, or stock solutions. NOTE: You must not use wash buffer in this step.<br />
Freeze-Dried Reagent Protocol for 50x Stock Solution Used for<br />
Antigen Add 0.5 ml of 1x PBS to vial • Positive control<br />
• “Infected” student samples<br />
Primary antibody Add 0.5 ml of 1x PBS to vial • Primary antibody<br />
Secondary antibody Add 0.5 ml of 1x PBS to vial • Secondary antibody<br />
16
Step 3. Dilute 50x stock reagents.<br />
Label one 30 ml bottle for each of the diluted solutions below. Use a fresh DPTP to add the<br />
contents of the appropriate 50x concentrated stock to the corresponding 30 ml bottle.<br />
Diluted solution Volume Reagent Used for<br />
Positive control (1x antigen), 7.5 ml 1x PBS Positive control<br />
label one 30 ml bottle 150 µl 50x antigen<br />
stock<br />
NOTE: you must not add any buffer containing Tween 20 to<br />
the antigen, or the experiment will not work.<br />
1x primary antibody, 24.5 ml Wash buffer Primary antibody<br />
label one 30 ml bottle 0.5 ml 50x primary<br />
antibody stock<br />
• Use the DPTP to rinse out the vial with some of the diluted<br />
reagent to ensure that all of the stock solution is used.<br />
• Close the cap and shake to mix.<br />
1x secondary antibody, 24.5 ml Wash buffer Secondary antibody<br />
label one 30 ml bottle 0.5 ml 50x secondary<br />
antibody stock<br />
• Dilute the secondary antibody less than 24 hours before the start<br />
of the lesson. Use the DPTP to rinse out the vial with some of the<br />
diluted reagent to ensure that all of the stock solution is used.<br />
• Close the cap and shake to mix.<br />
Step 4. Dispense reagents for student workstations.<br />
Tubes Description Label Contents (Each Tube)<br />
Violet tubes, 12 Positive control “+” 0.5 ml positive control solution<br />
(1x antigen)<br />
Blue tubes, 12 Negative control “–” 0.5 ml 1x PBS<br />
Green tubes, 12 Primary antibody “PA” 1.5 ml 1x primary antibody solution<br />
Orange tubes, 12 Secondary antibody “SA” 1.5 ml 1x secondary antibody solution<br />
Brown tubes, 12 Enzyme substrate “SUB” 1.5 ml HRP enzyme substrate (TMB)<br />
Note: TMB is light sensitive, so it is important to use the dark tubes to store this<br />
reagent.<br />
Yellow tubes, # “Infected” student Determined 100 µl 50x antigen stock solution<br />
depends on # of sample(s) (6.6x antigen) by 650 µl 1x PBS<br />
students (1–3 instructor<br />
tubes)<br />
The number of students in the class will determine the number of “infected” samples<br />
you mix with the blanks. For a result where about half the students become infected,<br />
we recommend making one infected sample per 16 students. (Note: if your class is<br />
less than 10 students, use a single sample and perform just 2 rounds of sharing.)<br />
Note: You must not add any buffer containing Tween 20 to the antigen, or the<br />
experiment will not work. You may want to keep the infected samples separate<br />
from the blank samples until the lesson to keep track of who receives them.<br />
17<br />
PROTOCOL I<br />
TRACKING DISEASE OUTBREAKS
PROTOCOL I<br />
TRACKING DISEASE OUTBREAKS<br />
Tubes Description Label Contents (Each Tube)<br />
Yellow tubes, # Blank (uninfected) Determined 750 µl 1x PBS<br />
depends on # of student samples by<br />
students instructor*<br />
Make enough blank yellow tubes for your student number minus the "infected"<br />
samples. Note: You must use 1x PBS and not wash buffer for the blank<br />
students samples, or the experiment will not work.<br />
* (Optional) For your own information, you may wish to number each tube of student sample (infected<br />
and blank) from 1 to 48 and record which numbered tubes contain the infected samples.<br />
Step 5. Set out student workstations.<br />
Student Workstation Checklist<br />
One workstation serves 4 students.<br />
Item (Label) Contents Number (✔)<br />
Yellow tubes Student test samples (0.75 ml) 4 (1 per student) ❑<br />
Violet tube (+) Positive control (0.5 ml) 1 ❑<br />
Blue tube (–) Negative control (0.5 ml) 1 ❑<br />
Green tube (PA) Primary antibody (1.5 ml) 1 ❑<br />
Orange tube (SA) Secondary antibody (1.5 ml) 1 ❑<br />
Brown tube (SUB) Enzyme substrate (1.5 ml) 1 ❑<br />
12-well microplate strips 2 ❑<br />
50 µl fixed-volume micropipet 1 ❑<br />
or 20–200 µl adjustable micropipet<br />
Yellow tips 10–20 ❑<br />
Disposable plastic transfer pipets 5 ❑<br />
70–80 ml wash buffer in beaker Phosphate buffered saline 1 ❑<br />
with 0.05% Tween 20<br />
Large stack of paper towels 2 ❑<br />
Black marking pen 1 ❑<br />
Note on sharing protocol: Make sure that the students share “body fluids” with students<br />
from other parts of the room, not just with their near neighbors. The best way to do this is to<br />
have orderly sharing: Tell the students to share with one other person, then return to their<br />
lab station. After all students are finished with the first sharing and are back in place, then<br />
tell them to share with a different person. The degree of sharing will depend on your class<br />
size. We recommend one "infected" sample per 16 students. If your class size is less than<br />
10, use a single "infected" sample and perform just two rounds of sharing.<br />
Stopping points: Although this procedure is designed to fit into a single lesson period, you<br />
may stop the laboratory activity after sharing the “body fluids” and place all the reagents in<br />
the refrigerator at 4°C overnight. Alternatively, if you wish to stop during the <strong>ELISA</strong> you may<br />
add wash buffer to the microplate wells at any stage after the addition of antigen and prior<br />
to the addition of enzyme substrate. Place the microplate strips and all the reagents in the<br />
refrigerator at 4°C overnight.<br />
18
Setting Up The Activity to Test for a Specific Disease (e.g., HIV)<br />
Appendix C provides information on a variety of diseases that can be diagnosed using<br />
<strong>ELISA</strong>. In addition, for each disease, we provide a table describing what the reagents for<br />
the activity represent in a real-world diagnostic <strong>ELISA</strong>. Below is an example of a diagnostic<br />
test to detect HIV viral proteins in a patient's blood sample.<br />
Detecting p24 HIV-1 Capsid Protein.<br />
Tube Actual Tube<br />
Tube Description Color Contents Simulated Tube Contents<br />
Student samples Yellow 1x antigen or Sample derived from patient's blood<br />
(unknowns) 1x PBS<br />
Primary antibody Green 1x primary Anti-p24 capsid protein antibody from<br />
antibody mouse<br />
Secondary Orange 1x secondary Anti-mouse immunoglobulin antibody<br />
antibody antibody conjugated to HRP<br />
Positive control Violet 1x antigen Heat-inactivated viral antigen (p24 protein)<br />
Negative control Blue 1x PBS HIV negative human serum<br />
19<br />
PROTOCOL I<br />
TRACKING DISEASE OUTBREAKS
PROTOCOL I<br />
TRACKING DISEASE OUTBREAKS<br />
Instructor’s Answer Key and Discussion Points<br />
Pre-Lab Focus Questions<br />
1. How does the immune system protect us from disease?<br />
The immune system includes physical barriers, such as the skin and mucous membranes<br />
that prevent pathogens from entering the body, and cellular responses, such as<br />
circulating macrophages that respond to foreign invaders. Our acquired immune system<br />
mounts a specific antibody response when the body is exposed to a foreign invader,<br />
and our immune cells attack the invader.<br />
2. How do doctors use the immune response to protect you from disease?<br />
Doctors use the immune response when we are vaccinated against diseases. Our<br />
immune system remembers the pathogens to which we have been exposed, and the<br />
next time we are exposed to the pathogens our immune system attacks them more<br />
quickly and efficiently. Doctors take advantage of this priming effect by exposing us to<br />
inactivated pathogens (killed or weakened organisms that cannot make us sick) so that if<br />
we are later exposed to the live pathogen, our body will mount a strong and immediate<br />
antibody response, reducing or eliminating the chance that it will make us sick.<br />
3. What are some ways that diseases spread?<br />
Diseases Can Spread Through: Examples:<br />
Exchange of bodily fluids • HIV, SARS, Epstein-Barr virus (cause of<br />
mononucleosis), STDs<br />
Ingestion of contaminated • E. coli O157:H7, prions that cause<br />
food or water Creutzfeldt-Jakob and mad cow diseases,<br />
protozoa that cause giardiasis, nematodes<br />
that cause trichinosis<br />
Inhalation • Viruses that cause the flu, bacteria that<br />
cause tuberculosis<br />
Vector transfer • Mosquito-borne diseases (malaria, West Nile<br />
virus, dengue fever, yellow fever), tick-borne<br />
diseases (Lyme disease, Rocky Mountain<br />
spotted fever)<br />
4. What is an example of a disease that attacks the human immune system?<br />
Diseases that attack the immune system include autoimmune diseases (e.g.,<br />
rheumatoid arthritis, lupus, asthma, eczema, SCID) and AIDS. An extensive list can be<br />
found in Appendix A.<br />
5. What problems can prevent the immune system from working properly?<br />
Problems with the immune system fall into three categories: hypersensitivity,<br />
immunodeficiency, and autoimmune diseases. Hypersensitivity occurs when the<br />
immune system overreacts to an antigen; hypersensitivity reactions include anaphylactic<br />
reactions, allergies, and contact sensitivity (e.g., reaction to poison ivy). <strong>Immuno</strong>deficiency<br />
means that an individual cannot mount an effective immune response.<br />
<strong>Immuno</strong>deficiency may be genetic (e.g., SCID or “bubble boy” disease) or induced by a<br />
disease (e.g., immunodeficiency from HIV infection) or by immunosuppressive drugs<br />
(e.g., drugs given after organ transplant to prevent rejection). Autoimmune disease<br />
results from the immune system inappropriately mounting an immune response to<br />
20
itself, for example, diseases like lupus, rheumatoid arthritis, multiple sclerosis (MS),<br />
insulin-dependent diabetes, and celiac disease.<br />
6. Why are immunosuppressant drugs necessary when someone has an organ<br />
transplant?<br />
<strong>Immuno</strong>suppressive drugs (like prednisolone and cyclosporine) prevent the body from<br />
treating the transplanted organ as a foreign invader; availability of immunosuppressive<br />
drugs is largely responsible for the success of transplantation as a treatment for organ<br />
failure. Organs are rejected when the body mounts a strong immune response to the<br />
transplant. On the negative side, the action of immunosuppressive drugs is not specific<br />
and they suppress all immunological reactions. As a result, transplant recipients are<br />
very vulnerable to infections.<br />
7. Why is rapid detection of disease exposure important?<br />
Rapid detection of disease exposure is important for several reasons. For many<br />
diseases, detecting the infection and beginning treatment early may reduce the severity<br />
of the symptoms or even prevent the disease completely. Rapid detection of disease<br />
exposure is also important to prevent further spread of the disease.<br />
8. What does <strong>ELISA</strong> stand for?<br />
Enzyme-linked immunosorbent assay.<br />
9. Why are enzymes used in this immunoassay?<br />
Enzymes provide a way to see whether the primary antibody has attached to its target<br />
(antigen) in the microplate well. Primary and secondary antibodies are invisible, so a<br />
detection method is necessary. The enzyme HRP is linked to the secondary antibody.<br />
HRP reacts with a colorless substrate in a chemical reaction that turns blue. If the<br />
secondary antibody is present in the well, the color change indicates a positive result.<br />
10. Why do you need to assay positive and negative control samples as well as your<br />
experimental samples?<br />
Controls are needed to make sure that the experiment worked. If there are no positive<br />
controls and the sample is negative, we can’t know if the sample was truly negative or if<br />
the assay didn’t work. Conversely, without a negative control, there is no way of<br />
knowing if all samples (positive or not) would have given a positive result.<br />
Post-Lab Focus Questions<br />
1. The samples that you added to the microplate strip contain many proteins and<br />
may or may not contain the disease antigen. What happened to the proteins in<br />
the plastic well if the sample contained the antigen? What if it did not contain the<br />
antigen?<br />
In either case, all the proteins present in the sample bind to the plastic wells.<br />
2. Why did you need to wash the wells after each step?<br />
Washing removes any proteins that have not bound to the plastic wells and any<br />
antibodies that have not bound to their targets, thus preventing unbound proteins<br />
(either antigen or antibodies) from giving false positive results.<br />
21<br />
PROTOCOL I<br />
TRACKING DISEASE OUTBREAKS
PROTOCOL I<br />
TRACKING DISEASE OUTBREAKS<br />
3. When you added primary antibody to the wells, what happened if your sample<br />
contained the antigen? What if it did not contain the antigen?<br />
If the sample contained the antigen, the primary antibody bound the antigen. If it did not<br />
contain the antigen, the primary antibody did not bind and was flushed out in the wash<br />
step.<br />
4. When you added secondary antibody to the wells, what happened if your sample<br />
contained the antigen? What if it did not contain the antigen?<br />
If the sample contained antigen, the secondary antibody bound to the primary<br />
antibodies already bound to antigen in the wells. If the test sample did not contain<br />
antigen, primary antibody did not bind in the wells, so the secondary antibody had<br />
nothing to bind and was flushed out in the wash step.<br />
5. If the sample gave a negative result for the disease-causing agent, does this<br />
mean that you do not have the disease? What reasons could there be for a<br />
negative result when you actually do have the disease?<br />
A negative result does not necessarily mean that you do not have the disease. It could<br />
be a false negative. The <strong>ELISA</strong> may not be sensitive enough to detect very low levels<br />
of disease agent, such as the levels that might be present soon after infection. Another<br />
cause of false negatives is experimental error, such as putting a negative control into a<br />
well where you thought you were putting an experimental sample.<br />
6. Why did you assay your samples in triplicate?<br />
Assaying the samples in triplicate is another control. If you do not get the same result in<br />
all triplicate wells, you have a problem with your experimental technique or you have<br />
made a pipetting error. In a clinical laboratory, the experiment would have to be repeated.<br />
If this error occurs in this activity, take the result of the two matching wells since this is<br />
probably correct.<br />
7. What antibody-based tests can you buy at your local pharmacy?<br />
Test kits that are based on the same principles as the <strong>ELISA</strong> include home pregnancy<br />
and ovulation tests, and tests for the presence of illegal drugs such as marijuana and<br />
cocaine.<br />
8. If you tested positive for disease exposure, did you have direct contact with one<br />
of the original infected students? If not, what conclusions can you reach about<br />
transmissibility of disease in a population?<br />
Having intimate contact with another person means that you are exposed to any germs<br />
that a person may have contracted from any previous intimate contacts.<br />
22
Laboratory Quick Guide<br />
<strong>ELISA</strong> for Tracking Disease Outbreaks<br />
Student Workstation Checklist<br />
One workstation serves 4 students.<br />
Item (Label) Contents Number (✔)<br />
Yellow tubes Student test samples (0.75 ml) 4 (1 per student) ❑<br />
Violet tube (+) Positive control (0.5 ml) 1 ❑<br />
Blue tube (–) Negative control (0.5 ml) 1 ❑<br />
Green tube (PA) Primary antibody (1.5 ml) 1 ❑<br />
Orange tube (SA) Secondary antibody (1.5 ml) 1 ❑<br />
Brown tube (SUB) Enzyme substrate (1.5 ml) 1 ❑<br />
12-well microplate strips 2 ❑<br />
50 µl fixed-volume micropipet 1 ❑<br />
or 20–200 µl adjustable micropipet<br />
Yellow tips 10–20 ❑<br />
Disposable plastic transfer pipets 5 ❑<br />
70–80 ml wash buffer in beaker Phosphate buffered saline 1 ❑<br />
with 0.05% Tween 20<br />
Large stack of paper towels 2 ❑<br />
Black marking pen 1 ❑<br />
1. Label a yellow tube and a plastic transfer<br />
pipet with your initials.<br />
2. Use the pipet to transfer all your “bodily<br />
fluid” sample into the tube of another<br />
student. Gently mix the samples, then take<br />
back half of the shared sample (750 µl) to<br />
your own tube. Write down the name of the<br />
student next to “Sharing Partner #1”.<br />
3. When instructed to do so, repeat the sharing<br />
protocol two more times. Discard this<br />
transfer pipet after this step.<br />
Optional stopping point: Samples may be<br />
stored at 4°C overnight.<br />
4. Label your 12-well strip. On each strip label<br />
the first 3 wells with a “+” for the positive<br />
controls and the next 3 wells with a “–” for<br />
the negative controls. Label the remaining<br />
wells with your and your lab partner’s<br />
initials (3 wells each).<br />
23<br />
Student A<br />
750 µl<br />
Student B<br />
Sharing Partner #1<br />
Sharing Partner #2<br />
Sharing Partner #3<br />
Students A+B<br />
Student C<br />
Students A+B+C<br />
Student D<br />
Student A Student B<br />
PROTOCOL I<br />
TRACKING DISEASE OUTBREAKS
PROTOCOL I<br />
TRACKING DISEASE OUTBREAKS<br />
5. Use a fresh pipet tip to transfer 50 µl of the<br />
positive control (+) into the three “+” wells.<br />
6. Use a fresh pipet tip to transfer 50 µl of the<br />
negative control (–) into the three “–” wells.<br />
7. Transfer 50 µl of each of your team’s<br />
samples from step 3 into the appropriately<br />
initialed three wells, using a fresh pipet tip<br />
for each sample.<br />
8. Wait 5 minutes while all the proteins in the<br />
samples bind to the plastic wells.<br />
9. WASH:<br />
a. Tip the microplate strip upside down<br />
onto the paper towels, and gently tap<br />
the strip a few times upside down.<br />
Make sure to avoid samples splashing<br />
back into wells.<br />
b. Discard the top paper towel.<br />
c. Use a fresh transfer pipet to fill each<br />
well with wash buffer, taking care not to<br />
spill over into wells. Note: the same<br />
transfer pipet is used for all washing<br />
steps.<br />
d. Tip the microplate strip upside down<br />
onto the paper towels and tap.<br />
e. Discard the top 2–3 paper towels.<br />
10. Repeat wash step 9.<br />
11. Use a fresh pipet tip to transfer 50 µl of<br />
primary antibody (PA) into all 12 wells of<br />
the microplate strip.<br />
12. Wait 5 minutes for the antibodies to bind<br />
to their targets.<br />
13. Wash the unbound primary antibody out<br />
of the wells by repeating all of wash step 9<br />
two times.<br />
24<br />
Primary<br />
antibody<br />
Control<br />
or<br />
sample<br />
WASH<br />
WASH 2x
14. Use a fresh pipet tip to transfer 50 µl of<br />
secondary antibody (SA) into all 12 wells<br />
of the microplate strip.<br />
15. Wait 5 minutes for the antibodies to bind<br />
to their targets.<br />
16. Wash the unbound secondary antibody<br />
out of the wells by repeating wash step 9<br />
three times.<br />
17. Use a fresh pipet tip to transfer 50 µl of<br />
enzyme substrate (SUB) into all 12 wells<br />
of the microplate strip.<br />
18. Wait 5 minutes. Observe and record the<br />
results.<br />
25<br />
Secondary<br />
antibody<br />
Enzyme<br />
substrate<br />
WASH 3x<br />
PROTOCOL I<br />
TRACKING DISEASE OUTBREAKS
PROTOCOL I<br />
TRACKING DISEASE OUTBREAKS<br />
Student Manual<br />
Introduction<br />
You are about to perform an experiment in which you will share simulated “body fluids” with<br />
your classmates. After sharing, you will perform an enzyme-linked immunosorbent assay or<br />
<strong>ELISA</strong> to determine if you have been exposed to a contagious “disease”. The <strong>ELISA</strong> uses<br />
antibodies to detect the presence of a disease agent, (for example, viruses, bacteria, or<br />
parasites) in your blood or other body fluid. You will then track the disease back to its source.<br />
When you are exposed to a disease agent, your body mounts an immune response.<br />
Molecules that cause your body to mount an immune response are called antigens, and<br />
may include components of infectious agents like bacteria, viruses, and fungi. Within days,<br />
millions of antibodies — proteins that recognize the antigen and bind very tightly to it — are<br />
circulating in your bloodstream. Like magic bullets, antibodies seek out and attach themselves<br />
to their target antigens, flagging the invaders for destruction by other cells of the immune<br />
system.<br />
Over 100 years ago, biologists found that animals’ immune systems respond to invasion by<br />
“foreign entities”, or antigens. Today, antibodies have become vital scientific tools, used in<br />
biotechnology research and to diagnose and treat disease. The number of different<br />
antibodies circulating in the blood has been estimated to be between 106 and 1011 , so there<br />
is usually an antibody ready to deal with any antigen. In fact, antibodies make up to 15% of<br />
your total blood serum protein. Antibodies are very specific; each antibody recognizes only<br />
a single antigen.<br />
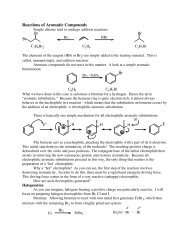
Antibody<br />
A) Structure of IgG bound to the HIV capsid protein p24 as determined by X-ray crystallography (Harris et al. 1998,<br />
Momany et al. 1996). These structures can be downloaded from the Protein Data Bank (www.pdb.ufmg.br,<br />
(Berman et al. 2000) using the PDB identification codes 1IGY and 1AFV and manipulated using free online software<br />
such as Rasmol and Protein Explorer. B) A commonly used representation of an antibody bound to an antigen.<br />
How Are Antibodies Made?<br />
y<br />
Antigen<br />
A B<br />
Heavy chain<br />
Scientists have learned to use the immune response of animals to make antibodies that can<br />
be used as tools to detect and diagnose diseases. The study of the immune system is called<br />
“immunology”. Animals such as chickens, goats, rabbits, and sheep can be injected with an<br />
antigen and, after a period of time, their serum will contain antibodies that specifically<br />
recognize that antigen. If the antigen was a disease agent, the antibodies can be used to<br />
develop diagnostic tests for the disease. In an immunoassay, the antibodies used to recognize<br />
antigens like disease agents are called primary antibodies; primary antibodies confer<br />
specificity to the assay.<br />
26<br />
-S-S-<br />
Disulfide<br />
bonds<br />
-S-S-<br />
-S-S-<br />
-S-S-<br />
Light chain<br />
Antigen
Other kinds of antibody tools, called secondary antibodies, are made in the same way. In<br />
an immunoassay, secondary antibodies recognize and bind to the primary antibodies,<br />
which are antibodies from another species. Secondary antibodies are prepared by injecting<br />
antibodies made in one species into another species. It turns out that antibodies from<br />
different species are different enough from each other that they will be recognized as<br />
foreign proteins and provoke an immune response. For example, to make a secondary<br />
antibody that will recognize a human primary antibody, human antibodies can be injected<br />
into an animal like a rabbit. After the rabbit mounts an immune response, the rabbit serum<br />
will contain antibodies that recognize and bind to human antibodies. The secondary<br />
antibodies used in this experiment are conjugated to the enzyme horseradish peroxidase<br />
(HRP) which produces a blue color in the presence of its substrate, TMB. These antibody<br />
and enzyme tools are the basis for the <strong>ELISA</strong>.<br />
Where Is <strong>ELISA</strong> Used in the Real World?<br />
With its rapid test results, the <strong>ELISA</strong> has had a major impact on many aspects of medicine<br />
and agriculture. <strong>ELISA</strong> is used for such diverse purposes as pregnancy tests, disease<br />
detection in people, animals, and plants, detecting illegal drug use, testing indoor air quality,<br />
and determining if food is labeled accurately. For new and emerging diseases like severe<br />
acute respiratory syndrome (SARS), one of the highest priorities of the US Centers for<br />
Disease Control (CDC) and the World Health Organization (WHO) has been to<br />
develop an <strong>ELISA</strong> that can quickly and easily verify<br />
whether patients have been exposed to the virus.<br />
Some tests give positive or negative results in<br />
a matter of minutes. For example, home<br />
pregnancy dipstick tests are based on very similar<br />
principles to <strong>ELISA</strong>. They detect levels of human<br />
Step 1.<br />
chorionic gonadotropin (hCG), a hormone that<br />
appears in the blood and urine of pregnant<br />
women within days of fertilization. The wick<br />
area of the dipstick is coated with anti-hCG<br />
antibody labeled with a pink compound (step 1).<br />
When the strip is dipped in urine, if hCG<br />
Step 2.<br />
is present it will bind to the pink antibody, and<br />
the pink hCG-antibody complex will migrate<br />
up the strip via capillary action (step 2). When<br />
the pink complex reaches the first test zone, a<br />
narrow strip containing an unlabeled fixed<br />
anti-hCG antibody, the complex will bind and Step 3.<br />
concentrate there, making a pink stripe (step 3).<br />
The dipsticks have a built-in control zone<br />
containing an unlabeled fixed secondary antibody<br />
that binds unbound pink complex (present in<br />
both positive and negative results) in the second<br />
Step 4.<br />
stripe (step 4). Thus, every valid test will give a<br />
second pink stripe, but only a positive pregnancy<br />
test will give two pink stripes.<br />
27<br />
Wick<br />
Capillary action<br />
Test<br />
Control<br />
Antigen (hCG)<br />
Colored anti-hCG antibody<br />
Fixed anti-hCG antibody<br />
Fixed secondary antibody<br />
PROTOCOL I<br />
TRACKING DISEASE OUTBREAKS
PROTOCOL I<br />
TRACKING DISEASE OUTBREAKS<br />
Why Do We Need Controls?<br />
Positive and negative controls are critical to any diagnostic test. Control samples are<br />
necessary to be sure your <strong>ELISA</strong> is working correctly. A positive control is a sample known<br />
to be positive for the disease agent, and a negative control is a sample that does not<br />
contain the disease agent.<br />
Your Task Today<br />
You will be provided the tools and an experimental protocol to perform an <strong>ELISA</strong>. You will<br />
be given a simulated “body fluid” sample that you will share with your classmates. One or<br />
two of the samples in the class have been “infected”. You will also be provided with<br />
positive and negative control samples. Then you and your fellow students will assay your<br />
samples for the presence of the “disease agent” to track the spread of the disease through<br />
your class population.<br />
Now let’s put this all together.<br />
28
Your task will be to:<br />
1. Share your (simulated) body fluids randomly with your classmates.<br />
Student A<br />
750 µl<br />
Student B<br />
Students A+B<br />
2. Add your shared sample plus control samples to the wells in a<br />
microplate strip. Your samples contain many proteins and may or<br />
may not contain the disease agent (antigen). Incubate for 5 minutes<br />
to allow all the proteins in the samples to bind to the plastic wells via<br />
hydrophobic interaction. This is an immunosorbent assay because<br />
proteins adsorb (bind) to the plastic wells.<br />
3. Add anti-disease antibody (primary antibody) to the wells and<br />
incubate. The primary antibody will seek out the antigen from the<br />
many proteins bound to the well. If your sample was “infected”, the<br />
antibodies will bind tightly to the disease agent (antigen) in the wells.<br />
4. Detect the bound antibodies with HRP-labeled secondary antibody.<br />
If the primary antibodies have bound to the antigen, the secondary<br />
antibodies will bind tightly to the primary antibodies.<br />
5. Add enzyme substrate to the wells, wait 5 minutes, and evaluate<br />
the assay results. If the disease antigen was present in your<br />
sample, the wells will turn blue. This is a positive diagnosis. If the<br />
wells remain colorless, the disease antigen was not present in your<br />
sample and the diagnosis is negative.<br />
Student C<br />
29<br />
Students A+B+C<br />
Student D<br />
PROTOCOL I<br />
TRACKING DISEASE OUTBREAKS
PROTOCOL I<br />
TRACKING DISEASE OUTBREAKS<br />
Pre-Lab Focus Questions<br />
1. How does the immune system protect us from disease?<br />
2. How do doctors use the immune response to protect you from disease?<br />
3. What are some ways that diseases spread?<br />
4. What is an example of a disease that attacks the human immune system?<br />
5. What problems can prevent the immune system from working properly?<br />
6. Why are immunosuppressant drugs necessary when someone has an organ transplant?<br />
7. Why is rapid detection of disease exposure important?<br />
8. What does <strong>ELISA</strong> stand for?<br />
9. Why are enzymes used in this immunoassay?<br />
10. Why do you need to assay positive and negative control samples as well as your<br />
experimental samples?<br />
30
Laboratory Guide<br />
Student Workstation Checklist<br />
One workstation serves 4 students<br />
Items Contents Number (✔)<br />
Yellow tubes Student samples (0.75 ml) 4 (1 per student) ❑<br />
Violet tube (+) Positive control (0.5 ml) 1 ❑<br />
Blue tube (–) Negative control (0.5 ml) 1 ❑<br />
Green tube (PA) Primary antibody (1.5 ml) 1 ❑<br />
Orange tube (SA) Secondary antibody (1.5 ml) 1 ❑<br />
Brown tube (SUB) Enzyme substrate (1.5 ml) 1 ❑<br />
12-well microplate strips 2 ❑<br />
50 µl fixed-volume micropipet or 1 ❑<br />
20–200 µl adjustable micropipet<br />
Yellow tips 10–20 ❑<br />
Disposable plastic transfer pipets 5 ❑<br />
70–80 ml wash buffer in beaker Phosphate buffered saline 1 ❑<br />
with 0.05% Tween 20<br />
Large stack of paper towels 2 ❑<br />
Black marking pen 1 ❑<br />
Laboratory Procedure<br />
Share Body Fluids<br />
1. Label each yellow tube with your initials. These are your “body fluid” samples that will<br />
be shared randomly with your classmates.<br />
2. Label a plastic transfer pipet with your initials; you will use this to mix your sample with<br />
your fellow students.<br />
3. When you are told to do so, find another student and use a pipet to transfer all 750 µl of<br />
your sample into the tube of the other student. (It doesn’t matter whose tube is used to<br />
mix both samples.) Gently mix the samples by pipetting the mixture up and down. Then<br />
take back half of the shared sample (about 750 µl) to your own tube. Write down the<br />
name of that student next to “Sharing Partner #1” below.<br />
Student A<br />
750 µl<br />
Student B<br />
Sharing Partner #1<br />
Sharing Partner #2<br />
Sharing Partner #3<br />
Students A+B<br />
Student C<br />
31<br />
Students A+B+C<br />
Student D<br />
PROTOCOL I<br />
TRACKING DISEASE OUTBREAKS
PROTOCOL I<br />
TRACKING DISEASE OUTBREAKS<br />
4. When told to do so, repeat the sharing protocol two more times with 2 other students so<br />
that you have shared your sample with 3 other students total. Make sure that you record<br />
their names in the order in which you shared. Discard your transfer pipets after this step.<br />
You may proceed directly to the next step or store your samples overnight at 4°C.<br />
Perform <strong>ELISA</strong><br />
5. Label the outside wall of each well of your 12-well strip. Two students may share a strip<br />
of 12 wells. On each strip, label the first three wells with a “+” for the positive controls<br />
and the next three wells with a “–” for the negative controls. On the remaining wells<br />
write your and your partner’s initials. For example, Florence Nightingale and Alexander<br />
Fleming would label their shared strip like this:<br />
6. Bind the antigen to the wells:<br />
a. Use a pipet to transfer 50 µl of the positive control (+) from the violet tube<br />
into the three “+” wells.<br />
b. Use a fresh pipet tip to transfer 50 µl of the negative control (–) from the<br />
blue tube into the three “–” wells.<br />
c. Use a fresh pipet tip for each sample and transfer 50 µl of each of your<br />
team’s samples into the appropriately initialed three wells.<br />
Control<br />
or<br />
sample<br />
7. Wait 5 minutes while all the proteins in the samples bind to the plastic wells.<br />
8. Wash the unbound sample out of the wells:<br />
a. Tip the microplate strip upside down onto the paper towels so that the<br />
samples drain out, then gently tap the strip a few times upside down on the<br />
paper towels. Make sure to avoid samples splashing back into wells.<br />
b. Discard the top paper towel.<br />
32<br />
FN FN FN AF AF AF
c. Use a fresh transfer pipet filled with wash buffer from the beaker to fill each<br />
well with wash buffer taking care not to spill over into neighboring wells. The<br />
same transfer pipet will be used for all washing steps.<br />
d. Tip the microplate strip upside down onto the paper towels so that the wash<br />
buffer drains out, then gently tap the strip a few times upside down on the<br />
paper towels.<br />
e. Discard the top 2–3 paper towels.<br />
9. Repeat wash step 8.<br />
10. Use a fresh pipet tip to transfer 50 µl of primary antibody (PA) from the green tube into<br />
all 12 wells of the microplate strip.<br />
Primary<br />
antibody<br />
11. Wait 5 minutes for the primary antibody to bind.<br />
12. Wash the unbound primary antibody out of the wells by repeating wash step 8 two times.<br />
13. Use a fresh pipet tip to transfer 50 µl of secondary antibody (SA) from the orange tube<br />
into all 12 wells of the microplate strip.<br />
Secondary<br />
antibody<br />
33<br />
PROTOCOL I<br />
TRACKING DISEASE OUTBREAKS
PROTOCOL I<br />
TRACKING DISEASE OUTBREAKS<br />
14. Wait 5 minutes for the secondary antibody to bind.<br />
15. Wash the unbound secondary antibody out of the wells by repeating wash step 8 three<br />
times.<br />
The secondary antibody is attached to an enzyme (HRP) that chemically changes the<br />
enzyme substrate, turning it from a colorless solution to a blue solution. Predict which<br />
wells of your experiment should turn blue and which should remain colorless and which<br />
wells you are not sure about.<br />
16. Use a fresh pipet tip to transfer 50 µl of enzyme substrate (SUB) from the brown tube<br />
into all 12 wells of the microplate strip.<br />
17. Wait 5 minutes. Observe and record your results.<br />
Results Section<br />
Enzyme<br />
substrate<br />
Label the figure below with the same labels you wrote on the wells in step 5. In each of the<br />
wells, put a “+” if the well turned blue and a “–” if there is no color change.<br />
Are you “infected” with the disease? YES/NO (circle one)<br />
You can track the progress of the disease through the class by having each student record<br />
whether they tested positive or negative next to the names of the people with whom they<br />
shared “body fluids”.<br />
34
Class Results For Tracking Disease Transmission<br />
Student’s + /– Sharing Student’s + /– Sharing<br />
name partners name partners<br />
(+ or –) (+ or –)<br />
35<br />
PROTOCOL I<br />
TRACKING DISEASE OUTBREAKS
PROTOCOL I<br />
TRACKING DISEASE OUTBREAKS<br />
Post-Lab Focus Questions<br />
1. The samples that you added to the microplate strip contain many proteins and may or<br />
may not contain the disease antigen. What happened to the proteins in the plastic well<br />
if the sample contained the antigen? What if it did not contain the antigen?<br />
2. Why did you need to wash the wells after every step?<br />
3. When you added primary antibody to the wells, what happened if your sample<br />
contained the antigen? What if it did not contain the antigen?<br />
4. When you added secondary antibody to the wells, what happened if your sample<br />
contained the antigen? What if it did not contain the antigen?<br />
5. If the sample gave a negative result for the disease-causing agent, does this mean that<br />
you do not have the disease? What reasons could there be for a negative result when<br />
you actually do have the disease?<br />
6. Why did you assay your samples in triplicate?<br />
7. What antibody-based tests can you buy at your local pharmacy?<br />
8. If you tested positive for disease exposure, did you have direct contact with one of the<br />
original infected students? If not, what conclusions can you reach about transmissibility<br />
of disease in a population?<br />
36
Protocol II: Antigen Detection <strong>ELISA</strong><br />
Instructor’s Guide ......................................................................................................38<br />
Instructor’s Laboratory Overview ..................................................................39<br />
Instructor’s Advance Laboratory Preparation ................................................40<br />
Student Workstation Checklist......................................................................43<br />
Instructor’s Answer Key and Discussion Points ............................................45<br />
Laboratory Quick Guide ............................................................................................47<br />
Student Manual ..........................................................................................................50<br />
Introduction ..................................................................................................50<br />
Pre-Lab Focus Questions ............................................................................54<br />
Laboratory Procedure ..................................................................................55<br />
Post-Lab Focus Questions ..........................................................................58<br />
37<br />
PROTOCOL II<br />
Antigen Detection <strong>ELISA</strong>
PROTOCOL II<br />
Antigen Detection <strong>ELISA</strong><br />
Protocol II: Antigen Detection <strong>ELISA</strong><br />
Instructor’s Guide<br />
This activity simulates a test for the presence of an antigen in a sample. The protocol can<br />
be used to discuss how an antibody-based <strong>ELISA</strong> can detect disease agents in samples<br />
such as body fluids (before the body has had a chance to mount an immune response).<br />
Smallpox virus is one great real-world application of this protocol. If exposure is detected<br />
and treated with vaccine within 2–3 days, infected patients do not develop smallpox. Other<br />
disease-based scenarios include West Nile virus, HIV, SARS, and anthrax (see Appendix C).<br />
Other sources of disease-related antigens can include samples taken from farm animals,<br />
agricultural products, food, and water supplies.<br />
Alternatively, you may choose to focus on non-disease-based applications for <strong>ELISA</strong> such<br />
as detecting the hormone hCG in a pregnancy test, illegal steroids in a drug test, bacterial<br />
toxins in a food safety test, or the presence of genetically modified organisms in non-GMO<br />
food — or any other scenario that may stimulate your students’ interest. Over-the-counter<br />
kits that are based on the same principles as this <strong>ELISA</strong> activity include home pregnancy<br />
and ovulation tests and tests for the presence of illegal drugs like marijuana and cocaine.<br />
To create a relevant and meaningful classroom context for this activity, the introductory<br />
pages to this manual as well as Appendices A and B provide background vocabulary and<br />
factual and conceptual lecture points. Appendix C contains useful information about specific<br />
diseases and classroom presentation scenarios.<br />
This <strong>ELISA</strong> relies on antibodies that are manufactured to detect particular antigens either in<br />
some body fluid or in samples from farm animals, food, or water supplies. Each student will<br />
be given a simulated sample to assay for the presence of the antigen. For more information<br />
about antibody manufacturing, see Appendix A.<br />
Implementation Timeline<br />
Day 1 Set the stage Lecture and discussion<br />
Day 2 Student <strong>ELISA</strong> lab<br />
38
Instructor’s Laboratory Overview<br />
Step 1: Using a pipet, 50 µl of each student’s sample (unknowns)<br />
along with positive and negative controls are added to the wells of<br />
the microplate strip and incubated for 5 minutes, allowing antigen,<br />
where present, to bind to the wells. The wells are rinsed with<br />
wash buffer (PBST: phosphate buffered saline containing 0.05%<br />
Tween 20) to block the unoccupied protein binding sites in the<br />
wells.<br />
Step 2: Primary antibody (50 µl) is added to the wells and<br />
incubated for 5 minutes at room temperature. The primary antibody<br />
is an antibody that recognizes and binds to the antigen. The wells<br />
are rinsed with wash buffer to remove unbound antibody.<br />
Step 3: Horseradish peroxidase (HRP)-labeled secondary<br />
antibody (50 µl) is added to the wells and incubated for 5 minutes<br />
at room temperature. The secondary antibody is antibody that<br />
recognizes and binds to the primary antibody. HRP is an enzyme<br />
that will oxidize a color-producing substrate. Wells are rinsed with<br />
wash buffer to remove unbound secondary antibody.<br />
Step 4: The enzyme substrate (50 µl) is added to each well and<br />
students watch color development. If HRP is present (meaning<br />
that the antigen was present in the sample), the solution in the wells<br />
will turn blue within 5 minutes. If the antigen was not present in the<br />
sample, the wells will remain colorless.<br />
Typical <strong>ELISA</strong> results.<br />
39<br />
PROTOCOL II<br />
Antigen Detection <strong>ELISA</strong>
PROTOCOL II<br />
Antigen Detection <strong>ELISA</strong><br />
Instructor’s Advance Laboratory Preparation<br />
This section is designed to help you prepare for the laboratory efficiently. We recommend that<br />
you read this section of the manual (Protocol II: Antigen Detection <strong>ELISA</strong>) in its entirety before<br />
beginning your preparation. In addition, if you are choosing to perform a scenario-based activity<br />
(for example, HIV testing), we recommend using the information given in Appendix C to help<br />
plan your lesson.<br />
The most important thing for the students to do is to put the correct components in the<br />
assay wells in the correct order, so having the tubes clearly labeled and properly color-coded<br />
is crucial to a successful outcome.<br />
Objectives<br />
Step 1. Prepare buffers<br />
Step 2. Rehydrate the freeze-dried antigen, primary antibody, and secondary<br />
antibody to make 50x stock solutions<br />
Step 3. Dilute 50x stock solutions<br />
Step 4. Dispense reagents for student workstations<br />
Step 5. Set out student workstations<br />
Time Required 1–3 hours<br />
Preparation Timeframe<br />
We recommend rehydrating and diluting the antigen and primary antibody no more than 3<br />
days before the lesson, and the secondary antibody less than 24 hours before the lesson.<br />
We also suggest using sterile distilled water to prepare the 1x PBS to avoid contaminating<br />
rehydrated reagents. These reagents must be kept on ice or in the refrigerator if prepared<br />
over 4 hours before the lesson.<br />
Note: If you are planning to use this kit for multiple lab sessions over a 1- or 2-week<br />
period, we strongly suggest using sterile water to prepare the PBS to avoid<br />
contaminating reagents. (Water can be sterilized by boiling it in a microwave oven for 5<br />
minutes in a loosely capped bottle; after you remove the bottle from the microwave oven,<br />
let it cool, then secure the cap.) Dilute only as much concentrated antibody and antigen as<br />
required for each lab session. The rehydrated antibodies are 50x concentrates. Store the<br />
remaining concentrated antigen and antibodies in the refrigerator at 4°C. We do not<br />
recommend storing the concentrated antibody and antigen for more than 2 weeks, even at<br />
4°C. Do not freeze the solutions.<br />
Volume Measurements<br />
This kit contains graduated disposable plastic transfer pipets (DPTPs) to use for preparing<br />
some of the reagents where volumes between 250 microliters (µl) and 5 milliliters (ml) are<br />
required. In addition adjustable- or fixed-volume micropipets are needed to measure 50 µl<br />
volumes. The illustration shows the marks on the DPTP corresponding to the volumes to<br />
be measured. Volumes over 1 ml will require multiple additions. For every step in this<br />
laboratory preparation, use a fresh DPTP or a fresh pipet tip.<br />
1 ml<br />
750 µl<br />
500 µl<br />
250 µl<br />
Measuring liquids that contain detergents that foam (e.g., the wash buffer) requires that you<br />
read the volume at the interface of the liquid and the bubbles.<br />
40<br />
100 µl
PROTOCOL II: Step-by-Step Instructor’s Advance Preparation Guide<br />
These instructions are for the setup of 12 student workstations of 4 students each.<br />
Supplied Reagents Quantity<br />
Antigen, chicken gamma globulin, freeze-dried 1 vial<br />
Primary antibody, rabbit anti-chicken polyclonal antibody, freeze-dried 1 vial<br />
Secondary antibody, goat anti-rabbit antibody conjugated to HRP,<br />
freeze-dried 1 vial<br />
HRP enzyme substrate (TMB) 1 bottle<br />
10x phosphate buffered saline (PBS) 1 bottle<br />
10% Tween 20 1 bottle<br />
Required Reagents<br />
Distilled water, sterile is recommended, see note on page 40 1 L<br />
Step 1. Prepare buffers.<br />
We recommend you use a 100 ml and a 1 liter (L) graduated cylinder for preparing the<br />
buffer solutions. You will also need 1 L of distilled water.<br />
Buffer Volume Reagent Used for<br />
1x PBS, 100 ml 90 ml distilled water • Rehydrating antigen,<br />
10 ml 10x PBS primary and secondary<br />
antibodies to make 50x<br />
reagent stock solutions<br />
• Diluting 50x antigen to make<br />
positive control and “infected”<br />
student samples<br />
• Negative control<br />
• Negative student samples<br />
Wash buffer, 900 ml 805 ml Distilled water • Dilution of 50x antibody<br />
stocks·<br />
90 ml 10x PBS • Plate washing<br />
4.5 ml 10% Tween 20<br />
Step 2. Rehydrate the freeze-dried antigen, primary antibody, and secondary<br />
antibody.<br />
Carefully remove the stoppers from the three freeze-dried reagents and use a fresh DPTP to<br />
add 0.5 ml 1x PBS to each. Close the stoppers and shake to mix. These solutions are 50x<br />
concentrates, or stock solutions. NOTE: You must not use wash buffer in this step.<br />
Freeze-Dried reagent Protocol for 50x Stock Solution Used for<br />
Antigen Add 0.5 ml of 1x PBS to vial • Positive control<br />
• “infected” student samples<br />
Primary antibody Add 0.5 ml of 1x PBS to vial • Primary antibody<br />
Secondary antibody Add 0.5 ml of 1x PBS to vial • Secondary antibody<br />
41<br />
PROTOCOL II<br />
Antigen Detection <strong>ELISA</strong>
PROTOCOL II<br />
Antigen Detection <strong>ELISA</strong><br />
Step 3. Dilute 50x stock reagents.<br />
Label one 30 ml bottle for each of the diluted solutions below. Use a fresh DPTP to add the<br />
contents of the appropriate 50x concentrated stock to the corresponding 30 ml bottle.<br />
Diluted solution Volume Reagent Used for:<br />
1x antigen, label 24.5 ml 1x PBS positive control<br />
one 30 ml bottle 0.5 ml 50x antigen<br />
NOTE: you must not add any buffer containing Tween 20 to<br />
the antigen, or the experiment will not work.<br />
• Use the DPTP to rinse out the vial with some of the diluted<br />
reagent to ensure that all of the stock solution is used.<br />
• Close the cap and shake to mix.<br />
1x primary antibody, 24.5 ml Wash buffer primary antibody<br />
label one 30 ml bottle 0.5 ml 50x primary<br />
antibody stock<br />
• Use the DPTP to rinse out the vial with some of the diluted<br />
reagent to ensure that all of the stock solution is used.<br />
• Close the cap and shake to mix.<br />
1x secondary antibody, 24.5 ml Wash buffer secondary antibody<br />
label one 30 ml bottle 0.5 ml 50x secondary<br />
antibody stock<br />
• Dilute the secondary antibody less than 24 hours before the start<br />
of the lesson.<br />
• Use the DPTP to rinse out the vial with some of the diluted<br />
reagent to ensure that all of the stock solution is used.<br />
• Close the cap and shake to mix.<br />
Step 4. Dispense reagents for student workstations.<br />
Tubes Description Label Contents (Each Tube)<br />
Violet tubes, 12 Positive controls "+" 0.5 ml 1x antigen<br />
Blue tubes, 12 Negative controls "–" 0.5 ml 1x PBS<br />
Green tubes, 12 Primary antibody "PA" 1.5 ml 1x primary antibody solution<br />
Orange tubes, 12 Secondary antibody "SA" 1.5 ml 1x secondary antibody solution<br />
Brown tubes, 12 Enzyme substrate "SUB" 1.5 ml HRP enzyme substrate (TMB)<br />
Note: TMB is light sensitive, so it is important to use the dark tubes to store this<br />
reagent.<br />
Yellow tubes, # Positive student test 50% of 0.25 ml 1x antigen<br />
depends on # of sample(s) tubes<br />
students (48 max)<br />
Negative student test 50% of 0.25 ml 1x PBS<br />
sample(s) tubes<br />
We recommend that you design the experiment so that 50% of your students will<br />
test positive and 50% will test negative. However, the final ratio is up to you. Make<br />
one student test sample for each student in your class as indicated above. Mix up<br />
the tubes before distributing.<br />
42
Step 5. Set out student workstations.<br />
Student Workstation Checklist<br />
One workstation serves 4 students.<br />
Item (Label) Contents Number (✔)<br />
Yellow tubes Student test samples (0.25 ml) 4 ❑<br />
Violet tube (+) Positive control (0.5 ml) 1 ❑<br />
Blue tube (–) Negative control (0.5 ml) 1 ❑<br />
Green tube (PA) Primary antibody (1.5 ml) 1 ❑<br />
Orange tube (SA) Secondary antibody (1.5 ml) 1 ❑<br />
Brown tube (SUB) Enzyme substrate (1.5 ml) 1 ❑<br />
12-well microplate strips 2 ❑<br />
50 µl fixed-volume micropipet or 1 ❑<br />
20–200 µl adjustable micropipet<br />
Yellow tips 10–20 ❑<br />
Disposable plastic transfer pipet 1 ❑<br />
70–80 ml wash buffer in beaker Phosphate buffered saline 1 ❑<br />
with 0.05% Tween 20<br />
Large stack of paper towels 2 ❑<br />
Black marking pen 1 ❑<br />
Stopping points: Although this procedure is designed to fit into a single lesson period, you<br />
may stop the procedure by adding wash buffer to the microplate wells at any stage after the<br />
addition of antigen and prior to the addition of enzyme substrate. Place the microplate<br />
strips and all the reagents in the refrigerator at 4°C overnight.<br />
Setting Up The Activity to Test for a Specific Disease (e.g. HIV)<br />
Appendix C provides information on a variety of diseases that can be diagnosed using<br />
<strong>ELISA</strong>. In addition, for each disease, we provide a table describing what the reagents for<br />
the activity represent in a real-world diagnostic <strong>ELISA</strong>. Below is an example of a diagnostic<br />
test to detect HIV viral proteins in a patient's blood sample.<br />
Detecting p24 HIV-1 Capsid Protein<br />
Tube Actual Tube<br />
Tube Description Color Contents Simulated Tube Contents<br />
Student samples Yellow 1x antigen or Sample derived from patient's blood<br />
1x PBS<br />
Primary antibody Green 1x primary Anti-p24 capsid protein antibody from<br />
antibody mouse<br />
Secondary Orange 1x secondary Anti-mouse immunoglobulin antibody<br />
antibody antibody conjugated to HRP<br />
Positive control Violet 1x antigen Heat-inactivated viral antigen (p24 protein)<br />
Negative control Blue 1x PBS HIV negative human serum<br />
43<br />
PROTOCOL II<br />
Antigen Detection <strong>ELISA</strong>
PROTOCOL II<br />
Antigen Detection <strong>ELISA</strong><br />
Setting Up The Activity to Test for a Specific Antigen (e.g. pregnancy<br />
hormones)<br />
The table below gives an example of how a diagnostic test for pregnancy can be simulated<br />
using protocol II.<br />
Detecting Human Chorionic Gonadotropin Hormone<br />
Tube Actual Tube<br />
Tube Description Color Contents Simulated Tube Contents<br />
Student samples Yellow 1x antigen or Patient's urine sample<br />
1x PBS<br />
Primary antibody Green 1x primary Anti-hCG antibody from mouse<br />
antibody<br />
Secondary Orange 1x secondary Anti-mouse immunoglobulin antibody<br />
antibody antibody conjugated to HRP<br />
Positive control Violet 1x antigen Purified human chorionic gonadotrophin<br />
(hCG) hormone<br />
Negative control Blue 1x PBS Urine from a nonpregnant woman<br />
44
Instructor’s Answer Key and Discussion Points<br />
Pre-lab Focus Questions<br />
1. How does the immune system protect us from disease?<br />
The immune system includes physical barriers, such as the skin and mucous membranes<br />
that prevent pathogens from entering the body, and cellular responses, such as<br />
circulating macrophages that respond to foreign invaders. Our acquired immune system<br />
mounts a specific antibody response when the body is exposed to a foreign invader,<br />
and our immune cells attack the invader.<br />
2. How do doctors use the immune response to protect you from disease?<br />
Doctors use the immune response when we are vaccinated against diseases. Our<br />
immune system remembers the pathogens to which we have been exposed, and the<br />
next time we are exposed to the pathogens our immune system attacks them more<br />
quickly and efficiently. Doctors take advantage of this priming effect by exposing us to<br />
inactivated pathogens (killed or weakened organisms that cannot make us sick) so that if<br />
we are later exposed to the live pathogen, our body will mount a strong and immediate<br />
antibody response, reducing or eliminating the chance that it will make us sick.<br />
3. How are the antibodies in your body made?<br />
Antibodies in the body are made by immune cells called B lymphocytes, or B cells.<br />
Production of an antibody to a particular antigen increases when you are exposed to<br />
the antigen.<br />
4. How are antibodies that are used in <strong>ELISA</strong> made?<br />
Antibodies used by scientists are usually made by immunizing animals. Polyclonal<br />
antibodies are purified from animal serum. Monoclonal antibodies are made by fusing B<br />
cells from immunized mice with immortalized cells in culture and collecting antibodies<br />
pumped out into growth medium. There are more technologically advanced methods of<br />
manufacturing antibodies involving recombinant DNA technology (discussed in<br />
Appendix A).<br />
5. Why is a rapid antigen detection test necessary?<br />
In medicine, patients and doctors need test results quickly so they can make crucial<br />
decisions about the patient’s care. Law enforcement and sports officials need rapid<br />
results from drug tests to help them decide whether or not to take action against<br />
someone suspected of abusing drugs. Environmental and food/water safety tests must<br />
yield rapid results because the population’s health and safety may be at risk. In addition,<br />
in all the cases above, time spent waiting for test results could have an economic<br />
impact.<br />
6. What does <strong>ELISA</strong> stand for?<br />
Enzyme-linked immunosorbent assay.<br />
7. Why are enzymes used in this immunoassay?<br />
Enzymes provide a way to see whether the primary antibody has attached to its target<br />
(antigen) in the microplate well. Primary and secondary antibodies are invisible, so a<br />
detection method is necessary. The enzyme, HRP is linked to the secondary antibody.<br />
HRP reacts with a colorless substrate in a chemical reaction that turns blue. If the<br />
secondary antibody is present in the well, the color change indicates a positive result.<br />
45<br />
PROTOCOL II<br />
Antigen Detection <strong>ELISA</strong>
PROTOCOL II<br />
Antigen Detection <strong>ELISA</strong><br />
8. Why do you need to assay positive and negative control samples as well as your<br />
experimental samples?<br />
Controls are needed to make sure the assay is working correctly. If there are no<br />
positive controls and the sample is negative, we can’t know if the sample was truly<br />
negative or if assay didn’t work. Conversely, without a negative control, there is no way<br />
of knowing if all samples (positive or not) would have given a positive result.<br />
Post-Lab Focus Questions<br />
1. Did your sample contain the antigen?<br />
Students explain using data from their results.<br />
2. The samples that you added to the microplate strip contain many proteins and<br />
may or may not contain the antigen. What happened to the proteins in the plastic<br />
well if the sample contained the antigen? What if it did not contain the antigen?<br />
In either case, all the proteins present in the sample bind to the plastic wells.<br />
3. Why did you need to wash the wells after every step?<br />
Washing removes any proteins that have not bound to the plastic wells and any<br />
antibodies that have not bound to their targets, thus preventing unbound proteins<br />
(either antigen or antibodies) from giving false positive results.<br />
4. When you added primary antibody to the wells, what happened if your sample<br />
contained the antigen? What if it did not contain the antigen?<br />
If it was positive for the antigen, the primary antibody bound the antigen. If it was<br />
negative, the primary antibody did not bind and was flushed out in the wash step.<br />
5. When you added secondary antibody to the wells, what happened if your sample<br />
contained the antigen? What if it did not contain the antigen?<br />
If the sample contained antigen, the secondary antibody bound to the primary<br />
antibodies already bound to antigen in the wells. If the test sample did not contain<br />
antigen, primary antibody did not bind in the wells, so the secondary antibody had<br />
nothing to bind and was flushed out in the wash step.<br />
6. If the sample gave a negative result for the antigen, does this mean that the<br />
antigen is not present? What reasons could there be for a negative result when<br />
the antigen is actually present?<br />
A negative result does not necessarily mean the antigen is not present. It could be a false<br />
negative. The <strong>ELISA</strong> may not be sensitive enough to detect very low levels of antigen.<br />
Another cause of false negatives is experimental error, such as putting a negative control<br />
into a well where you thought you were putting an experimental sample.<br />
7. Why did you assay your samples in triplicate?<br />
Assaying the samples in triplicate is another control. If you do not get the same result in<br />
all triplicate wells, you have a problem with your experimental technique or you have<br />
made a pipetting error. In a clinical laboratory, the experiment would have to be repeated.<br />
If this error occurs in this activity, take the result of the two matching wells since this is<br />
probably correct.<br />
8. What antibody-based tests can you buy at your local pharmacy?<br />
Test kits that are based on the same principles as the <strong>ELISA</strong> include home pregnancy<br />
and ovulation tests and tests for the presence of illegal drugs such as marijuana and<br />
cocaine.<br />
46
Laboratory Quick Guide<br />
Antigen Detection <strong>ELISA</strong><br />
Student Workstation Checklist<br />
One workstation serves 4 students.<br />
Item (Label) Contents Number (✔)<br />
Yellow tubes Student test samples (0.25 ml) 4 ❑<br />
Violet tube (+) Positive control (0.5 ml) 1 ❑<br />
Blue tube (–) Negative control (0.5 ml) 1 ❑<br />
Green tube (PA) Primary antibody (1.5 ml) 1 ❑<br />
Orange tube (SA) Secondary antibody (1.5 ml) 1 ❑<br />
Brown tube (SUB) Enzyme substrate (1.5 ml) 1 ❑<br />
12-well microplate strips 2 ❑<br />
50 µl fixed-volume micropipet or 1 ❑<br />
20–200 µl adjustable micropipet<br />
Yellow tips 10–20 ❑<br />
Disposable plastic transfer pipet 1 ❑<br />
70–80 ml wash buffer in beaker Phosphate buffered saline 1 ❑<br />
1. Label the yellow tubes with each student’s<br />
initials.<br />
2. Label your 12-well strip. On each strip label<br />
the first 3 wells with a “+” for the positive<br />
controls and the next 3 wells with a “–” for<br />
the negative controls. Label the remaining<br />
wells with your and your partner’s initials<br />
(3 wells each).<br />
3. Use a fresh pipet tip to transfer 50 µl of the<br />
positive control (+) into the three “+” wells.<br />
4. Use a fresh pipet tip to transfer 50 µl of the<br />
negative control (–) into the three “–” wells.<br />
5. Transfer 50 µl of each of your team’s<br />
samples into the appropriately initialed<br />
three wells, using a fresh pipet tip for each<br />
sample.<br />
6. Wait 5 minutes while the proteins in the<br />
samples bind to the plastic wells.<br />
with 0.05% Tween 20<br />
Large stack of paper towels 2 ❑<br />
Black marking pen 1 ❑<br />
47<br />
Control<br />
or<br />
sample<br />
Student A Student B<br />
PROTOCOL II<br />
Antigen Detection <strong>ELISA</strong>
PROTOCOL II<br />
Antigen Detection <strong>ELISA</strong><br />
7. WASH:<br />
a. Tip the microplate strip upside<br />
down onto the paper towels, and<br />
gently tap the strip a few times<br />
upside down. Make sure to avoid<br />
splashing samples back into wells.<br />
b. Discard the top paper towel.<br />
c. Use your transfer pipet to fill each<br />
well with wash buffer, taking care<br />
not to spill over into neighboring<br />
wells. Note: the same transfer pipet<br />
is used for all washing steps.<br />
d. Tip the microplate strip upside<br />
down onto the paper towels and<br />
tap.<br />
e. Discard the top 2–3 paper towels.<br />
8. Repeat wash step 7.<br />
9. Use a fresh pipet tip to transfer 50 µl of<br />
primary antibody (PA) into all 12 wells of<br />
the microplate strip.<br />
10. Wait 5 minutes for the antibodies to bind<br />
to their targets.<br />
11. Wash the unbound primary antibody out of<br />
the wells by repeating all of wash step 6<br />
two times.<br />
12. Use a fresh pipet tip to transfer 50 µl of<br />
secondary antibody (SA) into all 12 wells<br />
of the microplate strip.<br />
48<br />
Primary<br />
antibody<br />
Secondary<br />
antibody<br />
WASH<br />
WASH 2x
13. Wait 5 minutes for the antibodies to bind<br />
to their targets.<br />
14. Wash the unbound secondary antibody<br />
out of the wells by repeating wash step 6<br />
three times.<br />
15. Use a fresh pipet tip to transfer 50 µl of<br />
enzyme substrate (SUB) into all 12 wells<br />
of the microplate strip.<br />
16. Wait 5 minutes. Observe and record the<br />
results.<br />
49<br />
Enzyme<br />
substrate<br />
WASH 3x
Student Manual<br />
Introduction<br />
<strong>Immuno</strong>logy is the study of the immune system and how the body protects itself against<br />
disease. Over 100 years ago, biologists found that animals’ internal immune systems<br />
respond to invasion by “foreign entities” or antigens. When an invader enters the body, it<br />
provokes an immune response that begins with the production of proteins called antibodies.<br />
Like magic bullets, antibodies seek out and attach themselves to invading entities<br />
(antigens), flagging the invaders for destruction by other cells of the immune system. The<br />
antigenic invaders may be any molecules foreign to the body, including components of<br />
infectious agents like bacteria, viruses, and fungi. Today, antibodies have become vital<br />
scientific tools, used in biotechnology research and to diagnose and treat disease. The<br />
number of different antibodies circulating in the blood has been estimated to be between<br />
10 6 and 10 11 , so there is usually an antibody ready to deal with any antigen. In fact,<br />
antibodies make up to 15% of your total blood serum protein. Antibodies are very specific;<br />
each antibody recognizes only a single antigen.<br />
You are about to perform an <strong>ELISA</strong> (enzyme-linked immunosorbent assay). The <strong>ELISA</strong><br />
relies on antibodies to detect the presence of antigens in liquid samples. Because they are<br />
antibody-based, <strong>ELISA</strong>s are called immunoassays. <strong>ELISA</strong>s can detect minute amounts of<br />
disease agents in samples such as body fluids (before the body has had a chance to<br />
mount an immune response). Smallpox virus is an example of a disease agent that can<br />
now be detected using an <strong>ELISA</strong>. If exposure is detected and treated with vaccine within<br />
2–3 days, patients do not develop smallpox. Other applications for <strong>ELISA</strong> include testing<br />
for West Nile virus, HIV coat protein p24, SARS virus, anthrax spores, hormones such as<br />
hCG in pregnancy tests, illegal steroids in drug tests, bacteria in food safety tests, and the<br />
presence of genetically modified organisms contaminating non-GMO food.<br />
Where Is <strong>ELISA</strong> Used in the Real World?<br />
With its rapid test results, the <strong>ELISA</strong> has had a major impact on many aspects of medicine<br />
and agriculture. <strong>ELISA</strong> is used for such diverse purposes as home pregnancy tests, disease<br />
detection in people, animals, and plants, detecting illegal drug use, testing indoor air quality,<br />
and determining if food is labeled accurately. For new and emerging diseases like severe<br />
acute respiratory syndrome (SARS), one of the highest priorities of the US Centers for<br />
Disease Control and Prevention (CDC) and the World Health Organization (WHO) has been<br />
to develop an <strong>ELISA</strong> that can quickly and easily verify whether patients have been exposed<br />
to the virus.<br />
Over-the-counter kits that are based on the same principles as this <strong>ELISA</strong> activity include<br />
home pregnancy and ovulation tests, and tests for the presence of illegal drugs like<br />
marijuana and cocaine.<br />
Wick<br />
50<br />
Test Control<br />
Test Control<br />
Positive Negative<br />
PROTOCOL II<br />
Antigen Detection <strong>ELISA</strong>
Antigen<br />
Some tests give positive or negative results in<br />
a matter of minutes. For example, home<br />
pregnancy dipstick tests detect levels of<br />
human chorionic gonadotropin (hCG), a<br />
hormone that appears in the blood and<br />
urine of pregnant women within days of Step 1.<br />
fertilization. The wick area of the dipstick is<br />
coated with anti-hCG antibody labeled with<br />
a pink compound (step 1). When the strip is<br />
dipped in urine, if hCG is present it will bind<br />
to the pink antibody, and the pink hCG-anti- Step 2.<br />
body complex will migrate up the strip via<br />
capillary action (step 2). When the pink complex<br />
reaches the first test zone, a narrow<br />
strip containing an unlabeled fixed anti-hCG<br />
antibody, the complex will bind and<br />
Step 3.<br />
concentrate there, making a pink stripe<br />
(step 3). The dipsticks have a built-in<br />
control zone containing an unlabeled<br />
secondary antibody that binds unbound<br />
pink complex (present in both positive and Step 4.<br />
negative results) in the second stripe<br />
(step 4). Thus, every valid test will give a<br />
second pink stripe, but only a positive<br />
pregnancy test will give two pink stripes.<br />
How Are Antibodies Made?<br />
When exposed to antigens, all mammals generate an immune response and produce<br />
antibodies, proteins that recognize and bind tightly to the specific antigens. Each antibody<br />
recognizes only a single antigen. Animals such as goats, rabbits, and mice can be injected<br />
with an antigen and, after a period of time, their serum will contain antibodies that<br />
specifically recognize that antigen. If the antigen was a disease-causing agent, the<br />
antibodies can be used to develop diagnostic tests for the disease. In an immunoassay, the<br />
antibodies used to recognize antigens like disease agents are called primary antibodies.<br />
Antibody<br />
y<br />
Heavy chain<br />
A) Structure of IgG bound to the HIV capsid protein p24 as determined by X-ray crystallography (Harris et al. 1998,<br />
Momany et al. 1996). These structures can be downloaded from the Protein Data Bank (www.pdb.ufmg.br,<br />
(Berman et al. 2000) using the PDB identification codes 1IGY and 1AFV and manipulated using free online software<br />
such as Rasmol and Protein Explorer. B) A commonly used representation of an antibody bound to an antigen.<br />
51<br />
Wick<br />
A B<br />
Capillary action<br />
-S-S-<br />
Disulfide<br />
bonds<br />
-S-S-<br />
-S-S-<br />
Test Control<br />
-S-S-<br />
Antigen (hCG)<br />
Light chain<br />
Colored anti-hCG antibody<br />
Fixed anti-hCG antibody<br />
Fixed secondary antibody<br />
Antigen<br />
PROTOCOL II<br />
Antigen Detection <strong>ELISA</strong>
PROTOCOL II<br />
Antigen Detection <strong>ELISA</strong><br />
Secondary antibodies recognize and bind to primary antibodies in an immunoassay. They<br />
are prepared by injecting antibodies produced by one species of animal into another<br />
species. This works because the antibodies produced by different species are different<br />
enough from each other that they will provoke an immune response. For example, if you<br />
want a secondary antibody that will recognize a human primary antibody, inject human<br />
antibodies into an animal like a rabbit. After the rabbit immune response, the rabbit serum<br />
will contain antibodies that recognize and bind to human antibodies. Secondary antibodies<br />
are frequently labeled to make them visible.<br />
In this experiment, the secondary antibodies you will be working with are conjugated to an<br />
enzyme named horseradish peroxidase (HRP); HRP in the presence of its substrate, TMB,<br />
produces a blue color.<br />
Controls in <strong>Immuno</strong>assays<br />
For any immunoassay to be valid, it must include both positive and negative controls, i.e.,<br />
samples that will give known results. Controls are always run side by side with<br />
experimental samples. If you do not run a positive control and the experiment gives negative<br />
results, how can you be sure the results are truly negative? What if the assay simply did not<br />
work? If a positive sample gives a negative assay result, it is called a false negative.<br />
Conversely, if you do not run a negative control and the experiment gives all positive<br />
results, how can you be sure the results are truly positive? What if the assay was<br />
contaminated with antigen? If a negative sample gives a positive assay result, it is called a<br />
false positive.<br />
Controls are also needed to guard against experimental error and to ensure that the assay<br />
is working correctly. There can be problems with reagents, which can degrade due to age<br />
or poor storage conditions. Operators can make mistakes by choosing the wrong reagents,<br />
making errors in dilutions or in pipetting, or failing to remove unbound reagents. Poor<br />
record keeping is another source of false assay results. Most of these possibilities can be<br />
checked for within the assay with the appropriate controls.<br />
Now let’s put this all together.<br />
52
The main steps in this antigen detection <strong>ELISA</strong> are:<br />
1. Add your sample and control samples to the wells<br />
in a microplate strip. Your samples contain many proteins<br />
and may or may not contain the antigen. Incubate for<br />
5 minutes to allow all the proteins in the samples to bind to<br />
the plastic wells via hydrophobic interaction. This is called an<br />
immunosorbent assay because proteins adsorb (bind) to the<br />
plastic wells.<br />
2. Add primary antibody to the wells and incubate. The<br />
antibodies will seek out the antigen from the many proteins<br />
bound to the well. If your sample contains the antigen, the<br />
antibodies will bind it tightly and remain in the well.<br />
3. Detect the bound antibodies with HRP-labeled<br />
secondary antibody. If the primary antibodies have<br />
bound to the antigen, the secondary antibodies will<br />
bind tightly to the primary antibodies.<br />
4. Add enzyme substrate to the wells, wait 5 minutes,<br />
and evaluate the assay results. If the antigen was<br />
present in your sample, the wells will turn blue. This<br />
is a positive diagnosis. If the wells remain colorless,<br />
the antigen was not present in your sample and the<br />
diagnosis is negative.<br />
53
PROTOCOL II<br />
Antigen Detection <strong>ELISA</strong><br />
Pre-Lab Focus Questions<br />
1. How does the immune system protect us from disease?<br />
2. How do doctors use the immune response to protect you from disease?<br />
3. How are the antibodies in your body made?<br />
4. How are antibodies that are used in <strong>ELISA</strong> made?<br />
5. Why is a rapid antigen detection test necessary?<br />
6. What does <strong>ELISA</strong> stand for?<br />
7. Why are enzymes used in this immunoassay?<br />
8. Why do you need to assay positive and negative control samples as well as your<br />
experimental samples?<br />
54
Laboratory Guide<br />
Student Workstation Checklist<br />
One workstation serves 4 students.<br />
Items Contents Number (✔)<br />
Yellow tubes Student samples (0.25 ml) 4 ❑<br />
Violet tube (+) Positive control (0.5 ml) 1 ❑<br />
Blue tube (–) Negative control (0.5 ml) 1 ❑<br />
Green tube (PA) Primary antibody (1.5 ml) 1 ❑<br />
Orange tube (SA) Secondary antibody (1.5 ml) 1 ❑<br />
Brown tube (SUB) Enzyme substrate (1.5 ml) 1 ❑<br />
12-well microplate strips 2 ❑<br />
50 µl fixed-volume micropipet or 1 ❑<br />
20–200 µl adjustable micropipet<br />
Yellow tips 10–20 ❑<br />
Disposable plastic transfer pipets 1 ❑<br />
70–80 ml wash buffer in beaker Phosphate buffered saline<br />
with 0.05% Tween 20 1 ❑<br />
Large stack of paper towels 2 ❑<br />
Black marking pen 1 ❑<br />
Laboratory Procedure<br />
1. Label the yellow tubes with each student’s initials.<br />
2. Label the outside wall of each well of your 12-well strip. Two students may share a strip<br />
of 12 wells. On each strip label the first three wells with a “+” for the positive controls<br />
and the next three wells with a “–” for the negative controls. On the remaining wells<br />
write your and your partner’s initials. For example, Florence Nightingale and Alexander<br />
Fleming would label their shared strip like this:<br />
3. Bind the antigen to the wells:<br />
FN FN FN AF AF AF<br />
a. Use a pipet to transfer 50 µl of the positive control (+) from the violet tube into<br />
the three “+” wells.<br />
b. Use a fresh pipet tip to transfer 50 µl of the negative control (–) from the blue<br />
tube into the three “–” wells.<br />
c. Use a fresh pipet tip for each sample and transfer 50 µl of each of your<br />
team’s samples into the appropriately initialed three wells.<br />
Control<br />
or<br />
sample<br />
55<br />
PROTOCOL II<br />
Antigen Detection <strong>ELISA</strong>
PROTOCOL II<br />
Antigen Detection <strong>ELISA</strong><br />
4. Wait 5 minutes while all the proteins in the samples bind to the plastic wells.<br />
5. Wash the unbound sample out of the wells:<br />
a. Tip the microplate strip upside down onto the paper towels so that the samples<br />
drain out, then gently tap the strip a few times upside down on the paper towels.<br />
Make sure to avoid splashing sample back into wells.<br />
b. Discard the top paper towel.<br />
c. Use a transfer pipet filled with wash buffer from the beaker to fill each well<br />
with wash buffer taking care not to spill over into neighboring wells. The same<br />
transfer pipet will be used for all washing steps..<br />
d. Tip the microplate strip upside down onto the paper towels so that the wash<br />
buffer drains out, then gently tap the strip a few times upside down on the<br />
paper towels.<br />
e. Discard the top 2–3 paper towels.<br />
6. Repeat wash step 5.<br />
7. Use a fresh pipet tip to transfer 50 µl of primary antibody (PA) from the green tube into<br />
all 12 wells of the microplate strip.<br />
Primary<br />
antibody<br />
8. Wait 5 minutes for the primary antibody to bind.<br />
9. Wash the unbound primary antibody out of the wells by repeating wash step 5 two<br />
times.<br />
56
10. Use a fresh pipet tip to transfer 50 µl of secondary antibody (SA) from the orange tube<br />
into all 12 wells of the microplate strip.<br />
11. Wait 5 minutes for the secondary antibody to bind.<br />
12. Wash the unbound secondary antibody out of the wells by repeating wash step 4 three<br />
times.<br />
The secondary antibody is attached to an enzyme (HRP) that chemically changes TMB<br />
(the enzyme substrate), turning it from a colorless solution to a blue solution. Predict<br />
which wells of your experiment should turn blue and which should remain colorless and<br />
which wells you are not sure about.<br />
13. Use a fresh pipet tip to transfer 50 µl of enzyme substrate (SUB) from the brown tube into<br />
all 12 wells of the microplate strip.<br />
14. Wait 5 minutes. Observe and record your results.<br />
Results Section<br />
Secondary<br />
antibody<br />
Enzyme<br />
substrate<br />
Label the figure below with the same labels you wrote on the wells in step 1. In each of the<br />
wells, put a “+” if the well turned blue and a “–” if there is no color change.<br />
Is your sample positive? Explain your answer.<br />
57<br />
PROTOCOL II<br />
Antigen Detection <strong>ELISA</strong>
Post-Lab Focus Questions<br />
1. Did your sample contain the antigen?<br />
2. The samples that you added to the microplate strip contain many proteins and may or<br />
may not contain the antigen. What happened to the proteins in the plastic well if the<br />
sample contained the antigen? What if it did not contain the antigen?<br />
3. Why did you need to wash the wells after every step?<br />
4. When you added primary antibody to the wells, what happened if your sample contained<br />
the antigen? What if it did not contain the antigen?<br />
5. When you added secondary antibody to the wells, what happened if your sample<br />
contained the antigen? What if it did not contain the antigen?<br />
6. If the sample gave a negative result for the antigen, does this mean that the antigen is<br />
not present? What reasons could there be for a negative result when the antigen is<br />
actually present?<br />
7. Why did you assay your samples in triplicate?<br />
8. What antibody-based tests can you buy at your local pharmacy?<br />
58<br />
PROTOCOL II<br />
Antigen Detection <strong>ELISA</strong>
Protocol III: <strong>ELISA</strong> Antibody Test<br />
Instructor’s Guide ......................................................................................................60<br />
Instructor’s Laboratory Overview ..............................................................61<br />
Instructor’s Advance Laboratory Preparation ............................................62<br />
Student Workstation Checklist ..................................................................65<br />
Instructor’s Answer Key and Discussion Points ........................................66<br />
Laboratory Quick Guide ............................................................................................69<br />
Student Manual ..........................................................................................................71<br />
Introduction ..............................................................................................71<br />
Pre-Lab Focus Questions ........................................................................75<br />
Laboratory Procedure ..............................................................................76<br />
Post-Lab Focus Questions........................................................................79<br />
59<br />
PROTOCOL III<br />
<strong>ELISA</strong> Antibody Test
PROTOCOL III<br />
<strong>ELISA</strong> Antibody Test<br />
Protocol III: <strong>ELISA</strong> Antibody Test<br />
Instructor’s Guide<br />
This protocol simulates a diagnostic blood test for the detection of serum antibodies. With<br />
this protocol, students perform an <strong>ELISA</strong> to detect circulating antibodies in the blood as an<br />
indication of exposure to a disease-causing agent. Each student is provided with a simulated<br />
serum sample and asked to assay the sample for the presence of antibodies.<br />
You may choose to focus on any of a variety of diseases such as HIV, West Nile virus (in<br />
people or animals), SARS, Lyme disease, trichinosis, tuberculosis, or any other disease<br />
that may stimulate your students’ interest. This technique is useful for detection and<br />
diagnosis “post-infection” where the antigen itself is undetectable in the body. Once the<br />
body has mounted an immune response, antibodies are present in the blood serum and<br />
can be detected. For example, until very recently it was not possible to use <strong>ELISA</strong> to detect<br />
the HIV virus directly, but serum antibodies against the virus could be detected in vitro<br />
using <strong>ELISA</strong>. Hence, the <strong>ELISA</strong> antibody test was the only rapid way to diagnose HIV<br />
infection. Today, as the result of extensive investment into research on the biology of<br />
HIV/AIDS, it is possible to detect the HIV antigen in the blood directly by <strong>ELISA</strong>, allowing<br />
early treatment and extension of life.<br />
To create a relevant and meaningful classroom context for this activity, the introductory<br />
pages to this manual as well as Appendices A and B provide background vocabulary and<br />
factual and conceptual lecture points. Appendix C contains useful information about specific<br />
diseases and classroom presentation scenarios for this <strong>ELISA</strong> antibody test protocol. The<br />
assay can be personalized with students assaying their “own” simulated serum samples, or<br />
it can be performed as a role-playing activity where students assay patient samples in a<br />
clinical lab at a local hospital.<br />
Implementation Timeline<br />
Day 1 Set the stage Lecture and discussion<br />
Day 2 Student <strong>ELISA</strong> lab<br />
60
Instructor’s Laboratory Overview<br />
Step 1: Using a pipet, 50 µl of (simulated) purified disease<br />
antigen is added to the wells of the microplate strip and<br />
incubated for 5 minutes, allowing antigen to bind to the wells.<br />
The wells are rinsed with wash buffer (PBST: phosphate<br />
buffered saline containing 0.05% Tween 20) to block the<br />
unoccupied protein binding sites in the wells.<br />
Step 2: Serum samples and positive and negative controls<br />
(50 µl) are added to the wells and incubated for 5 minutes at<br />
room temperature. In this protocol, the serum samples are<br />
actually primary antibodies and represent the primary<br />
antibodies in a patient’s blood. If antibodies against the<br />
disease are present in the serum sample, they will bind to the<br />
purified disease antigen already bound in the wells. The wells<br />
are rinsed with wash buffer to remove unbound antibody.<br />
Step 3: Horseradish peroxidase (HRP)-labeled secondary<br />
antibody (50 µl) is added to the wells and incubated for 5 minutes<br />
at room temperature. The secondary antibody is antibody that<br />
recognizes and binds to the primary antibody. In this simulation,<br />
the secondary antibody represents an anti-human antibody.<br />
HRP is an enzyme that will oxidize a color-producing substrate.<br />
Wells are rinsed with wash buffer to remove unbound<br />
secondary antibody.<br />
Step 4: The enzyme substrate (50 µl) is added to each well<br />
and students watch color development. If HRP is present<br />
(meaning that antibodies to the purified antigen were present in<br />
the serum sample), the solution in the wells will turn blue within<br />
5 minutes, indicating a positive diagnosis. If there were no<br />
antibodies to the disease antigen, the wells will remain colorless,<br />
indicating a negative diagnosis.<br />
Typical <strong>ELISA</strong> results.<br />
61<br />
PROTOCOL III<br />
<strong>ELISA</strong> Antibody Test
PROTOCOL III<br />
<strong>ELISA</strong> Antibody Test<br />
Instructor’s Advance Laboratory Preparation<br />
This section is designed to help you prepare for the laboratory efficiently. We recommend<br />
that you read this section of the manual (Protocol III: <strong>ELISA</strong> Antibody Test) in its entirety<br />
before beginning your preparation. In addition, if you are choosing to perform a scenario-based<br />
activity (for example HIV testing), we recommend using the information given in Appendix C<br />
to help plan your lesson.<br />
The most important thing for the students to do is to put the correct components in the<br />
assay wells in the correct order, so having the tubes clearly labeled and properly color-coded<br />
is crucial to a successful outcome.<br />
Objectives<br />
Step 1. Prepare buffers<br />
Step 2. Rehydrate the freeze-dried antigen, primary antibody, and secondary<br />
antibody to make 50x stocks<br />
Step 3. Dilute 50x stock solutions<br />
Step 4. Dispense reagents for student workstations<br />
Step 5. Set out student workstations<br />
Time Required 1–3 hours<br />
Preparation Timeframe<br />
We recommend rehydrating and diluting the antigen and primary antibody no more than<br />
3 days before the lesson, and the secondary antibody less than 24 hours before the lesson.<br />
We also suggest using sterile, distilled water to prepare the 1x PBS to avoid contaminating<br />
rehydrated reagents. These reagents must be kept on ice or in the refrigerator if prepared<br />
more than 4 hours before the lesson.<br />
Note: If you are planning to use this kit for multiple lab sessions over a 1- or 2-week<br />
period, we strongly suggest using sterile water to prepare the PBS avoid<br />
contaminating reagents. (Water can be sterilized by boiling it in a microwave oven for<br />
5 minutes in a loosely capped bottle; after you remove the bottle from the microwave oven,<br />
let it cool, then secure the cap.) Dilute only as much concentrated antibody and antigen as<br />
required for each lab session. The rehydrated antibodies are 50x concentrates. Store the<br />
remaining concentrated antigen and antibodies in the refrigerator at 4°C. We do not<br />
recommend storing the concentrated antibody and antigen for more than 2 weeks, even at<br />
4°C. Do not freeze the solutions.<br />
Volume Measurements<br />
This kit contains graduated disposable plastic transfer pipets (DPTPs) to use for preparing<br />
some of the reagents where volumes between 250 microliters (µl) and 5 milliliters (ml) are<br />
required. In addition, adjustable- or fixed-volume micropipets are needed to measure 50 µl<br />
volumes. The illustration shows the marks on the DPTP corresponding to the volumes to<br />
be measured. Volumes over 1 ml will require multiple additions. For each step of the<br />
laboratory preparation use a fresh DPTP or a fresh pipet tip.<br />
1 ml<br />
Measuring liquids that contain detergents that foam (e.g., the wash buffer) requires that you<br />
read the volume at the interface of the liquid and the bubbles.<br />
62<br />
750 µl<br />
500 µl<br />
250 µl<br />
100 µl
PROTOCOL III: Step-by-Step Instructor's Advance Preparation Guide<br />
These instructions are for the setup of 12 student workstations of 4 students each.<br />
Supplied Reagents Quantity<br />
Antigen, chicken gamma globulin, freeze-dried 1 vial<br />
Primary antibody, rabbit anti-chicken polyclonal antibody, freeze-dried 1 vial<br />
Secondary antibody (goat anti-rabbit antibody conjugated to HRP,<br />
freeze-dried 1 vial<br />
HRP enzyme substrate (TMB) 1 bottle<br />
10x phosphate buffered saline (PBS) 1 bottle<br />
10% Tween 20 1 bottle<br />
Required Reagents<br />
Distilled water, sterile is recommended, see note on page 62 1 L<br />
Step 1. Prepare buffers.<br />
We recommend you use a 100 ml and a 1 liter (L) graduated cylinder for preparing the<br />
buffer solutions. You will also need 1 L of distilled water.<br />
Buffer Volume Reagent Used for<br />
1x PBS, 100 ml 90 ml distilled water • Rehydrating antigen,<br />
10 ml 10x PBS primary and secondary<br />
antibodies to make 50x<br />
reagent stock solutions<br />
• Diluting 50x antigen<br />
Wash buffer, 900 ml 805 ml Distilled water • Diluting 50x primary antibody<br />
90 ml 10x PBS stock for positive control and<br />
4.5 ml 10% Tween 20 positive student samples<br />
• Negative controls<br />
• Negative student serum<br />
samples<br />
• Dilution of 50x antibody<br />
stocks<br />
• Plate washing<br />
Step 2. Rehydrate the freeze-dried antigen, primary antibody, and secondary<br />
antibody.<br />
Carefully remove the stoppers from the three freeze-dried reagents and use a fresh DPTP to<br />
add 0.5 ml 1x PBS to each. Close the stoppers and shake to mix. These solutions are 50x<br />
concentrates, or stock solutions. NOTE: You must not use wash buffer in this step.<br />
Freeze-Dried Reagent Protocol for 50x Stock Solution Used for<br />
Antigen Add 0.5 ml of 1x PBS to vial • Purified antigen<br />
Primary antibody Add 0.5 ml of 1x PBS to vial • Positive controls<br />
• Positive student serum<br />
samples<br />
Secondary antibody Add 0.5 ml of 1x PBS to vial • Secondary antibody<br />
63<br />
PROTOCOL III<br />
<strong>ELISA</strong> Antibody Test
PROTOCOL III<br />
<strong>ELISA</strong> Antibody Test<br />
Step 3. Dilute 50x stock reagents.<br />
Label one 30 ml bottle for each of the diluted solutions below. Use a fresh DPTP to add the<br />
contents of the appropriate 50x concentrated stock to the corresponding 30 ml bottle.<br />
Diluted Solution Volume Reagent Used for<br />
1x antigen, label one 24.5 ml 1x PBS Purified antigen<br />
30 ml bottle 0.5 ml 50x antigen<br />
NOTE: you must not add any buffer containing Tween 20 to<br />
the antigen, or the experiment will not work.<br />
• Use the DPTP to rinse out the vial with some of the diluted<br />
reagent to ensure that all of the stock solution is used.<br />
• Close the cap and shake to mix.<br />
1x serum (1x primary 24.5 ml Wash buffer Positive controls<br />
antibody), label one 0.5 ml 50x primary<br />
30 ml bottle antibody stock Positive student serum samples<br />
• Use the DPTP to rinse out the vial with some of the diluted<br />
reagent to ensure that all of the stock solution is used.<br />
• Close the cap and shake to mix.<br />
1x secondary antibody, 24.5 ml Wash buffer Secondary antibody<br />
label one 30 ml bottle 0.5 ml 50x secondary<br />
antibody stock<br />
• Dilute the secondary antibody less than 24 hours before the start<br />
of the lesson.<br />
• Use the DPTP to rinse out the vial with some of the diluted<br />
reagent to ensure that all of the stock solution is used.<br />
• Close the cap and shake to mix.<br />
Step 4. Dispense reagents for student workstations.<br />
Tubes Description Label Contents (Each Tube)<br />
Violet tubes, 12 Positive controls “+” 0.5 ml 1x serum (1x primary antibody)<br />
Blue tubes, 12 Negative controls “–” 0.5 ml Wash buffer<br />
Green tubes, 12 Purified antigen “AG” 1.5 ml 1x antigen<br />
Orange tubes, 12 Secondary antibody “SA” 1.5 ml 1x secondary antibody solution<br />
Brown tubes, 12 Enzyme substrate “SUB” 1.5 ml HRP enzyme substrate (TMB)<br />
Note: TMB is light sensitive, so it is important to use the dark tubes to store this<br />
reagent.<br />
Yellow tubes, # Positive student serum 50% of 0.25 ml 1x serum (1x primary antibody)<br />
depends on # of sample(s) tubes<br />
students (48 max)<br />
Negative student serum 50% of 0.25 ml Wash buffer<br />
sample(s) tubes<br />
We recommend that you design the experiment so that 50% of your students will<br />
test positive and 50% will test negative. However, the final ratio is up to you. Make<br />
one student test sample for each student in your class as indicated above. Mix up<br />
the tubes before distributing.<br />
64
Step 5. Set out student workstations.<br />
Student Workstation Checklist<br />
One workstation serves 4 students.<br />
Item (Label) Contents Number (✔)<br />
Yellow tubes Student test samples (0.25 ml) 4 ❑<br />
Violet tube (+) Positive control (0.5 ml) 1 ❑<br />
Blue tube (–) Negative control (0.5 ml) 1 ❑<br />
Green tube (AG) Purified antigen (1.5 ml) 1 ❑<br />
Orange tube (SA) Secondary antibody (1.5 ml) 1 ❑<br />
Brown tube (SUB) Enzyme substrate (1.5 ml) 1 ❑<br />
12-well microplate strips 2 ❑<br />
50 µl fixed-volume micropipet or 1 ❑<br />
20–200 µl adjustable micropipet<br />
Yellow tips 10–20 ❑<br />
Disposable plastic transfer pipet 1 ❑<br />
70–80 ml wash buffer in beaker Phosphate buffered saline 1 ❑<br />
with 0.05% Tween 20<br />
Large stack of paper towels 2 ❑<br />
Black marking pen 1 ❑<br />
Stopping points: Although this procedure is designed to fit into a single lesson period, you<br />
may stop the laboratory activity by adding wash buffer to the microplate wells at any stage<br />
after the addition of antigen and prior to the addition of enzyme substrate. Place the<br />
microplate strips and all the reagents in the refrigerator at 4°C overnight.<br />
Setting Up The Activity to Test for a Specific Disease (e.g. HIV)<br />
Appendix C provides information on a variety of diseases that can be diagnosed using<br />
<strong>ELISA</strong>. In addition, for each disease, we provide a table describing what the reagents for<br />
the activity represent in a real-world diagnostic <strong>ELISA</strong>. Below is an example of a diagnostic<br />
test to detect antibodies towards HIV in a patient's blood sample.<br />
Detecting antibodies to HIV*<br />
Tube Actual Tube<br />
Tube Description Color Contents Simulated Tube Contents<br />
Purified antigen Green 1x antigen Purified HIV proteins<br />
Student samples Yellow 1x primary Serum sample from patient<br />
antibody or<br />
wash buffer<br />
Secondary Orange 1x secondary Anti-human immunoglobulin antibodies<br />
antibody antibody conjugated to HRP<br />
Positive control Violet 1x antigen Serum from an HIV negative patient<br />
spiked with HIV antibodies<br />
Negative control Blue 1x PBS Serum from an HIV negative patient<br />
* Note: Tests to detect anti-HIV antibodies in saliva and urine are also used.<br />
65<br />
PROTOCOL III<br />
<strong>ELISA</strong> Antibody Test
PROTOCOL III<br />
<strong>ELISA</strong> Antibody Test<br />
Instructor’s Answer Key and Discussion Points<br />
Pre-Lab Focus Questions<br />
1. How does the immune system protect us from disease?<br />
The immune system includes physical barriers, such as the skin and mucous<br />
membranes that prevent pathogens from entering the body, and cellular responses,<br />
such as circulating macrophages that respond to foreign invaders. Our acquired immune<br />
system mounts a specific antibody response when the body is exposed to a foreign<br />
invader, and our immune cells attack the invader.<br />
2. How do doctors use the immune response to protect you from disease?<br />
Doctors use the immune response when we are vaccinated against diseases. Our<br />
immune system remembers the pathogens to which we have been exposed, and the<br />
next time we are exposed to the pathogens our immune system attacks them more<br />
quickly and efficiently. Doctors take advantage of this priming effect by exposing us to<br />
inactivated pathogens (killed or weakened organisms that cannot make us sick) so that if<br />
we are later exposed to the live pathogen, our body will mount a strong and immediate<br />
antibody response, reducing or eliminating the chance that it will make us sick.<br />
3. What is an example of a disease that attacks the human immune system?<br />
Diseases that attack the immune system include autoimmune diseases (e.g.,<br />
rheumatoid arthritis, lupus, asthma, eczema, SCID) and AIDS. An extensive list can be<br />
found in Appendix A.<br />
4. What problems can prevent the immune system from working properly?<br />
Problems with the immune system fall into three categories: hypersensitivity,<br />
immunodeficiency, and autoimmune diseases. Hypersensitivity occurs when the<br />
immune system overreacts to an antigen; hypersensitivity reactions include anaphylactic<br />
reactions, allergies, and contact sensitivity (e.g., reaction to poison ivy). <strong>Immuno</strong>deficiency<br />
means that an individual cannot mount an effective immune response.<br />
<strong>Immuno</strong>deficiency may be genetic (e.g., SCID or “bubble boy” disease) or induced by a<br />
disease (e.g., immunodeficiency from HIV infection) or by immunosuppressive drugs<br />
(e.g., drugs given after organ transplant to prevent rejection). Autoimmune disease<br />
results from the immune system inappropriately mounting an immune response to<br />
itself, (for example, diseases like lupus, rheumatoid arthritis, multiple sclerosis (MS),<br />
insulin-dependent diabetes, and celiac disease).<br />
5. Why is it important to be able to detect antibodies in people who don’t appear<br />
sick?<br />
It is important because people may be disease carriers even though they are not sick<br />
themselves. Typhoid fever is an example of a disease that has chronic carriers; up to<br />
5% of individuals infected with typhoid fever excrete the bacteria for up to a year. For<br />
example, in the historical case of Typhoid Mary, Mary Mallon infected 47 people with<br />
typhoid fever over the course of 15 years, even though she was never ill herself.<br />
66
West Nile virus (WNV) is another good example of why it is important to detect<br />
antibodies in people who aren’t sick. WNV is spread by mosquitoes. Most people who<br />
are infected with West Nile have either no symptoms or very mild symptoms. To get a<br />
true picture of the epidemiology of West Nile virus, it is necessary to test for<br />
antibodies against WNV in many more individuals than just the few who develop<br />
symptoms. For example, if one person on a street becomes ill from WNV, testing all of<br />
his neighbors may show that dozens were infected with the virus but did not get sick.<br />
Information on infection rates, not just on rates of illness, is necessary to get an<br />
accurate picture of the disease.<br />
For a disease like HIV/AIDS, early detection of infection is crucial. People infected with<br />
HIV may have no symptoms at all for many years, yet if they begin treatment prior to<br />
the onset of disease, development of symptoms may be postponed indefinitely. In<br />
addition, during the asymptomatic phase of the infection, individuals infected with HIV and<br />
unaware of their infection could pass the virus on to other people with whom they have<br />
intimate contact.<br />
6. What does <strong>ELISA</strong> stand for?<br />
Enzyme-linked immunosorbent assay.<br />
7. Why are enzymes used in this immunoassay?<br />
Enzymes provide a way to see whether the primary antibody has attached to its target<br />
(antigen) in the microplate well. Primary and secondary antibodies are invisible, so a<br />
detection method is necessary. The enzyme horseradish peroxidase (HRP) is linked to<br />
the secondary antibody. HRP reacts with a colorless substrate in a chemical reaction<br />
that turns blue. If the secondary antibody is present in the well, the color change<br />
indicates a positive result.<br />
8. Why do you need to assay positive and negative control samples as well as your<br />
experimental samples?<br />
Controls are needed to make sure the experiment worked. If there are no positive<br />
controls and the sample is negative, we can’t know if the sample was truly negative or if<br />
the assay didn’t work. Conversely, without a negative control, there is no way of knowing<br />
if all samples (positive or not) would have given a positive result.<br />
Post-Lab Focus Questions<br />
1. Did your serum have antibodies to the disease?<br />
Students explain using data from their results.<br />
2. If you tested positive for antibodies, does this mean that you have been exposed<br />
to the disease?<br />
A positive result does not necessarily mean that you have been exposed to the disease.<br />
3. What reasons could there be for a positive test when you actually do not have<br />
the disease?<br />
It could be a false positive. Not all assays are specific for a single disease agent. For<br />
example, the <strong>ELISA</strong> for exposure to Lyme disease, which tests for IgG and IgM against<br />
the bacteria that cause the disease, has only 72% specificity, and a positive <strong>ELISA</strong><br />
must be confirmed by a more specific test such as a western blot.<br />
67<br />
PROTOCOL III<br />
<strong>ELISA</strong> Antibody Test
PROTOCOL III<br />
<strong>ELISA</strong> Antibody Test<br />
Another cause of false positives is past exposure to a disease. For example, most<br />
adults have been exposed to Epstein-Barr virus (EBV) (the cause of many, but not all,<br />
cases of mononucleosis), and some people maintain levels of antibodies to EBV for<br />
years after clearing the disease. If they present to their physician with a fever and sore<br />
throat, they may test positive for EBV, but EBV may not be the cause of their symptoms.<br />
A third cause of false positives is experimental error, such as putting a positive control<br />
into a well where you thought you were putting an experimental sample.<br />
4. Why did you assay your samples in triplicate?<br />
Assaying the samples in triplicate is another control. If you do not get the same result in<br />
all triplicate wells, you have a problem with your experimental technique or you have<br />
made a pipetting error. In a clinical laboratory, the experiment would have to be repeated.<br />
If this error occurs in this activity, take the result of the two matching wells since this is<br />
probably correct.<br />
5. When you added serum samples to the wells, what happened to the serum<br />
antibodies if the sample was positive? What if it was negative?<br />
If the sample was positive, serum antibodies that recognize the purified antigen in the<br />
wells bound to the antigen. If the sample was negative, no antibodies bound.<br />
6. Why did you need to wash the wells after every step?<br />
Washing removes any proteins that have not bound to the plastic wells and any<br />
antibodies that have not bound to their targets, thus preventing unbound proteins<br />
(either antigen or antibodies) from giving false positive results.<br />
7. When you added secondary antibody, what happened if your serum sample was<br />
positive? What if it was negative?<br />
If the sample was positive, the secondary antibody bound to the serum antibodies that<br />
were bound to the purified antigen adsorbed to the wells. If the sample was negative,<br />
there were no serum antibodies bound in the wells and therefore the secondary<br />
antibody had nothing to bind to and was washed away.<br />
8. What antibody-based tests can you buy at your local pharmacy?<br />
Test kits that are based on the same principles as the <strong>ELISA</strong> include home pregnancy<br />
and ovulation tests, and tests for the presence of illegal drugs such as marijuana and<br />
cocaine.<br />
68
Laboratory Quick Guide<br />
<strong>ELISA</strong> Antibody Test<br />
Student Workstation Checklist<br />
One workstation serves 4 students.<br />
Item (Label) Contents Number (✔)<br />
Yellow tubes Student test samples (0.25 ml) 4 ❑<br />
Violet tube (+) Positive control (0.5 ml) 1 ❑<br />
Blue tube (–) Negative control (0.5 ml) 1 ❑<br />
Green tube (AG) Purified antigen (1.5 ml) 1 ❑<br />
Orange tube (SA) Secondary antibody (1.5 ml) 1 ❑<br />
Brown tube (SUB) Enzyme substrate (1.5 ml) 1 ❑<br />
12-well microplate strips 2 ❑<br />
50 µl fixed-volume micropipet or 1 ❑<br />
20–200 µl adjustable micropipet<br />
Yellow tips 10–20 ❑<br />
Disposable plastic transfer pipet 1 ❑<br />
70–80 ml wash buffer in beaker Phosphate buffered saline 1 ❑<br />
with 0.05% Tween 20<br />
Large stack of paper towels 2 ❑<br />
Black marking pen 1 ❑<br />
1. Label the yellow tubes (if necessary) to<br />
identify the samples being tested.<br />
2. Label your 12-well strip. On each strip label<br />
the first 3 wells with a “+” for the positive<br />
controls and the next 3 wells with a “–” for<br />
the negative controls. Label the remaining<br />
wells to identify the samples being tested<br />
(3 wells each).<br />
3. Use a fresh pipet tip to transfer 50 µl of<br />
purified antigen (AG) into all 12 wells of the<br />
microplate strip.<br />
4. Wait 5 minutes for the antigen to bind to<br />
the plastic wells.<br />
5. WASH:<br />
a. Tip the microplate strip upside<br />
down onto the paper towels, and<br />
gently tap the strip a few times<br />
upside down. Make sure to avoid<br />
splashing sample back into wells.<br />
b. Discard the top paper towel.<br />
c. Use your transfer pipet to fill each<br />
well with wash buffer, taking care<br />
not to spill over into neighboring<br />
wells. Note: the same transfer<br />
pipet is used for all washing steps.<br />
69<br />
Purified<br />
antigen<br />
Sample A Sample B<br />
PROTOCOL III<br />
<strong>ELISA</strong> Antibody Test
PROTOCOL III<br />
<strong>ELISA</strong> Antibody Test<br />
d. Tip the microplate strip upside<br />
down onto the paper towels and<br />
tap.<br />
e. Discard the top 2–3 paper towels.<br />
6. Repeat wash step 5.<br />
7. Use a fresh pipet tip to transfer 50 µl of the<br />
positive control (+) into the three “+” wells.<br />
8. Use a fresh pipet tip to transfer 50 µl of the<br />
negative control (–) into the three “–” wells.<br />
9. Transfer 50 µl of each of your team’s<br />
serum samples into the appropriately<br />
initialed three wells, using a fresh pipet tip<br />
for each serum sample.<br />
10. Wait 5 minutes for the antibodies to bind<br />
to their targets.<br />
11. Wash the unbound primary antibody out of<br />
the wells by repeating all of wash step 5<br />
two times.<br />
12. Use a fresh pipet tip to transfer 50 µl of<br />
secondary antibody (SA) into all 12 wells<br />
of the microplate strip.<br />
13. Wait 5 minutes for the antibodies to bind<br />
to their targets.<br />
14. Wash the unbound secondary antibody out<br />
of the wells by repeating wash step 5 three<br />
times.<br />
15. Use a fresh pipet tip to transfer 50 µl of<br />
enzyme substrate (SUB) into all 12 wells<br />
of the microplate strip.<br />
16. Wait 5 minutes. Observe and record the<br />
results.<br />
70<br />
Control<br />
or<br />
serum<br />
Secondary<br />
antibody<br />
Enzyme<br />
substrate<br />
WASH<br />
WASH 2x<br />
WASH 3x
Student Manual<br />
Introduction<br />
You are about to perform an <strong>ELISA</strong> or enzyme-linked immunosorbent assay, a test that<br />
detects antibodies in your blood to determine if you have been exposed to a disease.<br />
When you are exposed to a disease agent, your body mounts an immune response.<br />
Molecules that cause your body to mount an immune response are called antigens, and<br />
may include components of infectious agents like bacteria, viruses, and fungi. Within days,<br />
millions of antibodies — proteins that recognize the antigen and bind very tightly to it — are<br />
circulating in your bloodstream. Like magic bullets, antibodies seek out and attach themselves<br />
to their target antigens, flagging the invaders for destruction by other cells of the immune<br />
system.<br />
Over 100 years ago, biologists found that animals’ immune systems respond to invasion by<br />
“foreign entities”, or antigens. Today, antibodies have become vital scientific tools, used in<br />
biotechnology research and to diagnose and treat disease. The number of different<br />
antibodies circulating in the blood has been estimated to be between 10 6 and 10 11 , so there<br />
is usually an antibody ready to deal with any antigen. In fact, antibodies make up to 15% of<br />
your total blood serum protein. Antibodies are very specific; each antibody recognizes only<br />
a single antigen.<br />
Antibody Antigen<br />
Antibody<br />
A B<br />
A) Structure of IgG bound to the HIV capsid protein p24 as determined by X-ray crystallography (Harris et al. 1998,<br />
Momany et al. 1996). These structures can be downloaded from the Protein Data Bank (www.pdb.ufmg.br,<br />
(Berman et al. 2000) using the PDB identification codes 1IGY and 1AFV and manipulated using free online software<br />
such as Rasmol and Protein Explorer. B) A commonly used representation of an antibody bound to an antigen.<br />
How Are Antibodies Made?<br />
g<br />
Heavy chain<br />
Scientists have learned to use the immune response of animals to make antibodies that can<br />
be used as tools to detect and diagnose diseases. The study of the immune system is called<br />
“immunology”. Animals such as chickens, goats, rabbits, and sheep can be injected with an<br />
antigen and, after a period of time, their serum will contain antibodies that specifically<br />
recognize that antigen. If the antigen was a disease agent, the antibodies can be used to<br />
develop diagnostic tests for the disease. In an immunoassay, the antibodies used to recognize<br />
antigens like disease agents are called primary antibodies; primary antibodies confer<br />
specificity to the assay.<br />
Other kinds of antibody tools, called secondary antibodies, are made in the same way. In<br />
an immunoassay, secondary antibodies recognize and bind to the primary antibodies,<br />
which are antibodies from another species. Secondary antibodies are prepared by injecting<br />
antibodies made in one species into another species. It turns out that antibodies from<br />
different species are different enough from each other that they will be recognized as<br />
71<br />
-S-S-<br />
Disulfide<br />
bonds<br />
-S-S-<br />
-S-S-<br />
-S-S-<br />
Light chain<br />
Antigen<br />
PROTOCOL III<br />
<strong>ELISA</strong> Antibody Test
PROTOCOL III<br />
<strong>ELISA</strong> Antibody Test<br />
foreign proteins and provoke an immune response. For example, to make a secondary<br />
antibody that will recognize a human primary antibody, human antibodies can be injected<br />
into an animal like a rabbit. After the rabbit mounts an immune response, the rabbit serum<br />
will contain antibodies that recognize and bind to human antibodies. The 2° antibodies<br />
used in this experiment are conjugated to the enzyme HRP which produces a blue color in<br />
the presence of its substrate, TMB. These antibody and enzyme tools are the basis for the<br />
<strong>ELISA</strong>.<br />
Where Is <strong>ELISA</strong> Used in the Real World?<br />
With its rapid test results, the <strong>ELISA</strong> has had a major impact on many aspects of medicine<br />
and agriculture. <strong>ELISA</strong> is used for such diverse purposes as pregnancy tests, disease<br />
detection in people, animals, and plants, detecting illegal drug use, testing indoor air quality,<br />
and determining if food is labeled accurately. For new and emerging diseases like severe<br />
acute respiratory syndrome (SARS), one of the highest priorities of the US Centers for<br />
Disease Control (CDC) and the World Health Organization (WHO) has been to develop an<br />
<strong>ELISA</strong> that can quickly and easily verify whether patients have been exposed to the virus.<br />
Over-the-counter kits that are based on the same principles as the <strong>ELISA</strong> include home<br />
pregnancy and ovulation tests, and tests for the presence of illegal drugs like marijuana<br />
and cocaine.<br />
Wick<br />
Positive Negative<br />
Some tests give positive or negative results in a matter of minutes. For example, home<br />
pregnancy dipstick tests detect levels of human chorionic gonadotropin (hCG), a hormone<br />
that appears in the blood and urine of pregnant women within days of fertilization.<br />
72<br />
Test Control<br />
Test Control
The wick area of the dipstick is coated with anti-hCG antibody labeled with a pink compound<br />
(step 1). When the strip is dipped in urine, if hCG is present it will bind to the pink antibody,<br />
and the pink hCG-antibody complex will<br />
migrate up the strip via capillary action<br />
(step 2). When the pink complex reaches the<br />
first test zone, a narrow strip containing an<br />
unlabeled,fixed anti-hCG antibody, the<br />
complex will bind and concentrate there,<br />
making a pink stripe (step 3). The<br />
Step 1.<br />
dipsticks have a built-in control zone<br />
containing an unlabeled secondary antibody<br />
that binds unbound pink complex (present<br />
in both positive and negative results) in the<br />
second stripe (step 4). Thus, every valid Step 2.<br />
test will give a second pink stripe, but only<br />
a positive pregnancy test will give two pink<br />
stripes.<br />
The Immune Response<br />
Following exposure to a disease, the Step 3.<br />
immune system produces antibodies<br />
directed against the disease antigens. The<br />
typical immune response follows a<br />
predictable course. First, the body<br />
produces a type of antibody called<br />
Step 4.<br />
immunoglobulin M, or IgM. Within a<br />
week of disease exposure, IgM can be<br />
detected in the blood. Approximately 3 weeks<br />
after that, IgM levels drop and levels of<br />
another immunoglobulin, IgG, begin to rise.<br />
If there is no further disease exposure, the<br />
levels of IgG drop rapidly after a few days.<br />
The second time the body is exposed to a<br />
disease, the immune response is stronger and<br />
faster than the first time. This is the principle<br />
behind vaccination (causing the primary<br />
response) and booster shots (causing the<br />
secondary response). By exposing you to a<br />
disease agent that can’t harm you (for example,<br />
an injection of inactivated influenza virus), your<br />
doctor is ensuring that when you are exposed to<br />
active flu virus, your immune system will respond<br />
rapidly to the invader.<br />
73<br />
Wick<br />
Capillary action<br />
Antibody Antibody concentrations in blood<br />
Primary<br />
response<br />
(slow)<br />
Secondary<br />
response<br />
(rapid)<br />
IgM<br />
Test<br />
Antigen (hCG)<br />
Colored anti-hCG antibody<br />
Fixed anti-hCG antibody<br />
Fixed secondary antibody<br />
Rate Rate of of Seroconversion:<br />
IgM<br />
IgG<br />
Control<br />
IgG<br />
0 5 10 15 20 25<br />
Days following Days following exposure to antigen to antigen<br />
PROTOCOL III<br />
<strong>ELISA</strong> Antibody Test
PROTOCOL III<br />
<strong>ELISA</strong> Antibody Test<br />
This <strong>ELISA</strong> protocol is designed to detect the presence of antibodies circulating in the<br />
blood that have been produced in response to exposure to a specific disease. The<br />
technique is based on the fact that antibodies produced by your body in response to a<br />
disease antigen will bind tightly to that antigen — even in a test tube. All that is needed is a<br />
source of pure antigen to capture the antibody of interest and a way to visualize the result.<br />
Controls in <strong>Immuno</strong>assays<br />
For any immunoassay to be valid, it must include both positive and negative controls, i.e.,<br />
samples that will give known results. Controls are always run side by side with actual<br />
samples. If you do not run a positive control and the experiment gives negative results, how<br />
can you be sure the results are truly negative? What if the assay simply did not work? If a<br />
positive sample gives a negative assay result, it is called a false negative. Conversely, if<br />
you do not run a negative control and the experiment gives all positive results, how can you<br />
be sure the results are truly positive? What if the assay was contaminated with antigen? If a<br />
negative sample gives a positive assay result, it is called a false positive.<br />
Why Do We Need Controls?<br />
Control samples are necessary to be sure your <strong>ELISA</strong> is working correctly. Many<br />
diagnostic assays give a percentage of false positive or false negative results, so confirmation<br />
of diagnosis by a second type of assay is important. For example, immunoassays for<br />
antibodies to human immunodeficiency virus (HIV) may give either false positive or false<br />
negative results. False positives can result from recent vaccinations, and false negatives<br />
can result from immunosuppression (e.g., from drugs given after transplants) or from<br />
administering the test too soon after infection with HIV. (Antibodies against HIV do not<br />
appear until some weeks after HIV infection; the appearance of antibodies is called<br />
seroconversion.) Because of this, positive HIV <strong>ELISA</strong> tests are always confirmed by<br />
performing a western blot.<br />
Controls are also needed to guard against experimental errors. There can be problems with<br />
reagents, which can degrade due to age or poor storage conditions. Technicians can make<br />
mistakes by choosing the wrong reagents, making errors in dilutions or in pipetting, or<br />
failing to remove unbound reagents. Poor record keeping is another source of false assay<br />
results. Most of these possibilities can be checked for within the assay with the appropriate<br />
controls.<br />
Now let’s put this all together.<br />
74
The main steps in the <strong>ELISA</strong> antibody test are:<br />
1. Add purified disease antigen to the wells of a<br />
microplate strip. Incubate for 5 minutes to allow<br />
proteins to bind to the plastic wells via hydrophobic<br />
interaction. This is called an immunosorbent assay<br />
because proteins adsorb (bind) to the plastic wells.<br />
2. Add your serum sample and control samples to<br />
the wells and incubate. Serum contains millions of<br />
different types of antibodies, but only if your serum<br />
contains antibodies that were produced in response to<br />
the disease will antibodies bind to the antigen in the<br />
wells.<br />
3. Detect the serum (primary) antibodies with<br />
HRP-labeled secondary antibody. If serum<br />
antibodies have bound to the antigen, the<br />
secondary antibodies will bind tightly to the<br />
serum antibodies.<br />
4. Add enzyme substrate to the wells, wait<br />
5 minutes, and evaluate the assay results. If the<br />
primary antibody was present in your serum<br />
sample, the wells will turn blue. This is a positive<br />
diagnosis. If the wells remain colorless, the<br />
primary antibody was not present in your serum<br />
sample, and the diagnosis is negative.<br />
75<br />
PROTOCOL III<br />
<strong>ELISA</strong> Antibody Test
PROTOCOL III<br />
<strong>ELISA</strong> Antibody Test<br />
Pre-Lab Focus Questions<br />
1. How does the immune system protect us from disease?<br />
2. How do doctors use the immune response to protect you from disease?<br />
3. What is an example of a disease that attacks the human immune system?<br />
4. What problems can prevent the immune system from working properly?<br />
5. Why is it important to be able to detect antibodies in people who don’t appear sick?<br />
6. What does <strong>ELISA</strong> stand for?<br />
7. Why are enzymes used in this immunoassay?<br />
8. Why do you need to assay positive and negative control samples as well as your<br />
experimental samples?<br />
76
Laboratory Guide<br />
Student Workstation Checklist<br />
One workstation serves 4 students.<br />
Items Contents Number (✔)<br />
Yellow tubes Student samples (0.25 ml) 4 ❑<br />
Green tube (AG) Purified antigen (1.5 ml) 1 ❑<br />
Violet tube (+) Positive control (0.5 ml) 1 ❑<br />
Blue tube (–) Negative control (0.5 ml) 1 ❑<br />
Orange tube (SA) Secondary antibody (1.5 ml) 1 ❑<br />
Brown tube (SUB) Substrate (1.5 ml) 1 ❑<br />
12-well microplate strips 2 ❑<br />
50 µl fixed-volume micropipet 1 ❑<br />
or 20–200 µl adjustable micropipet<br />
Yellow tips 10–20 ❑<br />
Disposable plastic transfer pipet 1 ❑<br />
70–80 ml wash buffer in beaker Phosphate buffered saline 1 ❑<br />
with 0.05% Tween 20<br />
Large stack of paper towels 2 ❑<br />
Black marking pen 1 ❑<br />
Laboratory Procedure<br />
1. The yellow tubes contain the serum samples that will be tested for the presence of<br />
antibodies. Label each yellow tube to identify the sample being tested.<br />
2. Label the outside wall of each well of your 12-well strip. Two students may share a strip<br />
of 12 wells. On each strip label the first three wells with a “+” for the positive controls and<br />
the next three wells with a “–” for the negative controls. Label the remaining wells to<br />
identify the samples being tested. For example, Florence Nightingale and Alexander<br />
Fleming would label their shared strip like this:<br />
FN FN FN AF AF AF<br />
3. Use a pipet to transfer 50 µl of the purified antigen (AG) from the green tube into all<br />
12 wells.<br />
Purified<br />
antigen<br />
4. Wait 5 minutes while the antigen binds to the plastic wells.<br />
77<br />
PROTOCOL III<br />
<strong>ELISA</strong> Antibody Test
PROTOCOL III<br />
<strong>ELISA</strong> Antibody Test<br />
5. Wash unbound antigen out of the wells:<br />
a. Tip the microplate strip upside down onto the paper towels so that the samples<br />
drain out, then gently tap the strip a few times upside down on the paper towels.<br />
Make sure to avoid splashing sample back into wells.<br />
b. Discard the top paper towel.<br />
c. Use a transfer pipet filled with wash buffer from the beaker to fill each well with<br />
wash buffer, taking care not to spill over into neighboring wells. The same<br />
transfer pipet will be used for all washing steps.<br />
d. Tip the microplate strip upside down onto the paper towels so that the wash<br />
buffer drains out, then gently tap the strip a few times upside down on the<br />
paper towels.<br />
e. Discard the top 2–3 paper towels.<br />
6. Use a fresh pipet tip to transfer 50 µl of the positive control (+) from the violet tube into<br />
the three “+” wells.<br />
Control<br />
or<br />
serum<br />
7. Use a fresh pipet tip to transfer 50 µl of the negative control (–) from the blue tube into<br />
the three “–” wells.<br />
8. Use a fresh pipet tip to transfer 50 µl of each student’s serum sample into the<br />
appropriately initialed three wells.<br />
9. Wait 5 minutes to allow the serum antibodies in the samples to bind to the antigen.<br />
10. Wash the samples out of the wells by repeating wash step 5.<br />
78
11. Use a fresh pipet tip to transfer 50 µl of secondary antibody (SA) from the orange tube<br />
into all 12 wells of the microplate strip.<br />
12. Wait 5 minutes for the secondary antibody to bind to the primary antibody.<br />
13. Wash the unbound secondary antibody out of the wells by repeating wash step 5 two<br />
times.<br />
The secondary antibody is attached to an enzyme (HRP) that chemically changes the<br />
enzyme substrate, turning it from a colorless solution to a blue solution. Predict which<br />
wells of your experiment should turn blue, which should remain colorless, and which<br />
wells you are not sure about.<br />
14. Use a fresh pipet tip to transfer 50 µl of enzyme substrate (SUB) from the brown tube<br />
into all 12 wells of the microplate strip.<br />
15. Wait 5 minutes. Observe and record your results.<br />
Results Section<br />
Secondary<br />
antibody<br />
Enzyme<br />
substrate<br />
Label the figure below with the same labels you wrote on the wells in step 1. In each of the<br />
wells, put a “+” if the well turned blue and a “–” if there is no color change.<br />
Is your sample positive? Explain your results.<br />
79<br />
PROTOCOL III<br />
<strong>ELISA</strong> Antibody Test
PROTOCOL III<br />
<strong>ELISA</strong> Antibody Test<br />
Post-Lab Focus Questions<br />
1. Did your serum have antibodies to the disease?<br />
2. If you tested positive for antibodies, does this mean that you have been exposed to the<br />
disease?<br />
3. What reasons could there be for a positive test when you actually do not have the<br />
disease?<br />
4. Why did you assay your samples in triplicate?<br />
5. When you added serum samples to the wells, what happened to the serum antibodies<br />
if the sample was positive? What if it was negative?<br />
6. Why did you need to wash the wells after every step?<br />
7. When you added secondary antibody, what happened if your serum sample was<br />
positive? What if it was negative?<br />
8. What antibody-based tests can you buy at your local pharmacy?<br />
80
Appendix A: <strong>Immuno</strong>logical Concepts<br />
Immunity<br />
<strong>Immuno</strong>logy is the study of the immune system. The body protects itself from infection<br />
using physical and chemical barriers, antibodies that circulate in the blood, and immune<br />
cells that attack foreign substances and invading microorganisms. Some types of immune<br />
cells adapt to “remember” (recognize) specific invaders, in case of future attacks.<br />
A person is born with certain immunological defenses against pathogens. This is called<br />
innate immunity and includes circulating macrophages and natural killer cells. These<br />
defenses do not change with exposure to pathogens and do not have much specificity for<br />
particular pathogens.<br />
Passive immunity is the acquisition of antibodies from an external source, for example,<br />
antibodies passed from mother to infant, or certain postexposure vaccines such as that for<br />
rabies. Passive immunity lasts only a few weeks, and also does not change with multiple<br />
exposures.<br />
Acquired or adaptive immunity is a specific response to specific foreign substances.<br />
Although individuals (except for those individuals who are immune-compromised) are born<br />
with the ability to respond to these invaders, the system must be activated by an initial<br />
contact with the invader. The initial contact, or immunization, begins a cascade of events<br />
that allows the body to mount a specific response on subsequent exposure to the invader,<br />
hence the term acquired immunity, as initial contact is necessary to acquire the immunity.<br />
Acquired immunity is split into two categories: humoral immunity involves production of<br />
antibodies that circulate in the bloodstream and lymph and bind specifically to foreign<br />
antigens, and cell-mediated immunity involves the production of T lymphocytes (T cells)<br />
that bind and destroy infected cells.<br />
Acquired immunity is the basis for the series of vaccinations that we undergo as we grow<br />
up. In the 1790s, long before we had any understanding of the immune system, it was<br />
discovered that inoculation with pus from a cowpox lesion prevented infection with smallpox,<br />
a disease related to cowpox. The US Centers for Disease Control (CDC) currently<br />
recommends childhood vaccination against 12 diseases: measles, mumps, rubella (German<br />
measles), diphtheria, tetanus (lockjaw), pertussis (whooping cough), polio, Haemophilus<br />
influenzae type b (Hib disease), hepatitis B, varicella (chicken pox), hepatitis A, and<br />
pneumococcal disease. For travelers abroad, additional vaccinations are recommended (or<br />
required, in the case of the US military). The recommendations are based on the traveler’s<br />
destination. For example, the CDC recommends that travelers to tropical South America be<br />
vaccinated against hepatitis A, hepatitis B, rabies (if the traveler will be exposed to animals),<br />
typhoid, and yellow fever, plus booster doses for tetanus, diphtheria, and measles.<br />
Components of the Acquired Immune Response<br />
In an immune response, an invasion by something foreign to the body (an antigen)<br />
generates antibody production by B lymphocytes (B cell). Each B lymphocyte generates a<br />
unique antibody that recognizes a single shape on an antigen called an epitope and thus<br />
helps the immune cells (including B cells, T cells, and macrophages) to recognize and<br />
attack foreign invaders. Everyone (except those who are immune-compromised) has<br />
circulating antibodies and lymphocytes that collectively recognize a huge number of<br />
antigenic substances.<br />
81
Antigens can be microorganisms (e.g., viruses and bacteria), microbial products (e.g., toxins<br />
produced by some bacteria, or protein components of the microbes), foreign proteins, DNA<br />
and RNA molecules, drugs, and other chemicals.<br />
Antibodies are proteins also called immunoglobulins (Ig), that are produced by B cells and<br />
can remain attached to B cells or become free floating. There are five classes of<br />
immunoglobulins: IgG, IgM, IgA, IgE, and IgD. IgG is the most abundant (Parham) in the<br />
internal body fluids, comprising about 15% of total serum protein in adults, and each IgG<br />
molecule can bind two antigen molecules. IgM is also in serum and is responsible for the<br />
primary immune response. IgA is found in external secretions such as tears, saliva, milk,<br />
and mucosal secretions of the respiratory, genital, and intestinal tracts and is a first line of<br />
defense against invading microorganisms. IgA is also the only antibody passed from mother<br />
to infant. IgD may be involved in regulating the immune response, and IgE is a primary<br />
component in allergic reactions.<br />
Antibody Antigen<br />
A B<br />
A) Structure of IgG bound to the HIV capsid protein p24 as determined by X-ray crystallography (Harris et al.<br />
1998, Momany et al. 1996). These structures can be downloaded from the Protein Data Bank (www.pdb.ufmg.br,<br />
Berman et al. 2000) using the PDB identification codes 1IGY and 1AFV and manipulated using free online<br />
software such as Rasmol and Protein Explorer. B) A commonly used representation of an antibody bound to an<br />
antigen.<br />
Epitopes are the specific parts of antigens that are recognized by antibodies. Each<br />
antibody recognizes a single epitope, thus multiple antibodies may recognize and bind to<br />
different epitopes on a single antigen. For example, an HIV virus particle (virion) has many<br />
potential epitopes on its surface that may be recognized by many different antibodies. One<br />
particular antibody may recognize the amino terminus of p24, an HIV capsid protein, while<br />
another may recognize the carboxy terminus of p24.<br />
Immune cells are the soldiers of the acquired immune response. Macrophages serve two<br />
primary functions: 1) removing foreign cells and molecules from the blood, and<br />
2) processing antigens and presenting them on their cell surfaces. Macrophages present<br />
antigenic epitopes on their cell surfaces to be recognized by T cells. The T cells draw more<br />
immune cells to the site of infection, causing inflammation. Both B cells and T cells are<br />
lymphocytes (white blood cells), and each recognizes a single specific epitope. T cells<br />
mature in the thymus, and B cells mature in the bone marrow. B cells produce antibodies;<br />
the number of different circulating antibodies has been estimated to be between 10 6 and<br />
10 11 , so there is usually an antibody ready to deal with any antigen. The huge number and<br />
diversity of different antibodies are possible because B cells have the ability to rearrange<br />
their DNA to make different antibody genes. Like macrophages, B cells present antigenic<br />
82<br />
Heavy chain<br />
-S-S-<br />
Disulfide<br />
bonds<br />
-S-S-<br />
-S-S-<br />
-S-S-<br />
Light chain<br />
Antigen
epitopes on their surface to attract T cells. T cells have two main functions: they stimulate<br />
the proliferation of B cells that have bound to an antigen, and they kill whole cells that are<br />
infected by a virus to prevent the virus infecting other cells.<br />
Why We Need an Immune System<br />
Even bacteria have a rudimentary innate immune system; they make restriction enzymes<br />
that destroy foreign DNA from bacterial viruses (bacteriophages), and they protect their<br />
own DNA by labeling it as “self” through methylation. Our immune system is at work every<br />
day, protecting us from thousands of potential threats, but it is so efficient that we usually<br />
don’t notice it. Disease can result from infection, genetic defect, or environmental toxins.<br />
Infection is an invasion by and multiplication of pathogenic (disease-causing)<br />
microorganisms. The infection can be 1) transmitted from person to person, like a cold or<br />
the flu, 2) transmitted from animals to people (called zoonosis), like rabies or psittacosis, or<br />
3) contracted from the environment, like parasites contracted from water or soil.<br />
The CDC and World Health Organization (WHO) state that infectious diseases are the<br />
leading cause of death worldwide. Organisms that can cause disease are called pathogens<br />
and include bacteria, viruses, fungi, infectious proteins called prions, and parasites.<br />
Infectious diseases spread in a variety of ways:<br />
Pathogen Spread Through: Examples<br />
Exchange of body fluids • HIV, SARS, Epstein-Barr virus (EBV), sexually<br />
transmitted diseases<br />
Food • Foodborne agents like E. coli O157:H7, which causes<br />
diarrheal disease; prions, which cause Creutzfeldt-<br />
Jakob disease (mad cow disease in cattle); or<br />
nematodes, which cause trichinosis<br />
Water • Waterborne agents like the bacteria that cause<br />
cholera or the protozoa that cause giardiasis<br />
Inhalation • Microorganisms like the viruses that cause the flu or<br />
the bacteria that cause tuberculosis<br />
Absorption through the skin • Nematodes like hookworms<br />
Vector transfer (vectors are organisms<br />
such as ticks or mosquitoes that carry<br />
pathogens fromo one host to another).<br />
• Malaria, West Nile virus, dengue fever, and yellow<br />
fever (mosquito vector)<br />
• Lyme disease and Rocky Mountain spotted fever<br />
(both tick vectors)<br />
• Plague (flea vector)<br />
• Some diseases, such as Ebola hemorrhagic fever, are<br />
presumed to have vectors, but the vectors have not<br />
yet been identified<br />
83
Immune Response<br />
When immunized with a foreign<br />
substance (either by vaccination or through<br />
natural exposure), an individual mounts an<br />
immune response, called the primary<br />
response. Within 1–2 weeks, there is a risein<br />
antibody production directed against the<br />
antigen (termed seroconversion),<br />
predominated by the IgM class of antibodies.<br />
IgM production is usually followed by<br />
production of IgG, and after that antibody<br />
levels decrease.<br />
The second time that the individual is<br />
exposed to the antigen, be it weeks or years<br />
after immunization, the immune response is<br />
IgM<br />
larger and much more rapid. In the<br />
secondary response, IgM is produced in<br />
detectable amounts in a matter of days,<br />
followed by a large production of IgG. Other<br />
classes of immunoglobulin may also be<br />
Days Days following exposure to to antigen<br />
produced. IgG is generated in much greater<br />
quantities, and persists in the blood for a much longer time than in the primary response.<br />
Antibody production may continue for months or even years.<br />
Problems With the Immune System<br />
We depend on our immune system to protect us from disease, but when the immune system<br />
fails to function correctly, it can cause severe health problems. These problems fall in to three<br />
basic categories: hypersensitivity, immunodeficiency, and autoimmune diseases.<br />
Hypersensitive reactions occur when the immune system overreacts to an antigen. The<br />
immune system functions are normal in a hypersensitive reaction, just exaggerated in<br />
scope, and this can result in illness or even death. There are four types of hypersensitive<br />
reactions: 1) anaphylactic reactions or immediate hypersensitivity, generally called allergies,<br />
such as food, dust mite, and pollen allergies (the antigen that causes the reaction is called<br />
an allergen); 2) cytotoxic reactions, such as transfusion reactions and Rh incompatibility<br />
reactions; 3) immune complex reactions, such as farmer’s lung, a disease caused by<br />
inhaling mold spores; and 4) delayed-type hypersensitivity, such as contact sensitivity (e.g.,<br />
poison ivy dermatitis and contact dermatitis after exposure to chemicals or environmental<br />
agents ranging from metallic nickel to cosmetics).<br />
<strong>Immuno</strong>deficiency means that an individual is unable to mount an effective immune<br />
response, resulting in increased vulnerability to opportunistic infections. There are two<br />
types of immunodeficiency: 1) Primary immunodeficiency has a genetic basis. Severe<br />
combined immunodeficiency (SCID, “bubble boy” disease) is an example of primary<br />
immunodeficiency. Treatments for primary immunodeficiency may include gene therapy.<br />
2) Secondary immunodeficiency has an external cause and is more common than primary<br />
immunodeficiency. Secondary immunodeficiency may be caused by an infection, as in the<br />
case of HIV/AIDS, by drug treatments, such as immunosuppressive drugs given after<br />
organ transplant, or by other health factors, such as poor nutrition, stress, or aging.<br />
Antibody Antibody concentrations in in blood<br />
84<br />
Primary<br />
response<br />
(slow)<br />
Secondary<br />
response<br />
(rapid)<br />
Rate of of Seroconversion:<br />
IgM<br />
IgG<br />
IgG<br />
0 5 10 15 20 25
Autoimmune disease results from the immune system making a mistake and<br />
mounting an immune response against one’s own body. Some examples of autoimmune<br />
disease include systemic lupus erythematosus (lupus, SLE), rheumatoid arthritis, multiple<br />
sclerosis (MS), insulin-dependent diabetes mellitus (IDDM), and celiac disease.<br />
Detecting Infectious Diseases<br />
Infectious diseases are diagnosed by observing symptoms and performing<br />
laboratory tests. Diagnostic tests may look for the microorganism itself or some part of it<br />
(e.g., bacterial or viral antigens), microbial products (e.g., bacteria toxins), or reactions of<br />
the body to the disease agent. The latter may include testing for signs of an immune<br />
response to the disease agent (e.g., antibodies) or for indications of effects of the disease<br />
agent on the body (e.g., abnormal enzyme activity or protein levels). In the last decade,<br />
tests to detect microbial RNA and DNA have become common.<br />
Laboratory tests cover a wide variety of methods, some of which have been in use for<br />
decades and others, like the tests for RNA and DNA from disease agents, which are very<br />
new. Depending on the test and putative diagnosis, laboratory tests may look for signs of<br />
disease in most body fluids, including blood, urine, stool samples, cerebrospinal fluid, and<br />
saliva. In the US, the Food and Drug Administration regulates laboratory tests.<br />
The first tests for detecting and identifying microorganisms from clinical samples used<br />
antisera directed against specific microbes. The antibodies were labeled with a fluorescent<br />
tag, and the microorganisms could be detected with microscopy when the antibodies<br />
bound to them. Other early diagnostic tests include: 1) culture methods, in which<br />
microorganisms from clinical samples are grown on different culture media and their growth<br />
and appearance observed (frequently takes weeks to get results); 2) identification of<br />
microbe-specific antibodies in serum by immunoassays such as <strong>ELISA</strong>; and 3) agar diffusion<br />
assays, in which antisera and antigens are placed in holes in agar plates. Both diffuse<br />
into the agar, and where antibodies encounter antigens for which they are specific, they<br />
bind. Upon antibody-antigen binding, a visible precipitation band forms. Many of these tests<br />
are still in use.<br />
85
Current diagnostic tests include:<br />
Test Type Description Examples<br />
<strong>Immuno</strong>fluorescence assay Specific microorganisms<br />
(IFA) detected with fluorescently<br />
labeled antibodies<br />
Agglutination Visible precipitates appear<br />
when antibodies and specific<br />
antigens come in contact<br />
<strong>Immuno</strong>chromatography tests Card or dipstick-based<br />
immunoassays<br />
Microplate tests <strong>ELISA</strong> or RIA<br />
(radioimmunoassays) used<br />
to detect microbial antigens,<br />
microbial products, and<br />
antibodies against the<br />
microorganisms and their<br />
products. RIA uses<br />
radioactive labels to<br />
replace the enzymes<br />
used in <strong>ELISA</strong><br />
Molecular methods Detection of microbial<br />
RNA or DNA; also used<br />
to detect microbial drug<br />
resistance (AST);<br />
may use PCR<br />
Microscopy Visual identification based<br />
on staining with specific<br />
reagents or on physical<br />
characteristics<br />
86<br />
• E. coli O157:H7<br />
• Identifying respiratory viruses<br />
• Gram-positive bacteria, such<br />
as Staphylococcus aureus<br />
(e.g., Staph A)<br />
• Fungi, such as Cryptococcus<br />
neoformans and Candida<br />
species<br />
• E. coli O 157:H7<br />
• Legionella<br />
• Mycoplasma pneumoniae<br />
• E. coli O157:H7<br />
• Legionella<br />
• Influenza viruses<br />
• HIV antigen<br />
• HIV antibodies<br />
• Giardia<br />
• Mycobacterium tuberculosis<br />
(TE)<br />
• HIV<br />
• Chlamydia trachomatis<br />
• Cytomegalovirus (CMV)<br />
• AST (antimicrobial<br />
susceptibility testing)<br />
• Electron microscopy of Ebola<br />
virus<br />
• Light microscopy of parasites<br />
such as protozoa, helminthes,<br />
etc.
Boosting the Immune System With Vaccination<br />
Doctors use the immune response to give us resistance to infectious diseases before we<br />
are exposed to them. Through vaccination, we are exposed to non-harmful forms of the<br />
pathogen that invoke an immune response. We also frequently need booster shots to<br />
invoke the secondary response to maintain the antibody levels in our blood. Vaccines used<br />
in immunization may be of several types:<br />
1) Live attenuated vaccines are weakened (attenuated) microbes, that are<br />
nonpathogenic. Using current technology, deletion or inactivation of microbial genes<br />
weakens the pathogens so they can be used in vaccines; previously, less pathogenic<br />
strains were selected from natural populations. Examples of live vaccines include those<br />
against polio (Sabin type), measles, mumps, and smallpox.<br />
2) Killed or inactivated vaccines are made of microbes killed by heat or chemicals. Killed<br />
vaccines are much safer than live vaccines, particularly for individuals with compromised<br />
immune systems, but they do not usually provoke as strong an immune response as do<br />
live vaccines. Examples of killed vaccines include those against rabies, cholera, polio<br />
(Salk type), and influenza.<br />
3) Subunit vaccines are made from pieces of microbes. They consist of one or more<br />
antigens from either the disease agent or a microbial product, and they may be derived<br />
from the organisms or engineered using molecular biology. Examples of subunit vaccines<br />
include those against hepatitis B, anthrax, and tetanus.<br />
4) DNA vaccines are a recent approach to vaccine development. DNA that codes for<br />
microbial antigens is cloned into a vector, and the naked DNA is injected into the<br />
patient. The DNA is taken up by cells, transcribed, and translated, and the resulting<br />
antigenic protein elicits an immune response. No DNA vaccines are yet available, but<br />
some are in clinical trials.<br />
5) Antibody vaccines are another innovation in vaccine development. The ability to<br />
construct human monoclonal antibodies using recombinant DNA technology means<br />
that antibodies prepared against specific antigens may be used safely in humans. For<br />
example, a human monoclonal antibody against an antigen involved in anthrax<br />
infection may soon be in clinical trials.<br />
6) Postexposure vaccinces (immunotherapy) are used to treat a disease. Some<br />
immunotherapies have been used for years (e.g., administering immune serum globulin<br />
after exposure to hepatitis and administering equine antivenin for snakebite), but there<br />
are not many other current vaccine-based immunotherapies. Probably the best known<br />
is postexposure rabies vaccination, consisting of 5 doses of rabies vaccine over<br />
30 days. If the vaccine regimen is begun promptly after exposure, it is 100% effective in<br />
preventing disease. Smallpox vaccination also provides protection even when<br />
administered 2–3 days postexposure. If the smallpox vaccine is administered as late as<br />
5 days after exposure, it may prevent smallpox from being fatal, although it will not<br />
prevent the disease.<br />
87
Tapping Nature’s Toolkit: Manufacturing Antibodies<br />
Antibodies used in research can be manufactured in the laboratory, both in vivo and in<br />
vitro. In vivo techniques have been in use for over 100 years. There are two types of<br />
traditionally produced antibodies: polyclonal antibodies and, in the last 30 years,<br />
monoclonal antibodies. Currently, antibody production is being revolutionized by<br />
recombinant DNA technology and, while most antibodies are still produced by traditional<br />
methods using animals or animal cells, techniques for making antibodies using recombinant<br />
DNA technology are becoming more common.<br />
Timeline of antibody production technology.<br />
Polyclonal Antibodies<br />
i<br />
Polyclonal antibodies are generated by immunizing an animal (usually a rabbit, goat, or<br />
sheep) and obtaining serum. For example, purified HIV gp120 protein can be injected into a<br />
goat, which will then generate antibodies directed against the many epitopes of gp120.<br />
(Remember that the goat will produce many different antibodies to the multiple epitopes of<br />
an antigen.) Blood containing the antibodies is drawn from the goat and the cells of the<br />
blood are removed, leaving the serum. The product is antiserum towards gp120, and the<br />
antiserum can be used directly or the antibodies can be purified from it. The antibodies are<br />
called polyclonal because the antibodies are from many (poly) B cell clones (clonal) in the<br />
goat’s blood. Polyclonal antiserum has the advantage of being simple and inexpensive to<br />
produce, but the disadvantage is that no two batches, even made in the same animal, will<br />
be exactly the same.<br />
88<br />
Culture cells<br />
in liquid<br />
growth medium<br />
Growth<br />
medium
Monoclonal Antibodies<br />
For many antibody applications such as diagnostic tests, polyclonal antibodies are too<br />
variable. In these cases, one antibody type from a single B cell clone is preferable. B cell<br />
clones producing single antibodies can be isolated from the spleens of immunized mice,<br />
but these cells die after a few weeks in the laboratory, limiting production of the large<br />
amounts of antibody generally needed for research and commercial applications. However,<br />
B cells can be made to live (and produce antibodies) indefinitely if they are fused with<br />
tumor-like immortal cells. The fusion generates hybrid cells (a hybridoma cell line), which<br />
can be cultured indefinitely; the monoclonal antibodies generated by the hybrid cells can be<br />
collected and purified from the growth medium with almost no batch-to-batch variability.<br />
Genetically Engineering Antibodies<br />
The ability of antibodies to act like magic bullets and home in on their targets makes them<br />
ideal candidates for medical therapies. For example, an antibody that recognizes a tumor<br />
antigen can be attached to a chemotherapy drug or radioactive molecule and be used to<br />
deliver the drug specifically to targeted tumor cells, sparing the patient many of the side<br />
effects of conventional chemotherapy or radiation treatment. However, traditional antibodies<br />
made in animals are seen by the human immune system as foreign and elicit an immune<br />
response that results in their destruction. Recombinant DNA technology can be used to<br />
produce antibodies that look human to the human immune system and so can be used as<br />
therapeutic agents in people. (For example, Herceptin is a “humanized” antibody used to<br />
treat breast cancer.) Using genetic engineering to manufacture antibodies also obviates the<br />
sacrifice of laboratory animals. Two of the methods used to engineer antibodies are<br />
described below.<br />
Hybridoma Immortalization<br />
Recombinant DNA technology allows the antigen recognition site from a known mouse<br />
monoclonal antibody to be camouflaged within a human antibody by combining part of the<br />
mouse gene with the human antibody gene. Bacteria transformed with this DNA are<br />
capable of producing humanized monoclonal antibodies indefinitely, with the added bonus<br />
that culturing bacteria requires much less time and expense then the culture of a mouse<br />
hybridoma cell line.<br />
Phage Display<br />
Novel antibodies to antigens are being generated using modern biotechnology. Libraries of<br />
billions of potentially useful antibodies are being created by inserting shuffled antibody<br />
genes from billions of human B cells into the genomes of bacteriophage lambda<br />
(bacteriophages, or phages, are viruses that infect bacteria; lambda phage is a specific<br />
species of phage), so that the lambda phages display the binding sites from human<br />
antibodies on their surfaces. This phage library is screened to find a phage that binds to a<br />
specific antigen. The phage can then be used directly as an antibody would be used.<br />
Alternatively, the DNA from the selected phage can be cloned into a human antibody gene<br />
and transformed into bacteria. Large amounts of the antibody can then be produced for<br />
therapeutic use. Phage display is on the cutting edge of immunotherapy.<br />
89
Labeling and Detecting Antibodies<br />
Antibodies are used in diagnosis and research as labeling tools. As labels they have to be<br />
made visible, so antibodies are covalently linked (or conjugated) to chemical labels that<br />
emit detectable signals. Detection systems can be low-tech or high-tech, and the detection<br />
system determines the type of label used. For example, a fluorescently labeled antibody<br />
allows you to localize an antigen in a cell using a high-tech fluorescent microscope.<br />
Antibodies are also linked to enzymes that oxidize a chromogenic (color-producing)<br />
substrate, producing visible color only where the enzyme-linked antibody has bound.<br />
Enzyme-linked antibodies are commonly used in western blots, microscopy, and <strong>ELISA</strong>.<br />
Antibody targets or antigens can be detected directly by labeling the antibody specific for<br />
the antigen and looking for signal.<br />
Direct detection of antibodies.<br />
However, labeling every type of antibody scientists might wish to use is time-consuming<br />
and costly. Thus, a more common method to visualize antigens is called indirect detection.<br />
This technique relies on the use of polyclonal secondary antibodies. Secondary antibodies<br />
recognize primary antibodies. The primary antibody binds specifically to the antigen, and<br />
the secondary antibody binds specifically to the primary antibody. The indirect method<br />
means that only one type of enzyme-linked secondary antibody is needed to visualize all<br />
antibodies produced in one type of animal (e.g., in rabbits), reducing time and cost. Indirect<br />
detection adds a bonus, since the primary antibody is effectively an antigen to the<br />
secondary antibody. The primary antibody has many different epitopes and so is bound by<br />
multiple secondary antibodies. Thus, more labels accumulate around the antigen, amplifying<br />
the signal.<br />
Antigen<br />
Antibody<br />
HRP enzyme<br />
Enzyme<br />
substrate (TMB)<br />
Antigen<br />
Antibody<br />
HRP enzyme<br />
Enzyme<br />
substrate (TMB)<br />
Indirect detection of antibodies.<br />
90
Secondary antibodies are produced by injecting the antibodies of one animal into a<br />
different species of animal. For example, if the primary antibody is a mouse monoclonal<br />
antibody, secondary antibodies are generated by immunizing a goat with any mouse<br />
antibody. Goat polyclonal anti-mouse IgG is purified from the goat serum and linked to an<br />
enzyme for detection. Secondary antibodies are commercially available, either unlabeled or<br />
with a wide variety of fluorescent or enzymatic labels for many applications.<br />
Putting Antibodies to Use<br />
Antibodies have been used for decades as research tools, but in recent years the expansion<br />
of technology to produce antibodies has yielded a myriad of new applications that take<br />
advantage of the specificity of antibody binding. The basis of all immunoassays is the<br />
specific binding of an antibody to its antigen, and there are many ways that binding can be<br />
utilized. Here are some of those uses:<br />
<strong>Immuno</strong>staining localizes antigens in organelles, cells, tissues, or whole organisms, and<br />
can also be used to distinguish one cell type from another. For example, pathologists can<br />
identify cancer cells using immunostaining. Cancer cells frequently look identical to normal<br />
cells under the microscope, but when they are immunostained, variations in the amount<br />
and kinds of cell surface proteins (antigens) are revealed. Studying this information helps<br />
diagnose cancer, and it can help in our understanding of how cancer cells cause harm.<br />
<strong>Immuno</strong>staining tissues or organisms can tell us in what cell types a protein is normally<br />
found, which can help us understand the protein’s function. For instance, immunostaining<br />
of plant seedlings at different stages of maturation allows us to follow how a protein’s<br />
abundance and localization change as the plant grows. Antibodies for immunostaining are<br />
labeled with either fluorescent molecules or enzymes that produce colored signals upon<br />
addition of a substrate.<br />
A special application of immunostaining is fluorescence-activated cell sorting (FACS),<br />
in which a population of cells is stained with a fluorescently labeled antibody and then<br />
physically separated into labeled and unlabeled cells. The cell sorter uses lasers to detect<br />
the fluorescent labels and an electrostatic charge to sort the cells in solution. Cell sorters<br />
can separate as many as 30,000 cells per second!<br />
<strong>Immuno</strong>blotting or western blotting tells us about a protein’s size and relative<br />
abundance in a given sample. In western blotting, an antibody picks out a specific protein<br />
from a complex sample (usually lysed cells or tissue) that has been separated by size<br />
using SDS-polyacrylamide gel electrophoresis (SDS-PAGE). Proteins separated in<br />
SDS-PAGE gels are transferred (electroblotted) from the gel to the surface of a nylon or<br />
nitrocellulose membrane using an electrical current. The membrane is probed with a<br />
primary antibody that is specific for the protein of interest, and then an enzyme-linked<br />
secondary antibody is used to visualize the protein. The enzyme oxidizes a colorimetric<br />
substrate, producing a colored band on the membrane. Alternatively, the oxidized substrate<br />
may emit light (chemiluminescent substrate) that is detected as a band on photographic film.<br />
The size of the protein is determined by comparing the position of the band to the position of<br />
known protein standards that are run alongside it on the SDS-PAGE gel. The abundance of<br />
the protein is determined by comparing band intensity to known amounts of protein standards<br />
run on the same gel.<br />
A modification of immunoblotting is called dot blotting, in which a sample is spotted onto a<br />
membrane directly rather than being blotted from a gel. Dot blotting is used for rapid<br />
91
screening of a large number of samples. This technique provides a rapid determination of<br />
whether a particular protein or antigen is present, as many samples may be spotted on a<br />
membrane and processed simultaneously, but dot blotting provides no information about<br />
the size of the protein.<br />
There are many varieties of dipstick tests, including home pregnancy tests, tests for illegal<br />
drug use (e.g., marijuana, cocaine, and methamphetamines), and tests for infectious<br />
agents (e.g., HIV, plague, E. coli O157, and Legionella). These immunochromatography<br />
assays give positive or negative results in a matter of minutes and are called sandwich<br />
immunoassays because they rely on the use of multiple antibodies. One of the antibodies<br />
is labeled with a colored compound, such as colloidal gold, which produces a pink band on<br />
the test strip in positive assays. For example, home pregnancy dipstick tests detect levels<br />
of human chorionic gonadotropin (hCG), a hormone that appears in the blood and urine of<br />
pregnant women within days of fertilization. The wick area of the dipstick is coated with<br />
mouse monoclonal anti-hCG antibody labeled with colloidal gold, a pink compound (step<br />
1). When the strip is dipped in urine, if hCG is present it will be bound by the pink antibody<br />
and the pink hCG-antibody complex will migrate up the strip via capillary action (step 2).<br />
When the complex reaches the test zone, a narrow strip containing a fixed unlabeled goat<br />
polyclonal anti-hCG, the pink complex will bind and concentrate there, making a pink stripe<br />
(step 3). The dipstick tests have a built-in control zone containing polyclonal goat anti-mouse<br />
IgG. The unbound pink mouse anti-hCG (present in both positive and negative results) will<br />
continue to migrate up the strip, past the test zone, and bind in the control zone, giving a<br />
second (or first, if the test is negative for pregnancy) pink stripe (step 4). If no pink stripe<br />
appears in the control zone, the test did not function properly.<br />
Wick<br />
Test<br />
Control<br />
Positive<br />
Test Control<br />
Negative<br />
92<br />
Step 1.<br />
Step 2.<br />
Step 3.<br />
Step 4.<br />
Wick<br />
Capillary<br />
action<br />
Test<br />
Control<br />
Antigen (hCG)<br />
Pink anti-hCG antibody<br />
Fixed anti-hCG antibody<br />
Fixed secondary antibody
Appendix B: Glossary<br />
3,3',5,5'-tetramethylbenzidine (TMB): A soluble colorimetric substrate, oxidized to a blue<br />
color by horseradish peroxidase and frequently used in <strong>ELISA</strong> assays.<br />
Acquired immunity: A specific response to specific foreign substances that adapts with<br />
multiple exposures. Also called adaptive immunity.<br />
Antibody: <strong>Immuno</strong>globulin protein formed in response to a challenge of the immune system<br />
by a foreign agent. Antibodies bind to specific antigens.<br />
Antigen: Any agent that provokes an acquired immune response and is bound specifically<br />
by either antibodies or T cells.<br />
Antiserum: Blood serum containing antibodies raised against a specific antigen.<br />
Autoimmune disease: Disease that results from the immune system making a mistake<br />
and mounting an immune response against one’s own body. Examples are systemic lupus<br />
erythematosus (lupus, SLE), rheumatoid arthritis, and multiple sclerosis (MS).<br />
Bacteriophage: A virus that infects bacteria; also called a phage. Can be used to introduce<br />
foreign DNA into a bacterial genome.<br />
Chromogenic: Color-producing. Substrates that produce a colored product when acted<br />
upon by an enzyme are termed chromogenic substrates; for example, 3,3',5,5'-tetramethylbenzidine<br />
(TMB) produces a blue product when oxidized by horseradish peroxidase.<br />
Clone: In the context of molecular biological techniques, “to clone” means to obtain a fragment<br />
of DNA from a genome and ligate it into another piece of DNA, such that the ligated DNA<br />
now has an identical copy of that gene fragment. In the context of cell biology, “a clone” is a<br />
cell or group of cells that are all derived through cell division from the same parent cell and<br />
thus have identical genetic data.<br />
Conjugate: A substance formed by the covalent bonding of two types of molecules, such<br />
as horseradish peroxidase linked to (“conjugated to”) an antibody.<br />
Enzyme: A protein with catalytic activity. The molecule that an enzyme acts on is called its<br />
substrate. Enzymes are classified (and frequently named) on the basis of the reactions that<br />
they catalyze. For example, a peroxidase oxidizes its substrate.<br />
Epitope: A specific site on an antigen that is recognized by an antibody. Also called<br />
antigenic determinant.<br />
Genetically modified organism (GMO): An organism whose genetic material (DNA) has<br />
been altered in a way that does not occur naturally by mating or natural recombination.<br />
Horseradish peroxidase (HRP): An enzyme frequently used to label secondary antibodies.<br />
HRP oxidizes substrates (e.g., TMB) for colorimetric detection.<br />
Immune cell: Any cell of the immune system, including lymphocytes (B and T cells) and<br />
macrophages.<br />
<strong>Immuno</strong>deficiency: Weakening or defects of the immune response such that an individual<br />
is unable to mount an effective immune response. May have a genetic basis, result from a<br />
disease or other health factor, or be caused by immunosuppressive drugs.<br />
93
<strong>Immuno</strong>gen: Any agent that provokes an immune response. <strong>Immuno</strong>gens that provoke a<br />
response from the acquired immune system are called antigens.<br />
<strong>Immuno</strong>globulin (Ig): General term for all types of antibodies.<br />
<strong>Immuno</strong>logy: The study of the immune system, the body system that protects the body<br />
from foreign substances, cells, and tissues by producing an immune response.<br />
Innate immunity: The immunity with which a person is born. Includes cells such as<br />
circulating macrophages that respond to foreign invaders. Also called nonadaptive immunity.<br />
Ligate: To connect pieces of DNA together, for example, inserting a fragment of an antibody<br />
gene into a phage genome.<br />
Lymphocyte: Type of white blood cell. Component of the immune system, includes T cells<br />
(thymus-derived) and B cells (bone marrow-derived).<br />
Macrophage: A type of white blood cell that binds and engulfs foreign materials and<br />
antigens in a process called phagocytosis. Macrophages serve two primary functions:<br />
1) removing foreign cells and molecules from the blood; and 2) processing antigens and<br />
presenting them on their cell surfaces.<br />
Microplate: Molded plastic plate consisting of multiple small wells, usually in a 96-well format.<br />
Opportunistic infections: Infections that occur as a result of deficiencies in the immune<br />
system, e.g., diseases like oral candidiasis and tuberculosis that occur in immunodeficient<br />
AIDS patients.<br />
Passive immunity: The acquisition of antibodies from an external source, e.g., antibodies<br />
passed from mother to infant, or certain postexposure vaccines such as that for rabies.<br />
Passive immunity lasts only a few weeks and does not change with multiple exposures.<br />
Pathogens: An organism that can cause disease. Pathogens include bacteria, viruses,<br />
fungi, infectious proteins called prions, and parasites.<br />
Phage display: A method of producing novel antibodies to specific antigens using<br />
recombinant DNA technology and bacterial viruses (bacteriophages).<br />
Primary antibody: In an immunoassay, the antibody that binds a specific antigen,<br />
conferring specificity to the assay.<br />
Secondary antibody: In an immunoassay, the antibody that recognizes the primary<br />
antibody, which is from a different species. Secondary antibodies are frequently labeled for<br />
easy detection.<br />
Serum (plural sera): The clear fluid obtained when the solid components (e.g., red and<br />
white blood cells) are removed from whole blood.<br />
Seroconversion: The development of detectable antibodies in the blood directed against<br />
an infectious agent. For example, after a person is exposed to HIV, no antibodies against<br />
HIV can be detected in the blood for approximately 6 weeks. Once seroconversion has<br />
occurred, antibodies against HIV can be detected (e.g., by <strong>ELISA</strong>).<br />
Subclone: To transfer an already cloned fragment of DNA into another carrier vector, such<br />
as an expression plasmid.<br />
94
Substrate: The target molecule for an enzyme.<br />
TMB: see 3,3',5,5'-tetramethylbenzidine.<br />
Vaccination: The process of inducing acquired immunity by deliberately stimulating an<br />
immune response with a nonpathogenic form of a disease agent. Also called immunization<br />
or immunoprophylaxis. The term vaccination originated from the Latin word for cow (vacca)<br />
because the first vaccination used cowpox to vaccinate against smallpox.<br />
Vector: An organism that carries pathogens from one host to another. Vectors are<br />
frequently arthropods, e.g., ticks or mosquitoes.<br />
Zoonosis (plural zoonoses): An infection transmitted to humans from an animal host,<br />
e.g., SARS and rabies.<br />
95
Appendix C: Disease Descriptions<br />
HIV/AIDS ......................................................................................................................97<br />
Smallpox......................................................................................................................98<br />
Trichinosis ................................................................................................................100<br />
West Nile Virus..........................................................................................................102<br />
SARS..........................................................................................................................104<br />
Lyme Disease............................................................................................................108<br />
96
HIV/AIDS<br />
Protocol Fit:<br />
• I: <strong>ELISA</strong> for Tracking Disease Outbreaks<br />
• II: Antigen Detection <strong>ELISA</strong><br />
• III: <strong>ELISA</strong> Antibody Test<br />
Name of pathogen Human immunodeficiency virus or HIV<br />
Type of organism Virus<br />
Infectious agent Virus<br />
Method of spread Exchange of body fluids<br />
Sharing needles (illicit drug use; developing nations)<br />
Mother to child during pregnancy<br />
Blood transfusion or organ donation (rarely, since all donated blood<br />
and organ donors are tested)<br />
Not spread through casual contact<br />
Incubation 2 months to over 10 years<br />
Symptoms Flu-like symptoms within 1–2 months of exposure<br />
Infectivity From time of exposure<br />
During asymptomatic period (2 months to >10 years), the immune<br />
system declines, and symptoms may include lack of energy, weight<br />
loss, frequent fevers and sweats, persistent or frequent yeast<br />
infections (oral or vaginal), persistent skin rashes or flaky skin, and<br />
short-term memory loss<br />
At onset of AIDS, opportunistic infections produce symptoms which<br />
may include coughing, shortness of breath, seizures, lack of<br />
coordination, difficult or painful swallowing, mental symptoms such<br />
as confusion and forgetfulness, severe and persistent diarrhea,<br />
fever, vision loss, nausea, abdominal cramps, weight loss, extreme<br />
fatigue, severe headaches, and coma.<br />
Diagnosis In the first 4–8 weeks after exposure, virus can be detected by<br />
<strong>ELISA</strong> against viral protein p24 or by western blot.<br />
After 4–8 weeks, antibodies against HIV can be detected by <strong>ELISA</strong>.<br />
Treatment Nucleoside reverse transcriptase (RT) inhibitors, e.g., AZT<br />
Protease inhibitors<br />
Combination drug treatments<br />
Treatments for opportunistic infections<br />
Mortality Varies widely with geographic location of patients<br />
History as a pathogen Earliest known case in 1959. HIV may have spread from an animal<br />
host to man. The disease was described and named acquired<br />
immune deficiency syndrome (AIDS) in 1982; HIV, the cause of<br />
AIDS, was isolated in 1983.<br />
Suggested scenarios for the classroom: A role-playing exercise in which students act as<br />
scientists working in a clinical laboratory of the local hospital, performing HIV tests on<br />
patient samples. There are <strong>ELISA</strong>s for the HIV antigen (HIV capsid protein p24) and for<br />
serum antibodies against HIV. This can be further expanded to include biographies of the<br />
patients to aid discussion on lifestyle behavior and risk of HIV infection.<br />
97
Simulation for detecting p24 HIV capsid protein.<br />
The table below gives an example of how a diagnostic test to detect HIV virions in a patient's<br />
blood sample can be simulated using protocols I and II.<br />
Tube Actual Tube<br />
Tube Description Color Contents Simulated Tube Contents<br />
Students samples Yellow 1x antigen or Sample derived from patient's blood<br />
1x PBS<br />
Primary antibody Green 1x primary Anti-p24 capsid protein antibody from<br />
antibody mouse<br />
Secondary Orange 1x secondary Anti-mouse immunoglobulin antibody<br />
antibody antibody conjugated to HRP<br />
Positive control Violet 1x antigen Heat-inactivated viral antigen (p24 protein)<br />
Negative control Blue 1x PBS HIV-negative human serum<br />
Simulation for detecting HIV antibodies.<br />
The table below gives an example of how a diagnostic test to detect antibodies to HIV in a<br />
patient's serum sample can be simulated using protocol III.<br />
Tube Actual Tube<br />
Tube Description Color Contents Simulated Tube Contents<br />
Purified antigen Green 1x antigen Purified HIV proteins<br />
Student samples Yellow 1x primary Serum sample* from patient<br />
antibody or<br />
wash buffer<br />
Secondary Orange 1x secondary Anti-human immunoglobulin antibodies<br />
antibody antibody conjugated to HRP<br />
Positive control Violet 1x antigen Serum from an HIV-negative patient spiked<br />
with HIV antibodies<br />
Negative control Blue 1x PBS Serum from an HIV-negative patient<br />
*Note: Tests to detect anti-HIV antibodies in saliva and urine are also used.<br />
98
Smallpox<br />
Protocol Fit:<br />
• I: <strong>ELISA</strong> for Tracking Disease Outbreaks<br />
• II: Antigen Detection <strong>ELISA</strong><br />
• III: <strong>ELISA</strong> Antibody Test<br />
Name of pathogen Variola major, smallpox virus<br />
Type of organism DNA virus in genus Orthopoxvirus<br />
Infectious agent Virus (only a few virus particles needed for infection)<br />
Method of spread Person to person via aerosols from infected individual.<br />
Can also be spread through infected clothing, bedding, etc.<br />
Intentional dissemination of aerosolized virus; if not exposed to UV light,<br />
virus may be viable for ≥24 hours under optimal conditions.<br />
Incubation 12–14 days<br />
Symptoms High fever, malaise, headache, backache, abdominal pain, rash<br />
Infectivity Most infectious at onset of rash; contagious until rash is totally gone.<br />
Diagnosis Initially by symptoms. Virus identification by electron microscopy.<br />
Identification of viral DNA by molecular biological methods.<br />
Development of <strong>ELISA</strong> against IgG, IgM, and antigen high priority with<br />
CDC and many companies (smallpox was eradicated before current<br />
immunoassays were developed).<br />
Treatment Postexposure vaccination within 2–3 days of exposure protects against<br />
the disease.<br />
Postexposure vaccination within 4–5 days of exposure may prevent a<br />
fatal outcome.<br />
After 4–5 days postexposure, supportive treatment only. Experimental<br />
treatment with antiviral drugs.<br />
Mortality Up to 30%<br />
History as a pathogen Used for biological warfare by British in North America in the 18th<br />
century. Army distributed blankets that had been used by smallpox<br />
patients. Mortality in some Native American tribes was 50%.<br />
In 1796, Jenner discovered cowpox vaccine effective against<br />
smallpox.<br />
Global immunization effort eradicated smallpox in 1977, and routine<br />
vaccination ceased.<br />
May have been weaponized in the Soviet Union in the 1980s<br />
Suggested Scenario for the Classroom Using Protocols I & II: Bioterrorism on a Field<br />
Trip<br />
Your students have been on a field trip. While on public transportation (aircraft, bus, subway,<br />
train), it is possible that they have been exposed to smallpox, deliberately released in aerosol<br />
form. (Smallpox virus, if not exposed to UV light, may survive for ≥24 hours in cool, dry locations.)<br />
It is important to determine as soon as possible which students have been exposed.<br />
Vaccination within 2–3 days of exposure can prevent smallpox, but the vaccine is in short<br />
supply. Also, vaccination can have nasty side effects, so no one should be vaccinated<br />
unnecessarily. Vaccination of exposed individuals is essential to prevent further spread of<br />
the disease.<br />
To determine which students have been exposed, perform an <strong>ELISA</strong> to detect the<br />
virus in samples of their body fluid.<br />
99
Students who test positive for the virus should undergo immediate vaccination.<br />
Simulation for detecting smallpox virus.<br />
The table below gives an example of how a diagnostic text to detect smallpox virus in<br />
patient samples can be simulated using protocols I and II.<br />
Tube Actual Tube<br />
Tube Description Color Contents Simulated Tube Contents<br />
Students samples Yellow 1x antigen or Sample from patient's lesion<br />
1x PBS<br />
Primary antibody Green 1x primary Anti-variola antibody from mouse<br />
antibody<br />
Secondary Orange 1x secondary Anti-mouse immunoglobulin antibody<br />
antibody antibody conjugated to HRP<br />
Positive control Violet 1x antigen Sample from lesion of chickenpox patient<br />
spiked with variola proteins<br />
Negative control Blue 1x PBS Sample from lesion of chickenpox patient<br />
Suggested Scenario for the Classroom Using Protocol III <strong>ELISA</strong> Antibody Test: Are prior<br />
smallpox immunizations in healthcare providers still current?<br />
In the event of a smallpox outbreak, healthcare providers will be needed to tend to the sick and<br />
this will put them at risk of becoming infected. It has been proposed that teams of healthcare<br />
workers should be vaccinated in preparation for a smallpox attack. However, since the smallpox<br />
vaccine can have detrimental side effects, the ethics of this proposition has been questioned;<br />
i.e., should someone assume such a risk in order to prepare themselves for a situation that has<br />
not yet occurred? A partial solution to this dilemma is to test older healthcare providers who<br />
may have already been given the smallpox vaccination. In this scenario, your students act as<br />
lab technicians testing serum samples from healthcare providers for the presence of<br />
anti-smallpox antibodies to determine whether they still have immunity to the disease. The<br />
smallpox vaccine was routinely given in the U.S. until 1972, was recommended for health care<br />
providers until 1976, and was administered in the military until 1990.<br />
Simulation for detecting smallpox antibodies.<br />
The table below gives an example of how a diagnostic test to detect antibodies to smallpox<br />
virus in a patient's serum sample can be simulated using protocol III.<br />
Tube Actual Tube<br />
Tube Description Color Contents Simulated Tube Contents<br />
Purified antigen Green 1x antigen Purified smallpox proteins<br />
Student samples Yellow 1x primary Patient's serum sample<br />
antibody or<br />
wash buffer<br />
Secondary Orange 1x secondary Anti-human immunoglobulin antibodies<br />
antibody antibody conjugated to HRP<br />
Positive control Violet 1x antigen Serum from smallpox patient<br />
Negative control Blue 1x PBS Serum from a patient without smallpox<br />
• Note: At press time, an <strong>ELISA</strong> to detect smallpox had not yet been developed, although<br />
it is a high priority with the CDC. Thus, these scenarios are hypothetical.<br />
100
Trichinosis<br />
Protocol Fit:<br />
• III: <strong>ELISA</strong> Antibody Test<br />
Name of pathogen Trichinella spiralis and 4 other Trichinella species<br />
Type of organism Nematode<br />
Infectious agent Larvae<br />
Method of spread Eating larvae encysted in muscle (frequently in undercooked pork)<br />
Incubation The larval cyst wall is digested in the stomach, and the larvae penetrate<br />
the lining of the small intestine. In
Simulation for detecting antibodies to trichinella.<br />
The table below gives an example of how a diagnostic test to detect antibodies to<br />
Trichinella species in a patient's serum sample can be simulated using protocol III.<br />
Tube Actual Tube<br />
Tube Description Color Contents Simulated Tube Contents<br />
Purified antigen Green 1x antigen Extraction of Trichinella spiralis larvae<br />
Student samples Yellow 1x primary Serum sample from patient<br />
antibody or<br />
wash buffer<br />
Secondary Orange 1x secondary Anti-human immunoglobulin antibodies<br />
antibody antibody conjugated to HRP<br />
Positive control Violet 1x antigen Serum from a trichinosis-positive patient<br />
Negative control Blue 1x PBS Serum from a trichinosis-negative patient<br />
102
West Nile Virus<br />
Protocol Fit:<br />
• I: <strong>ELISA</strong> for Tracking Disease Outbreaks<br />
• II: Antigen Detection <strong>ELISA</strong><br />
• III: <strong>ELISA</strong> Antibody Test<br />
Name of pathogen West Nile virus (WNV)<br />
Type of organism RNA virus; flavivirus (virus in the family Flaviviridae)<br />
Infectious agent Virus<br />
Method of spread Bite from an infected mosquito. Transmission cycle is: 1) mosquito bites<br />
infected bird or animal; 2) virus circulates in mosquito’s blood; 3) virus<br />
enters mosquito’s salivary glands; and 4) mosquito injects virus into a<br />
human or animal when it bites.<br />
Incubation 3 to 14 days<br />
No evidence that WNV can be spread person to person or animal to person.<br />
Very rarely, transmission via transplanted organs from an infected<br />
individual, transmission by transfusion of blood products, or mother-to-child<br />
(across the placenta) transmission.<br />
Symptoms Most people infected with WNV will have no illness.<br />
Approximately 20% of infected people will have West Nile fever with mild<br />
symptoms including fever, headache, body aches, skin rash, and swollen<br />
lymph glands.<br />
Less than 1% of infected people will have West Nile encephalitis<br />
(inflammation of the brain) or meningitis (inflammation of the lining of the<br />
brain and spinal cord) with severe symptoms including headache, high<br />
fever, neck stiffness, stupor, disorientation, coma, tremors, convulsions,<br />
muscle weakness, and paralysis.<br />
Infectivity Not infectious from person to person.<br />
Diagnosis Initial diagnosis based on clinical suspicion (flu-like symptoms and<br />
presence of the virus in birds in the area).<br />
<strong>ELISA</strong> to detect anti-WNV IgM in serum or cerebrospinal fluid, called<br />
MAC-<strong>ELISA</strong>; IgM is detectable in 90% of cases within 8 days of infection.<br />
<strong>ELISA</strong> for West Nile virus or viral antigens in cerebrospinal fluid, tissue,<br />
blood, or other body fluids.<br />
<strong>ELISA</strong> for anti-WNV IgG in serum.<br />
Note: <strong>ELISA</strong> reagents are not available commercially, but may be<br />
obtained from the CDC.<br />
Treatment Supportive treatment only (IV fluids, respiratory support, treatment for<br />
secondary infections).<br />
Mortality Among those hospitalized with severe symptoms, mortality rate ~10%<br />
(rate highest among those >70 years old).<br />
History as a pathogen Isolated in Uganda in 1937; characterized in Egypt in the 1950s.<br />
Outbreaks in Africa, West Asia, Europe, and Middle East in the 1990s.<br />
First appeared in the United States in 1999. In 2003, human cases were<br />
reported in 45 states (up from 10 states in 1999–2001).<br />
103
Prevention Avoid mosquito bites by using insect repellent containing DEET<br />
(N,N-diethyl-meta-toluamide), wearing long-sleeved clothes and long<br />
pants treated with insect repellents, staying indoors at peak mosquito<br />
biting times (dawn, dusk, and in the early evening), and eliminating<br />
standing water sources to reduce the number of places available for<br />
mosquitoes to lay their eggs.<br />
Suggested scenarios for the classroom: Epidemiological study. In order to understand<br />
the characteristics of the West Nile virus, an emerging disease in the United States, it is<br />
important to understand how infectious and how pathogenic the disease is. On one street<br />
in your town, there have been two severe cases of WNV. You survey the street and find<br />
that three other people report having had flu-like symptoms. To determine the epidemiology<br />
of the West Nile virus, you test serum samples from everyone in the neighborhood to see<br />
how many have been exposed (you may test for IgM, which indicates recent exposure, or<br />
you may test for the viral antigen itself). Once you know how many have been exposed,<br />
you can determine how many people actually get sick from WNV. Note: According to the<br />
CDC, WNV-IgM can persist in serum for 12 months or longer.<br />
Simulation for detecting West Nile virus.<br />
The table below gives an example of how a diagnostic test to detect West Nile virus in a<br />
patient's serum sample can be simulated using protocols I and II.<br />
Tube Actual Tube<br />
Tube Description Color Contents Simulated Tube Contents<br />
Student samples Yellow 1x antigen or Sample derived from patient's blood<br />
1x PBS<br />
Primary antibody Green 1x primary Anti-West Nile virus antibody from mouse<br />
antibody<br />
Secondary Orange 1x secondary Anti-mouse immunoglobulin antibodies<br />
antibody antibody conjugated to HRP<br />
Positive control Violet 1x antigen Heat-inactivated viral antigen<br />
Negative control Blue 1x PBS West Nile virus-negative human serum<br />
Simulation for detecting antibodies to West Nile virus.<br />
The table below gives an example of how a diagnostic test to detect antibodies to West<br />
Nile virus in patient's serum sample can be simulated using protocol III.<br />
Tube Actual Tube<br />
Tube Description Color Contents Simulated Tube Contents<br />
Purified antigen Green 1x antigen Purified West Nile virus proteins<br />
Student samples Yellow 1x primary Serum sample from patient<br />
antibody or<br />
wash buffer<br />
Secondary Orange 1x secondary Anti-human immunoglobulin antibodies<br />
antibody antibody conjugated to HRP<br />
Positive control Violet 1x antigen Serum from a patient with West Nile virus<br />
Negative control Blue 1x PBS West Nile virus-negative human serum<br />
104
Severe Acute Respiratory Syndrome (SARS)*<br />
Protocol Fit:<br />
• I: <strong>ELISA</strong> for Tracking Disease Outbreaks<br />
• II: Antigen Detection <strong>ELISA</strong><br />
• III: <strong>ELISA</strong> Antibody Test<br />
Name of pathogen Coronavirus (SARS-CoV)<br />
Type of organism Virus<br />
Infectious agent Virus<br />
Method of spread Close person-to-person contact.<br />
Infected individual spreads infectious droplets by coughing or sneezing;<br />
infection occurs when individuals touch contaminated surfaces and then<br />
touch their eyes, nose, or mouth.<br />
There is no evidence of airborne transmission<br />
Incubation Onset of symptoms within 10 days of exposure.<br />
Symptoms Initial symptoms are fever >100.4°F and other flu-like symptoms.<br />
Respiratory illness, including dry cough and breathing difficulties, may<br />
develop after 2–7 days.<br />
Infectivity Patients are most infectious at around day 10 of the illness while they are<br />
showing respiratory symptoms (coughing and sneezing).<br />
Diagnosis Initial diagnosis by symptoms and epidemiology; i.e., Has the patient<br />
either been in contact with another SARS patient or traveled in an area in<br />
which SARS is known to be prevalent during the previous 10 days.?<br />
Laboratory tests for diagnosis include:<br />
1) <strong>ELISA</strong> to detect the SARS-CoV in patient specimens.<br />
2) PCR to detect the SARS-CoV in patient specimens.<br />
3) Detection of SARS-CoV RNA by reverse transcription PCR (RT-PCR).<br />
4) <strong>ELISA</strong> that detects SARS-CoV antibodies (both IgG and IgM).<br />
Antibodies can be detected within 21 days of onset of illness.<br />
Note: <strong>ELISA</strong> reagents are not available commercially, but may be<br />
obtained from the CDC.<br />
Treatment No specific treatments are yet recommended for SARS. Symptoms are<br />
being treated with standard treatments for pneumonia. Tests of antiviral<br />
agents are ongoing.<br />
Mortality As of May 2003, the mortality rate is approximately 8%.<br />
History as a pathogen Was first recognized in February 2003. Evidence suggests that SARS<br />
may have arisen in rural China, possibly in the fall of 2002. Report in<br />
Science in September 2003 that the virus had been found in palm civets<br />
(Paguma larvata, carnivores closely related to meerkats and mongeese)<br />
in a live animal market in Guangdong, China. The same study found<br />
evidence of infection in a raccoon-dog (Nyctereutes procyonoides) and in<br />
humans working in the market. This is evidence of transmission of the<br />
virus between species, but does not tell us what animal is the reservoir of<br />
infection.<br />
SARS spread around the world via international air travel.<br />
*SARS is an emerging infection and investigations into the virus, its origins, epidemiology,<br />
etc., are ongoing. Information is current as of press time, but see the CDC and WHO<br />
web sites (www.cdc.gov and www.who.int/en) for the most recent information.<br />
105
Suggested scenarios for the classroom:<br />
Simulation for detecting SARS virus using Protocol I or II:<br />
A few of your students have been on a field trip. It is later determined that they rode on public<br />
transportation (aircraft, bus, subway, train) with a health care worker who has SARS, and one<br />
or two of the students may have contracted the disease. The remainder of the class may also<br />
have been exposed. Some have had contact with several of their classmates since their<br />
exposure, plus SARS may be spread by inhalation. Perform an <strong>ELISA</strong> to determine the<br />
spread of SARS within your classroom. It is important to determine as soon as possible which<br />
students have been exposed so that they may be isolated. (Quarantine of exposed individuals<br />
is currently the best way to prevent the spread of this very infectious virus.) To determine<br />
which students have been exposed, perform an <strong>ELISA</strong> to detect the SARS virus in samples<br />
of their body fluid.<br />
The table below gives an example of how a diagnostic test to detect SARS coronavirus in a<br />
patient sample can be simulated using protocols I and II.<br />
Tube Actual Tube<br />
Tube Description Color Contents Simulated Tube Contents<br />
Student samples Yellow 1x antigen or Sample derived from patient’s blood<br />
1x PBS<br />
Primary antibody Green 1x primary Anti-SARS-CoV antibody from mouse<br />
antibody<br />
Secondary Orange 1x secondary Anti-mouse immunoglobulin antibody<br />
antibody antibody conjugated to HRP<br />
Positive control Violet 1x antigen Heat-inactivated viral antigen<br />
Negative control Blue 1x PBS SARS-negative human serum<br />
Simulation for detecting antibodies to SARS using Protocol III:<br />
The entire class has been on a field trip and it is later determined that they stayed at the<br />
same hotel as a SARS-infected person. Since SARS can be spread by contact with<br />
respiratory droplets, the class may have been exposed. It is important to determine as soon<br />
as possible which students have been exposed so that they can be isolated. (Quarantine of<br />
exposed individuals is currently the best way to prevent the spread of this very infectious<br />
virus.) To determine which students have been exposed, perform an <strong>ELISA</strong> to detect the<br />
SARS virus or antibodies to the SARS virus in samples of their body fluid or serum,<br />
respectively.<br />
The table below gives an example of how a diagnostic test to detect antibodies to SARS<br />
coroniavirus in a patient’s serum sample can be simulated using protocol III.<br />
Tube Actual Tube<br />
Tube Description Color Contents Simulated Tube Contents<br />
Purified antigen Green 1x antigen Extracts from SARS-CoV-infected, cultured<br />
human cells<br />
Student samples Yellow 1x primary Serum sample from patient<br />
antibody or<br />
wash buffer<br />
Secondary Orange 1x secondary Anti-human immunoglobulin antibodies<br />
antibody antibody conjugated to HRP<br />
Positive control Violet 1x antigen Serum from a SARS patient<br />
Negative control Blue 1x PBS SARS-negative human serum or serum from a<br />
patient with a respiratory disease that is not<br />
SARS<br />
106
Lyme Disease or Lyme Borreliosis<br />
Protocol Fit:<br />
• III: <strong>ELISA</strong> Antibody Test<br />
Name of pathogen Borrelia bergdorferi<br />
Type of organism Bacterium (spirochete)<br />
Infectious agent Bacterium<br />
Method of spread Lyme disease is spread in the eastern US through the bite of the<br />
black-legged tick, Ixodes scapularis; on the west coast, it is spread by the<br />
western black-legged tick, Ixodes pacificus. Transmission of the bacteria<br />
usually does not occur until the tick has been attached for 36–48 hours,<br />
so finding and removing ticks can prevent infection.<br />
Incubation 3–32 days after tick bite<br />
Animal reservoir in the US is the white-footed deer mouse (Peromyscus<br />
leucopus).<br />
Symptoms Bull’s eye rash (erythema migrans) appears around tick bite in 75% of<br />
patients, typically 7–14 days after bite. Other early symptoms are flu-like<br />
(malaise, chills, fever, headache, body aches). About 60% of patients<br />
develop arthritis within weeks to months. Less common symptoms<br />
include neurological and myocardial abnormalities.<br />
Infectivity Not infectious from person to person.<br />
Diagnosis Bull’s eye around bite location is very diagnostic.<br />
<strong>ELISA</strong> for antibodies (IgG and/or IgM) against B. bergdorferi. Since the<br />
current assays have 89% sensitivity and 72% specificity, clinical diagnosis<br />
must be confirmed by a more specific test, such as a western blot. (If<br />
there is no bull’s eye rash, a positive <strong>ELISA</strong> is most likely a false positive.)<br />
Presence of antibodies indicates exposure, not active disease, as the<br />
antibodies may be present for years after exposure.<br />
Treatment Early-stage Lyme disease is treated with a 3–4 week course of oral<br />
antibiotics. Later disease may be treated with intravenous antibiotics for<br />
>4 weeks.<br />
Mortality Rarely fatal.<br />
History as a pathogen Reports in Europe of a bull’s eye rash (erythema migrans) associated<br />
with a tick bite date to the early 1900s. The disease was recognized in<br />
the US in 1975 because of a cluster of cases around Lyme, Connecticut.<br />
Suggested scenario for the classroom: Your class went on an outdoor field trip last fall,<br />
and a number of students have been suffering from flu-like symptoms and joint pain.<br />
Several remember having a red bull’s eye mark and wonder if they had been bitten by ticks<br />
on the outing. Perform an <strong>ELISA</strong> to determine if they have antibodies to B. bergdorferi in<br />
their blood.<br />
107
Simulation for detecting antibodies to B. bergdorferi.<br />
The table below gives an example of how a diagnostic test to detect antibodies to B.<br />
bergdorferi species in a patient’s serum sample can be simulated using protocol III.<br />
Tube Actual Tube<br />
Tube Description Color Contents Simulated Tube Contents<br />
Purified antigen Green 1x antigen B. bergorferi purified proteins<br />
Student samples Yellow 1x primary Serum sample from patient<br />
antibody or<br />
wash buffer<br />
Secondary Orange 1x secondary Anti-human immunoglobulin antibodies<br />
antibody antibody conjugated to HRP<br />
Positive control Violet 1x antigen Serum from patients with Lyme disease<br />
Negative control Blue 1x PBS Serum negative for Lyme disease<br />
108
Appendix D: Lesson Extensions<br />
Investigations Into Specific Diseases<br />
There is much information on infectious diseases on the Internet, particularly on the CDC<br />
and WHO web sites (see appendix E for other websites). Web searches will also uncover<br />
web sites for companies with newly developed diagnostic tests for infectious diseases. As a<br />
student assignment, have your students fill out a disease table on a different disease, either<br />
one that they chose or one that is assigned.<br />
As a secondary lesson, this activity can be used to help students distinguish between<br />
“good” and “bad” information on the Internet. There are many web sites containing<br />
unproven treatments and incorrect information about medical issues, as there are no<br />
controlling agencies to prevent spurious information from being posted on the Web.<br />
Disease name:<br />
Name of pathogen<br />
Type of organism<br />
Infectious agent<br />
Method of spread<br />
Incubation<br />
Symptoms<br />
Infectivity<br />
Diagnosis<br />
Treatment<br />
Mortality<br />
History as a<br />
pathogen<br />
References used:<br />
109
Quantitative <strong>ELISA</strong> Laboratory Exercise<br />
While <strong>ELISA</strong> gives a definitive qualitative (yes/no) answer, a major strength lies in that it<br />
can also give quantitative (how much?) information. This lesson extension provides a<br />
protocol to adapt this kit for use as a quantitative <strong>ELISA</strong> to assay either antigen or antibody<br />
levels. The following protocol is written to quantitate levels of antigen with protocol II as a<br />
basis, but it can easily be adapted to quantitate levels of antibody in serum with protocol III<br />
as a basis. It can be adapted for protocol I, but the results will probably not be in the linear<br />
range and therefore will not be very accurate.<br />
This extension activity uses serial dilution to generate dilutions of known antigen<br />
concentration. As the concentration of antigen or antibody increases, so does the intensity<br />
of the blue color in the wells. The blue color absorbs light at a specific wavelength, and this<br />
absorbance can be measured with a microplate reader. Students compare their test samples<br />
to the dilution series to calculate (or estimate) the concentration of the test samples. Using<br />
the Model 680 microplate reader with a 655 nm filter (Bio-Rad catalog #168-1002EDU),<br />
students can read the absorbance values of their wells, generate a standard curve, and<br />
calculate the concentration of their samples. If no microplate reader is available, the students<br />
can visually match the intensity of their samples with the samples in their dilution series and<br />
estimate the concentration of antigen in their samples.<br />
Instructor’s Advance Preparation<br />
We strongly recommend that you familiarize yourself with the basic protocols in this kit prior to<br />
performing this lab. It is especially important to read the information and notes on p. 40<br />
concerning reagent stability.<br />
The instructor’s advance preparation is similar to that of protocol II, but includes two extra<br />
tubes at the workstation: one with a sample of known concentration and one tube of PBS.<br />
This protocol also has only two student test samples per workstation of up to four students.<br />
The two will have different levels of antigen in them and can be labeled either as “A” and “B”<br />
or with hypothetical patient initials. You will also need two clean 15 ml test tubes or<br />
equivalent containers.<br />
Quantitative <strong>ELISA</strong>: Step-by-Step Instructor’s Advance Preparation Guide<br />
These instructions are for the setup of 12 student workstations of 4 students each.<br />
Supplied Reagents Quantity<br />
Antigen (chicken gamma globulin), freeze-dried 1 vial<br />
Primary antibody (rabbit anti-chicken polyclonal antibody), freeze-dried 1 vial<br />
Secondary antibody (goat anti-rabbit antibody conjugated to horseradish 1 vial<br />
peroxidase(HRP)), freeze-dried<br />
HRP enzyme substrate (TMB) 1 bottle<br />
10x phosphate buffered saline (PBS) 1 bottle<br />
10% Tween 20 1 bottle<br />
Required Reagents<br />
Distilled water, sterile is recommended, see note on page 40 1 L<br />
110
Step 1. Prepare buffers.<br />
We recommend you use a 100 ml and a 1 liter graduated cylinder for preparing the buffer<br />
solutions. You will also need 1 liter of distilled water.<br />
Buffer Volume Reagent Used for<br />
1x PBS, 100 ml 90 ml Distilled water • Rehydrating antigen,<br />
10 ml 10x PBS primary and secondary<br />
antibodies to make 50x<br />
reagent stock solutions<br />
• Diluting 50x antigen to make<br />
positive control and sample<br />
of known concentration<br />
• Diluting 1x stocks to make<br />
student samples<br />
• Negative control<br />
• Diluting sample of known<br />
concentration during<br />
experiment to make serial<br />
dilutions for standard curve<br />
Wash buffer, 900 ml 805 ml Distilled water • Dilution of 50x antibody<br />
stocks·<br />
90 ml 10x PBS • Plate washing<br />
4.5 ml 10% Tween 20<br />
Step 2. Rehydrate the freeze-dried antigen, primary antibody, and secondary<br />
antibody.<br />
Carefully remove the stoppers from the three freeze-dried reagents and use a fresh pipet to<br />
add 0.5 ml 1x PBS to each. Close the stoppers and shake to mix. These solutions are 50x<br />
concentrates, or stock solutions. NOTE: You must not use wash buffer in this step.<br />
Freeze-Dried Reagent Protocol for 50x Stock Solution Used for<br />
Antigen Add 0.5 ml of 1x PBS to vial • Positive control<br />
• Student samples A and B<br />
Primary antibody Add 0.5 ml of 1x PBS to vial • Primary antibody<br />
Secondary antibody Add 0.5 ml of 1x PBS to vial • Secondary antibody<br />
111
Label one 30 ml bottle each for 1x antigen, 1x primary antibody and 1x secondary antibody.<br />
Label one 15 ml tube for student sample A and student sample B. Use a fresh DPTP to<br />
add the contents of the appropriate stock to the corresponding receptacle.<br />
Diluted Solution Volume Reagent Used for<br />
1x Antigen, label one 24.5 ml 1x PBS • Positive control<br />
30 ml bottle 0.5 ml 50 x antigen stock • Concentrated reagent for<br />
student samples A and B<br />
• Sample of known concentration<br />
NOTE: you must not add any buffer containing Tween 20 to the<br />
antigen, or the experiment will not work.<br />
• Use the DPTP to rinse out the vial with some of the diluted<br />
reagent to ensure that all of the stock solution is used.<br />
• Close the cap and shake to mix.<br />
1x Primary antibody, 24.5 ml Wash buffer • Primary antibody<br />
label one 30 ml bottle 0.5 ml 50 x primary<br />
antibody stock<br />
• Use the DPTP to rinse out the vial with some of the diluted<br />
reagent to ensure that all of the stock solution is used.<br />
• Close the cap and shake to mix.<br />
1x Secondary antibody, 24.5 ml Wash buffer • Secondary antibody<br />
label one 30 ml bottle 0.5 ml 50x secondary<br />
antibody stock<br />
• Dilute the secondary antibody less than 24 hours before the start<br />
of the lesson.<br />
• Use the DPTP to rinse out the vial with some of the diluted<br />
reagent to ensure that all of the stock solution is used.<br />
• Close the cap and shake to mix.<br />
125 ng/ml antigen (A), 8.75 ml 1x PBS • Student sample A<br />
label one 15 ml tube 1.25 ml 1x antigen<br />
Close the tube cap and shake to mix<br />
25 ng/ml antigen (B), 9.75 ml 1x PBS • Student sample B<br />
label one 15 ml tube 0.25 ml 1x antigen<br />
• Close the tube cap and shake to mix.<br />
112
Step 4. Dispense reagents for student workstations.<br />
Tubes Description Label Contents (Each Tube)<br />
Violet tubes, 12 Positive controls “+” 0.5 ml 1x antigen solution<br />
Blue tubes, 12 Negative controls “–” 0.5 ml 1x PBS<br />
Green tubes, 12 Primary antibody “PA” 1.5 ml 1x primary antibody solution<br />
Orange tubes, 12 Secondary antibody “SA” 1.5 ml 1x secondary antibody solution<br />
Brown tubes, 12 Enzyme substrate “SUB” 1.5 ml HRP enzyme substrate (TMB)<br />
Note: TMB is light sensitive, so it is important to use the dark tubes to store this<br />
reagent.<br />
Yellow tubes, 12 Sample of known “1,000 ng/ml 0.25 ml 1x antigen<br />
concentration AG”<br />
Yellow tubes, 12 1x PBS “PBS” 1 ml 1x PBS<br />
Yellow tubes, 12 125 ng/ml antigen “A” 0.25 ml 125 ng/ml antigen<br />
Yellow tubes, 12 25 ng/ml antigen “B” 0.25 ml 25 ng/ml antigen<br />
Step 5. Set out student workstations.<br />
Student Workstation Checklist<br />
One workstation serves 4 students.<br />
Item (Label) Contents Number Check<br />
Yellow tubes (A and B) Student samples (0.25 ml) 2 ❑<br />
Yellow tube (1,000 ng/ml AG) 1x antigen (0.25 ml) 1 ❑<br />
Yellow tube (PBS) 1x PBS (1 ml) 1 ❑<br />
Violet tube (+) Positive control (0.5 ml) 1 ❑<br />
Blue tube (–) Negative control (0.5 ml) 1 ❑<br />
Green tube (PA) Primary antibody (1.5 ml) 1 ❑<br />
Orange tube (SA) Secondary antibody (1.5 ml) 1 ❑<br />
Brown tube (SUB) Enzyme substrate (1.5 ml) 1 ❑<br />
12-well microplate strips 2 ❑<br />
50 µl fixed-volume micropipet 1 ❑<br />
or 20–200 µl adjustablevolume<br />
micropipet<br />
Yellow tips 9 ❑<br />
Disposable plastic transfer pipet 1 ❑<br />
70–80 ml wash buffer in beaker 1x PBS with 0.05% Tween 20 1 ❑<br />
Black marking pen 1 ❑<br />
Waste container 1 ❑<br />
Large stack of paper towels 1 ❑<br />
113
Student Lab Procedure<br />
1. Label the outside wall of each well on one 12-well strip with the numbers 1–12. Label<br />
the first three wells of a second 12-well strip with a “+” for the positive controls, the next<br />
three wells with a “–” for the negative controls, the next three wells with the initials of<br />
one of your sample tubes, and the last three wells with the initials of the second sample<br />
tube.<br />
2. Use a pipet to add 50 µl of PBS from the yellow tube labeled “PBS” to wells labeled #2<br />
through #12.<br />
3. Add 100 µl from the yellow tube labeled “1,000 ng/ml AG” to the well labeled #1.<br />
4. Perform serial dilution from well #1 through well #11 in the following manner:<br />
a. Pipet 50 µl out of well #1 and add it to well # 2. Pipet up and down gently three<br />
times to mix the sample in well #2.<br />
b. Using the same pipet tip, transfer 50 µl from well # 2 to well # 3 and mix the sample<br />
in well # 3.<br />
c. Using the same pipet tip, transfer 50 µl from well # 3 to well # 4 and mix the sample<br />
in well # 4.<br />
d. Repeat this transfer and mixing step, moving to the next well each time. STOP<br />
when you reach well # 11; discard the 50 µl of solution from well #11 into a waste<br />
container.<br />
5. In the second microplate strip, use a fresh pipet tip to transfer 50 µl of the positive<br />
control (+) from the violet tube into the three “+” wells.<br />
6. Use a fresh pipet tip to transfer 50 µl of the negative control (–) from the blue tube into<br />
the three “–” wells.<br />
,<br />
7. Use a fresh pipet tip to transfer 50 µl of each of your team’s samples into the<br />
appropriately initialed three wells.<br />
8. Wait 5 minutes to allow the proteins in the samples to bind to the plastic wells, then<br />
proceed exactly as in protocol II, starting at step 5 on page 56.<br />
114
Analysis of Results<br />
The concentration of 1x antigen is 1 microgram per milliliter (µg/ml) or 1,000 nanograms<br />
per ml (ng/ml). Note: If adapting this protocol for a quantitative <strong>ELISA</strong> antibody test, the<br />
concentration of primary antibody in 1x serum is also 1 µg/ml. Thus, the concentrations of<br />
protein in the wells of the dilution series are:<br />
,<br />
If using a microplate reader, insert the microplate strips firmly back into the strip holder in<br />
the correct orientation, secure the plate into the microplate reader, close the lid, and read<br />
using a 655 nm filter.<br />
Microplate readers measure the amount of light at a specific wavelength (in this case,<br />
655 nm) that is absorbed by the liquid in the wells of the microplate. The absorption of light<br />
by the liquid is directly related to the intensity of the colored product in the wells, which in<br />
turn is determined by the amount of enzyme activity in the wells. The amount of enzyme<br />
activity is governed by the amount of antigen that originally bound to the wells.<br />
Create a standard curve by plotting the known concentrations of each well on the y-axis<br />
and the corresponding absorbance values from the microplate reader on the x-axis (See<br />
example on next page). (Note: The unit of measurement for absorbance is absorbance<br />
units, or AU.) Since the resulting curve will be logarithmic, you will need to linearize it by<br />
plotting the data on semilog graph paper. A sheet is provided on the next page.<br />
Calculate the concentrations of the test samples by drawing vertical lines from their<br />
absorbance values on the x-axis to the standard curve. Read horizontally from the points<br />
where the vertical lines intersect with the standard curve to the concentration values on the<br />
y-axis.<br />
Please note that the substrate – enzyme reaction loses correlation between antigen<br />
concentration and absorbance value when unoxidised substrate becomes scarce either<br />
due to too concentrated antigen (see 1000 ng/ml datapoint on example graph on next<br />
page) or after too long a reaction time. Thus microplates should be read within 15 min of<br />
adding substrate.<br />
Note: The enzymatic reaction can be stopped after 5 min by adding 0.18 M sulfuric acid to<br />
the wells. The blue solution will turn yellow. The yellow solution is read using a microplate<br />
reader with a 450 nm filter. Stopping the run after 5 min produces a more linear reading of<br />
diluted samples.<br />
If no microplate reader is available, visually compare the intensity of the blue color in test<br />
wells to the intensities of the dilution series of known concentrations. Identify which wells of<br />
known concentration most closely match the test wells and, from this, approximate the<br />
concentration of antigen in the test samples.<br />
115
Concentration, ng/ml<br />
1000<br />
100<br />
10<br />
1<br />
Test sample B<br />
Test sample A<br />
0.1<br />
0 0.2 0.4 0.6 0.8 1 1.2<br />
Absorbance at 655 nm, AU<br />
An example of a standard curve from a dilution series from 1,000 ng/ml to 1 ng/ml, read at 655 nm. Test<br />
sample A had an absorbance of 0.456 AU, and test sample B had an absorbance of 0.208 AU. Thus, their<br />
concentrations were 125 ng/ml and 25 ng/ml, respectively.<br />
116
Semilog graph paper<br />
1,000<br />
100<br />
10<br />
Concentration, ng/ml<br />
117<br />
1<br />
0.1<br />
0 0.2 0.4 0.6 0.8 1 1.2 1.4 1.6 1.8 2<br />
Absorbance at 655 nm, AU
Possible Scenarios for Quantitative <strong>ELISA</strong> Assays<br />
Protocol II: Antigen Detection <strong>ELISA</strong><br />
Monitoring viral load is crucial in treating HIV/AIDS infections. Antiretroviral therapies are<br />
directed at keeping the viral load at or near undetectable levels. Some antiretroviral agents<br />
currently in use include efavirenz, indinavir, nelfinavir, ritonavir, zidovudine, didanosine, and<br />
stavudine. Treatments normally include a combination of two or more antiretroviral drugs.<br />
(For more information, search on the CDC or WHO web sites for “using retroviral agents”.)<br />
As a classroom scenario, evaluate new combinations of antiretroviral drugs by assaying<br />
patient samples for the presence of HIV. A good combination of drugs will reduce the viral<br />
load, as indicated by little or no detectable HIV antigen in the samples. Poor drug<br />
combinations will result in a high concentration of HIV antigen in the samples.<br />
Instructor’s preparation: The two samples of unknown concentration (“A” and “B”) are<br />
samples from patients who have been treated with novel combinations of antiretroviral<br />
drugs. Your students will determine which is the more efficacious treatment by testing for<br />
HIV antigen concentration in the samples. The drug combination that results in lower viral<br />
load in the patient is interpreted as a more effective treatment for HIV.<br />
For further discussion, consider what other factors are important in evaluating a new drug<br />
treatment, for example, side effects, cost of treatment, interactions with other drugs used to<br />
treat HIV/AIDS, etc.<br />
Protocol III: <strong>ELISA</strong> Antibody Test<br />
Anthrax is a disease caused by Bacillus anthracis, a bacterium that forms spores. There are<br />
three types of anthrax: skin (cutaneous), lung (inhalation), and digestive (gastrointestinal). All<br />
three types are treated with antibiotics. Cutaneous anthrax is not as dangerous as inhalation<br />
or gastrointestinal anthrax; even without treatment, most patients will survive cutaneous<br />
anthrax. Gastrointestinal and inhalation anthrax are much more dangerous; over 25% of<br />
patients die, even with antibiotic treatment.<br />
Anthrax infection is unusual in humans; historically, anthrax is primarily a disease of herbivores.<br />
However, after the bioterrorism attack of 2001 in the US, during which anthrax spores were sent<br />
through the mail and 22 people were infected, many researchers have been looking for ways to<br />
detect anthrax infections. A research group at the CDC has developed a quantitative <strong>ELISA</strong> for<br />
detecting antibodies against anthrax protective antigen, a protein component of anthrax. The<br />
<strong>ELISA</strong> can detect seroconversion, an increase in serum antibodies against anthrax protective<br />
antigen, between the time initial symptoms appear and 2–4 weeks later.<br />
As a classroom scenario, evaluate two serum samples from a single patient for the presence<br />
of anti-anthrax IgG. The patient is suspected of having anthrax. The first sample was drawn<br />
from the patient a week after symptoms developed, and the second sample was drawn 3<br />
weeks later. If the patient indeed has anthrax, there should be a rise in the concentration of<br />
antibodies against anthrax.<br />
Instructor’s preparation: The two samples of unknown concentration (“A” and “B”) are samples<br />
from a patient who may have anthrax. The “B” sample is the serum drawn early in the illness<br />
and the “A” sample is the serum drawn later in the infection. An increase in the concentration of<br />
antibodies indicates exposure to anthrax.<br />
118
Appendix E: Bibliography and Useful Web Sites<br />
Bibliography<br />
Benjamini E et al., <strong>Immuno</strong>logy: A Short Course, Wiley-Liss, New York (1996)<br />
Berman HM et al., The Protein Data Bank, Nucleic Acids Res 28, 235–242 (2000)<br />
Breitling F and Dübel S, Recombinant Antibodies, John Wiley & Sons, New York (1999)<br />
Harris LJ et al., Crystallographic structure of an intact IgG monoclonal antibody, J Mol Biol 275,<br />
861–872 (1998)<br />
Harlow E and Lane D (eds), Using Antibodies: A Laboratory Manual, Cold Spring Harbor Laboratory<br />
Press, Cold Spring Harbor (1999)<br />
Kaufmann SHE et al. (eds), <strong>Immuno</strong>logy of Infectious Diseases, ASM Press, Washington, DC (2002)<br />
Lashley FR and Durham JD (eds), Emerging Infectious Diseases, Springer Publishing Company,<br />
New York (2002)<br />
Law B (ed), <strong>Immuno</strong>assay: A Practical Guide, Taylor & Francis, Bristol (1996)<br />
Momany C et al., Crystal structure of dimeric HIV-1 capsid protein, Nat Struct Biol 3, 763–770 (1996)<br />
Truant AL (ed), Manual of Commercial Methods in Clinical Microbiology, ASM Press, Washington,<br />
DC (2002)<br />
Referenced Web Sites (Disease Information)<br />
http://www.cdc.gov/health/default.htm<br />
http://ww.who.int/health_topics/infectious_diseases/en/<br />
http://www.niaid.nih.gov/dmid/<br />
http://www.merck.com/pubs/mmanual/<br />
The Merck Veterinary Manual (online, http://www.merckvetmanual.com/mvm/index.jsp)<br />
The Merck Manual of Diagnosis and Therapy (online, http://www.merck.com/pubs/mmanual/)<br />
Useful Web Sites<br />
http://www.who.int/en/ World Health Organization (WHO)<br />
http://www.cdc.gov/ Centers for Disease Control and Prevention (CDC)<br />
http://www.niaid.nih.gov/ National Institute of Allergy and Infectious Diseases (NIAID)<br />
http://www.usamriid.army.mil/<br />
http://www.fda.gov/cdrh/clia/index.html<br />
http://www.bioterry.com/History_of_Biological_Terrorism.asp<br />
Herceptin is a trademark of Genentech, Inc. Roundup Ready is a trademark of Monsanto Company. Tween is a trademark of ICI<br />
Americas Inc.<br />
119
Life Science<br />
Group<br />
Bulletin 3085 US/EG Rev A<br />
Bio-Rad<br />
Laboratories, Inc.<br />
Web site www.bio-rad.com USA (800) 4BIORAD Australia 02 9914 2800 Austria (01)-877 89 01 Belgium 09-385 55 11 Brazil 55 21 2527 3454<br />
Canada (905) 712-2771 China (86-21) 63052255 Czech Republic + 420 2 41 43 05 32 Denmark 44 52 10 00 Finland 09 804 22 00<br />
France 01 47 95 69 65 Germany 089 318 84-0 Hong Kong 852-2789-3300 Hungary 36 1 455 8800 India (91-124)-6398112/113/114, 6450092/93<br />
Israel 03 951 4127 Italy 39 02 216091 Japan 03-5811-6270 Korea 82-2-3473-4460 Latin America 305-894-5950 Mexico 55-52-00-05-20<br />
The Netherlands 0318-540666 New Zealand 64 9 415 2280 Norway 23 38 41 30 Poland + 48 22 331 99 99 Portugal 351-21-472-7700<br />
Russia 7 095 721 1404 Singapore 65-6415 3188 South Africa 00 27 11 4428508 Spain 34 91 590 5200 Sweden 08 555 12700<br />
Switzerland 061 717-9555 Taiwan (8862) 2578-7189/2578-7241 United Kingdom 020 8328 2000<br />
0104 Sig 1103<br />
4110175 Rev C